Làm việc với Bottom Sheet
Bài đăng này đã không được cập nhật trong 7 năm
Thành phần Bottom Sheet của Android trượt lên từ phía dưới hiển thị nội dung có liên quan. Và bạn có thể nhận thấy các Bottom Sheet trong các ứng dụng như ứng dụng bản đồ (Bottom Sheet cho biết vị trí, thông tin chỉ đường), trình phát nhạc (Thanh phát từ dưới lên và mở khi vuốt lên). Bottom Sheet là thành phần của thư viện hỗ trợ thiết kế Android.
Trong bài viết này, chúng ta sẽ tìm hiểu cách tích hợp một Bottom Sheet cơ bản và các loại Bottom Sheet. Trước khi bắt đầu, hãy tham khảo nguyên tắc thiết kế material design của Google về Trang tính dưới cùng để biết thông số kỹ thuật thiết kế.
1. Phân loại Bottom Sheets
Có hai loại Bottom Sheets: Persistent Bottom Sheet và Modal Bottom Sheet.
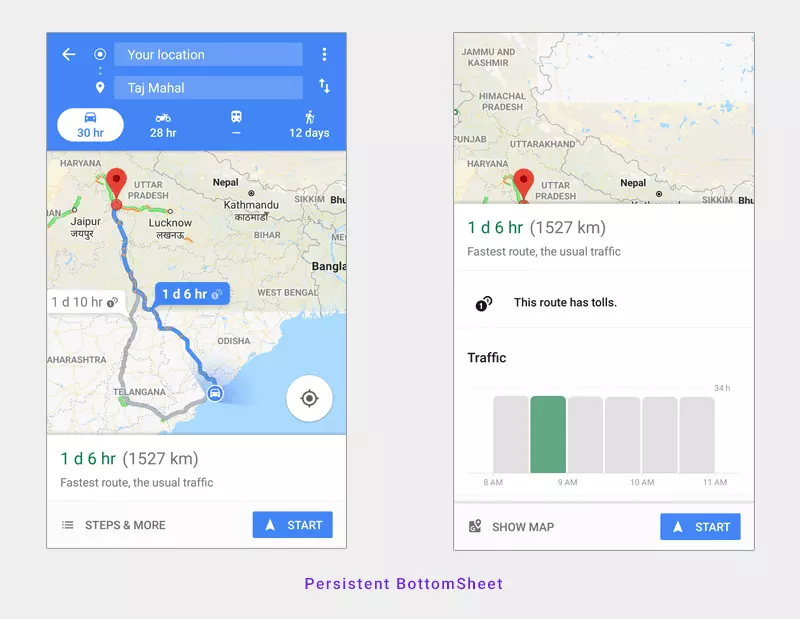
Persistent Bottom Sheet: Persistent Bottom Sheet hiển thị nội dung trong ứng dụng. Nó sẽ được hiển thị ở dưới cùng của màn hình làm cho một số phần của nội dung hiển thị. Khi được kích hoạt, nó sẽ mở ra toàn bộ nội dung. Độ cao của Persistent Bottom Sheet giống như ứng dụng biến nó thành một phần của ứng dụng. Dưới đây là ví dụ về Persistent Bottom Sheet của ứng dụng Google Maps.
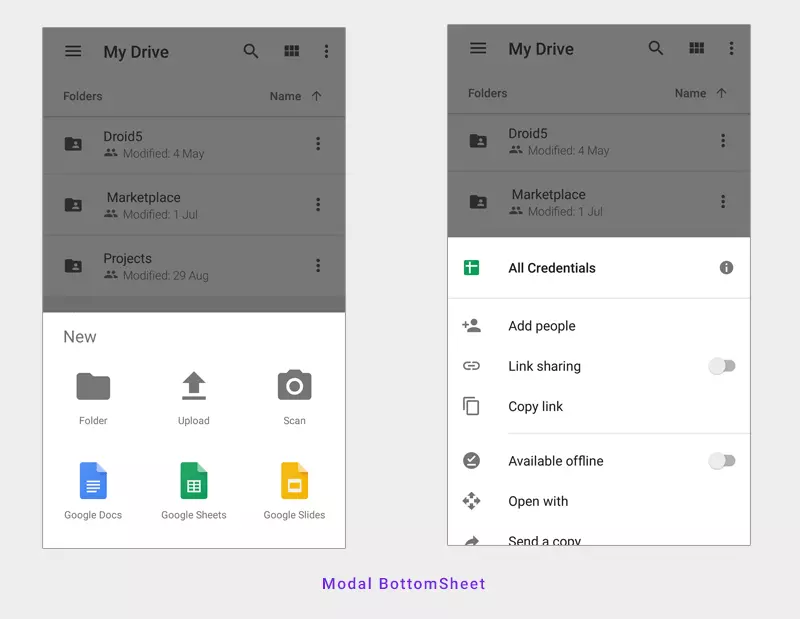
Modal Bottom Sheet: Modal Bottom Sheet có độ cao cao hơn so với ứng dụng. Chúng thường thay thế các menu hoặc hộp thoại. Nói chung, các Modal Bottom Sheet được sử dụng để hiển thị nội dung được liên kết sâu từ các ứng dụng khác. Dưới đây là ví dụ về Modal Bottom Sheet của ứng dụng Google Drive.
2. Creating New Project
Bước 1
Tạo một dự án mới trong Android Studio từ File ⇒ New Project và chọn Basic Activity từ templates.
Bước 2
Tải xuống thư mục res và thêm các drawables vào thư mục res trong dự án của bạn. Thư mục này chứa các drawables cần thiết cho modal bottom sheet.
Bước 3
Mở tệp build.gradle và thêm support design và dependencies ButterKnife. Ở đây ButterKnife là hoàn toàn tùy chọn. Nó được sử dụng cho binding view và không liên quan đến bottom sheet.
build.gradle
dependencies {
    implementation fileTree(dir: 'libs', include: ['*.jar'])
    implementation 'com.android.support:appcompat-v7:26.1.0'
    implementation 'com.android.support:design:26.1.0'

    // butter knife
    compile 'com.jakewharton:butterknife:8.8.1'
    annotationProcessor 'com.jakewharton:butterknife-compiler:8.8.1'
}
Bây giờ chúng ta sẽ tạo layout cần thiết cho bottom sheet.
Bước 4
Tạo xml layout trong res ⇒ layout có tên bottom_sheet.xml và thêm mã bên dưới. Ở đây vài thuộc tính quan trọng phải để ý tới.
app: layout_behavior: Thuộc tính này làm cho layout hoạt động dưới dạng bottom sheet. Giá trị phải là android.support.design.widget.BottomSheetBehavior
app: behavior_peekHeight: Đây là chiều cao của bottom sheet khi nó được thu nhỏ.
app: behavior_hideable: Làm ẩn tbottom sheet khi vuốt xuống.
bottom_sheet.xml
<?xml version="1.0" encoding="utf-8"?>
<LinearLayout xmlns:android="http://schemas.android.com/apk/res/android"
    xmlns:app="http://schemas.android.com/apk/res-auto"
    android:id="@+id/bottom_sheet"
    android:layout_width="match_parent"
    android:layout_height="wrap_content"
    android:background="#fff"
    android:orientation="vertical"
    android:padding="@dimen/activity_margin"
    app:behavior_hideable="true"
    app:behavior_peekHeight="56dp"
    app:layout_behavior="android.support.design.widget.BottomSheetBehavior">

    <LinearLayout
        android:layout_width="match_parent"
        android:layout_height="wrap_content"
        android:orientation="horizontal"
        android:layout_gravity="center_vertical"
        android:weightSum="3">

        <TextView
            android:layout_width="0dp"
            android:layout_height="wrap_content"
            android:layout_marginBottom="@dimen/activity_margin"
            android:layout_weight="2"
            android:text="Order Details"
            android:textColor="#444"
            android:textSize="18dp"
            android:textStyle="bold" />

        <TextView
            android:layout_width="0dp"
            android:gravity="right"
            android:layout_height="wrap_content"
            android:layout_weight="1"
            android:textStyle="bold"
            android:textSize="15dp"
            android:text="₹435.00"></TextView>
    </LinearLayout>


    <TextView
        android:layout_width="wrap_content"
        android:layout_height="wrap_content"
        android:text="Chicken Fried Rice 1x1" />

    <TextView
        android:layout_width="wrap_content"
        android:layout_height="wrap_content"
        android:text="Paneer Tikka 1x2" />

    <TextView
        android:layout_width="wrap_content"
        android:layout_height="wrap_content"
        android:layout_marginTop="@dimen/activity_margin"
        android:text="Delivery Address"
        android:textColor="#444"
        android:textStyle="bold" />

    <TextView
        android:layout_width="wrap_content"
        android:layout_height="wrap_content"
        android:text="Flat No 404, Skyline Apartments, Vizag - 500576" />

    <Button
        android:layout_width="match_parent"
        android:layout_height="wrap_content"
        android:layout_marginTop="30dp"
        android:background="#000"
        android:foreground="?attr/selectableItemBackground"
        android:text="PROCEED PAYMENT"
        android:textColor="#fff" />

</LinearLayout>
Bước 5
Bây giờ bao gồm tệp bottom_sheet.xml trong layout main activity. Mở layout main activity (activity_main.xml và content_main.xml) sửa đổi như dưới đây. Tôi cũng giữ ba nút để giới thiệu các ví dụ bottom sheet khác.
activity_main.xml
<?xml version="1.0" encoding="utf-8"?>
<android.support.design.widget.CoordinatorLayout xmlns:android="http://schemas.android.com/apk/res/android"
    xmlns:app="http://schemas.android.com/apk/res-auto"
    xmlns:tools="http://schemas.android.com/tools"
    android:layout_width="match_parent"
    android:layout_height="match_parent"
    android:background="#efefef"
    tools:context="info.androidhive.bottomsheet.MainActivity">

    <android.support.design.widget.AppBarLayout
        android:layout_width="match_parent"
        android:layout_height="wrap_content"
        android:theme="@style/AppTheme.AppBarOverlay">

        <android.support.v7.widget.Toolbar
            android:id="@+id/toolbar"
            android:layout_width="match_parent"
            android:layout_height="?attr/actionBarSize"
            android:background="?attr/colorPrimary"
            app:popupTheme="@style/AppTheme.PopupOverlay" />

    </android.support.design.widget.AppBarLayout>

    <include layout="@layout/content_main" />

    <!-- Adding bottom sheet after main content -->
    <include layout="@layout/bottom_sheet" />

</android.support.design.widget.CoordinatorLayout>
content_main.xml
<?xml version="1.0" encoding="utf-8"?>
<LinearLayout xmlns:android="http://schemas.android.com/apk/res/android"
    xmlns:app="http://schemas.android.com/apk/res-auto"
    xmlns:tools="http://schemas.android.com/tools"
    android:layout_width="match_parent"
    android:layout_height="match_parent"
    android:orientation="vertical"
    app:layout_behavior="@string/appbar_scrolling_view_behavior"
    tools:context="info.androidhive.bottomsheet.MainActivity"
    tools:showIn="@layout/activity_main">

    <Button
        android:id="@+id/btn_bottom_sheet"
        android:layout_width="wrap_content"
        android:layout_marginTop="@dimen/activity_margin"
        android:layout_gravity="center_horizontal"
        android:layout_height="wrap_content"
        android:text="Show Bottom Sheet" />

    <Button
        android:id="@+id/btn_bottom_sheet_dialog"
        android:layout_width="wrap_content"
        android:layout_marginTop="@dimen/activity_margin"
        android:layout_gravity="center_horizontal"
        android:layout_height="wrap_content"
        android:text="Show Bottom Sheet Dialog" />

    <Button
        android:id="@+id/btn_bottom_sheet_dialog_fragment"
        android:layout_width="wrap_content"
        android:layout_gravity="center_horizontal"
        android:layout_marginTop="@dimen/activity_margin"
        android:layout_height="wrap_content"
        android:text="Show Bottom Sheet Dialog Fragment" />

</LinearLayout>
Bước 6
Bây giờ hãy mở MainActivity.java và thực hiện các thay đổi dưới đây.
BottomSheetBehavior cung cấp callbacks và làm cho BottomSheet làm việc với CoordinatorLayout. BottomSheetBehavior.BottomSheetCallback() cung cấp callbacks khi bottom sheet thay đổi trạng thái của nó. toggleBottomSheet() Mở hoặc đóng bottom sheet khi nhấp vào nút.Bây giờ hãy mở MainActivity.java và thực hiện các thay đổi dưới đây.
BottomSheetBehavior cung cấp các callbacks và làm cho BottomSheet làm việc với CoordinatorLayout. BottomSheetBehavior.BottomSheetCallback() cung callbacks khi bottom sheet thay đổi trạng thái của nó. toggleBottomSheet() Mở hoặc đóng bottom sheet khi nhấp vào nút.
MainActivity.java
package info.androidhive.bottomsheet;

import android.os.Bundle;
import android.support.annotation.NonNull;
import android.support.design.widget.BottomSheetBehavior;
import android.support.design.widget.BottomSheetDialog;
import android.support.design.widget.FloatingActionButton;
import android.support.design.widget.Snackbar;
import android.support.v7.app.AppCompatActivity;
import android.support.v7.widget.Toolbar;
import android.util.Log;
import android.view.View;
import android.view.Menu;
import android.view.MenuItem;
import android.widget.Button;
import android.widget.LinearLayout;
import android.widget.RelativeLayout;

import butterknife.BindView;
import butterknife.ButterKnife;
import butterknife.OnClick;

public class MainActivity extends AppCompatActivity {

    private static final String TAG = MainActivity.class.getSimpleName();

    @BindView(R.id.btn_bottom_sheet)
    Button btnBottomSheet;

    @BindView(R.id.bottom_sheet)
    LinearLayout layoutBottomSheet;

    BottomSheetBehavior sheetBehavior;

    @Override
    protected void onCreate(Bundle savedInstanceState) {
        super.onCreate(savedInstanceState);
        setContentView(R.layout.activity_main);
        ButterKnife.bind(this);

        Toolbar toolbar = (Toolbar) findViewById(R.id.toolbar);
        setSupportActionBar(toolbar);

        sheetBehavior = BottomSheetBehavior.from(layoutBottomSheet);

        /**
         * bottom sheet state change listener
         * we are changing button text when sheet changed state
         * */
        sheetBehavior.setBottomSheetCallback(new BottomSheetBehavior.BottomSheetCallback() {
            @Override
            public void onStateChanged(@NonNull View bottomSheet, int newState) {
                switch (newState) {
                    case BottomSheetBehavior.STATE_HIDDEN:
                        break;
                    case BottomSheetBehavior.STATE_EXPANDED: {
                        btnBottomSheet.setText("Close Sheet");
                    }
                    break;
                    case BottomSheetBehavior.STATE_COLLAPSED: {
                        btnBottomSheet.setText("Expand Sheet");
                    }
                    break;
                    case BottomSheetBehavior.STATE_DRAGGING:
                        break;
                    case BottomSheetBehavior.STATE_SETTLING:
                        break;
                }
            }

            @Override
            public void onSlide(@NonNull View bottomSheet, float slideOffset) {

            }
        });
    }

    /**
     * manually opening / closing bottom sheet on button click
     */
    @OnClick(R.id.btn_bottom_sheet)
    public void toggleBottomSheet() {
        if (sheetBehavior.getState() != BottomSheetBehavior.STATE_EXPANDED) {
            sheetBehavior.setState(BottomSheetBehavior.STATE_EXPANDED);
            btnBottomSheet.setText("Close sheet");
        } else {
            sheetBehavior.setState(BottomSheetBehavior.STATE_COLLAPSED);
            btnBottomSheet.setText("Expand sheet");
        }
    }
}
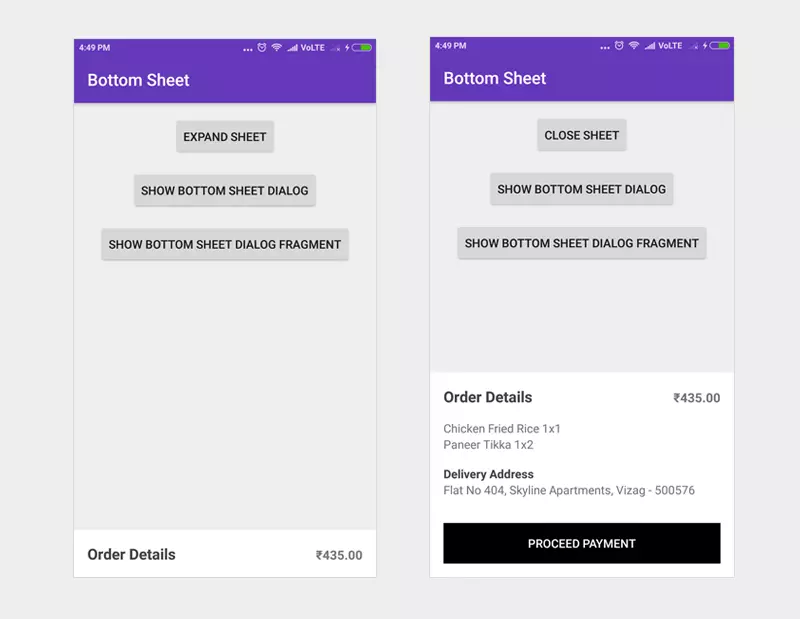
Nếu bạn run project, bạn có thể thấy bottom sheet cùng được hiển thị ở dưới cùng. Điều này sẽ được coi là Persistent Bottom Sheet.
3. Modal Bottom Sheet – BottomSheetDialog và BottomSheetDialogFragment
Modal Bottom Sheets không phải là một phần của layout giống như Persistent sheets. Thay vào đó, chúng sẽ được hiển thị động bằng cách sử dụng BottomSheetDialog hoặc BottomSheetDialogFragment. Bây giờ, hãy xem cách triển khai Trang tính phương thức dưới dạng
Bước 7
Tạo layout xml có tên fragment_bottom_sheet_dialog.xml trong thư mục res. Layout này chứa vài mục danh sách để cung cấp hành động của người dùng.
fragment_bottom_sheet_dialog.xml
<?xml version="1.0" encoding="utf-8"?>
<LinearLayout xmlns:android="http://schemas.android.com/apk/res/android"
    android:layout_width="match_parent"
    android:layout_height="match_parent"
    android:orientation="vertical"
    android:paddingBottom="8dp"
    android:paddingTop="8dp">

    <!-- NOTE: This list should be displayed in a list
    instead of nested layouts -->

    <LinearLayout
        android:layout_width="match_parent"
        android:layout_height="wrap_content"
        android:clickable="true"
        android:foreground="?attr/selectableItemBackground"
        android:orientation="horizontal"
        android:paddingBottom="8dp"
        android:paddingLeft="@dimen/activity_margin"
        android:paddingRight="@dimen/activity_margin"
        android:paddingTop="8dp">

        <ImageView
            android:layout_width="24dp"
            android:layout_height="24dp"
            android:layout_marginRight="32dp"
            android:src="@drawable/ic_remove_red_eye_black_24dp"
            android:tint="#737373" />

        <TextView
            android:layout_width="wrap_content"
            android:layout_height="wrap_content"
            android:layout_gravity="center_vertical"
            android:text="Preview"
            android:textColor="#737373"
            android:textSize="16sp" />

    </LinearLayout>

    <LinearLayout
        android:layout_width="match_parent"
        android:layout_height="wrap_content"
        android:clickable="true"
        android:foreground="?attr/selectableItemBackground"
        android:orientation="horizontal"
        android:paddingBottom="8dp"
        android:paddingLeft="@dimen/activity_margin"
        android:paddingRight="@dimen/activity_margin"
        android:paddingTop="8dp">

        <ImageView
            android:layout_width="24dp"
            android:layout_height="24dp"
            android:layout_marginRight="32dp"
            android:src="@drawable/ic_share_black_24dp"
            android:tint="#737373" />

        <TextView
            android:layout_width="wrap_content"
            android:layout_height="wrap_content"
            android:layout_gravity="center_vertical"
            android:text="Share"
            android:textColor="#737373"
            android:textSize="16sp" />

    </LinearLayout>

    <LinearLayout
        android:layout_width="match_parent"
        android:layout_height="wrap_content"
        android:clickable="true"
        android:foreground="?attr/selectableItemBackground"
        android:orientation="horizontal"
        android:paddingBottom="8dp"
        android:paddingLeft="@dimen/activity_margin"
        android:paddingRight="@dimen/activity_margin"
        android:paddingTop="8dp">

        <ImageView
            android:layout_width="24dp"
            android:layout_height="24dp"
            android:layout_marginRight="32dp"
            android:src="@drawable/ic_link_black_24dp"
            android:tint="#737373" />

        <TextView
            android:layout_width="wrap_content"
            android:layout_height="wrap_content"
            android:layout_gravity="center_vertical"
            android:text="Get link"
            android:textColor="#737373"
            android:textSize="16sp" />

    </LinearLayout>

    <LinearLayout
        android:layout_width="match_parent"
        android:layout_height="wrap_content"
        android:clickable="true"
        android:foreground="?attr/selectableItemBackground"
        android:orientation="horizontal"
        android:paddingBottom="8dp"
        android:paddingLeft="@dimen/activity_margin"
        android:paddingRight="@dimen/activity_margin"
        android:paddingTop="8dp">

        <ImageView
            android:layout_width="24dp"
            android:layout_height="24dp"
            android:layout_marginRight="32dp"
            android:src="@drawable/ic_content_copy_black_24dp"
            android:tint="#737373" />

        <TextView
            android:layout_width="wrap_content"
            android:layout_height="wrap_content"
            android:layout_gravity="center_vertical"
            android:text="Make a Copy"
            android:textColor="#737373"
            android:textSize="16sp" />

    </LinearLayout>

    <LinearLayout
        android:layout_width="match_parent"
        android:layout_height="wrap_content"
        android:clickable="true"
        android:foreground="?attr/selectableItemBackground"
        android:orientation="horizontal"
        android:paddingBottom="8dp"
        android:paddingLeft="@dimen/activity_margin"
        android:paddingRight="@dimen/activity_margin"
        android:paddingTop="8dp">

        <ImageView
            android:layout_width="24dp"
            android:layout_height="24dp"
            android:layout_marginRight="32dp"
            android:src="@drawable/ic_email_black_24dp"
            android:tint="#737373" />

        <TextView
            android:layout_width="wrap_content"
            android:layout_height="wrap_content"
            android:layout_gravity="center_vertical"
            android:text="Email a Copy"
            android:textColor="#737373"
            android:textSize="16sp" />
    </LinearLayout>
</LinearLayout>
Bước 8
Tạo một Fragment mới từ File ⇒ New ⇒ Fragment ⇒ Fragment (Blank) và đặt tên nó là BottomSheetFragment.java hoặc chỉ tạo một lớp có cùng tên. Kế thừa lớp này từ BottomSheetDialogFragment.
BottomSheetFragment.java
package info.androidhive.bottomsheet;

import android.os.Bundle;
import android.support.design.widget.BottomSheetDialogFragment;
import android.view.LayoutInflater;
import android.view.View;
import android.view.ViewGroup;

public class BottomSheetFragment extends BottomSheetDialogFragment {
    public BottomSheetFragment() {
        // Required empty public constructor
    }

    @Override
    public void onCreate(Bundle savedInstanceState) {
        super.onCreate(savedInstanceState);
    }

    @Override
    public View onCreateView(LayoutInflater inflater, ViewGroup container,
                             Bundle savedInstanceState) {
        // Inflate the layout for this fragment
        return inflater.inflate(R.layout.fragment_bottom_sheet_dialog, container, false);
    }
}
Bước 9
Bây giờ khi dialog fragment đã sẵn sàng, hãy mở MainActivity.java và thêm phương thức bên dưới. Sau khi thêm vào, hãy thử chạy lại dự án và nhấp vào hai nút khác để mở Modal Bottom Sheet Dialog và Fragment
MainActivity.java
/**
 * showing bottom sheet dialog
 */
@OnClick(R.id.btn_bottom_sheet_dialog)
public void showBottomSheetDialog() {
    View view = getLayoutInflater().inflate(R.layout.fragment_bottom_sheet_dialog, null);

    BottomSheetDialog dialog = new BottomSheetDialog(this);
    dialog.setContentView(view);
    dialog.show();
}


/**
 * showing bottom sheet dialog fragment
 * same layout is used in both dialog and dialog fragment
 */
@OnClick(R.id.btn_bottom_sheet_dialog_fragment)
public void showBottomSheetDialogFragment() {
    BottomSheetFragment bottomSheetFragment = new BottomSheetFragment();
    bottomSheetFragment.show(getSupportFragmentManager(), bottomSheetFragment.getTag());
}
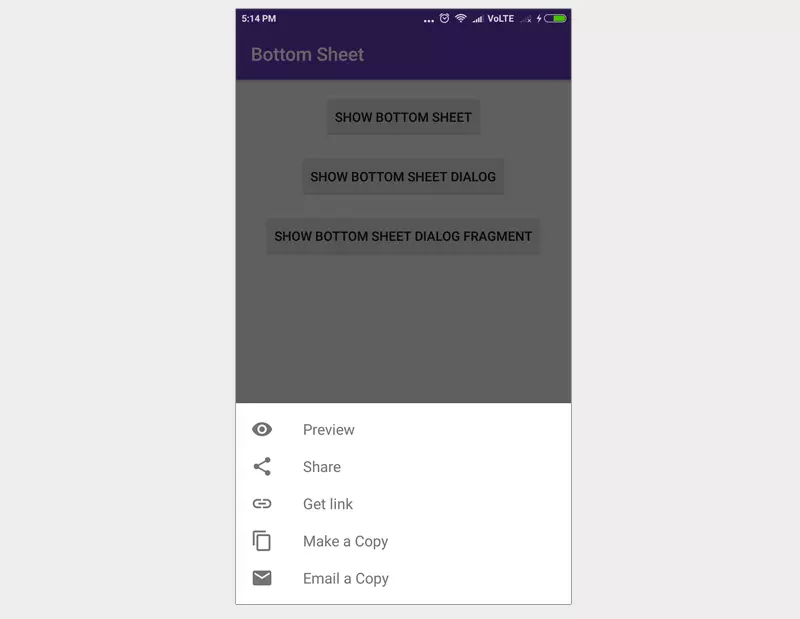
Dưới đây là kết quả của Modal Bottom Sheet.
All rights reserved
