Xây dựng app scan QR code sử dụng Google Mobile Vision
Bài đăng này đã không được cập nhật trong 4 năm
Ngày nay Barcodes and QR Codes được sử dụng rộng rãi trong rất nhiều ứng dụng di động. Trong QR Code bạn có thể lưu trữ thông tin như văn bản, sms, email, url, hình ảnh, âm thanh và vài định dạng khác. Trong Android bạn có thể trích xuất thông tin được lưu trữ trong mã vạch bằng cách sử dụng Thư viện Google Vision. Mặc dù có rất nhiều thư viện khác hiện có, google vision library của Google là tốt nhất vì nó không chỉ cung cấp đọc mã vạch mà còn có các tính năng khác như nhận diện khuôn mặt, nhận diện văn bản.
Trong bài này chúng ta sẽ tìm hiểu cách sử dụng thư viện google vision library bằng cách tạo một ứng dụng quét vé phim đơn giản.
1. Giới thiệu về Google Mobile Vision API
Google Mobile Vision giúp tìm các đối tượng trong một hình ảnh hoặc video. Nó cung cấp các chức năng như nhận diện khuôn mặt, nhận diện văn bản và nhận diện mã vạch. Tất cả các chức năng này có thể được sử dụng riêng biệt hoặc kết hợp với nhau.
Bài viết này nhằm mục đích giải thích việc nhận diện mã vạch bằng việc sử dụng case scenario theo thời gian thực. Chúng ta có thể thấy việc quét mã vạch được sử dụng trong các siêu thị, rạp hát và khách sạn và nó cung cấp thông tin người dùng mong muốn. Trong bài này sẽ hướng dẫn xây dựng một ứng dụng quét vé xem phim đơn giản và hiển thị thông tin về bộ phim để đặt vé.
Thư viện google vision library là một phần của play services và có thể được thêm vào build.gradle trong dự án
compile 'com.google.android.gms:play-services-vision:11.0.2'
2. Thư viện barcode scanner
Google đã cung cấp tutorial đơn giản để thử nghiệm thư viện quét mã vạch bằng ảnh bitmap. Nhưng khi nói đến việc quét mã vạch bằng máy ảnh với thời gian thực, thì mọi thứ trở nên khó thực hiện vì chúng ta cần thực hiện việc nhận diện mã vạch trên video camera.
3. Cách sử dụng the barcode
Bài viết này đã được viết bằng cách sử dụng Android Studio 3.0 Canary 9.
Bước 1.Thêm trình đọc barcode androidhive and thư viện google vision vào file build.gradle của project
build.gradle
dependencies {
    // barcode reader library
    implementation 'info.androidhive:barcode-reader:1.1.2'

    // google vision library
    implementation 'com.google.android.gms:play-services-vision:11.0.2'
}
Bước 2. Thêm barcode camera fragment vào activity hoặc fragment.
<fragment
        android:id="@+id/barcode_scanner"
        android:name="info.androidhive.barcode.BarcodeReader"
        android:layout_width="match_parent"
        android:layout_height="match_parent"
        app:auto_focus="true"
        app:use_flash="false" />
Bước 3. Kế thừa BarcodeReader.BarcodeReaderListener vào trong acitivity và override những hàm cần thiết
import android.support.v7.app.AppCompatActivity;
import android.os.Bundle;
import android.util.SparseArray;
import com.google.android.gms.vision.barcode.Barcode;
import java.util.List;

import info.androidhive.barcode.BarcodeReader;

public class MainActivity extends AppCompatActivity implements BarcodeReader.BarcodeReaderListener {
    @Override
    protected void onCreate(Bundle savedInstanceState) {
        super.onCreate(savedInstanceState);
        setContentView(R.layout.activity_scan);
    }

    @Override
    public void onScanned(Barcode barcode) {
        // single barcode scanned
    }

    @Override
    public void onScannedMultiple(List<Barcode> list) {
        // multiple barcodes scanned
    }

    @Override
    public void onBitmapScanned(SparseArray<Barcode> sparseArray) {
        // barcode scanned from bitmap image
    }

    @Override
    public void onScanError(String s) {
        // scan error
    }
}
Bước 4. Chạy ứng dụng và thử scan barcode hoặc qrcode. Kết quả scan sẽ đc trả về hàm onScanned() hoặc onScannedMultiple()
3.1 Adding Scanning Overlay Indicator Line
Chúng ta có thể thấy tất cả các ứng dụng quét thường thêm một đường chỉ thị trên máy ảnh để cho biết quá trình quét đang diễn ra. Để đạt được điều này, cần thêm một lớp tái sử dụng trong cùng một thư viện và nó có thể được thêm vào màn hình máy ảnh.
Để thêm dòng quét động, hãy thêm mã thông báo.androidhive.barcode.ScannerOverlay.
<info.androidhive.barcode.ScannerOverlay
    android:layout_width="match_parent"
    android:layout_height="match_parent"
    android:background="#44000000"
    app:line_color="#7323DC"
    app:line_speed="6"
    app:line_width="4"
    app:square_height="200"
    app:square_width="200"/>
The library also contains few other useful functionalities like auto flash, beep sound etc., Detailed information about library can be found on it’s Github page.
4. Xây dựng ứng dụng scan vé
Hãy xem cách sử dụng thư viện trong tình huống sử dụng thực tế. Ứng dụng này, không chỉ giải thích việc quét mã vạch mà còn bao gồm xây dựng giao diện người dùng phức tạp, làm REST api để lấy json trả về và viết các custom view class.
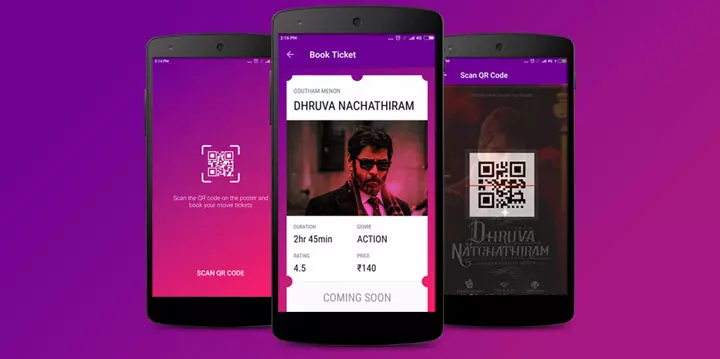
Nhìn chung, ứng dụng có ba màn hình. Đầu tiên là màn hình splash, thứ hai là quét mã vạch và cuối cùng là hiển thị thông tin vé phim.
Dưới đây là ảnh chụp màn hình của ứng dụng.
4.1 The REST API
Để xây dựng ứng dụng này chúng ta cần một api REST để tìm kiếm thông qua cơ sở dữ liệu phim bằng mã vạch phim.
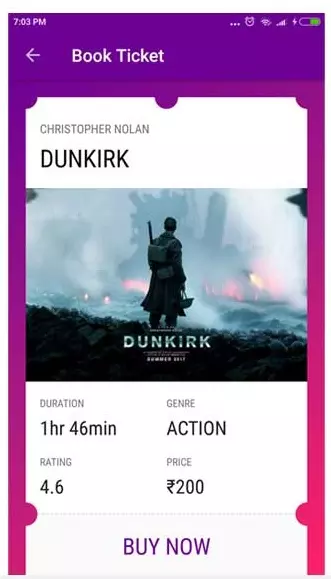
API tìm kiếm Movie: GET reques https://api.androidhive.info/barcodes/search.php?code=dunkirk
Kết quả: Bộ phim phù hợp sẽ được đưa ra trả về json trong respone
{
    "name": "Dunkirk",
    "poster": "https://api.androidhive.info/barcodes/dunkirk.jpg",
    "duration": "1hr 46min",
    "rating": 4.6,
    "released": true,
    "genre": "Action",
    "price": "₹200",
    "director": "Christopher Nolan"
}
Bây giờ chúng tôi đã các thứ cần thiết. Cùng bắt đầu bằng cách tạo một dự án mới trong Android Studio.
Lưu ý: Dự án này được phát triển bằng cách sử dụng Android Studio 3.0 Canary 9
Bước 1. Tạo project mới, vào File ⇒ New Project. Và điền những thông tin cần thiết của dự án
Bước 2. Thêm barcode và google vision dependencies vào file app’s build.gradle and
Thêm các thư viện cần dùng: Glide, Volley and Gson
app/build.gradle
dependencies {
    implementation 'com.google.android.gms:play-services-vision:11.0.2'

    // vision barcode scanner
    implementation 'info.androidhive:barcode-reader:1.1.2'

    // glide image library
    implementation 'com.github.bumptech.glide:glide:4.0.0-RC1'
    annotationProcessor 'com.github.bumptech.glide:compiler:4.0.0-RC1'

    implementation 'com.android.volley:volley:1.0.0'
    implementation 'com.google.code.gson:gson:2.6.2'
}
Bước 3. Thêm string, dimen, color resources vào các tệp tin tương ứng trong thư mục res
strings.xml
<resources>
    <string name="app_name">Movie Tickets</string>
    <string name="title_activity_ticket">Book Ticket</string>
    <string name="lbl_duration">DURATION</string>
    <string name="lbl_genre">GENRE</string>
    <string name="lbl_rating">RATING</string>
    <string name="lbl_price">PRICE</string>
    <string name="btn_buy_now">BUY NOW</string>
    <string name="btn_coming_soon">COMING SOON</string>
    <string name="msg_no_ticket_found">No ticket found. Try scanning the QR Codes from http://api.androidhive.info/qrcodes/</string>
</resources>
dimens.xml
<?xml version="1.0" encoding="utf-8"?>
<resources>
    <dimen name="dimen_20">20dp</dimen>
    <dimen name="dimen_10">10dp</dimen>
    <dimen name="activity_margin">16dp</dimen>
    <dimen name="lbl_directory">14dp</dimen>
    <dimen name="lbl_movie_name">28dp</dimen>
    <dimen name="img_poster_height">220dp</dimen>
    <dimen name="dimen_40">40dp</dimen>
</resources>
colors.xml
<?xml version="1.0" encoding="utf-8"?>
<resources>
    <color name="colorPrimary">#6d0094</color>
    <color name="colorPrimaryDark">#6d0094</color>
    <color name="colorAccent">#ff2068</color>
    <color name="colorAccentSecondary">#ad1a7f</color>
    <color name="viewBg">#f8f8f8</color>
    <color name="btn_disabled">#999</color>
    <color name="lbl_value">#222222</color>
</resources>
Bước 4. Tạo 1 class với tên là MyApplication.java và thêm đoạn code ở dưới. Ở trong file, tạo một singleton instancevolley .
MyApplication.java
import android.app.Application;
import android.text.TextUtils;

import com.android.volley.Request;
import com.android.volley.RequestQueue;
import com.android.volley.toolbox.Volley;

public class MyApplication extends Application {

    public static final String TAG = MyApplication.class
            .getSimpleName();

    private RequestQueue mRequestQueue;

    private static MyApplication mInstance;

    @Override
    public void onCreate() {
        super.onCreate();
        mInstance = this;
    }

    public static synchronized MyApplication getInstance() {
        return mInstance;
    }

    public RequestQueue getRequestQueue() {
        if (mRequestQueue == null) {
            mRequestQueue = Volley.newRequestQueue(getApplicationContext());
        }

        return mRequestQueue;
    }

    public <T> void addToRequestQueue(Request<T> req, String tag) {
        // set the default tag if tag is empty
        req.setTag(TextUtils.isEmpty(tag) ? TAG : tag);
        getRequestQueue().add(req);
    }

    public <T> void addToRequestQueue(Request<T> req) {
        req.setTag(TAG);
        getRequestQueue().add(req);
    }

    public void cancelPendingRequests(Object tag) {
        if (mRequestQueue != null) {
            mRequestQueue.cancelAll(tag);
        }
    }
}
Bước 5. Mở file AndroidManifest.xml và thêm MyApplication ở tag <applicaton>.
Và cũng thêm quyền truy cập INTERNET
AndroidManifest.xml
<?xml version="1.0" encoding="utf-8"?>
<manifest xmlns:android="http://schemas.android.com/apk/res/android"
    package="info.androidhive.movietickets">

    <uses-permission android:name="android.permission.INTERNET" />

    <application
        android:name=".MyApplication"
        android:allowBackup="true"
        android:icon="@mipmap/ic_launcher"
        android:label="@string/app_name"
        android:roundIcon="@mipmap/ic_launcher_round"
        android:supportsRtl="true"
        android:theme="@style/AppTheme">
        <activity
            android:name=".MainActivity"
            android:screenOrientation="portrait"
            android:theme="@style/AppTheme.NoActionBar">
            <intent-filter>
                <action android:name="android.intent.action.MAIN" />

                <category android:name="android.intent.category.LAUNCHER" />
            </intent-filter>
        </activity>
        <activity
            android:name=".ScanActivity"
            android:screenOrientation="portrait" />
        <activity
            android:name=".TicketActivity"
            android:label="@string/title_activity_ticket"
            android:screenOrientation="portrait"
            android:theme="@style/AppTheme.NoActionBar"></activity>
    </application>
</manifest>
Bước 6. Trong thư mục drawable folder tạo 1 file xml drawable với tên là bg_gradient.xml
bg_gradient.xml
<?xml version="1.0" encoding="utf-8"?>
<shape xmlns:android="http://schemas.android.com/apk/res/android"
    android:shape="rectangle">
    <gradient
        android:angle="135"
        android:centerColor="@color/colorAccentSecondary"
        android:endColor="@color/colorPrimary"
        android:startColor="@color/colorAccent"
        android:type="linear" />

    <corners android:radius="0dp" />
</shape>
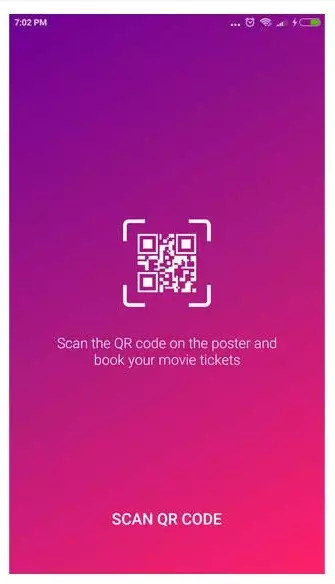
4.2 Thêm màn hình Landing
Màn hình Landing sẽ có vài mẫu text và 1 button để mở camera scanner.
Bước 7.Mở file layout activity_main.xml và thêm đoạn code ở bên dưới. Ở đây có thêm button để khởi động scanner activity.
<?xml version="1.0" encoding="utf-8"?>
<RelativeLayout xmlns:android="http://schemas.android.com/apk/res/android"
    xmlns:app="http://schemas.android.com/apk/res-auto"
    xmlns:tools="http://schemas.android.com/tools"
    android:layout_width="match_parent"
    android:layout_height="match_parent"
    android:background="@drawable/bg_gradient"
    tools:context="info.androidhive.movietickets.MainActivity">

    <LinearLayout
        android:layout_width="wrap_content"
        android:layout_height="wrap_content"
        android:layout_centerHorizontal="true"
        android:layout_centerInParent="true"
        android:gravity="center"
        android:orientation="vertical"
        android:paddingLeft="40dp"
        android:paddingRight="40dp">

        <ImageView
            android:id="@+id/icon"
            android:layout_width="100dp"
            android:layout_height="100dp"
            android:layout_centerHorizontal="true"
            android:clickable="true"
            android:foreground="?attr/selectableItemBackground"
            android:src="@drawable/qrcode"
            android:tint="@android:color/white" />

        <TextView
            android:layout_width="wrap_content"
            android:layout_height="wrap_content"
            android:layout_marginTop="30dp"
            android:fontFamily="sans-serif-light"
            android:gravity="center"
            android:text="Scan the QR code on the poster and book your movie tickets"
            android:textColor="@android:color/white"
            android:textSize="16dp" />
    </LinearLayout>

    <Button
        android:id="@+id/btn_scan"
        android:layout_width="wrap_content"
        android:layout_height="wrap_content"
        android:layout_alignParentBottom="true"
        android:layout_centerHorizontal="true"
        android:layout_marginBottom="40dp"
        android:background="@android:color/transparent"
        android:foreground="?attr/selectableItemBackground"
        android:paddingLeft="20dp"
        android:paddingRight="20dp"
        android:fontFamily="sans-serif-medium"
        android:text="Scan QR Code"
        android:textColor="@android:color/white"
        android:textSize="18sp" />

</RelativeLayout>
Bước 8. Mở file main activity và thay đổi những thứ cần thiết. Trong đó có phương thức transparentToolbar() làm cho toolbar trong suốt.
MainActivity.java
import android.app.Activity;
import android.content.Intent;
import android.graphics.Color;
import android.os.Build;
import android.support.v7.app.AppCompatActivity;
import android.os.Bundle;
import android.util.SparseArray;
import android.view.View;
import android.view.Window;
import android.view.WindowManager;

import com.google.android.gms.vision.barcode.Barcode;

import java.util.List;

import info.androidhive.barcode.BarcodeReader;

public class MainActivity extends AppCompatActivity {

    @Override
    protected void onCreate(Bundle savedInstanceState) {
        super.onCreate(savedInstanceState);

        // making toolbar transparent
        transparentToolbar();

        setContentView(R.layout.activity_main);

        findViewById(R.id.btn_scan).setOnClickListener(new View.OnClickListener() {
            @Override
            public void onClick(View view) {
                startActivity(new Intent(MainActivity.this, ScanActivity.class));
            }
        });
    }

    private void transparentToolbar() {
        if (Build.VERSION.SDK_INT >= 19 && Build.VERSION.SDK_INT < 21) {
            setWindowFlag(this, WindowManager.LayoutParams.FLAG_TRANSLUCENT_STATUS, true);
        }
        if (Build.VERSION.SDK_INT >= 19) {
            getWindow().getDecorView().setSystemUiVisibility(View.SYSTEM_UI_FLAG_LAYOUT_STABLE | View.SYSTEM_UI_FLAG_LAYOUT_FULLSCREEN);
        }
        if (Build.VERSION.SDK_INT >= 21) {
            setWindowFlag(this, WindowManager.LayoutParams.FLAG_TRANSLUCENT_STATUS, false);
            getWindow().setStatusBarColor(Color.TRANSPARENT);
        }
    }

    private void setWindowFlag(Activity activity, final int bits, boolean on) {
        Window win = activity.getWindow();
        WindowManager.LayoutParams winParams = win.getAttributes();
        if (on) {
            winParams.flags |= bits;
        } else {
            winParams.flags &= ~bits;
        }
        win.setAttributes(winParams);
    }
}
Khi chạy app, có thể nhìn thấy màn hình landing như hình bên dưới
4.3 Thêm màn hình Ticket Scan
Bước 9. Tạo 1 activity mới từ File ⇒ New ⇒ Activity ⇒ Empty Activity and name it as ScanActivity.java
Bước 10. Mở file layout activity_scan.xml và thêm fragment Barcode Reader như bên dưới. Ở đây chúng ta cũng có thểm thêm view indicator scanner
activity_scan.xml
<?xml version="1.0" encoding="utf-8"?>
<RelativeLayout xmlns:android="http://schemas.android.com/apk/res/android"
    xmlns:app="http://schemas.android.com/apk/res-auto"
    xmlns:tools="http://schemas.android.com/tools"
    android:layout_width="match_parent"
    android:layout_height="match_parent"
    tools:context="info.androidhive.movietickets.ScanActivity">

    <fragment
        android:id="@+id/barcode_scanner"
        android:name="info.androidhive.barcode.BarcodeReader"
        android:layout_width="match_parent"
        android:layout_height="match_parent"
        app:auto_focus="true"
        app:use_flash="false" />

    <info.androidhive.barcode.ScannerOverlay
        android:layout_width="match_parent"
        android:layout_height="match_parent"
        android:background="#44000000"
        app:line_color="#7323DC"
        app:line_speed="6"
        app:line_width="4"
        app:square_height="200"
        app:square_width="200" />

</RelativeLayout>
Bước 11. Mở file ScanActivity.java và thay đổi đoạn code như ở bên dưới
Thực thi activity từ BarcodeReader.BarcodeReaderListener Override method callback như onScanned(), onScannedMultiple() và các phương thức callback khác barcodeReader.playBeep() phát ra tiếng bíp khi đọc mã vạch. Khởi động TicketActivity lần đầu khi mã vạch được quét bằng cách truyền giá trị mã vạch ở trong intent
ScanActivity.java
package info.androidhive.movietickets;

import android.content.Intent;
import android.support.v7.app.AppCompatActivity;
import android.os.Bundle;
import android.util.SparseArray;
import android.widget.Toast;

import com.google.android.gms.vision.barcode.Barcode;

import java.util.List;

import info.androidhive.barcode.BarcodeReader;

public class ScanActivity extends AppCompatActivity implements BarcodeReader.BarcodeReaderListener {

    BarcodeReader barcodeReader;

    @Override
    protected void onCreate(Bundle savedInstanceState) {
        super.onCreate(savedInstanceState);
        setContentView(R.layout.activity_scan);

        // get the barcode reader instance
        barcodeReader = (BarcodeReader) getSupportFragmentManager().findFragmentById(R.id.barcode_scanner);
    }

    @Override
    public void onScanned(Barcode barcode) {

        // playing barcode reader beep sound
        barcodeReader.playBeep();

        // ticket details activity by passing barcode
        Intent intent = new Intent(ScanActivity.this, TicketActivity.class);
        intent.putExtra("code", barcode.displayValue);
        startActivity(intent);
    }

    @Override
    public void onScannedMultiple(List<Barcode> list) {

    }

    @Override
    public void onBitmapScanned(SparseArray<Barcode> sparseArray) {

    }

    @Override
    public void onScanError(String s) {
        Toast.makeText(getApplicationContext(), "Error occurred while scanning " + s, Toast.LENGTH_SHORT).show();
    }
}
Chạy app và thử scan một barcode bất kỳ. Mã vạch được quét sẽ được trả về trong phương thức onScanned ().
4.4 Thêm màn hình Ticket Scan Result
Màn hình tiếp theo sẽ là activity kết quả. Trên màn hình này, chi tiết phim sẽ được hiển thị bằng cách gửi qrcode đã quét để tìm kiếm endpoint và nhận kết quả.
4.4.1 Chuẩn bị Ticket View cùng với đục lỗ vé
Bước 12. Tạo 1 class với tên TicketView.java. Đây là lớp khung nhìn đơn giản, trong đó Canvas được sử dụng để hiển thị chế độ xem với các lỗ trong suốt ở các góc.
TicketView.java
import android.content.Context;
import android.graphics.Bitmap;
import android.graphics.Canvas;
import android.graphics.Color;
import android.graphics.DashPathEffect;
import android.graphics.Paint;
import android.graphics.Path;
import android.graphics.PorterDuff;
import android.graphics.PorterDuffXfermode;
import android.util.AttributeSet;
import android.widget.LinearLayout;

public class TicketView extends LinearLayout {
    private Bitmap bm;
    private Canvas cv;
    private Paint eraser;
    private int holesBottomMargin = 70;
    private int holeRadius = 40;

    public TicketView(Context context) {
        super(context);
        Init();
    }

    public TicketView(Context context, AttributeSet attrs) {
        super(context, attrs);
        Init();
    }

    public TicketView(Context context, AttributeSet attrs,
                      int defStyleAttr) {
        super(context, attrs, defStyleAttr);
        Init();
    }

    private void Init() {
        eraser = new Paint();
        eraser.setXfermode(new PorterDuffXfermode(PorterDuff.Mode.CLEAR));
        eraser.setAntiAlias(true);
    }

    @Override
    protected void onSizeChanged(int w, int h, int oldw, int oldh) {
        if (w != oldw || h != oldh) {
            bm = Bitmap.createBitmap(w, h, Bitmap.Config.ARGB_8888);
            cv = new Canvas(bm);
        }
        super.onSizeChanged(w, h, oldw, oldh);
    }

    @Override
    protected void onDraw(Canvas canvas) {
        int w = getWidth();
        int h = getHeight();

        bm.eraseColor(Color.TRANSPARENT);

        // set the view background color
        cv.drawColor(Color.WHITE);

        // drawing footer square contains the buy now button
        Paint paint = new Paint();
        paint.setARGB(255, 250, 250, 250);
        paint.setStrokeWidth(0);
        paint.setStyle(Paint.Style.FILL);
        cv.drawRect(0, h, w, h - pxFromDp(getContext(), holesBottomMargin), paint);

        // adding punching holes on the ticket by erasing them
        cv.drawCircle(0, 0, holeRadius, eraser); // top-left hole
        cv.drawCircle(w / 2, 0, holeRadius, eraser); // top-middle hole
        cv.drawCircle(w, 0, holeRadius, eraser); // top-right
        cv.drawCircle(0, h - pxFromDp(getContext(), holesBottomMargin), holeRadius, eraser); // bottom-left hole
        cv.drawCircle(w, h - pxFromDp(getContext(), holesBottomMargin), holeRadius, eraser); // bottom right hole

        // drawing the image
        canvas.drawBitmap(bm, 0, 0, null);


        // drawing dashed lines at the bottom
        Path mPath = new Path();
        mPath.moveTo(holeRadius, h - pxFromDp(getContext(), holesBottomMargin));
        mPath.quadTo(w - holeRadius, h - pxFromDp(getContext(), holesBottomMargin), w - holeRadius, h - pxFromDp(getContext(), holesBottomMargin));

        // dashed line
        Paint dashed = new Paint();
        dashed.setARGB(255, 200, 200, 200);
        dashed.setStyle(Paint.Style.STROKE);
        dashed.setStrokeWidth(2);
        dashed.setPathEffect(new DashPathEffect(new float[]{10, 5}, 0));
        canvas.drawPath(mPath, dashed);

        super.onDraw(canvas);
    }

    public static float pxFromDp(final Context context, final float dp) {
        return dp * context.getResources().getDisplayMetrics().density;
    }
}
Bước 13. Tạo 1 class với tên là TicketResultActivity.java bằng cách File ⇒ New ⇒ Activity ⇒ Empty Activity.
Bước 14. Mở file layout activity_ticket_result.xml và thêm đoạn mã ở dưới.
activity_ticket_result.xml
<?xml version="1.0" encoding="utf-8"?>
<android.support.design.widget.CoordinatorLayout xmlns:android="http://schemas.android.com/apk/res/android"
    xmlns:app="http://schemas.android.com/apk/res-auto"
    xmlns:tools="http://schemas.android.com/tools"
    android:id="@+id/main_content"
    android:layout_width="match_parent"
    android:layout_height="match_parent"
    android:background="@drawable/bg_gradient"
    android:descendantFocusability="beforeDescendants"
    android:fitsSystemWindows="true"
    tools:context=".TicketResultActivity">

    <android.support.design.widget.AppBarLayout
        foreground="?android:windowContentOverlay"
        android:layout_width="match_parent"
        android:layout_height="wrap_content"
        android:theme="@style/AppTheme.AppBarOverlay">


        <android.support.v7.widget.Toolbar
            android:id="@+id/toolbar"
            android:layout_width="match_parent"
            android:layout_height="?actionBarSize"
            android:background="@color/colorPrimary"
            app:popupTheme="@style/AppTheme.PopupOverlay"></android.support.v7.widget.Toolbar>

    </android.support.design.widget.AppBarLayout>

    <include layout="@layout/content_ticket_details"/>

</android.support.design.widget.CoordinatorLayout>
content_ticket_details.xml
<?xml version="1.0" encoding="utf-8"?>
<RelativeLayout xmlns:android="http://schemas.android.com/apk/res/android"
    xmlns:app="http://schemas.android.com/apk/res-auto"
    xmlns:tools="http://schemas.android.com/tools"
    android:layout_width="match_parent"
    android:layout_height="match_parent"
    android:background="@drawable/bg_gradient"
    app:layout_behavior="@string/appbar_scrolling_view_behavior"
    tools:context=".TicketResultActivity">

    <TextView
        android:id="@+id/txt_error"
        android:layout_width="wrap_content"
        android:layout_height="wrap_content"
        android:layout_centerHorizontal="true"
        android:layout_centerInParent="true"
        android:gravity="center_horizontal"
        android:text="@string/msg_no_ticket_found"
        android:textColor="@android:color/white"
        android:padding="@dimen/dimen_20"
        android:textSize="16dp"
        android:visibility="gone" />

    <info.androidhive.movietickets.TicketView
        android:id="@+id/layout_ticket"
        android:layout_width="match_parent"
        android:layout_height="match_parent"
        android:layout_marginLeft="@dimen/dimen_20"
        android:layout_marginRight="@dimen/dimen_20"
        android:layout_marginTop="@dimen/dimen_20"
        android:background="@android:color/transparent"
        android:orientation="vertical"
        android:paddingTop="@dimen/dimen_10"
        android:visibility="gone">

        <TextView
            android:id="@+id/director"
            android:layout_width="match_parent"
            android:layout_height="wrap_content"
            android:layout_marginBottom="5dp"
            android:fontFamily="sans-serif-condensed"
            android:paddingLeft="@dimen/activity_margin"
            android:paddingRight="@dimen/activity_margin"
            android:paddingTop="@dimen/activity_margin"
            android:textAllCaps="true"
            android:textSize="@dimen/lbl_directory" />

        <TextView
            android:id="@+id/name"
            android:layout_width="match_parent"
            android:layout_height="wrap_content"
            android:fontFamily="sans-serif-condensed"
            android:paddingLeft="16dp"
            android:paddingRight="16dp"
            android:textAllCaps="true"
            android:textColor="#111"
            android:maxLines="1"
            android:ellipsize="end"
            android:textSize="@dimen/lbl_movie_name" />

        <ImageView
            android:id="@+id/poster"
            android:layout_width="match_parent"
            android:layout_height="@dimen/img_poster_height"
            android:layout_marginBottom="@dimen/activity_margin"
            android:layout_marginTop="@dimen/activity_margin"
            android:scaleType="centerCrop" />

        <LinearLayout
            android:layout_width="match_parent"
            android:layout_height="wrap_content"
            android:orientation="horizontal"
            android:paddingLeft="@dimen/activity_margin"
            android:paddingRight="@dimen/activity_margin"
            android:weightSum="2">

            <LinearLayout
                android:layout_width="0dp"
                android:layout_height="wrap_content"
                android:layout_weight="1"
                android:orientation="vertical">

                <TextView
                    android:layout_width="match_parent"
                    android:layout_height="wrap_content"
                    android:layout_marginBottom="5dp"
                    android:fontFamily="sans-serif-condensed"
                    android:text="@string/lbl_duration"
                    android:textSize="12dp" />

                <TextView
                    android:id="@+id/duration"
                    android:layout_width="match_parent"
                    android:layout_height="wrap_content"
                    android:fontFamily="sans-serif-condensed"
                    android:textColor="@color/lbl_value"
                    android:textSize="22dp" />
            </LinearLayout>

            <LinearLayout
                android:layout_width="0dp"
                android:layout_height="wrap_content"
                android:layout_weight="1"
                android:orientation="vertical">

                <TextView
                    android:layout_width="match_parent"
                    android:layout_height="wrap_content"
                    android:layout_marginBottom="5dp"
                    android:fontFamily="sans-serif-condensed"
                    android:text="@string/lbl_genre"
                    android:textSize="12dp" />

                <TextView
                    android:id="@+id/genre"
                    android:layout_width="match_parent"
                    android:layout_height="wrap_content"
                    android:fontFamily="sans-serif-condensed"
                    android:textAllCaps="true"
                    android:textColor="@color/lbl_value"
                    android:textSize="22dp" />
            </LinearLayout>

        </LinearLayout>

        <LinearLayout
            android:layout_width="match_parent"
            android:layout_height="wrap_content"
            android:layout_marginTop="16dp"
            android:orientation="horizontal"
            android:paddingLeft="16dp"
            android:paddingRight="16dp"
            android:weightSum="2">

            <LinearLayout
                android:layout_width="0dp"
                android:layout_height="wrap_content"
                android:layout_weight="1"
                android:orientation="vertical">

                <TextView
                    android:layout_width="match_parent"
                    android:layout_height="wrap_content"
                    android:layout_marginBottom="5dp"
                    android:fontFamily="sans-serif-condensed"
                    android:text="@string/lbl_rating"
                    android:textSize="12dp" />

                <TextView
                    android:id="@+id/rating"
                    android:layout_width="match_parent"
                    android:layout_height="wrap_content"
                    android:fontFamily="sans-serif-condensed"
                    android:textColor="@color/lbl_value"
                    android:textSize="22dp" />
            </LinearLayout>

            <LinearLayout
                android:layout_width="0dp"
                android:layout_height="wrap_content"
                android:layout_weight="1"
                android:orientation="vertical">

                <TextView
                    android:layout_width="match_parent"
                    android:layout_height="wrap_content"
                    android:layout_marginBottom="5dp"
                    android:fontFamily="sans-serif-condensed"
                    android:text="@string/lbl_price"
                    android:textSize="12dp" />

                <TextView
                    android:id="@+id/price"
                    android:layout_width="match_parent"
                    android:layout_height="wrap_content"
                    android:fontFamily="sans-serif-condensed"
                    android:textAllCaps="true"
                    android:textColor="@color/lbl_value"
                    android:textSize="22dp" />
            </LinearLayout>

        </LinearLayout>

    </info.androidhive.movietickets.TicketView>

    <Button
        android:id="@+id/btn_buy"
        android:layout_width="wrap_content"
        android:layout_height="wrap_content"
        android:layout_alignParentBottom="true"
        android:layout_centerHorizontal="true"
        android:layout_marginBottom="10dp"
        android:background="@android:color/transparent"
        android:fontFamily="sans-serif-condensed"
        android:foreground="?attr/selectableItemBackground"
        android:paddingLeft="@dimen/activity_margin"
        android:paddingRight="@dimen/activity_margin"
        android:textColor="@color/colorPrimary"
        android:textSize="26dp" />

    <ProgressBar
        android:id="@+id/progressBar"
        android:layout_width="@dimen/dimen_40"
        android:layout_height="@dimen/dimen_40"
        android:layout_centerInParent="true"
        android:indeterminateTint="@android:color/white"
        android:indeterminateTintMode="src_atop"
        android:visibility="visible" />
</RelativeLayout>
Bước 15. Mở TicketResultActivity.java tương ứng và sửa như đoạn code ở dưới
searchBarcode () thực hiện gọi http volley để tìm kiếm endpoint bằng cách quét mã vạch được quét. renderMovie () phân tích json và hiển thị các chi tiết phim trên màn hình.
TicketResultActivity.java
import android.os.Bundle;
import android.support.v4.content.ContextCompat;
import android.support.v7.app.AppCompatActivity;
import android.support.v7.widget.Toolbar;
import android.text.TextUtils;
import android.util.Log;
import android.view.MenuItem;
import android.view.View;
import android.widget.Button;
import android.widget.ImageView;
import android.widget.ProgressBar;
import android.widget.TextView;
import android.widget.Toast;

import com.android.volley.Request;
import com.android.volley.Response;
import com.android.volley.VolleyError;
import com.android.volley.toolbox.JsonObjectRequest;
import com.bumptech.glide.Glide;
import com.google.gson.Gson;
import com.google.gson.JsonSyntaxException;
import com.google.gson.annotations.SerializedName;

import org.json.JSONObject;

public class TicketResultActivity extends AppCompatActivity {
    private static final String TAG = TicketResultActivity.class.getSimpleName();

    // url to search barcode
    private static final String URL = "https://api.androidhive.info/barcodes/search.php?code=";

    private TextView txtName, txtDuration, txtDirector, txtGenre, txtRating, txtPrice, txtError;
    private ImageView imgPoster;
    private Button btnBuy;
    private ProgressBar progressBar;
    private TicketView ticketView;

    @Override
    protected void onCreate(Bundle savedInstanceState) {
        super.onCreate(savedInstanceState);
        setContentView(R.layout.activity_ticket_result);

        Toolbar toolbar = findViewById(R.id.toolbar);
        setSupportActionBar(toolbar);
        getSupportActionBar().setDisplayHomeAsUpEnabled(true);

        txtName = findViewById(R.id.name);
        txtDirector = findViewById(R.id.director);
        txtDuration = findViewById(R.id.duration);
        txtPrice = findViewById(R.id.price);
        txtRating = findViewById(R.id.rating);
        imgPoster = findViewById(R.id.poster);
        txtGenre = findViewById(R.id.genre);
        btnBuy = findViewById(R.id.btn_buy);
        imgPoster = findViewById(R.id.poster);
        txtError = findViewById(R.id.txt_error);
        ticketView = findViewById(R.id.layout_ticket);
        progressBar = findViewById(R.id.progressBar);

        String barcode = getIntent().getStringExtra("code");

        // close the activity in case of empty barcode
        if (TextUtils.isEmpty(barcode)) {
            Toast.makeText(getApplicationContext(), "Barcode is empty!", Toast.LENGTH_LONG).show();
            finish();
        }

        // search the barcode
        searchBarcode(barcode);
    }

    /**
     * Searches the barcode by making http call
     * Request was made using Volley network library but the library is
     * not suggested in production, consider using Retrofit
     */
    private void searchBarcode(String barcode) {
        // making volley's json request
        JsonObjectRequest jsonObjReq = new JsonObjectRequest(Request.Method.GET,
                URL + barcode, null,
                new Response.Listener<JSONObject>() {

                    @Override
                    public void onResponse(JSONObject response) {
                        Log.e(TAG, "Ticket response: " + response.toString());

                        // check for success status
                        if (!response.has("error")) {
                            // received movie response
                            renderMovie(response);
                        } else {
                            // no movie found
                            showNoTicket();
                        }
                    }
                }, new Response.ErrorListener() {

            @Override
            public void onErrorResponse(VolleyError error) {
                Log.e(TAG, "Error: " + error.getMessage());
                showNoTicket();
            }
        });

        MyApplication.getInstance().addToRequestQueue(jsonObjReq);
    }

    private void showNoTicket() {
        txtError.setVisibility(View.VISIBLE);
        ticketView.setVisibility(View.GONE);
        progressBar.setVisibility(View.GONE);
    }

    /**
     * Rendering movie details on the ticket
     */
    private void renderMovie(JSONObject response) {
        try {

            // converting json to movie object
            Movie movie = new Gson().fromJson(response.toString(), Movie.class);

            if (movie != null) {
                txtName.setText(movie.getName());
                txtDirector.setText(movie.getDirector());
                txtDuration.setText(movie.getDuration());
                txtGenre.setText(movie.getGenre());
                txtRating.setText("" + movie.getRating());
                txtPrice.setText(movie.getPrice());
                Glide.with(this).load(movie.getPoster()).into(imgPoster);

                if (movie.isReleased()) {
                    btnBuy.setText(getString(R.string.btn_buy_now));
                    btnBuy.setTextColor(ContextCompat.getColor(this, R.color.colorPrimary));
                } else {
                    btnBuy.setText(getString(R.string.btn_coming_soon));
                    btnBuy.setTextColor(ContextCompat.getColor(this, R.color.btn_disabled));
                }
                ticketView.setVisibility(View.VISIBLE);
                progressBar.setVisibility(View.GONE);
            } else {
                // movie not found
                showNoTicket();
            }
        } catch (JsonSyntaxException e) {
            Log.e(TAG, "JSON Exception: " + e.getMessage());
            showNoTicket();
            Toast.makeText(getApplicationContext(), "Error occurred. Check your LogCat for full report", Toast.LENGTH_SHORT).show();
        } catch (Exception e) {
            // exception
            showNoTicket();
            Toast.makeText(getApplicationContext(), "Error occurred. Check your LogCat for full report", Toast.LENGTH_SHORT).show();
        }
    }

    @Override
    public boolean onOptionsItemSelected(MenuItem item) {
        if (item.getItemId() == android.R.id.home) {
            finish();
        }
        return super.onOptionsItemSelected(item);
    }

    private class Movie {
        String name;
        String director;
        String poster;
        String duration;
        String genre;
        String price;
        float rating;

        @SerializedName("released")
        boolean isReleased;

        public String getName() {
            return name;
        }

        public String getDirector() {
            return director;
        }

        public String getPoster() {
            return poster;
        }

        public String getDuration() {
            return duration;
        }

        public String getGenre() {
            return genre;
        }

        public String getPrice() {
            return price;
        }

        public float getRating() {
            return rating;
        }

        public boolean isReleased() {
            return isReleased;
        }
    }
}
Nếu bây giờ chạy ứng dụng và quét mã qr được cung cấp trong bài viết này thì kết quả sẽ được hiển thị như dưới đây.
5. Test app
Ứng dụng có thể quét bất kỳ mã vạch nào nhưng thông tin vé phim chỉ được hiển thị khi mã qr được quét được cung cấp trong bài viết này.
Chạy ứng dụng và thử quét các mã qr bên dưới. Bạn có thể xem thông tin về bộ phim thích hợp.
All rights reserved
