Hướng dẫn tạo Tag Layout trong Android
Bài đăng này đã không được cập nhật trong 4 năm
1. Giới thiệu về ViewGroup
ViewGroup trong Android có chế độ xem đặc biệt có thể chứa các Chế độ xem khác. Một ViewGroup có thể chứa một hoặc nhiều view con. Tất cả các trình quản lý layout tiêu chuẩn khác như LinearLayout, FrameLayout, RelativeLayout là các lớp phụ chuyên biệt của lớp ViewGroup bố trí con của chúng ở định dạng cụ thể. Ví dụ: LinearLayout sắp xếp con của nó ở gần nhau theo chiều dọc hoặc chiều ngang.
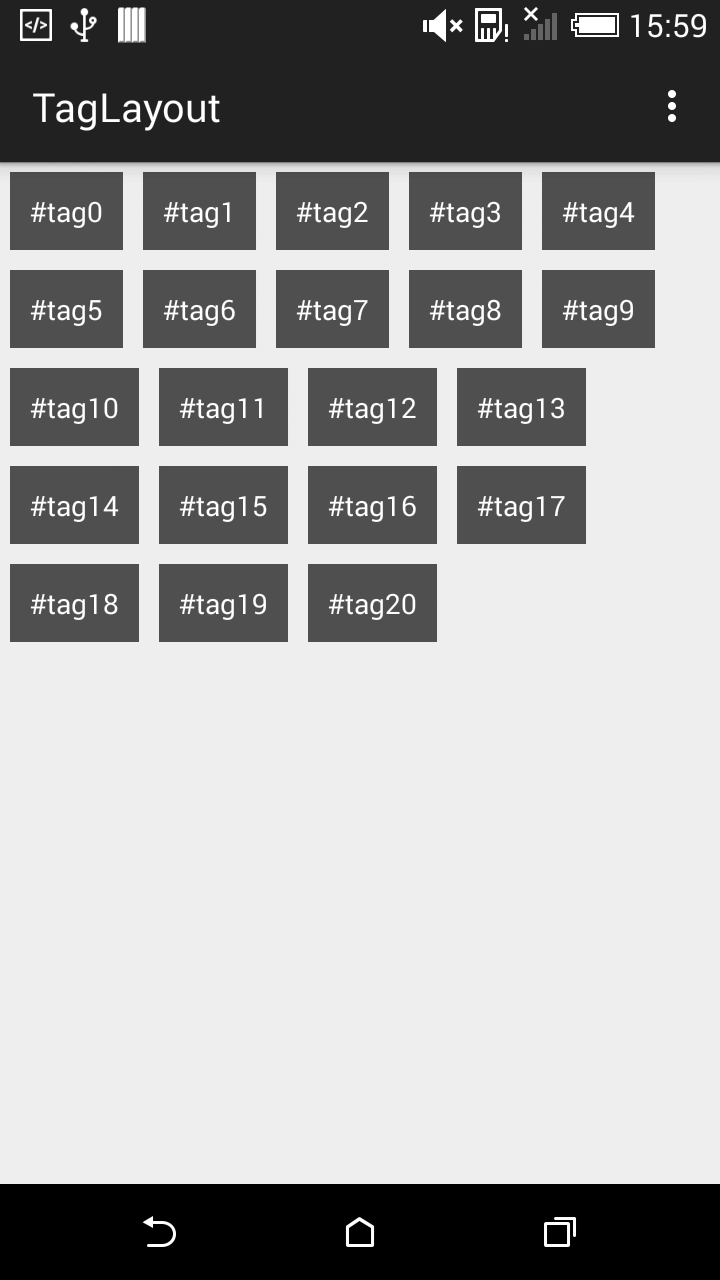
Đôi khi, do tính chất cụ thể của yêu cầu, các layout tiêu chuẩn là không đủ nên cần mở rộng lớp ViewGroup để tạo trình quản lý layout tùy chỉnh của riêng bạn. Bài đăng này sẽ giúp bạn giải quyết việc tạo một lớp TagLayout quản lý Layout tùy chỉnh sẽ được sử dụng để hiển thị danh sách các thẻ như thể hiện trong ảnh chụp màn hình sau.
Phải thực hiện các bước sau trong khi tạo Trình quản lý layout tùy chỉnh.
Mở rộng lớp học của bạn từ lớp ViewGroup. Bạn phải ghi đè phương thức onLayout (). Phương thức này được sử dụng để thay chế độ child views. Override phương thức onMeasure (). Phương thức onMeasure () sẽ được sử dụng để cho ViewGroup xác định kích thước của ViewGroup dựa trên việc tính toán kích thước child view. Phương thức onMeasure () và onLayout () sẽ chứa logic để tổ chức các chế độ child view với layout của ViewGroup. Cũng có thể đo từng chiều cao và chiều rộng của child view bằng cách gọi phương thức getMeasuredWidth () và getMeasuredHeight ().
2. Tạo Custom ViewGroup
public class TagLayout extends ViewGroup {
    int deviceWidth;

    public TagLayout(Context context) {
        this(context, null, 0);
    }

    public TagLayout(Context context, AttributeSet attrs) {
        this(context, attrs, 0);
    }

    public TagLayout(Context context, AttributeSet attrs, int defStyleAttr) {
        super(context, attrs, defStyleAttr);
        init(context);
    }

    private void init(Context context) {
        final Display display = ((WindowManager) context.getSystemService(Context.WINDOW_SERVICE)).getDefaultDisplay();
        Point deviceDisplay = new Point();
        display.getSize(deviceDisplay);
        deviceWidth = deviceDisplay.x;
    }

    @Override
    protected void onLayout(boolean changed, int l, int t, int r, int b) {
        final int count = getChildCount();
        int curWidth, curHeight, curLeft, curTop, maxHeight;

        //get the available size of child view
        final int childLeft = this.getPaddingLeft();
        final int childTop = this.getPaddingTop();
        final int childRight = this.getMeasuredWidth() - this.getPaddingRight();
        final int childBottom = this.getMeasuredHeight() - this.getPaddingBottom();
        final int childWidth = childRight - childLeft;
        final int childHeight = childBottom - childTop;

        maxHeight = 0;
        curLeft = childLeft;
        curTop = childTop;

        for (int i = 0; i < count; i++) {
            View child = getChildAt(i);

            if (child.getVisibility() == GONE)
                return;

            //Get the maximum size of the child
            child.measure(MeasureSpec.makeMeasureSpec(childWidth, MeasureSpec.AT_MOST), MeasureSpec.makeMeasureSpec(childHeight, MeasureSpec.AT_MOST));
            curWidth = child.getMeasuredWidth();
            curHeight = child.getMeasuredHeight();
            //wrap is reach to the end
            if (curLeft + curWidth >= childRight) {
                curLeft = childLeft;
                curTop += maxHeight;
                maxHeight = 0;
            }
            //do the layout
            child.layout(curLeft, curTop, curLeft + curWidth, curTop + curHeight);
            //store the max height
            if (maxHeight < curHeight)
                maxHeight = curHeight;
            curLeft += curWidth;
        }
    }

    @Override
    protected void onMeasure(int widthMeasureSpec, int heightMeasureSpec) {
        int count = getChildCount();
        // Measurement will ultimately be computing these values.
        int maxHeight = 0;
        int maxWidth = 0;
        int childState = 0;
        int mLeftWidth = 0;
        int rowCount = 0;

        // Iterate through all children, measuring them and computing our dimensions
        // from their size.
        for (int i = 0; i < count; i++) {
            final View child = getChildAt(i);

            if (child.getVisibility() == GONE)
                continue;

            // Measure the child.
            measureChild(child, widthMeasureSpec, heightMeasureSpec);
            maxWidth += Math.max(maxWidth, child.getMeasuredWidth());
            mLeftWidth += child.getMeasuredWidth();

            if ((mLeftWidth / deviceWidth) > rowCount) {
                maxHeight += child.getMeasuredHeight();
                rowCount++;
            } else {
                maxHeight = Math.max(maxHeight, child.getMeasuredHeight());
            }
            childState = combineMeasuredStates(childState, child.getMeasuredState());
        }

        // Check against our minimum height and width
        maxHeight = Math.max(maxHeight, getSuggestedMinimumHeight());
        maxWidth = Math.max(maxWidth, getSuggestedMinimumWidth());

        // Report our final dimensions.
        setMeasuredDimension(resolveSizeAndState(maxWidth, widthMeasureSpec, childState),
                resolveSizeAndState(maxHeight, heightMeasureSpec, childState << MEASURED_HEIGHT_STATE_SHIFT));
    }
}
3. Thêm Custom ViewGroup vào trong layout
Bây giờ chúng ta đã sẵn sàng với view group, chúng ta hãy thêm nó vào activity layout
<RelativeLayout xmlns:android="http://schemas.android.com/apk/res/android"
    android:layout_width="match_parent"
    android:layout_height="match_parent">

    <com.example.nguyenmanhquan.taglayout.TagLayout
        android:id="@+id/tagLayout"
        android:layout_width="wrap_content"
        android:layout_height="wrap_content"
        android:background="#ffff00"/>

</RelativeLayout>
4. Tạo Child View Layout
<?xml version="1.0" encoding="utf-8"?>
<LinearLayout xmlns:android="http://schemas.android.com/apk/res/android"
    android:layout_width="wrap_content"
    android:layout_height="wrap_content">

    <TextView
        android:id="@+id/tagTextView"
        android:layout_width="wrap_content"
        android:layout_height="wrap_content"
        android:layout_margin="5dp"
        android:background="#a000"
        android:padding="10dp"
        android:textColor="#fff" />

</LinearLayout>
5. Thêm Child View vào trong Custom ViewGroup
Để đơn giản, tôi inflate 20 child views từ bên trong vòng lặp.
import android.support.v7.app.AppCompatActivity;
import android.os.Bundle;
import android.view.LayoutInflater;
import android.view.View;
import android.widget.TextView;

public class MainActivity extends AppCompatActivity {

    @Override
    protected void onCreate(Bundle savedInstanceState) {
        super.onCreate(savedInstanceState);
        setContentView(R.layout.activity_main);

        TagLayout tagLayout = (TagLayout) findViewById(R.id.tagLayout);
        LayoutInflater layoutInflater = getLayoutInflater();
        String tag;
        for (int i = 0; i <= 20; i++) {
            tag = "#tag" + i;
            View tagView = layoutInflater.inflate(R.layout.tag_layout, null, false);

            TextView tagTextView = (TextView) tagView.findViewById(R.id.tagTextView);
            tagTextView.setText(tag);
            tagLayout.addView(tagView);
        }
    }
}
All rights reserved
