Thông báo (Notification) trong android với Firebase Cloud Messaging - Phần 2
Bài đăng này đã không được cập nhật trong 6 năm
Giới thiệu
Chào mọi người, lại là mình đây (hehe).
Ở phần trước, mình đã giới thiệu cho các bạn về thông báo (Notification) trong android với Firebase Cloud Messaging. Và hướng dẫn các bạn gửi và nhận thông báo dạng Notification messages thông qua một ứng dụng đơn giản (các bạn có thể xem lại phần 1 ở đây). Trong phần 2 này, chúng ta sẽ cùng tìm hiểu về loại FCM message còn lại là Data messages nhé  .
.
Tìm hiểu về Data messages
Như ở bài trước mình đã trình bày thì Data messages là một loại thông báo của Firebase Cloud Messaging. Data messages được sử dụng khi bạn muốn trực tiếp xử lý thông báo ở ứng dụng client mà không cần quan tâm ứng dụng đang ở trạng thái Foreground hay Background. Bởi vì đối với Data messages thì ứng dụng client (android) sẽ xử lý thông qua phương thức onMessageReceived() bất kể ứng dụng đang ở trạng thái Foreground hay Background.
Cấu trúc của một thông báo dạng Data messages:
{
  "message":{
    "token":"bk3RNwTe3H0:CI2k_HHwgIpoDKCIZvvDMExUdFQ3P1...",
    "data":{
      "name" : "Peter Paker",
      "mission" : "Kick ass Thanos!",
      "status" : "Open"
    }
  }
}
Trong đó, data sẽ là nơi chứa dữ liệu mà bạn muốn gửi. Các key dữ liệu name, mission, status ở trên là do mình tự định nghĩa, bạn cũng có thể tự định nghĩa các cặp key - value riêng cho ứng dụng của bạn tại đây.
Tạo ứng dụng đơn giản gửi và nhận thông báo dạng Data messages
Bây giờ mình sẽ tạo một hệ thống đơn giản để gửi và nhận Data messages với Firebase như sau:
- Một trang web bằng php đơn giản để gửi các thông báo, trong thông báo đó sẽ có chứa một
Missiongì đó (ví dụ như "Kick ass Thanos" chẳng hạn ).
). - Một ứng dụng bằng android để nhận các thông báo này, sau đó hiển thị ra popup với các action để người dùng có thể chấp nhận hoặc từ chối
Missionđó.
Tạo ứng dụng android nhận thông báo
-
Tạo ứng dụng android và kết nối với
Firebase:Bước này các bạn làm tương tự như ở bài trước mình đã trình bày.
-
Xử lý nhận thông báo và hiển thị thông báo dưới dạng popup nổi trên màn hình:
Bạn cần tạo một service có tên là
MyFirebaseServicevàextendstừFirebaseMessagingServicenhư sau:public class MyFirebaseService extends FirebaseMessagingService { private static final String TAG = "FirebaseMsgService"; @Override public void onMessageReceived(RemoteMessage remoteMessage) { Log.d(TAG, "From: " + remoteMessage.getFrom()); sendNotification(remoteMessage.getData()); } @Override public void onNewToken(String token) { Log.d(TAG, "Refreshed token: " + token); sendRegistrationToServer(token); } private void sendRegistrationToServer(String token) { // TODO: Implement this method to save device token to Database. } // create Intent follow acction private Intent createIntent(String actionName, int notificationId, String mission) { Intent intent = new Intent(this, MissionActivity.class); intent.addFlags(Intent.FLAG_ACTIVITY_CLEAR_TOP); intent.setAction(actionName); intent.putExtra("NOTIFICATION_ID", notificationId); intent.putExtra("MISSION", mission); return intent; } private void sendNotification(Map data) { try { String name = (String) data.get("name"); String mission = (String) data.get("mission"); int status = Integer.parseInt((String) data.get("status")); int notificationId = new Random().nextInt(); String title = "Hi " + name + "! You have a new Mission!"; String message = "Mission: " + mission; Intent acceptIntent = createIntent(MissionActivity.ACCEPT_ACTION, notificationId, mission); Intent rejectIntent = createIntent(MissionActivity.REJECT_ACTION, notificationId, mission); Intent intent = createIntent(MissionActivity.SHOW_ACTION, notificationId, mission); PendingIntent pendingIntent = PendingIntent.getActivity(this, 0, intent, PendingIntent.FLAG_UPDATE_CURRENT); String channelId = getString(R.string.project_id); Uri defaultSoundUri = RingtoneManager.getDefaultUri(RingtoneManager.TYPE_NOTIFICATION); NotificationCompat.Builder notificationBuilder = new NotificationCompat.Builder(this, channelId) .setSmallIcon(R.drawable.ic_launcher_background) .setLargeIcon(BitmapFactory.decodeResource(getResources(), R.drawable.ic_launcher_background)) .setContentTitle(title) .setStyle(new NotificationCompat.BigTextStyle().bigText(message)) .setAutoCancel(true) .setSound(defaultSoundUri) .setContentIntent(pendingIntent) .setDefaults(Notification.DEFAULT_ALL) .setPriority(NotificationManager.IMPORTANCE_HIGH) .addAction(new NotificationCompat.Action( android.R.drawable.sym_call_missed, "Reject", PendingIntent.getActivity(this, 0, rejectIntent, PendingIntent.FLAG_CANCEL_CURRENT))) .addAction(new NotificationCompat.Action( android.R.drawable.sym_call_outgoing, "Accept", PendingIntent.getActivity(this, 0, acceptIntent, PendingIntent.FLAG_CANCEL_CURRENT))); NotificationManager notificationManager = (NotificationManager) getSystemService(Context.NOTIFICATION_SERVICE); // Since android Oreo notification channel is needed. if (Build.VERSION.SDK_INT >= Build.VERSION_CODES.O) { NotificationChannel channel = new NotificationChannel( channelId, "Channel human readable title", NotificationManager.IMPORTANCE_DEFAULT); notificationManager.createNotificationChannel(channel); } notificationManager.notify(notificationId, notificationBuilder.build()); } catch (Exception e) { e.printStackTrace(); } } }Mình sẽ giải thích sơ cho các bạn về các method ở trên nhé:
onMessageReceived(): đây là phương thức xử lý nhận thông báo từFirebasegửi về. Như mình đã nói ở trên (cũng như ở bài trước) là thông báo dạngData messagesluôn được phương thứconMessageReceived()xử lý dù ứng dụng ở trạng tháiForegroundhayBackground. Vì vậy mình sẽ xử lý nhận thông báo và hiển thị lên popup nổi ở đây.onNewToken()vàsendRegistrationToServer(): Khi một thiết bị cài đặt ứng dụng thì nó sẽ sinh ra một device_token trong methodonNewToken()và đăng kí nó vớiFirebase.Firebasesẽ dựa vào các token này để gửi thông báo đến các thiết bị. Bạn cần lưu ý rằng token này rất quan trọng nếu bạn muốn gửi thông báo từ Web -> App. Bạn nên lưu token này vào Database của bạn để sử dụng cho việc gửi thông báo từ Web.sendNotification(): đây là phương thức xử lý hiển thị thông báo nổi dạng popup trên màn hình thiết bị. Lưu ý: nếu bạn gửi thông báo đến thiết bị thành công nhưng nó chỉ hiển thị ở thanh trạng thái mà không hiển thị popup nổi trên màn hình thì bạn cần vào setting của thiết bị và cấp quyền hiển thị thông báo cho ứng dụng.
createIntent(): phương thức này xử lý tạo các intent tương ứng với các action mà bạn thực hiện với popup thông báo (click button Accept, Reject hoặc click thẳng vào thông báo).
Tiếp theo bạn cần đăng ký service này trong
AndroidManifest.xml:<service android:name=".Services.MyFirebaseService"> <intent-filter> <action android:name="com.google.firebase.MESSAGING_EVENT" /> </intent-filter> </service> -
Tạo một activity xử lý hiển thị thông tin tương ứng với các action của popup thông báo
Tạo activity có tên là
MissionActivitynhư sau:public class MissionActivity extends AppCompatActivity { public static final String ACCEPT_ACTION = "Accept"; public static final String REJECT_ACTION = "Reject"; public static final String SHOW_ACTION = "Show"; private Intent intent; private TextView tvMissionContent; private TextView tvMissionStatus; private Button btnAccept; private Button btnReject; private LinearLayout layoutAction; @Override protected void onCreate(Bundle savedInstanceState) { super.onCreate(savedInstanceState); setContentView(R.layout.activity_mission); mappingWidgets(); hideNotification(); process(); } private void mappingWidgets() { intent = getIntent(); tvMissionContent = findViewById(R.id.tvMissionContent); tvMissionStatus = findViewById(R.id.tvMissionStatus); btnAccept = findViewById(R.id.btnAccept); btnReject = findViewById(R.id.btnReject); tvMissionContent.setText(intent.getStringExtra("MISSION")); layoutAction = findViewById(R.id.layoutAction); layoutAction.setVisibility(LinearLayout.INVISIBLE); btnAccept.setOnClickListener(new View.OnClickListener() { @Override public void onClick(View v) { layoutAction.setVisibility(LinearLayout.INVISIBLE); acceptMission(); } }); btnReject.setOnClickListener(new View.OnClickListener() { @Override public void onClick(View v) { layoutAction.setVisibility(LinearLayout.INVISIBLE); rejectMission(); } }); } private void process() { String action = intent.getAction(); if (action == null) { return; } switch (action) { case ACCEPT_ACTION: acceptMission(); break; case SHOW_ACTION: showMission(); break; case REJECT_ACTION: rejectMission(); break; default: finish(); break; } } private void hideNotification() { NotificationManager manager = (NotificationManager) getSystemService(NOTIFICATION_SERVICE); manager.cancel(getIntent().getIntExtra("NOTIFICATION_ID", -1)); } private void acceptMission() { tvMissionStatus.setText("Accepted"); tvMissionStatus.setTextColor(Color.GREEN); Toast.makeText(this, "You have been accepted this mission!", Toast.LENGTH_LONG).show(); } private void showMission() { layoutAction.setVisibility(LinearLayout.VISIBLE); tvMissionStatus.setText("Waiting"); tvMissionStatus.setTextColor(Color.CYAN); } private void rejectMission() { tvMissionStatus.setText("Rejected"); tvMissionStatus.setTextColor(Color.RED); Toast.makeText(this, "You have been rejected this mission!", Toast.LENGTH_LONG).show(); } }Tạo layout
activity_missioncủaMissionActivitytrong folderres/layout:<?xml version="1.0" encoding="utf-8"?> <LinearLayout xmlns:android="http://schemas.android.com/apk/res/android" xmlns:app="http://schemas.android.com/apk/res-auto" xmlns:tools="http://schemas.android.com/tools" android:layout_width="match_parent" android:layout_height="match_parent" tools:context="vinhbb96er.cntt.com.notificationdemo.MainActivity"> <LinearLayout android:layout_width="match_parent" android:layout_height="wrap_content" android:orientation="vertical" android:gravity="center" android:layout_gravity="center"> <TextView android:layout_width="wrap_content" android:layout_height="wrap_content" android:text="Mission:" android:textColor="#0e70ef" android:textSize="20dp"/> <TextView android:id="@+id/tvMissionContent" android:layout_width="wrap_content" android:layout_height="wrap_content"/> <TextView android:layout_width="wrap_content" android:layout_height="wrap_content" android:text="Status:" android:textColor="#0e70ef" android:textSize="20dp" android:layout_marginTop="20dp"/> <TextView android:id="@+id/tvMissionStatus" android:layout_width="wrap_content" android:layout_height="wrap_content"/> <LinearLayout android:id="@+id/layoutAction" android:layout_width="match_parent" android:layout_height="wrap_content" android:orientation="horizontal" android:gravity="center" android:layout_marginTop="30dp" android:layout_marginLeft="15dp" android:layout_marginRight="15dp"> <Button android:id="@+id/btnReject" android:layout_width="120dp" android:layout_height="wrap_content" android:paddingTop="10dp" android:paddingBottom="10dp" android:paddingLeft="20dp" android:paddingRight="20dp" android:text="Reject" android:drawableLeft="@android:drawable/sym_call_missed" android:background="@drawable/border_radius_red_button" android:textColor="#fff" android:layout_marginRight="20dp" android:textAllCaps="false"/> <Button android:id="@+id/btnAccept" android:layout_width="120dp" android:layout_height="wrap_content" android:paddingTop="10dp" android:paddingBottom="10dp" android:paddingLeft="20dp" android:paddingRight="20dp" android:text="Accept" android:drawableLeft="@android:drawable/sym_call_outgoing" android:background="@drawable/border_radius_green_button" android:textColor="#fff" android:textAllCaps="false"/> </LinearLayout> </LinearLayout> </LinearLayout>Tạo 2 layout cho button Accept và Reject trong folder
res/drawable:border_radius_green_button:<?xml version="1.0" encoding="utf-8"?> <shape xmlns:android="http://schemas.android.com/apk/res/android" android:shape="rectangle"> <corners android:radius="25dp" /> <solid android:color="#17d117" /> <stroke android:width="1dip" android:color="#4af563" /> </shape>border_radius_red_button:<?xml version="1.0" encoding="utf-8"?> <shape xmlns:android="http://schemas.android.com/apk/res/android" android:shape="rectangle"> <corners android:radius="25dp" /> <solid android:color="#f23838" /> <stroke android:width="1dip" android:color="#f76868" /> </shape>
Okie vậy là ứng dụng nhận thông báo của chúng ta đã xong


Tạo một web (php) đơn giản để gửi thông báo
-
Bạn cần tạo một trang view với một form đơn giản gồm có:
- 2 trường là Name và Mission
- 1 button Send Mission để submit form.
(Khá đơn giản nên các bạn tự tạo nhé
 )
) -
Xử lý gửi thông báo dạng
Data messagesđếnFirebase:function sendNotification($devicesToken, $data) { $messages = [ 'registration_ids' => $devicesToken, 'data' => $data, ]; $headers = [ 'Authorization: key=' . 'YOUR_FIRE_BASE_SERVER_KEY', 'Content-Type: application/json', ]; $ch = curl_init(); curl_setopt($ch, CURLOPT_URL, 'https://fcm.googleapis.com/fcm/send'); curl_setopt($ch, CURLOPT_POST, true); curl_setopt($ch, CURLOPT_HTTPHEADER, $headers); curl_setopt($ch, CURLOPT_RETURNTRANSFER, true); curl_setopt($ch, CURLOPT_SSL_VERIFYPEER, false); curl_setopt($ch, CURLOPT_POSTFIELDS, json_encode($messages)); $result = curl_exec($ch); curl_close($ch); if ($result === FALSE) { throw new Exception('FCM Send Error: ' . curl_error($ch), 500); } }Các bạn dùng function trên để gửi thông báo đến
Firebase, trong đó:YOUR_FIRE_BASE_SERVER_KEY: Firebase server key ứng dụng của bạn. Bạn cần vào Firebase console -> chọn project -> Project setting -> Cloud Messaging để lấy server key này.$devicesToken: đây là một array chứa danh sách các device_token của các thiết bị mà bạn muốn gửi thông báo đến. Token này sinh ra từ methodonNewToken()mà mình đã nói ở trên. Nếu ở trên bạn đã lưu các token nào vào Database thì ở đây bạn chỉ cần lấy chúng ra thôi.$devicesTokensẽ có dạng như sau:$devicesToken = [ 'device_token_1', 'device_token_2', 'device_token_3', .... ];$data: đây là một array chứa dữ liệu (dạng key - value) của thông báo mà bạn muốn gửi đi. Ở đây mình sẽ lấy từ form và nó có sẽ dạng như sau:$data = [ 'name' => 'Peter Paker', 'mission' => 'Kick ass Thanos!', 'status' => 0, ];
Demo
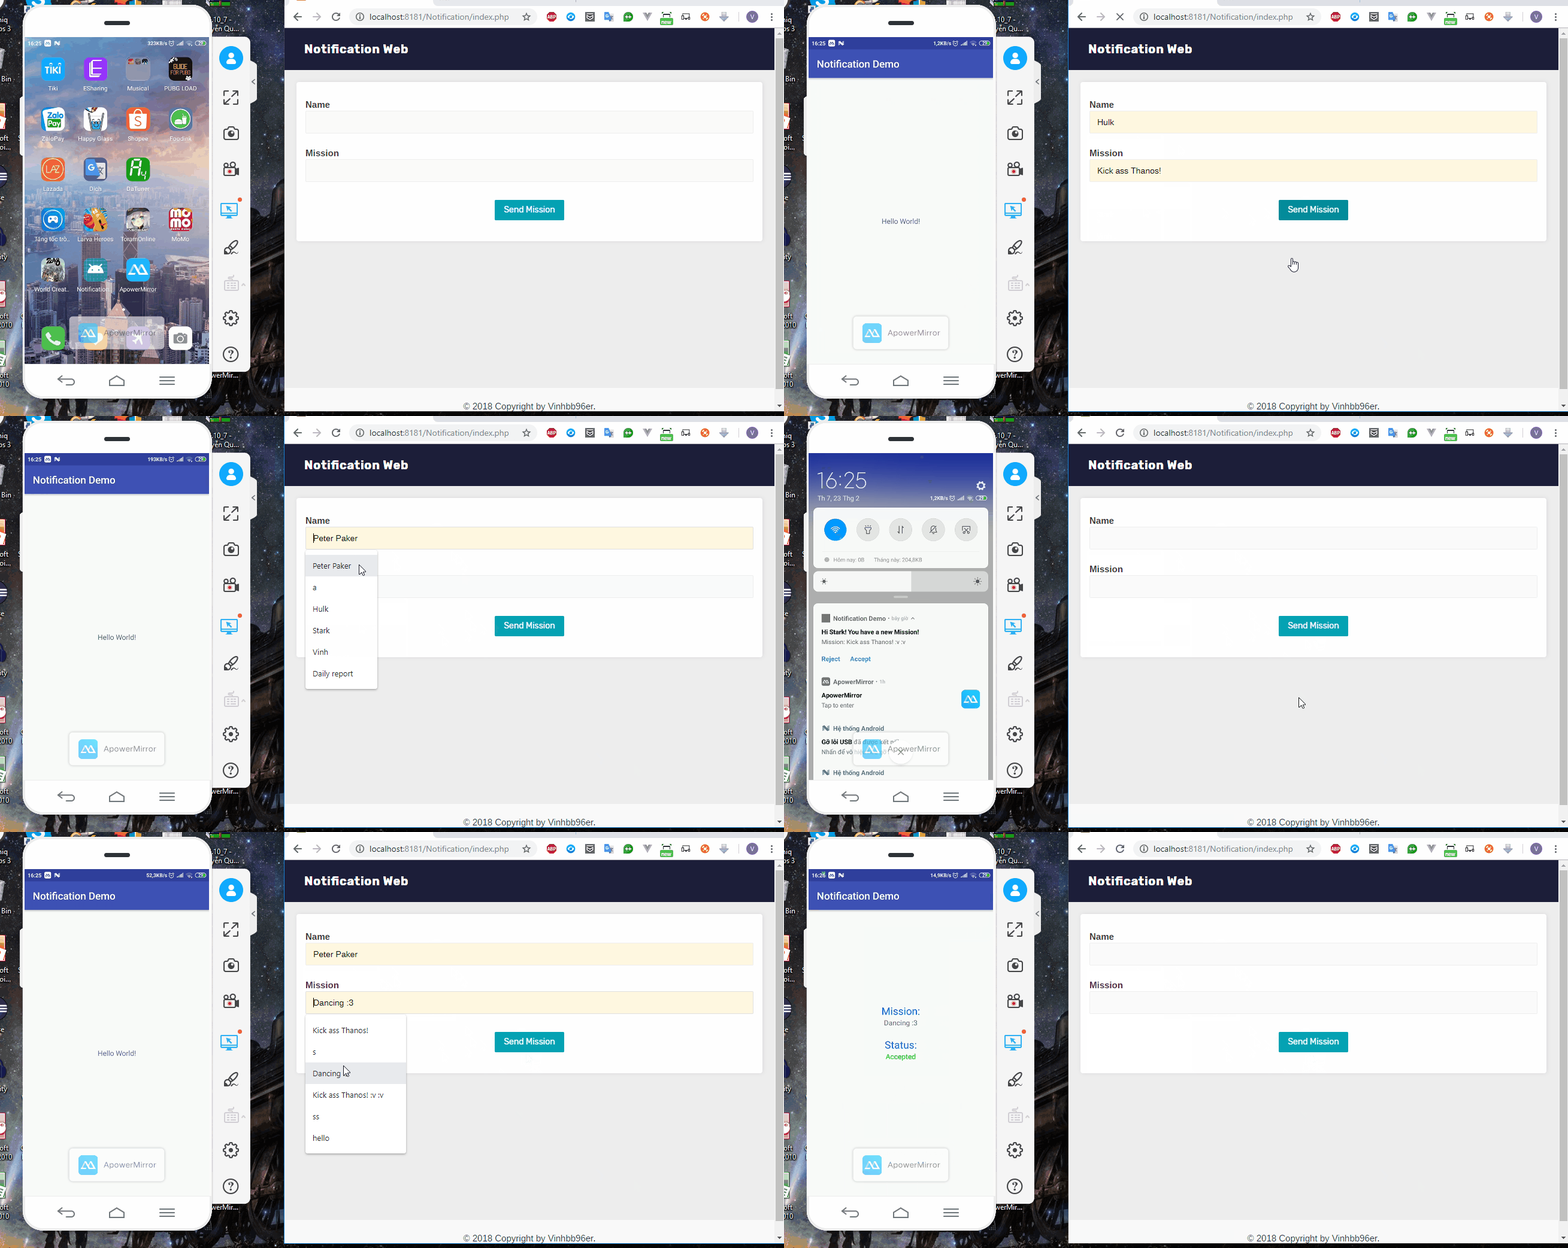
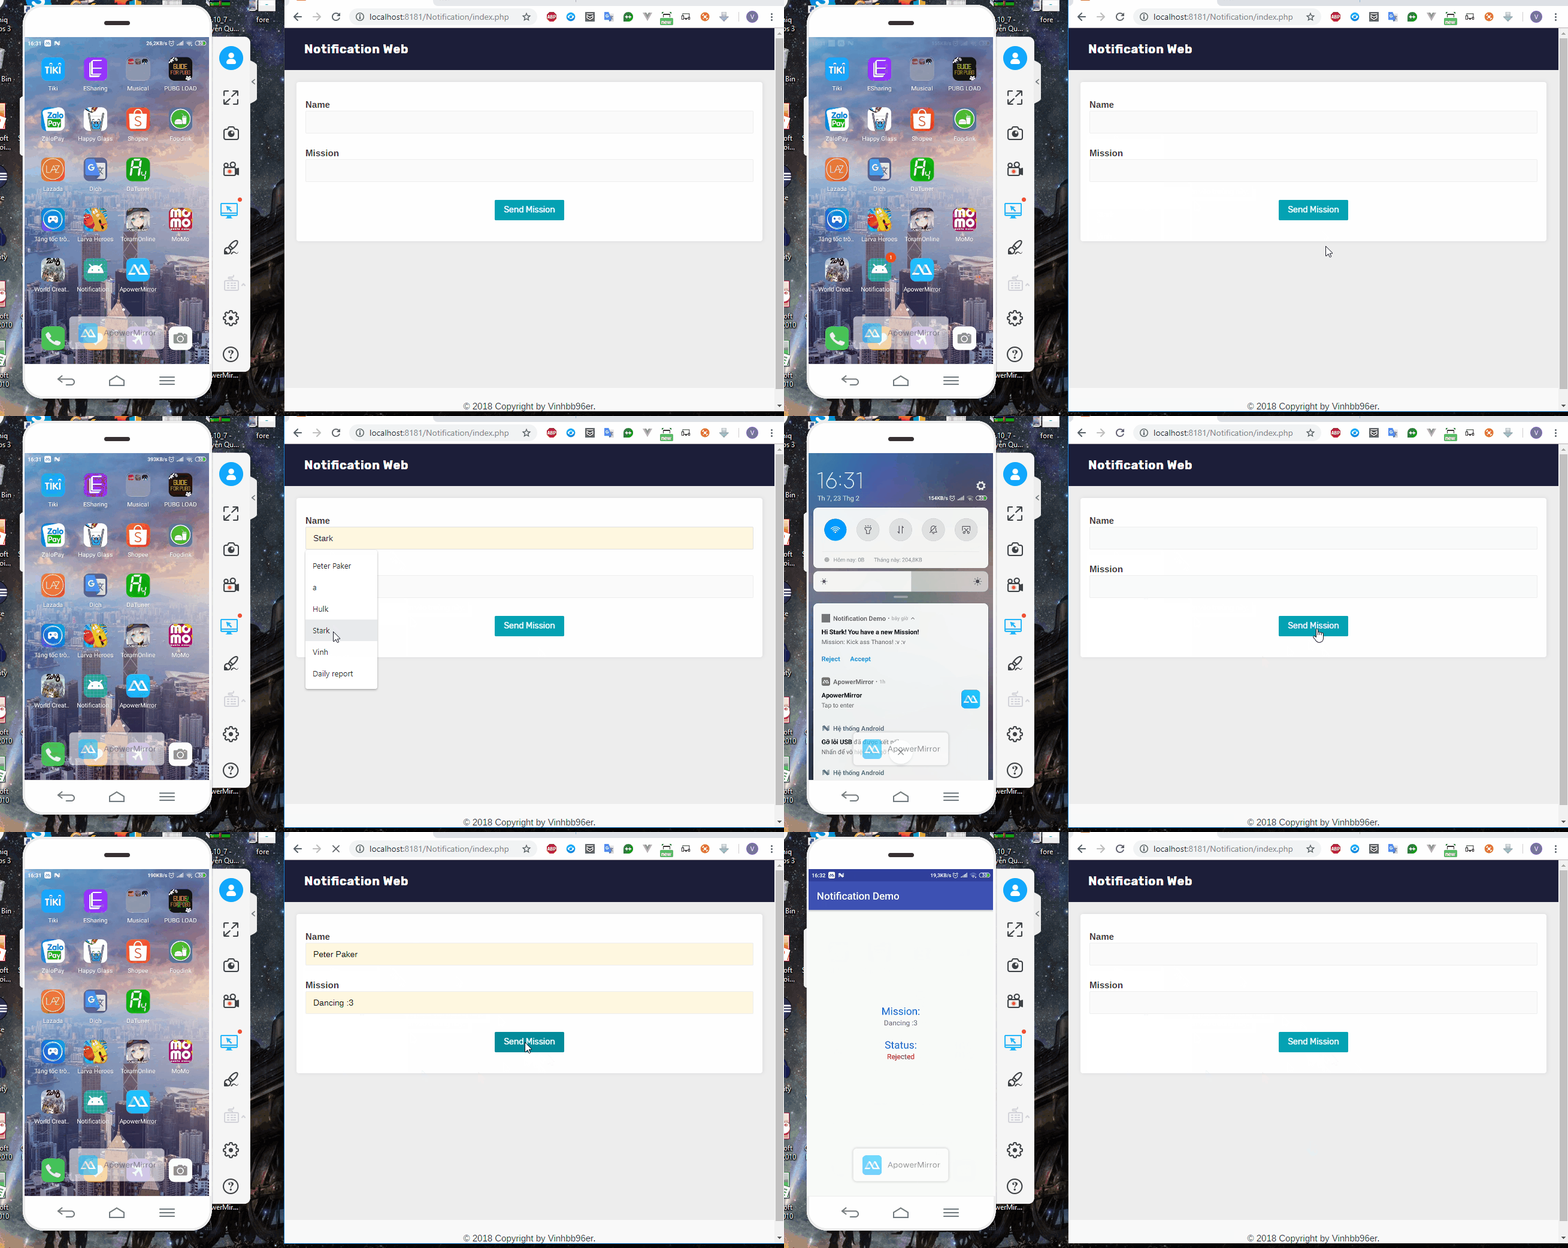
Cũng như bài trước, bài này mình cũng sẽ thực hiện gửi thông báo Data messages với ứng dụng nhận ở hai trạng thái là Foreground và Background để các bạn có thể so sánh, tuy nhiên lần này hình ảnh demo sẽ sinh động hơn nhiều 

1. Ứng dụng ở trạng thái Foreground:

2. Ứng dụng ở trạng thái Background:

Bạn có thể thấy rõ, dù ứng dụng đang ở trạng thái Foreground hay Background thì popup thông báo nổi cũng đều giống nhau, điều này chứng tỏ cả hai trạng thái khi nhận thông báo đều qua phương thức onMessageReceived() xử lý. Đây cũng chính là đặc điểm của loại thông báo Data messages trong Firebase Cloud Messaging, khác với thông báo dạng Notification messages mình đã giới thiệu với các bạn ở bài viết trước.
Kết luận
Qua hai bài viết, mình đã giới thiệu cho các bạn về Firebase Cloud Messaging nói chung và 2 loại thông báo của nó là Notification messages và Data messages nói riêng. Chắc các bạn đã hiểu cách thức gửi và xử lý nhận từng loại thông báo thông qua các ứng dụng đơn giản mình đã trình bày. Vì vậy, tùy vào mục đích sử dụng cũng như ứng dụng của bạn mà lựa chọn loại thông báo thích hợp nhé. Ngoài ra, các bạn cũng có thể sử dụng kết hợp cả 2 loại thông báo này trong ứng dụng của mình.
Hy vọng bài viết của mình sẽ giúp ích cho các bạn, đặc biệt là những bạn newbie như mình. 
Tham khảo
All rights reserved