Xây dựng nhanh một trang quản lý dữ liệu (Admin page) trong Laravel với Laravel Grid
Bài đăng này đã không được cập nhật trong 6 năm
Giới thiệu
Chào mọi người, hôm nay mình sẽ giới thiệu cho các bạn một package của Laravel giúp cho việc tạo một trang quản lý dữ liệu (admin page) một cách cực kỳ nhanh chóng với đầy đủ các chức năng cơ bản (search, view, create, edit, delete, sort, ...) với một giao diện khá ổn. Package đó chính là Laravel grid, chúng ta cùng tìm hiểu nó nhé 
Cài đặt
Bạn cần mở terminal lên và chạy câu lệnh sau để cài đặt:
composer require leantony/laravel-grid "~2.0"
Yêu cầu: Package này yêu cầu một số thư viện, package liên quan như:
- Laravel 5.5+
- Bootstrap 4 (Nếu bạn dùng Bootstrap 3 thì bạn có thể cài package với version 1.0, tuy nhiên version này có thể bị thiếu mất một vài chức năng).
- Jquery
- Jquery pjax
- Date picker (tùy chọn - dành cho các bộ lọc (filter) theo ngày tháng)
- Các pakage dành cho việc export csv, xls, pdf,... như
Maatwebsite/Laravel-Excel,barryvdh/laravel-dompdf,... nếu bạn có sử dụng chức năng export dữ liệu.
Sau khi cài đặt xong, bạn hãy chạy lệnh sau để publish file config ra ngoài:
php artisan vendor:publish --provider="Leantony\Grid\Providers\GridServiceProvider"
Bạn có thể thêm tùy chọn --tag=value ở lệnh trên với value là assets, views, config để publish các file tương ứng, trong trường hợp bạn muốn custom lại.
Sử dụng
Mình sẽ tiến hành tạo một ứng dụng quản lý học sinh đơn giản với Laravel 5.8 và Laravel grid.
Tạo Migration, Fake dữ liệu và tạo Model
Đầu tiên mình sẽ tạo một table students với các trường: id, name, age, email, code và tiến hành fake khoảng 1000 dữ liệu cho bảng này (việc tạo table và fake dữ liệu trong Laravel khá đơn giản nên các bạn tự làm nhé).
Tạo Model: Tạo một model Student đơn giản cho table ở trên như sau:
<?php

namespace App\Models;

use Illuminate\Database\Eloquent\Model;

class Student extends Model
{
    protected $fillable = [
        'name',
        'email',
        'age',
        'code'
    ];
}
Tạo và đăng ký Grid
Tạo Grid:
Tiếp theo bạn cần chạy lệnh sau để tạo Grid cho model App\Models\Student ở trên:
php artisan make:grid --model="App\Models\User"
Lệnh này sẽ tạo cho bạn 2 file StudentsGrid và StudentsGridInterface trong folder app\Grids:
<?php

namespace App\Grids;

use Leantony\Grid\GridInterface;

interface StudentsGridInterface extends GridInterface
{
    //
}
<?php

namespace App\Grids;

use Closure;
use Leantony\Grid\Grid;

class StudentsGrid extends Grid implements StudentsGridInterface
{
    /**
     * The name of the grid
     *
     * @var string
     */
    protected $name = 'Students';

    /**
     * List of buttons to be generated on the grid
     *
     * @var array
     */
    protected $buttonsToGenerate = [
        'create',
        'view',
        'delete',
        'refresh',
        'export'
    ];

    /**
     * Specify if the rows on the table should be clicked to navigate to the record
     *
     * @var bool
     */
    protected $linkableRows = false;

    /**
    * Set the columns to be displayed.
    *
    * @return void
    * @throws \Exception if an error occurs during parsing of the data
    */
    public function setColumns()
    {
        $this->columns = [
		    "id" => [
		        "label" => "ID",
		        "filter" => [
		            "enabled" => true,
		            "operator" => "="
		        ],
		        "styles" => [
		            "column" => "grid-w-10"
		        ]
		    ],
		    "name" => [
		        "search" => [
		            "enabled" => true
		        ],
		        "filter" => [
		            "enabled" => true,
		            "operator" => "like"
		        ]
		    ],
		    "email" => [
		        "search" => [
		            "enabled" => true
		        ],
		        "filter" => [
		            "enabled" => true,
		            "operator" => "="
		        ]
		    ],
		    "age" => [
		        "search" => [
		            "enabled" => true
		        ],
		        "filter" => [
		            "enabled" => true,
		            "operator" => "="
		        ]
		    ],
		    "code" => [
		        "search" => [
		            "enabled" => true
		        ],
		        "filter" => [
		            "enabled" => true,
		            "operator" => "="
		        ]
		    ],
		    "created_at" => [
		        "sort" => false,
		        "date" => "true",
		        "filter" => [
		            "enabled" => true,
		            "type" => "date",
		            "operator" => "<="
		        ]
		    ]
		];
    }

    /**
     * Set the links/routes. This are referenced using named routes, for the sake of simplicity
     *
     * @return void
     */
    public function setRoutes()
    {
        // searching, sorting and filtering
        $this->setIndexRouteName('students.index');

        // crud support
        $this->setCreateRouteName('students.create');
        $this->setViewRouteName('students.show');
        $this->setDeleteRouteName('students.destroy');

        // default route parameter
        $this->setDefaultRouteParameter('id');
    }

    /**
    * Return a closure that is executed per row, to render a link that will be clicked on to execute an action
    *
    * @return Closure
    */
    public function getLinkableCallback(): Closure
    {
        return function ($gridName, $item) {
            return route($this->getViewRouteName(), [$gridName => $item->id]);
        };
    }

    /**
    * Configure rendered buttons, or add your own
    *
    * @return void
    */
    public function configureButtons()
    {
        // call `addRowButton` to add a row button
        // call `addToolbarButton` to add a toolbar button
        // call `makeCustomButton` to do either of the above, but passing in the button properties as an array

        // call `editToolbarButton` to edit a toolbar button
        // call `editRowButton` to edit a row button
        // call `editButtonProperties` to do either of the above. All the edit functions accept the properties as an array
    }

    /**
    * Returns a closure that will be executed to apply a class for each row on the grid
    * The closure takes two arguments - `name` of grid, and `item` being iterated upon
    *
    * @return Closure
    */
    public function getRowCssStyle(): Closure
    {
        return function ($gridName, $item) {
            // e.g, to add a success class to specific table rows;
            // return $item->id % 2 === 0 ? 'table-success' : '';
            return "";
        };
    }
}
Giống với cấu trúc của Respository design pattern trong Laravel, bạn sẽ định nghĩa tên các phương thức bạn cần dùng ở StudentsGridInterface và implement chúng trong StudentsGrid. Ở trong file StudentsGrid, bạn có thể:
-
Tùy chọn các button chức năng trong view với thuộc tính
$buttonsToGenerate. -
function
setColumns()sẽ là nơi thiết lập các trường sẽ hiển thị trên view với một số tùy chọn là:label: Tên hiển thị của trường đó trên view.filter: Bạn có thể bật tắt bộ lọc ở mỗi trường với tuỳ chọnenabled, tùy chọnoperatorlà để thiết lập toán tử được sử dụng khi lọc dữ liệu (ví dụ như=,<=,<,like, .....), còn tùy chọntypelà để thiết lập loại của bộ lọc (ví dụ:date- lọc theo ngày tháng bằng datetimepicker,daterange- lọc theo khoảng ngày tháng với daterangepicker)styles: Thiết lập các class name để tùy chỉnh css cho các hàng, cột dữ liệu.sort: Thiết lập chức năng sắp xếp dữ liệu theo trường (giá trị mặc định là true).
-
function
setRoutes()sẽ là nơi thiết lập các router cho các action view, create, delete,... -
function
getRowCssStyle()sẽ giúp bạn tùy chỉnh giao diện cho các hàng của bảng dữ liệu. Ví dụ nếu bạn trả vềreturn $item->id % 2 === 0 ? 'table-success' : '';thì có nghĩa là sẽ thêm classtable-successvào các hàng chẵn của bảng dữ liệu.
Đăng ký Grid: Tương tự như kiến trúc Repository pattern thì để sử dụng Grid này bạn cần đăng ký nó trong Providers. Bạn hãy chạy lệnh sau để tạo riêng một provider dùng cho Grid:
php artisan make:provider GridServiceProvider
Sau khi tạo providers xong bạn cần đăng ký Grid của mình trong function register() như sau:
<?php

namespace App\Providers;

use Illuminate\Support\ServiceProvider;

class GridServiceProvider extends ServiceProvider
{
    /**
     * Register services.
     *
     * @return void
     */
    public function register()
    {
        $this->app->bind('App\Grids\StudentsGridInterface', 'App\Grids\StudentsGrid');
    }

    /**
     * Bootstrap services.
     *
     * @return void
     */
    public function boot()
    {
        //
    }
}
Cuối cùng bạn cần đăng ký GridServiceProvider của mình vào file config\app.php:
'providers' => [
    ...
    App\Providers\GridServiceProvider::class,
]
Tạo View
Tạo file layout.blade.php chứa layout chung và import các package, thư viện cần thiết mà mình đã đề cập ở đầu bài viết (ở đây thì mình sẽ dùng link cdn cho đơn giản nhé )
<!DOCTYPE html>
<html lang="en">
<head>
    <meta charset="UTF-8">
    <meta name="csrf-token" content="{{ csrf_token() }}">
    <meta name="viewport" content="width=device-width, user-scalable=no, initial-scale=1.0, maximum-scale=1.0, minimum-scale=1.0">
    <meta http-equiv="X-UA-Compatible" content="ie=edge">
    <title>My application</title>
    <!-- font awesome (required) -->
    <link rel="stylesheet" href="https://cdnjs.cloudflare.com/ajax/libs/font-awesome/4.7.0/css/font-awesome.css" />
    <!-- progress bar (not required, but cool) -->
    <link rel="stylesheet" href="https://cdnjs.cloudflare.com/ajax/libs/nprogress/0.2.0/nprogress.css" />
    <!-- bootstrap (required) -->
    <link rel="stylesheet" href="https://stackpath.bootstrapcdn.com/bootstrap/4.1.1/css/bootstrap.min.css" />
    <!-- date picker (required if you need date picker & date range filters) -->
    <link rel="stylesheet" type="text/css" href="https://cdn.jsdelivr.net/npm/daterangepicker/daterangepicker.css"/>
    <!-- grid's css (required) -->
    <link rel="stylesheet" type="text/css" href="{{ asset('vendor/leantony/grid/css/grid.css') }}" />
</head>
<body>

<nav class="navbar navbar-expand-sm bg-primary navbar-dark">
    <ul class="navbar-nav">
        <li class="nav-item">
            <a class="navbar-brand" href="/">My appliation</a>
        </li>
    </ul>
</nav>

<div class="container" style="margin: 30px auto;">
    <div class="row">
        @yield('content')
    </div>
</div>

<!-- modal container (required if you need to render dynamic bootstrap modals) -->
@include('leantony::modal.container')

<!-- progress bar js (not required, but cool) -->
<script src="https://cdnjs.cloudflare.com/ajax/libs/nprogress/0.2.0/nprogress.min.js"></script>
<!-- moment js (required by datepicker library) -->
<script src="https://cdnjs.cloudflare.com/ajax/libs/moment.js/2.22.1/moment.min.js"></script>
<!-- jquery (required) -->
<script src="https://cdnjs.cloudflare.com/ajax/libs/jquery/3.3.1/jquery.min.js"></script>
<!-- popper js (required by bootstrap) -->
<script src="https://unpkg.com/popper.js/dist/umd/popper.min.js"></script>
<!-- bootstrap js (required) -->
<script src="https://stackpath.bootstrapcdn.com/bootstrap/4.1.1/js/bootstrap.min.js"></script>
<!-- pjax js (required) -->
<script src="https://cdnjs.cloudflare.com/ajax/libs/jquery.pjax/2.0.1/jquery.pjax.min.js"></script>
<!-- datepicker js (required for datepickers) -->
<script type="text/javascript" src="https://cdn.jsdelivr.net/npm/daterangepicker/daterangepicker.min.js"></script>
<!-- required to supply js functionality for the grid -->
<script src="{{ asset('vendor/leantony/grid/js/grid.js') }}"></script>
<script>
    $.ajaxSetup({
        headers: {
            'X-CSRF-TOKEN': $('meta[name="csrf-token"]').attr('content')
        }
    });

    // for the progress bar (required for progress bar functionality)
    $(document).on('pjax:start', function () {
        NProgress.start();
    });
    $(document).on('pjax:end', function () {
        NProgress.done();
    });
</script>
</body>
</html>
Tạo file view students/index.blade.php:
@extends('layout')

@section('content')
    {!! $grid !!}
@endsection
{!! $grid !!} sẽ là nơi bảng dữ liệu (students) được render ra.
Tạo một modal students/student_modal.blade.php dành cho việc show, edit và create student:
{!! Modal::start($modal) !!}
    <div class="form-group row">
        <label for="input_name" class="col-sm-2 col-form-label">Name:</label>
        <div class="col-sm-10">
            <input type="text" class="form-control" id="input_name" name="name"
                placeholder="Enter name" value="{{ isset($student) ? $student->name : old('name')}}">
        </div>
    </div>
    <div class="form-group row">
        <label for="input_email" class="col-sm-2 col-form-label">Email:</label>
        <div class="col-sm-10">
            <input type="email" class="form-control" id="input_email"
                name="email" placeholder="Enter email" value="{{ isset($student) ? $student->email : old('email')}}">
        </div>
    </div>
    <div class="form-group row">
        <label for="input_age" class="col-sm-2 col-form-label">Age:</label>
        <div class="col-sm-10">
            <input type="number" class="form-control" id="input_age"
                name="age" placeholder="Enter age" value="{{ isset($student) ? $student->age : old('age')}}">
        </div>
    </div>
    <div class="form-group row">
        <label for="input_code" class="col-sm-2 col-form-label">Code:</label>
        <div class="col-sm-10">
            <input type="text" class="form-control" id="input_code"
                name="code" placeholder="Enter student code" value="{{ isset($student) ? $student->code : old('code')}}">
        </div>
    </div>
{!! Modal::end() !!}
Tạo Controller
Tiếp theo bạn cần tạo một resource controller là StudentController với nội dung như sau:
<?php

namespace App\Http\Controllers;

use Illuminate\Http\Request;
use App\Models\Student;
use App\Grids\StudentsGridInterface;
use Illuminate\Http\JsonResponse;

class StudentController extends Controller
{
    /**
     * Display a listing of the resource.
     *
     * @param StudentsGridInterface $usersGrid
     * @param Request $request
     * @return \Illuminate\Http\Response
     */
    public function index(StudentsGridInterface $usersGrid, Request $request)
    {
        // the 'query' argument needs to be an instance of the eloquent query builder
        // you can load relationships at this point
        return $usersGrid
            ->create([
                'query' => Student::query(),
                'request' => $request
            ])
            ->renderOn('students.index'); // render the grid on the welcome view
    }

    /**
     * Show the form for creating a new resource.
     *
     * @param Request $request
     * @return \Illuminate\Http\Response
     * @throws \Throwable
     */
    public function create(Request $request)
    {
        $modal = [
            'model' => class_basename(Student::class),
            'route' => route('students.store'),
            'action' => 'create',
            'pjaxContainer' => $request->get('ref'),
        ];

        return view('students.student_modal', compact('modal'))->render();
    }

    /**
     * Store a newly created resource in storage.
     *
     * @param  \Illuminate\Http\Request $request
     * @return JsonResponse|\Illuminate\Http\Response
     */
    public function store(Request $request)
    {
        $this->validate($request, [
            'name' => 'required',
            'email' => 'required|email|unique:students',
            'age' => 'required|integer',
            'code' => 'required|unique:students'
        ]);

        $student = Student::query()->create($request->all());

        return new JsonResponse([
            'success' => true,
            'message' => 'New student has been created.'
        ]);
    }

    /**
     * Display the specified resource.
     *
     * @param  int $id
     * @param Request $request
     * @return \Illuminate\Http\Response
     * @throws \Throwable
     */
    public function show($id, Request $request)
    {
        $student = Student::query()->findOrFail($id);

        $modal = [
            'model' => class_basename(User::class),
            'route' => route('students.update', $student->id),
            'pjaxContainer' => $request->get('ref'),
            'method' => 'patch',
            'action' => 'update'
        ];

        return view('students.student_modal', compact('modal', 'student'))->render();
    }

    /**
     * Show the form for editing the specified resource.
     *
     * @param  int $id
     * @return \Illuminate\Http\Response
     */
    public function edit($id)
    {
        //
    }

    /**
     * Update the specified resource in storage.
     *
     * @param  \Illuminate\Http\Request $request
     * @param  int $id
     * @return JsonResponse|\Illuminate\Http\Response
     */
    public function update(Request $request, $id)
    {
        $this->validate($request, [
            'name' => 'required',
            'email' => 'required|email|unique:students,id,' . $id,
            'age' => 'required|integer',
            'code' => 'required|unique:students,id,' . $id,
        ]);

        $status = Student::query()->findOrFail($id)->update($request->all());

        if ($status) {
            return new JsonResponse([
                'success' => true,
                'message' => 'Update student successfully.'
            ]);
        }

        return new JsonResponse(['success' => false], 400);
    }

    /**
     * Remove the specified resource from storage.
     *
     * @param  int $id
     * @return JsonResponse|\Illuminate\Http\Response
     * @throws \Exception
     */
    public function destroy($id)
    {
        $status = Student::query()->findOrFail($id)->delete();

        return new JsonResponse([
            'success' => $status,
            'message' => 'Delete student successfully.'
        ]);
    }
}
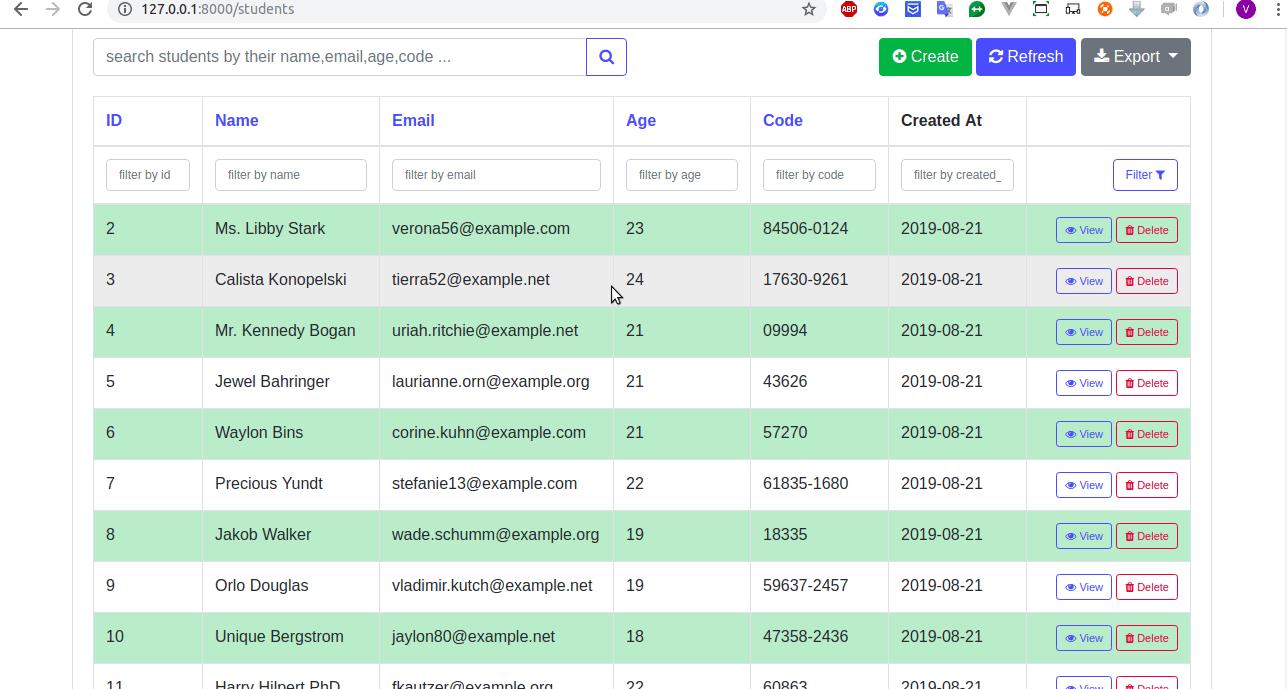
Vậy là các bạn đã tạo xong một trang quản lý dữ liệu học sinh đơn giản, giờ thì chạy ứng dụng lên để xem thành quả thôi
Demo
Kết luận
Qua bài viết này mình đã giới thiệu cho các bạn một Package hữu ích giúp cho bạn tạo nhanh một trang quản lý dữ liệu với giao diện khá ổn và có đầy đủ các chức năng cơ bản như view, search, edit, delete, filter,...
Hy vọng bài viết của mình sẽ có ích cho các bạn.
Tham khảo
All rights reserved
