Phần 3: Basic View
Bài đăng này đã không được cập nhật trong 8 năm
Project 5: Tip Caculator
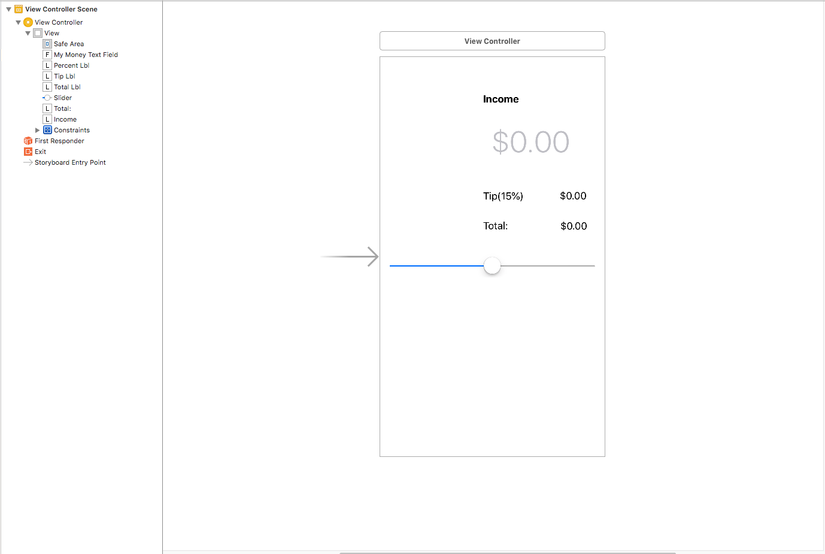
Tạo mới 1 project và tạo giao diện như sau cho ứng dụng
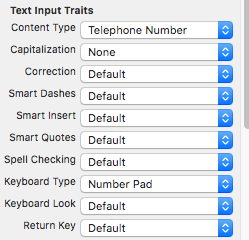
Lưu ý: ở Content type của Text Field chọn Telephone Number để bàn phím chỉ hiện số khi nhập Income
Gồm có Text Field, Label, Slider và kéo Outlet và Action cho chúng
    @IBOutlet weak var myMoneyTextField: UITextField!
    @IBOutlet weak var tipLbl: UILabel!
    @IBOutlet weak var percentLbl: UILabel!
    @IBOutlet weak var totalLbl: UILabel!
    @IBOutlet weak var slider: UISlider!
    @IBAction func sliderAction(_ sender: Any) {}
Trong code, đầu tiên ở ViewDidLoad() ta cần làm những việc sau
Vừa mở view lên thì focus luôn vào text field để người dùng nhập icome luôn: self.myMoneyTextField.becomeFirstResponder()
Set giá trị mặc địch ban đầu cho Slider là 0.15: self.slider.setValue(0.15, animated: true) (giá trị này trùng với phần tip ở giao diện đang là 15 %)
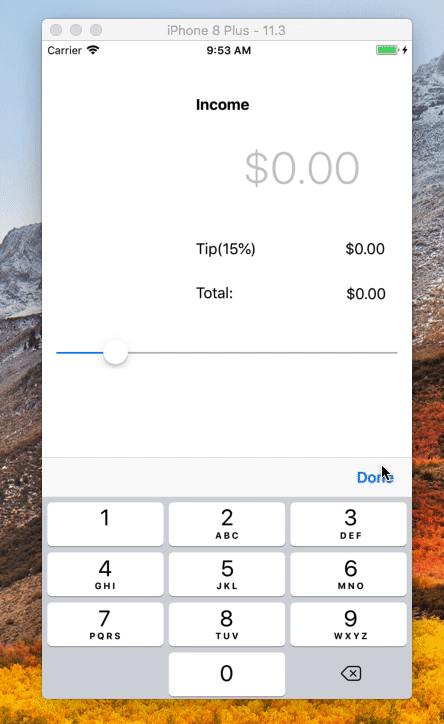
Add done button cho keyboard: self.addDoneButtonOnKeyboard()
Và ta viết luôn hàm add done button cho keyboard
    func addDoneButtonOnKeyboard()
    {
        let doneToolbar: UIToolbar = UIToolbar(frame: CGRect.init(x: 0, y: 0, width: UIScreen.main.bounds.width, height: 50))
        doneToolbar.barStyle = .default

        let flexSpace = UIBarButtonItem(barButtonSystemItem: .flexibleSpace, target: nil, action: nil)
        let done: UIBarButtonItem = UIBarButtonItem(title: "Done", style: .done, target: self, action: #selector(self.doneButtonAction))

        let items = [flexSpace, done]
        doneToolbar.items = items
        doneToolbar.sizeToFit()

        self.myMoneyTextField.inputAccessoryView = doneToolbar
    }
Viết Hàm doneButtonAction
    @objc func doneButtonAction()
    {
        self.myMoneyTextField.resignFirstResponder()
    }
khi ấn done thì bàn phím sẽ tắt
Ở Action của Slider
if myMoneyTextField.text == "" {
            let alert = UIAlertController(title: "Alert", message: "Please enter your income", preferredStyle: .alert)
            alert.addAction(UIAlertAction(title: "OK", style: .default, handler: nil))
            self.present(alert, animated: true, completion: nil)
        } else {
            let myMoneyFloat = (myMoneyTextField.text! as NSString).floatValue
            let percentTipString = String(format: "%.2f", slider.value)
            let percentTipFloat = (percentTipString as NSString).floatValue
            percentLbl.text = String(format: "Tip (%.f%%)", percentTipFloat * 100)
            tipLbl.text = "$\(myMoneyFloat * percentTipFloat)"
            totalLbl.text = "$\(myMoneyFloat * percentTipFloat + myMoneyFloat)"
        }
Trong đó check nếu text field chưa có giá trị thì sẽ bật lên 1 Alert thông báo và yêu cầu người dùng nhập Income. Nếu có Income rồi thì sẽ thực hiện tính toán và hiển thị thông tin lên
Cuối cùng ta chạy ứng dụng và xem kết quả
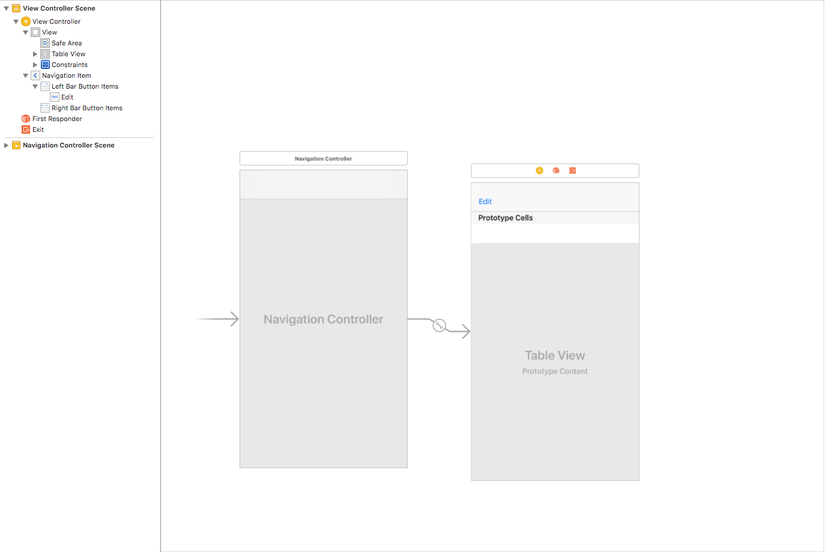
Project 6: Basic Table View
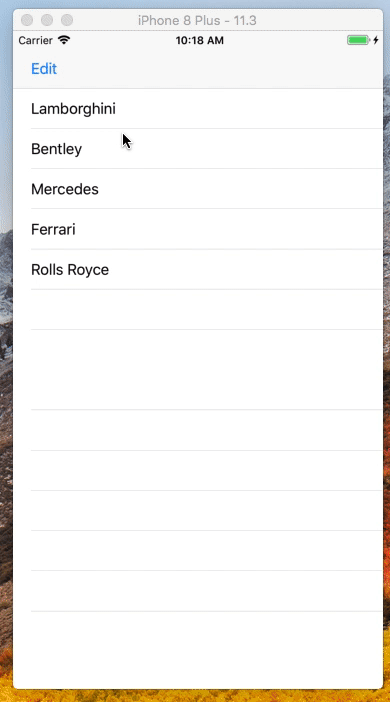
Ở phần giao diện, ứng dụng này chỉ có 1 tableView và 1 bar button item
Lưu ý: ở TableViewCell cần đặt Identifier để sử dụng dequeueReusableCell trong vần code

ở đây mình để Identifier là "myCell", để tên gì cũng đc nhưng cần có ý nghĩa của cell và phải trùng với identifier khi mình gọi đến ở phần sau
Chúng cần đc tạo Outlet và Action
    @IBOutlet weak var tableView: UITableView!
    @IBAction func editAction(_ sender: Any) {}
Ở phần code Đầu tiên cần có dữ liệu để hiển thị lên TableView
var dataSource = ["Lamborghini", "Bentley", "Mercedes", "Ferrari", "Rolls Royce"]
ở đây ta có một mảng String để hiển thị lên TableView
Trong viewDidLoad() cần set dataSource và delegate của TableView cho chính viewController hiện tại để hiện thị dữ liệu cũng như dùng các delegate của TableView
        self.tableView.dataSource = self
        self.tableView.delegate = self
Tiếp đến là viết action cho bar button Edit, mỗi khi ấn vào sẽ bật hoặc tắt editing mode của TableView
if tableView.isEditing {
            tableView.setEditing(false, animated: true)
        } else {
            tableView.setEditing(true, animated: true)
        }
check được hiện tại TableView của mình đang on hay off editing mode qua thuộc tính isEditing
Sau đó implement protocol UITableViewDataSource để hiển thị dữ liệu
extension ViewController: UITableViewDataSource {
    func tableView(_ tableView: UITableView, numberOfRowsInSection section: Int) -> Int {
        return dataSource.count
    }

    func tableView(_ tableView: UITableView, cellForRowAt indexPath: IndexPath) -> UITableViewCell {
        let cell = tableView.dequeueReusableCell(withIdentifier: "myCell", for: indexPath)
        cell.textLabel?.text = dataSource[indexPath.row]
        return cell
    }
}
Sau cùng là implement protocol UITableViewDelegate để xử lý khi xóa 1 cột
extension ViewController: UITableViewDelegate {
    func tableView(_ tableView: UITableView, commit editingStyle: UITableViewCellEditingStyle, forRowAt indexPath: IndexPath) {
        if editingStyle == .delete {
            dataSource.remove(at: indexPath.row)
            tableView.deleteRows(at: [indexPath], with: .automatic)
        }
    }

    func tableView(_ tableView: UITableView, canEditRowAt indexPath: IndexPath) -> Bool {
        return true
    }
}
Mình viết riêng mỗi khi implement protocol ở extension riêng để dễ phân biệt khi có nhiều protocol cần implement mà nhìn code cũng thấy gọn gàng hơn
Tất cả đã xong, bây giờ bạy chạy ứng dụng để thấy thành quả của mình nào 
Peaceeee!
All rights reserved
