Awesome Notification - Bài 1: Tìm hiểu về Awesome Notification và cách Push Notification trên thiết bị Android
Bài đăng này đã không được cập nhật trong 3 năm
Chào các bạn, Notification là thứ không thể thiếu trong 1 ứng dụng di động. Notification giúp ứng dụng thông tin tới user nhanh chóng, giúp user cập nhật những thông tin quan trọng, tin tức, sự kiện mới nhất. Tùy theo những lĩnh vực khác nhau Notification sẽ thúc đẩy doanh số bán hành, thông tin giao dịch,… Hôm nay chúng ta cùng nhau tìm hiểu về Notification và triển khai 1 mô hình gửi thông báo đơn giản nhé.
1. Khái niệm cơ bản
Thông thường Notification gồm những loại chính sau:
- Push notification: là dạng message mà bạn nhận được từ 1 remote server ngay cả khi không mở ứng dụng (những thông báo bạn nhận hàng ngày trên thanh thông báo).
- Local notification: cũng giống push notification nhưng là cục bộ được cài đặt, schedule gửi từ chính thiết bị đó. Ví dụ: nhắc nhở chấm công, đặt lịch cố định hàng ngày…
- In-app Notification: khác với 2 loại trên. In-app notification được gửi từ 1 remote server xuất hiện khi mở ứng dụng. Ví dụ: những popup khuyến mãi, chương trình flash sale,.. khi vừa mở app.
Push notification lại được chia làm 2 loại, tùy setting:
- Standard Push notification: những thông báo dạng text thông thường.
- Rich Push notification: những thông báo có kèm hình ảnh, nút CTA, textfield,..
Trong phạm vi bài viết này, mình sẽ cùng nhau tìm hiểu về Push notification với package awesome notification nhé.
2. Vì sao mình lại lựa chọn Awesome notifications
Trong phần lớn trường hợp, việc sử dụng firebase_messaging dường như đã đáp ứng những nhu cầu gửi notifications đến 1 ứng dụng. Tuy nhiên, để tùy biến nhiều hơn thì awesome_notifications là 1 lựa chọn hay ho vì:
- Tạo được Notification cục bộ trên Android, iOS bằng Flutter mà không cần dùng thêm package flutter_local_notification khi sử dụng firebase_messaging
- Thêm được images, sounds, emoticons, buttons và tùy biến nhiều layout trên thanh thông báo → Điểm cộng so với firebase_messaging (chỉ config được images, icon)
- Còn nhiều tính năng nữa, các bạn có thể tham khảo tại đây nhé
3. Triển khai 1 push notification cơ bản thôi nào!
Cài đặt package
flutter pub add awesome_notifications awesome_notifications_fcm firebase_core
- awesome_notifications: cái package awesome notification mình dùng nè.
- awesome_notifications_fcm: là 1 cái add-on, tích hợp vào để sử dụng Push notification từ Firebase Cloud Message.
- firebase_core: plugin Flutter để sử dụng API Firebase, cho phép kết nối với nhiều ứng dụng Firebase.
Android setup
- Trong thư mục "android/app/".
android {
    compileSdkVersion 33 // Cập nhật compileSdkVersion 33,

    defaultConfig {
        minSdkVersion 21 // Cập nhật minSdkVersion 21
        targetSdkVersion 33
        ...
    }
    ...
}
- Hãy chắc chắn là đã thêm “android:exported="true"” trong AndroidManifest.xml.
<manifest xmlns:android="http://schemas.android.com/apk/res/android"
    package="com.example.myapp">
   <application>
        ...
        <activity
            android:name=".MainActivity"
            ...
            android:exported="true"> // Kiểm tra chỗ này xem thử thêm chưa nhé
                ...
        </activity>
        ...
    </application>
</manifest>
Đến đây thì các bạn có thể dùng local notification được rồi nha. Tuy nhiên, để sử dụng Push notification ta cần setup thêm 1 xíu:
- Áp dụng Google Play Services vào project để sử dụng dịch vụ FCM. File nằm ở “android/build.gralde”
buildscript {
    ...
    dependencies {
        ...
        classpath 'com.google.gms:google-services:4.3.10'
        ...
    }
    ...
}
- Ở “android/app/build.gralde” apply plugin này:
apply plugin: 'com.google.gms.google-services'
4. Tạo project trên Firebase để Push notification
Để Push Notification đến thiết bị di dộng chúng ta cần tài khoản Firebase và enable Cloud Messaging. Các bước như sau:
- Đăng nhập vào Firebase.
- Go to console.
- Click vào + Add project và làm theo hướng dẫn để tạo project. Ở đây Package name mình sẽ dùng Package name của app mình đặt. Ví dụ “com.daq.flutterresearch”
- Sau khi tạo xong project thì Download file google-services.json rồi paste vào “android/app/src”.
- Nếu các bước trên chưa rõ chỗ nào thì các bạn có thể tham khảo link này để tạo & cấu hình Firebase account nha. Nhớ chọn Android nhé vì mình đang push notification trên Android.
- Sau khi hoàn thành các bước mình sẽ vào Project settings → Tab Cloud Messaging để kích hoạt FCM nhé
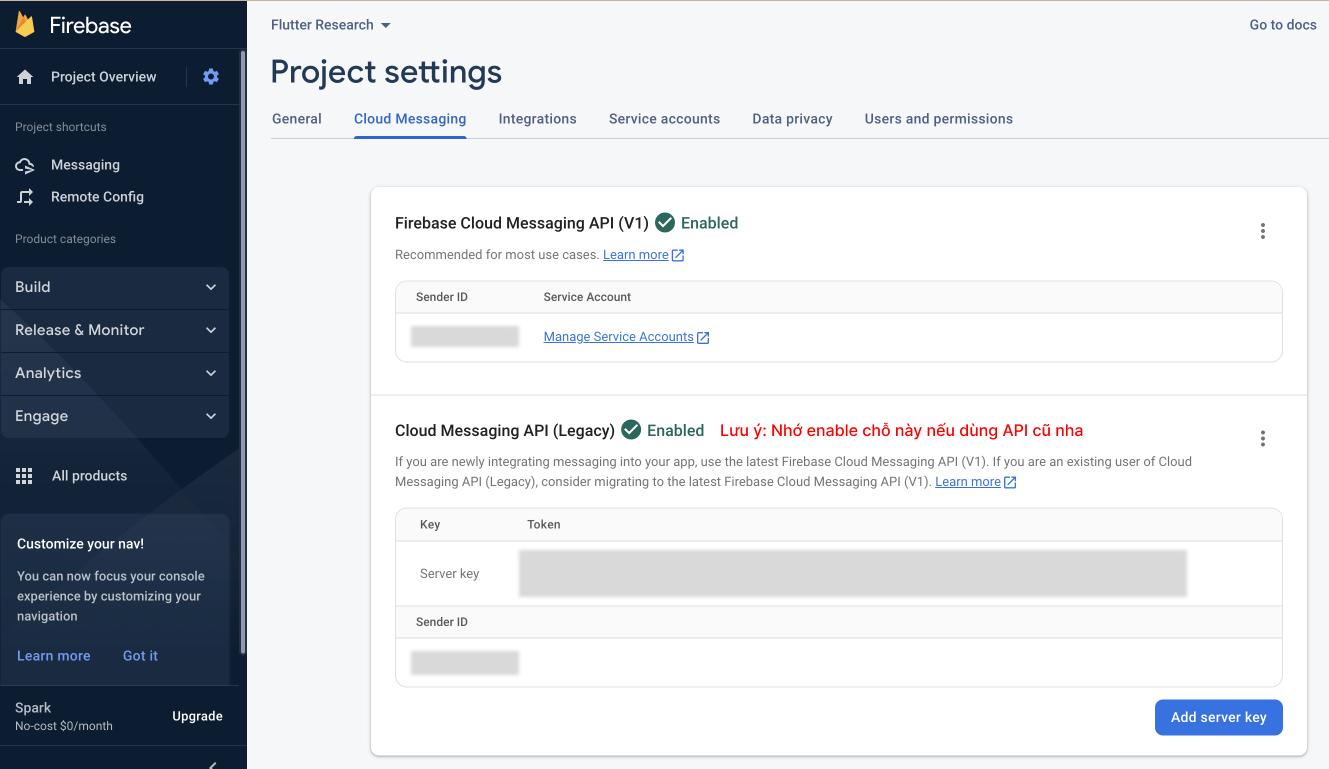
Cái server key xíu nữa mình sẽ dùng để push notification demo trên postman.
5. Thế là phần setup cơ bản đã xong. Vào code thôi nào!
Ở main.dart mình call 2 function để thực hiện việc khởi tạo ban đầu cho notification
void main() async {
  WidgetsFlutterBinding.ensureInitialized();

	// Initialize cho Local Notification
  await NotificationController.initializeLocalNotifications(debug: true);

	// Initialize cho Push Notification
	await NotificationController.initializeRemoteNotifications(debug: true);

  runApp(const MyApp());
}
- Tạo một class NotificationController để handle các function của Notification.
import 'package:awesome_notifications/awesome_notifications.dart';
import 'package:awesome_notifications_fcm/awesome_notifications_fcm.dart';
import 'package:firebase_core/firebase_core.dart';
import 'package:flutter/material.dart';
class NotificationController {
// Khởi tạo Local Notification ở đây với custom tùy thích
static Future<void> initializeLocalNotifications(
{required bool debug}) async {
await AwesomeNotifications().initialize(
null,
[
NotificationChannel(
channelKey: 'alerts',
channelName: 'Alerts',
channelDescription: 'Notification tests as alerts',
playSound: true,
importance: NotificationImportance.High,
defaultPrivacy: NotificationPrivacy.Private,
defaultColor: Colors.deepPurple,
ledColor: Colors.deepPurple)
],
debug: debug);
}
// Hàm này dùng để Khởi tạo Push Notification.
static Future<void> initializeRemoteNotifications(
{required bool debug}) async {
await Firebase.initializeApp();
await AwesomeNotificationsFcm().initialize(
// Handle Silent data
onFcmSilentDataHandle: NotificationController.mySilentDataHandle,
// Method này dùng để phát hiện khi nhận được fcm token mới.
onFcmTokenHandle: NotificationController.myFcmTokenHandle,
// Method này dùng để phát hiện khi nhận được native token mới.
onNativeTokenHandle: NotificationController.myNativeTokenHandle,
// Bài sau mình sẽ đi chi tiết hơn về 3 Method trên nhé.
// This license key is necessary only to remove the watermark for
// push notifications in release mode. To know more about it, please
// visit http://awesome-notifications.carda.me#prices
licenseKeys: null,
debug: debug);
}
// Chỗ này để lấy cái FCM Token của thiết bị nè.
Future<String> requestFirebaseToken() async {
if (await AwesomeNotificationsFcm().isFirebaseAvailable) {
try {
final token = await AwesomeNotificationsFcm().requestFirebaseAppToken();
print('==================FCM Token==================');
print(token);
print('======================================');
return token;
} catch (exception) {
debugPrint('$exception');
}
} else {
debugPrint('Firebase is not available on this project');
}
return '';
}
Future<void> checkPermission() async {
bool isAllowed = await AwesomeNotifications().isNotificationAllowed();
if (!isAllowed) {
await AwesomeNotifications().requestPermissionToSendNotifications();
}
}
// Hàm gọi Local notification khi nhấn nút Send notification trên ứng dụng
Future<void> localNotification() async {
String timezom = await AwesomeNotifications().getLocalTimeZoneIdentifier();
await AwesomeNotifications().createNotification(
content: NotificationContent(
id: 1,
channelKey: 'alerts',
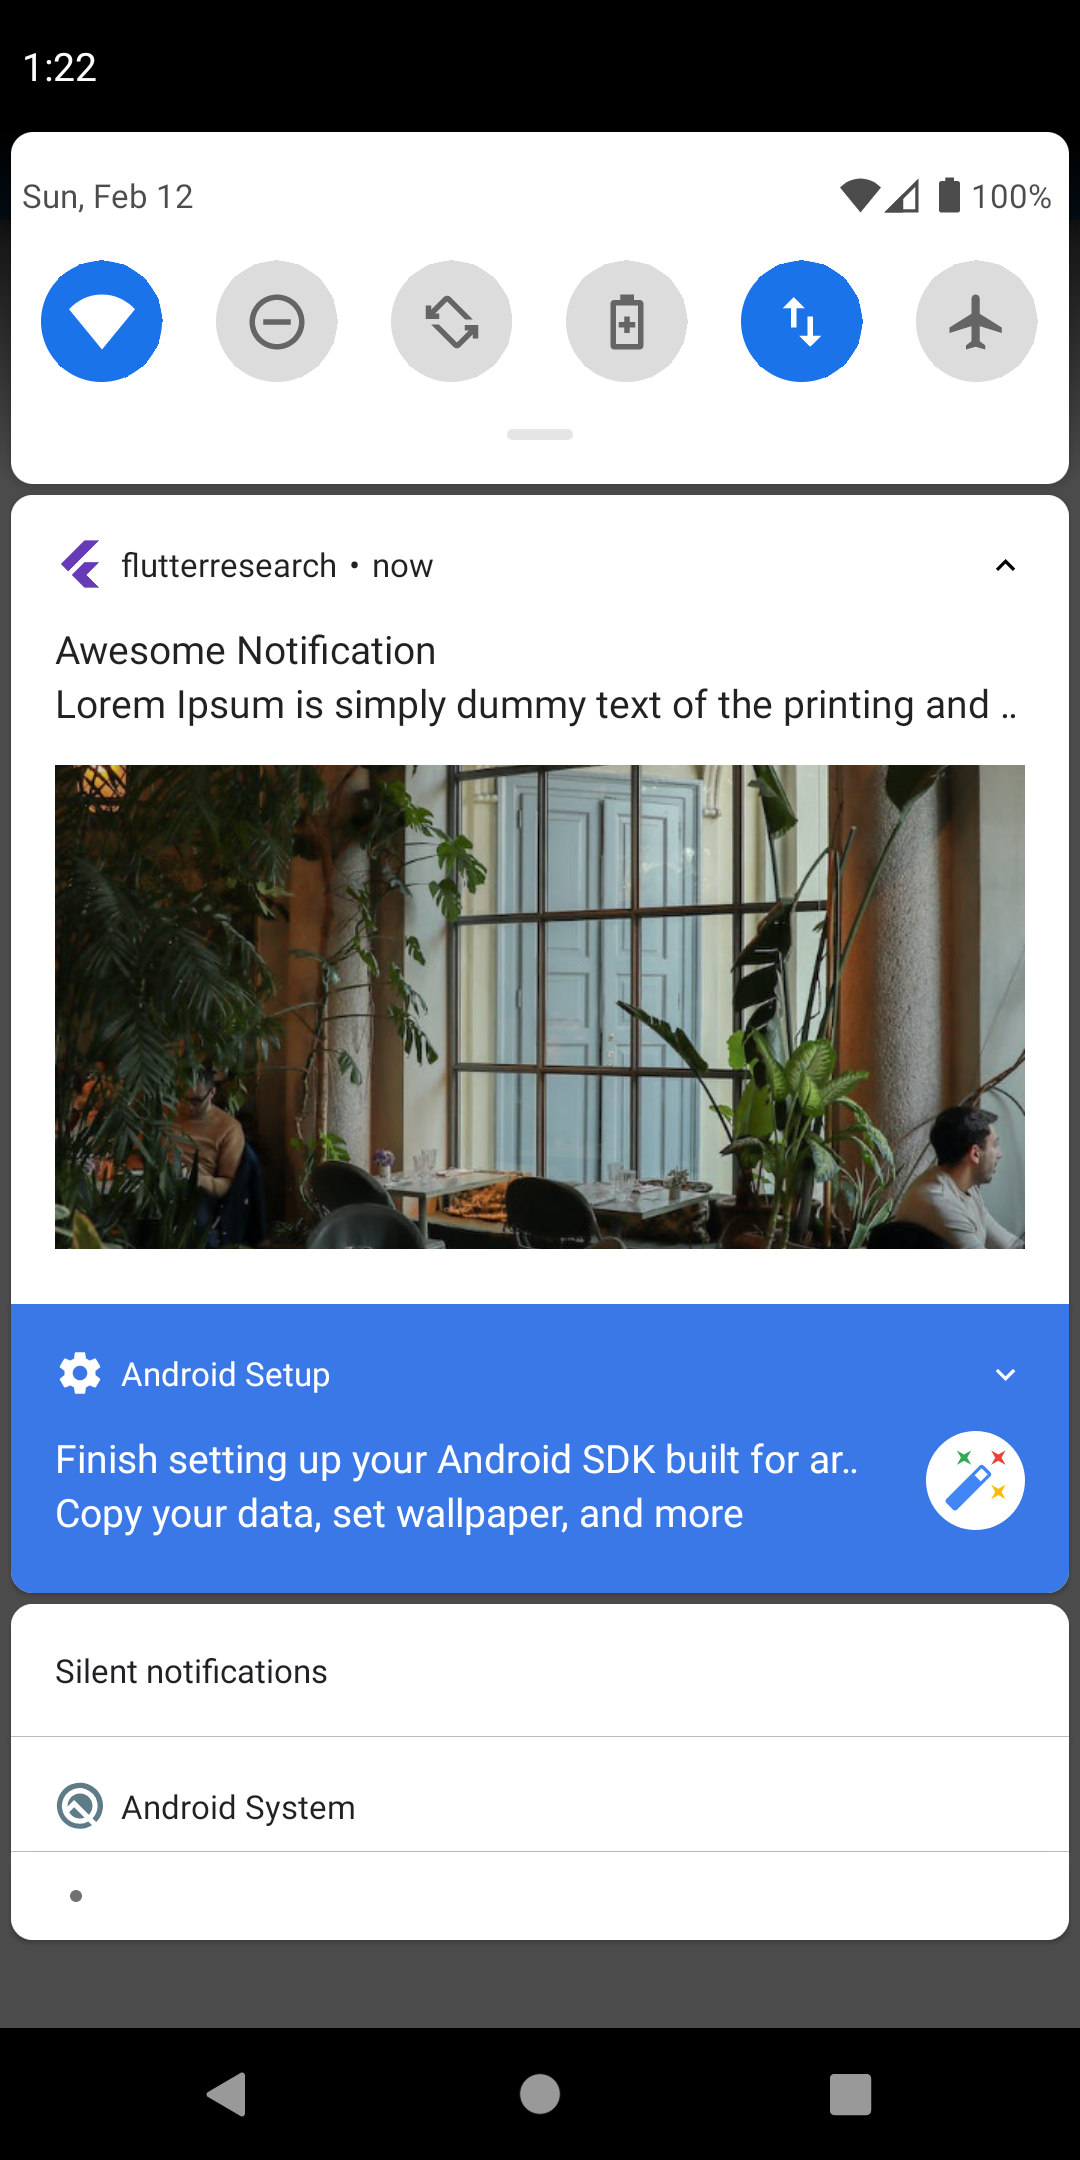
title: 'This is Notification',
// Thêm cái hình vào nhìn cho vui mắt :v
bigPicture:
'https://images.pexels.com/photos/14679216/pexels-photo-14679216.jpeg?auto=compress&cs=tinysrgb&w=1260&h=750&dpr=2',
notificationLayout: NotificationLayout.BigPicture,
),
);
}
/// Use this method to execute on background when a silent data arrives
/// (even while terminated)
("vm:entry-point")
static Future<void> mySilentDataHandle(FcmSilentData silentData) async {
print('"SilentData": ${silentData.toString()}');
if (silentData.createdLifeCycle != NotificationLifeCycle.Foreground) {
print("bg");
} else {
print("FOREGROUND");
}
print("starting long task");
await Future.delayed(Duration(seconds: 4));
final url = Uri.parse("http://google.com");
// final re = await http.get(url);
// print(re.body);
print("long task done");
}
/// Use this method to detect when a new fcm token is received
("vm:entry-point")
static Future<void> myFcmTokenHandle(String token) async {
debugPrint('FCM Token:"$token"');
}
/// Use this method to detect when a new native token is received
("vm:entry-point")
static Future<void> myNativeTokenHandle(String token) async {
debugPrint('Native Token:"$token"');
}
}
Như đoạn code trên, ta có khái niệm FCM token. Vậy nó là gì vậy nhỉ?
- Định nghĩa: FCM token là một chuỗi ký tự duy nhất được sử dụng để xác định thiết bị của người dùng trong hệ thống Firebase Cloud Messaging (FCM). Để gửi push notification đến thiết bị, ứng dụng cần truyền FCM token vào server của Firebase. Mỗi thiết bị sẽ có token riêng biệt, và token này sẽ thay đổi khi ứng dụng di động được cập nhật hoặc thiết bị được thay đổi. (đoạn này mình copy từ ChatGPT ra nè 😝)
→ Định nghĩa là thế, để dễ hình dung thì có hiểu đơn giản nó là 1 địa chỉ duy nhất của máy để cho Firebase gửi message đến. Muốn gửi thư thì cũng phải có chỗ nhận thư đúng không nào ✌️. Và mỗi app trên 1 thiết bị sẽ có 1 FCM token khác nhau. Nó sẽ bị thay thế khi ứng dụng bị gỡ ra rồi cài đặt lại.
- Ở màn hình home page. Tạo 1 nút để kiểm tra thử gửi Local Notification xem nó có hoạt động không nào
import 'package:flutterresearch/notification/notification_controller.dart';
class _MyHomePageState extends State<MyHomePage> {
final notifController = NotificationController();
void initState() {
super.initState();
// Kiểm tra xem thử có Notification permission chưa nè
notifController.checkPermission();
// Đoạn này gọi hàm để log ra cái FCM Token nè.
notifController.requestFirebaseToken();
}
Widget build(BuildContext context) {
return Scaffold(
appBar: AppBar(
title: Text(widget.title),
),
body: Center(
child: ElevatedButton(
onPressed: () {
// Gọi sự kiện gửi Notification
notifController.localNotification();
},
child: Icon(Icons.circle_notifications),
),
),
);
}
}
6. Kiểm tra Push Notification xem nó có hoạt động không nào!
Có 2 cách để gửi thông báo đến ứng dụng của bạn khi dùng Firebase Cloud Message.
- Gửi trực tiếp từ Messaging của Firebase.
- Gửi từ server của mình. (trong dự án thực tế sẽ ưu tiên dùng cách này hơn)
Cách 1: Gửi trực tiếp từ Messaging của Firebase.
- Thêm các thông tin cho thông báo như title, text, image,…
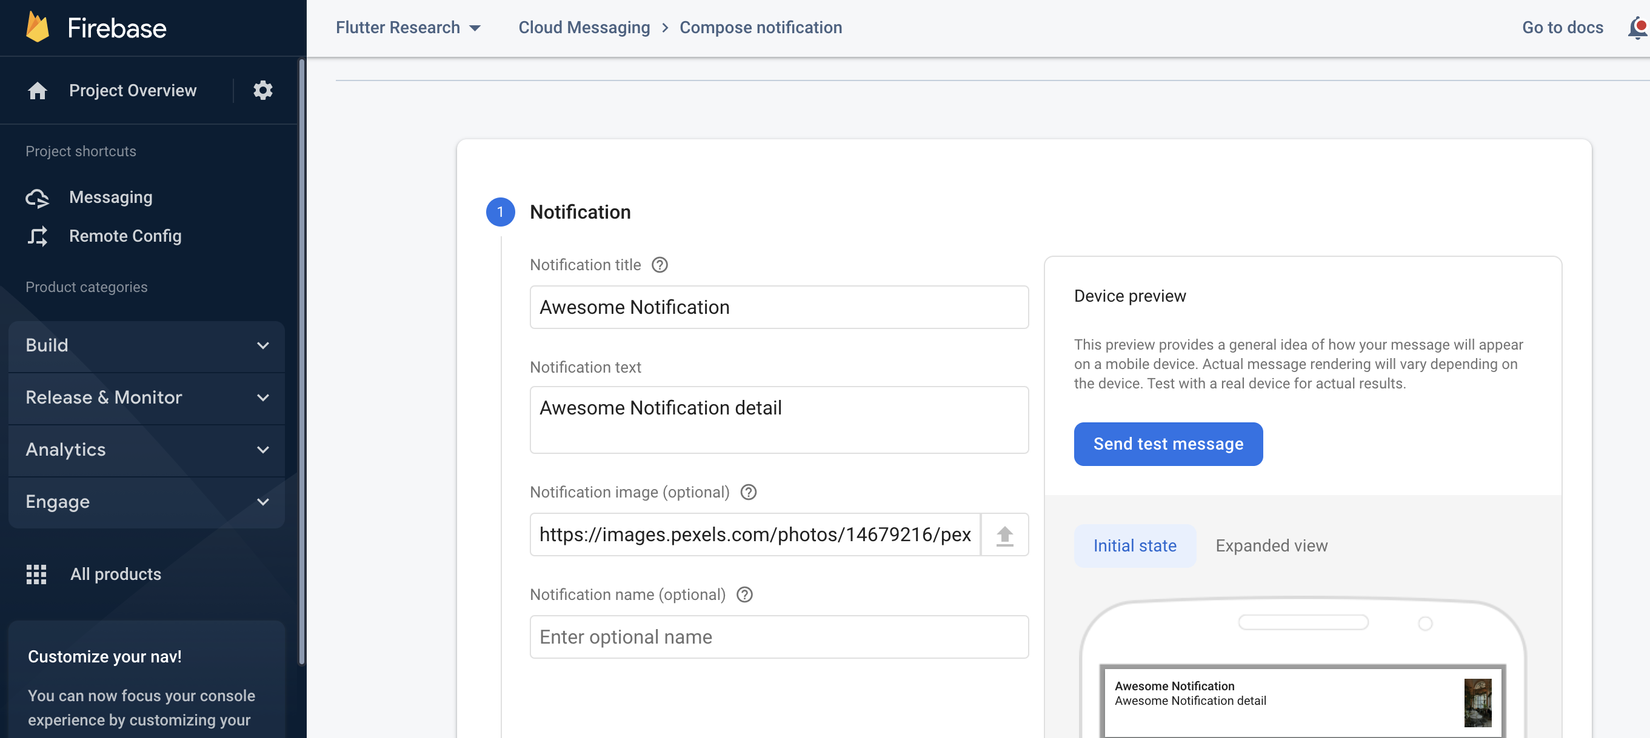
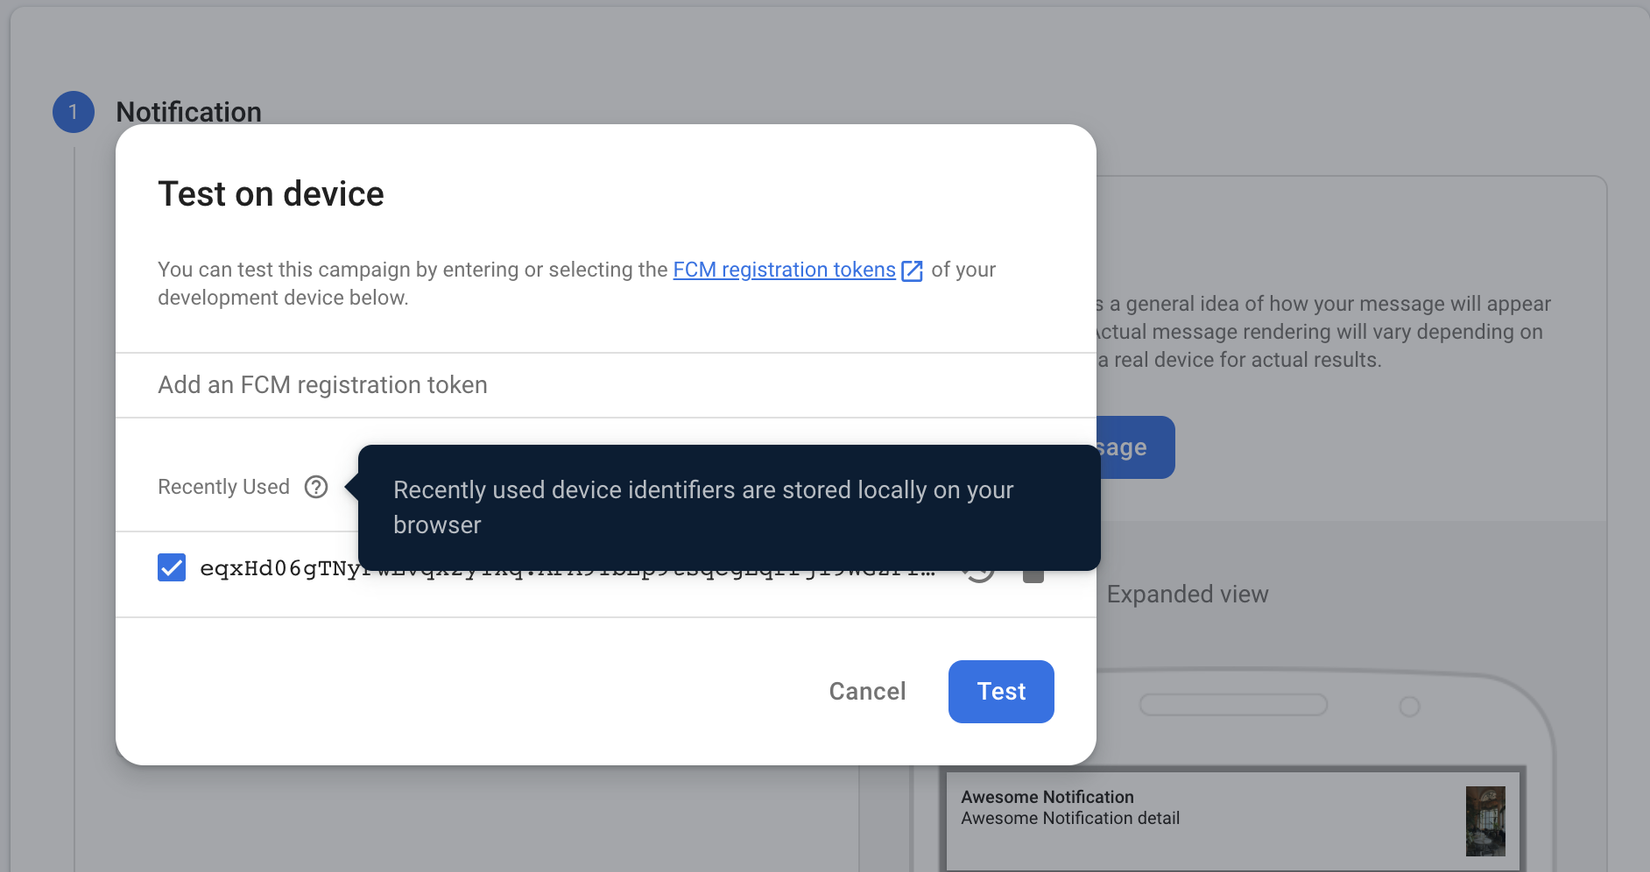
- Click vào nút Send test message bên phải. Paste cái FCM token lúc nãy mình mới log ra vào ô “Add an FCM registration token” → Click Test là xong → Kiểm tra xem thử ứng dụng có nhận thông báo chưa nhé.
Cách 2: Gửi từ server của mình. Để tiết kiệm thời gian mình sẽ dùng Postman test xem sao nhé.
Endpoint: [https://fcm.googleapis.com/fcm/send](https://fcm.googleapis.com/fcm/send)
 Method: POST
 Header:
     + Content-Type: application/json
     + Authorization: key=gắn cái server key lúc nãy trên Firebase Cloud Messaging API (Legacy) vào đây nhé.
Body:
{
        "registration_ids": [
    	// Gắn FCM token vào đây
                   "eqxHd06gTNyPwLvqx2y1Xq:APA91bEp9tsqcgEqrrjI9WGZPfNijw2eQHww8eWRvt5NZYxobiL7oBIu1w5a-pxX-n9sSs5J0TSy7pyZZ9Fi-vbYxsCbIiWhKQYQklNb5kj_hmm6yG0BakYAmIT0AD8gL3y2oGEMAbcn"
        ],
        "notification": {
            "body": "Lorem Ipsum is simply dummy text of the printing and typesetting industry. Lorem Ipsum has been the industry's standard",
            "title": "Awesome notification",
            "sound": true,
            "image": "https://images.pexels.com/photos/14679216/pexels-photo-14679216.jpeg?auto=compress&cs=tinysrgb&w=1260&h=750&dpr=2",
        },
        "data": {
            "content_type": "notification",
            "value": 2
        },
        "content_available": true,
        "priority": "high"
    }
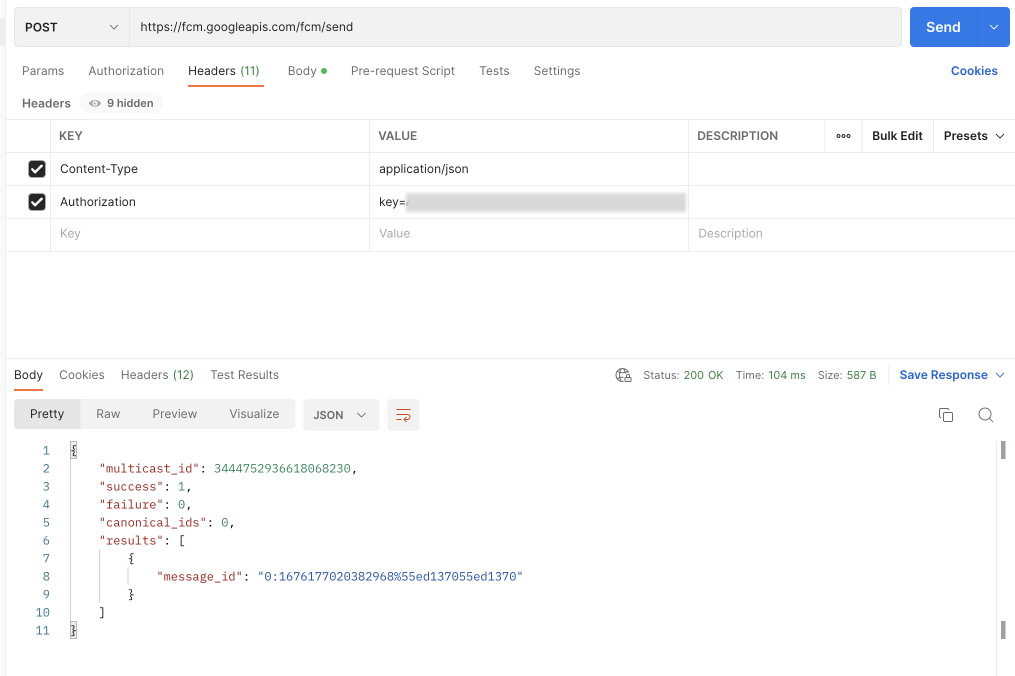
→ Nhấn nút send để tận hưởng thành quả. 😋
7. Tổng kết
Trong bài này chúng ta đã cùng nhau tìm hiểu về các khái niệm của Notification trong ứng dụng di động, và triển khai một ví dụ cơ bản trên Android bằng Awesome Notifications. Cùng đoán đọc các bài viết tiếp theo trong Series Awesome Notifications của mình nhé. Hết Tết còn Xuân. Chúc mọi người năm 2023 đạt nhiều thành công hơn nữa nhé!
8. Tài liệu tham khảo
https://pub.dev/packages/awesome_notifications_fcm/ https://pub.dev/packages/awesome_notifications
9. Source code
https://github.com/AnhQuangCee/flutter-research/tree/feature/lesson-1-android-notif
All rights reserved
