Create notification use Laravel and Pusher Channels
Bài đăng này đã không được cập nhật trong 7 năm
1. Giới thiệu
Xin chào các bạn. Hôm nay mình xin demo với các bạn ứng dụng tạo thông báo Realtime sử dụng Pusher Channels.
Giới thiệu qua 1 chút các khái niệm Realtime và Pusher Channels trước khi đi đến phần chính nhé 
Realtime : Về cơ bản Realtime (thời gian thực) ám chỉ việc phản hồi và tương tác người dùng một cách tức thì mà người dùng không cần chờ đợi lâu hoặc refresh lại ứng dụng hoặc trình duyệt. Ví dụ như thông báo trên Facebook, các notifications, chat,....
Pusher Channels: Là 1 dịch vụ trung gian giúp chúng ta có thể xử lý các tác vụ thời gian thực. Khi đã đang ký 1 tài khoản pusher, những dữ liệu được gửi lên đây sẽ trả về tương ứng với các clinet đã đăng ký.
2. Xây dựng
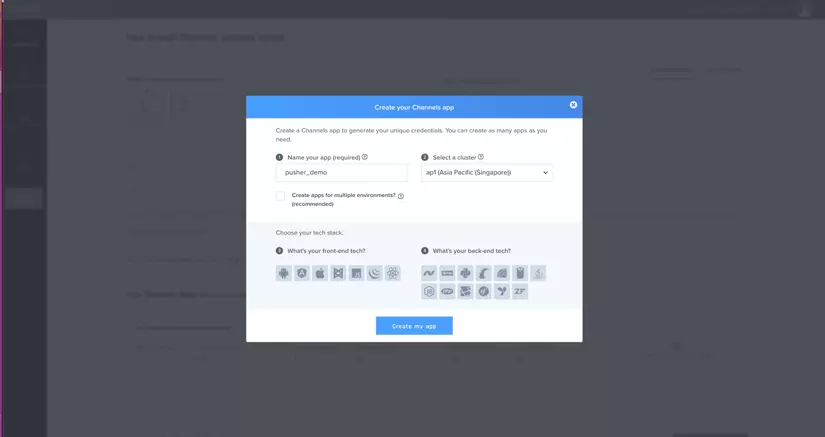
Bước 1. Đầu tiên bạn hãy tạo cho mình 1 tài khoản tại trang https://pusher.com/ và chọn "Create new app" để tạo connect cho pusher và điền thông tin như hình sau nhé.
 Teng teng ... và đây là kết quả
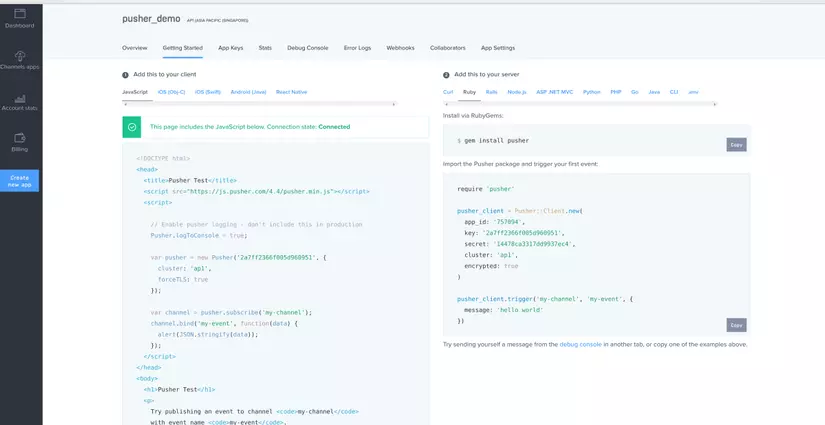 Hãy lưu lại các thông tin dưới đây vì đằng sau chúng ta sẽ dùng tới nó để cấu hình projetc đó.
app_id
key
secret
cluster
Bước 2. Tạo project laravel. Mở command line lên và chạy lệnh
composer create-project --prefer-dist laravel/laravel pusherDemo
Bước 3. Cài package pusher. Mở comman line => chạy lệnh
composer require pusher/pusher-php-server
Bước 4. Sửa file Config .env (đây là các thông tin chúng ta đã lưu lại ở bước 1)
BROADCAST_DRIVER=pusher

PUSHER_APP_ID=xxxxx
PUSHER_APP_KEY=xxxxxxxxxxxxxxxxxxxxxxxx
PUSHER_APP_SECRET=xxxxxxxxxxxxxxxxxx
PUSHER_APP_CLUSTER=xxx
Mỗi khi cấu hình lại .env xong thì nhớ chạy lệnh sau tại command line
$php artisan config:clear
$php artisan cache:clear
Bỏ comment dòng sau trong config/app.php
App\Providers\BroadcastServiceProvider::class,
Bước 5. Tạo even (sự kiện) để lắng nghe hoạt động gửi thông báo từ bạn
php artisan make:event formSubmit
Nội dung file app/Events/formSubmit.php
<?php

namespace App\Events;

use Illuminate\Broadcasting\Channel;
use Illuminate\Queue\SerializesModels;
use Illuminate\Broadcasting\PrivateChannel;
use Illuminate\Broadcasting\PresenceChannel;
use Illuminate\Foundation\Events\Dispatchable;
use Illuminate\Broadcasting\InteractsWithSockets;
use Illuminate\Contracts\Broadcasting\ShouldBroadcast;

class formSubmit implements ShouldBroadcast
{
    use Dispatchable, InteractsWithSockets, SerializesModels;

    public $comment,$name;

    /**
     * Create a new event instance.
     *
     * @return void
     */
    public function __construct($comment, $name)
    {
        $this->comment = $comment;
        $this->name = $name;
    }

    /**
     * Get the channels the event should broadcast on.
     *
     * @return \Illuminate\Broadcasting\Channel|array
     */
    public function broadcastOn()
    {
        return new Channel('my-channel');
    }

    public function broadcastAs()
    {
        return 'form-submit';
    }
}
Ở đây mình chỉ tạo 2 biến name và comment để sử dụng
Bước 6. Tạo 2 file view (1 file để gửi dữ liệu và 1 file nhân dữ liệu)
sender.blade.php gửi dữ liệu với nội dung sau
<form action="/sender" method="post">
<b>Name </b> <input type="text" name="name" placeholder="name"><br><br>
<b>Comment </b><input type="text" name="comment" placeholder="comment"><br><br>
<input type="submit" name="">
{{ csrf_field() }}
</form>
counter.blade.php nhận dữ liệu với nội dung sau
<!DOCTYPE html>
<html>
<head>
	<title>Pusher Test</title>
	<link rel="stylesheet" href="//maxcdn.bootstrapcdn.com/bootstrap/3.3.7/css/bootstrap.min.css" integrity="sha384-BVYiiSIFeK1dGmJRAkycuHAHRg32OmUcww7on3RYdg4Va+PmSTsz/K68vbdEjh4u" crossorigin="anonymous">
	<link rel="stylesheet" type="text/css" href="https://skywalkapps.github.io/bootstrap-notifications/stylesheets/bootstrap-notifications.css">
</head>
<body>
	<nav class="navbar navbar-inverse">
		<div class="container-fluid">
			<div class="collapse navbar-collapse">
				<ul class="nav navbar-nav">
					<li class="dropdown dropdown-notifications">
						<a href="#notifications-panel" class="dropdown-toggle" data-toggle="dropdown">
							<i data-count="0" class="glyphicon glyphicon-bell notification-icon" id="co"></i>
						</a>
						<div class="dropdown-container">
							<div class="dropdown-toolbar">
								<div class="dropdown-toolbar-actions">
										<a href="#">Mark all as read</a>
								</div>
								<h3 class="dropdown-toolbar-title">Notifications (<span class="notif-count">0</span>)</h3>
							</div>
							<ul class="dropdown-menu">
							</ul>
							<div class="dropdown-footer text-center">
								<a href="#">View All</a>
							</div>
						</div>
					</li>
				</ul>
			</div>
		</div>
	</nav>
<script src="https://ajax.googleapis.com/ajax/libs/d3js/5.7.0/d3.min.js"></script>
<script src="https://js.pusher.com/4.4/pusher.min.js"></script>
<script src="//cdnjs.cloudflare.com/ajax/libs/jquery/2.1.4/jquery.min.js"></script>
<script src="//maxcdn.bootstrapcdn.com/bootstrap/3.3.7/js/bootstrap.min.js" integrity="sha384-Tc5IQib027qvyjSMfHjOMaLkfuWVxZxUPnCJA7l2mCWNIpG9mGCD8wGNIcPD7Txa" crossorigin="anonymous"></script>
<script type="text/javascript">

		var notificationsWrapper   = $('.dropdown-notifications');
		var notificationsToggle    = notificationsWrapper.find('a[data-toggle]');
		var notificationsCountElem = notificationsToggle.find('i[data-count]');
		var notificationsCount     = parseInt(notificationsCountElem.data('count'));
		var notifications          = notificationsWrapper.find('ul.dropdown-menu');

		// Enable pusher logging - don't include this in production
		Pusher.logToConsole = true;

		var pusher = new Pusher('2a7ff2366f005d960951', {
			cluster: 'ap1',
			// forceTLS: true
			encrypted: true
		});

		// Subscribe to the channel we specified in our Laravel Event
		var channel = pusher.subscribe('my-channel');

		// Bind a function to a Event (the full Laravel class)
		channel.bind('form-submit', function(data) {
			var existingNotifications = notifications.html();
			var avatar = Math.floor(Math.random() * (71 - 20 + 1)) + 20;
			var newNotificationHtml = `
				<li class="notification active">
					<div class="media">
						<div class="media-left">
							<div class="media-object">
								<img src="https://api.adorable.io/avatars/71/`+avatar+`.png" class="img-circle" alt="50x50" style="width: 50px; height: 50px;">
							</div>
						</div>
						<div class="media-body">
							<strong class="notification-title">`+data.name+`</strong>
							<p class="notification-desc">`+data.comment+`</p>
							<div class="notification-meta">
								<small class="timestamp">about a minute ago</small>
							</div>
						</div>
					</div>
				</li>
			`;
			notifications.html(newNotificationHtml + existingNotifications);

			notificationsCount += 1;
			notificationsCountElem.attr('data-count', notificationsCount);
			notificationsWrapper.find('.notif-count').text(notificationsCount);
			notificationsWrapper.show();
			$('#name').text();
		});
</script>
</body>
</html>
Note: Bạn cần thay đổi đoạn sau trong file counter.blade.php. Phần XXXXXXXXXXXXXXXXXXXX chính là key pusher mà bạn đã lưu trong file .env
var pusher = new Pusher('XXXXXXXXXXXXXXXXXXXX', {
			cluster: 'ap1',
			// forceTLS: true
			encrypted: true
		});
Bước 7. Viết file router với nội dung
<?php

use App\Events\formSubmit;

Route::get('/counter', function () {
    return view('counter');
});
Route::get('/sender', function () {
    return view('sender');
});
Route::post('/sender', function () {
    $comment = request()->comment;
    $name = request()->name;
    event(new formSubmit($comment, $name));
    return redirect('/sender');
});
3. Demo
Source code: https://github.com/minhchamtat/pusherDemo
All rights reserved
