[Dio Flutter]: Tìm hiểu về Interceptor trong Dio và triển khai cơ chế Authentication.
Bài đăng này đã không được cập nhật trong 3 năm
Chào các bạn, có rất nhiều thư viện HTTP client mạnh mẽ cho Dart như: Http, Dio, Retrofit, Chopper... Hôm nay mình sẽ cùng nhau tìm hiểu về Interceptor trong package Dio nhé.

Chắc hẳn mọi người đã không còn xa lạ với khái niệm Interceptor trong lập trình, đặc biệt là khi làm việc với cơ chế Authentication. Cùng điểm lại một số khái niệm cơ bản nhé.
Khái niệm cơ bản.
Dio là ứng dụng khách HTTP mạnh mẽ dành cho Dart. Một số chức năng chính như sau:
- Global Configuration
- Interceptors
- FormData
- Request Cancellation
- Retrying Requests
- File Downloading
- Timeout
- Https certificate verification
- Http2
Chúng ta có thể sử dụng cơ bản như sau:
import 'package:dio/dio.dart';
void getHttp() async {
  try {
    Response response = await Dio().get("http://www.google.com");
    print(response);
  } catch (e) {
    print(e);
  }
}
Trong bài viết này chỉ tập trung vào Dio Interceptor. Chi tiết hơn về cách sử dụng, các bạn có thể tham khảo Document của Dio, Docs này viết khá là dễ hiểu: https://pub.dev/packages/dio
Authentication
Để một ứng dụng có thể hoạt động với cơ chế đăng ký, đăng nhập thì điều chúng ta cần quan tâm là Cơ chế Authentication (hay Xác thực người dùng).
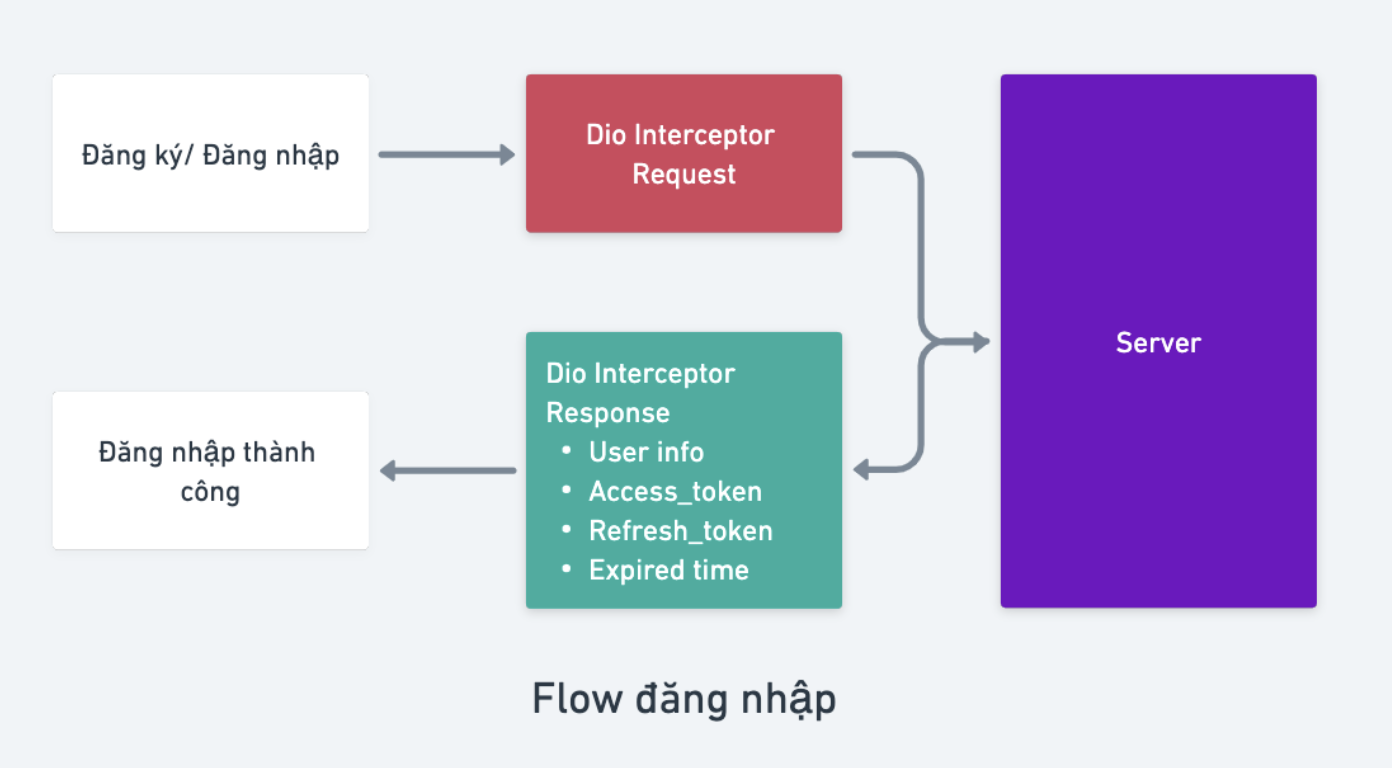
Mỗi user khi đăng ký/đăng nhập thành công thì server sẽ trả về
- access_token: Định danh user nào đăng nhập. Thông thường access_token sẽ tồn tại với thời gian khoảng 24h (hoặc ngắn hơn tùy nghiệp vụ của mỗi project). Thời gian này được gọi là Expired time.
- refresh_token: Token dùng để lấy lại access_token mới khi access_token cũ hết hạn. Thời hạn tồn tại của refresh_token sẽ dài hơn access_token
- expired time: thời gian tồn tại của access_token
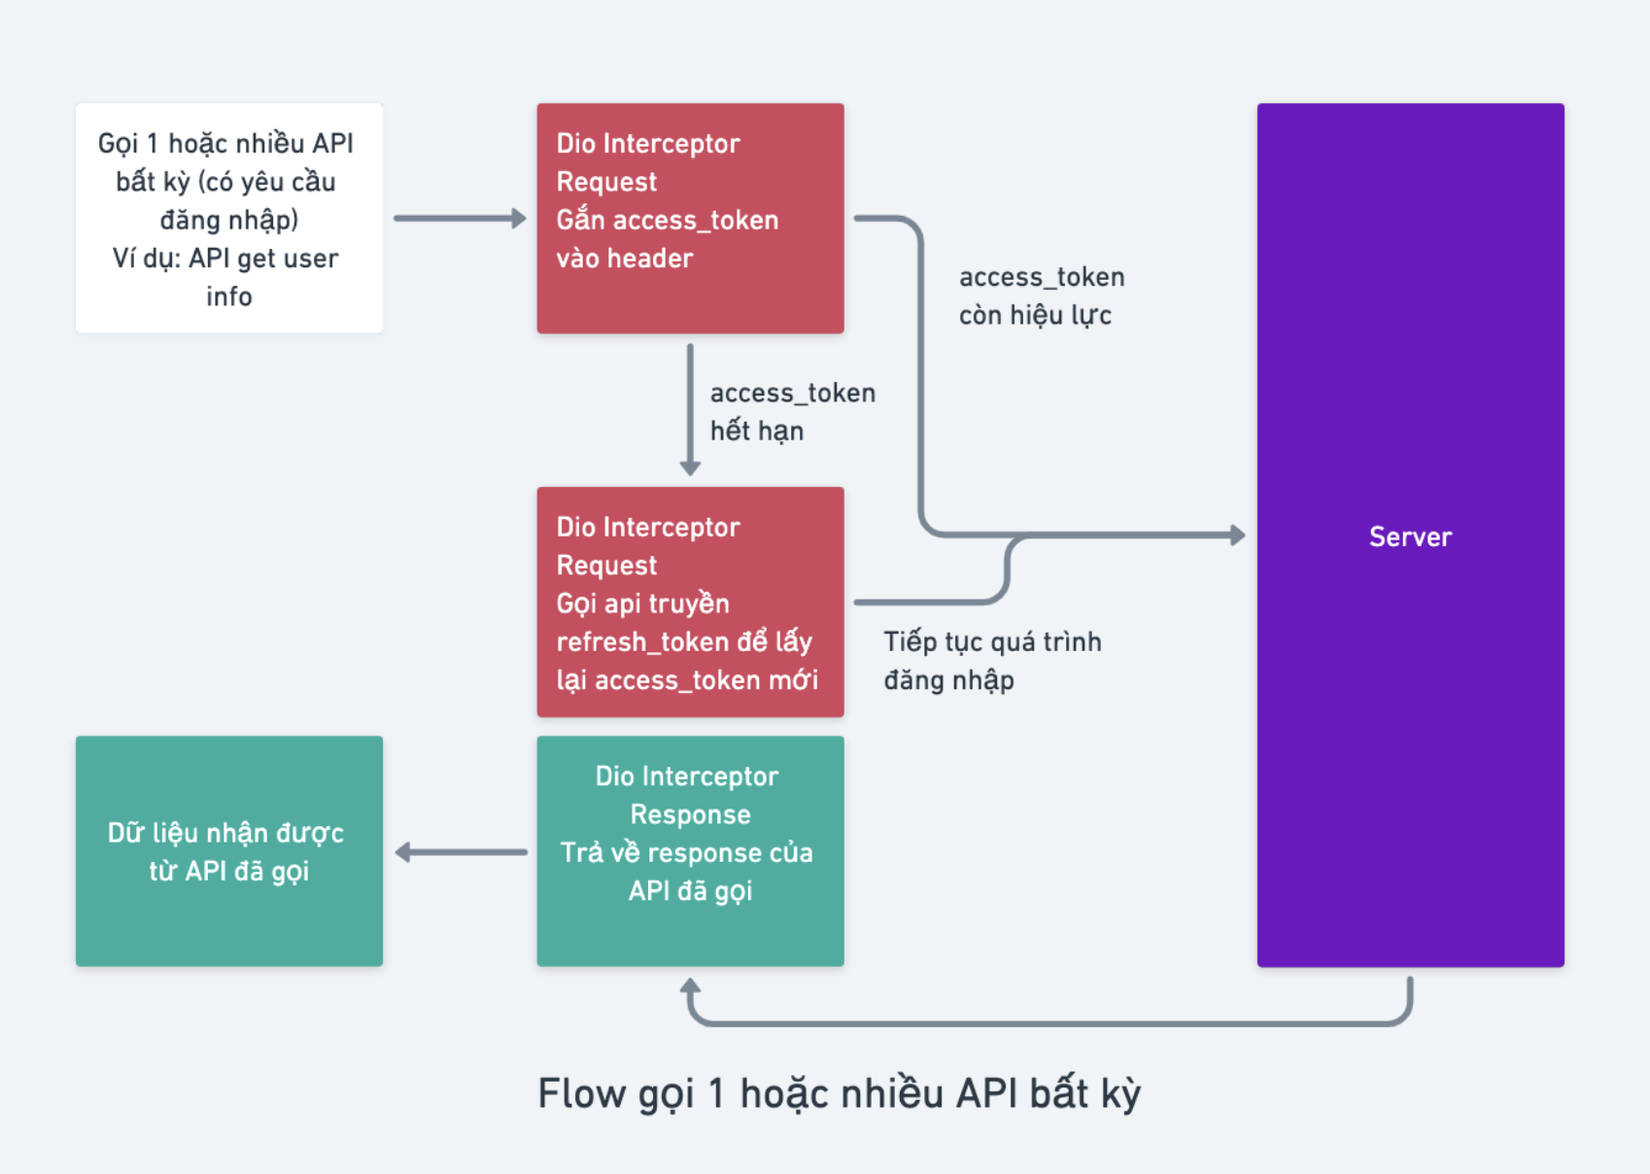
Vậy, để duy trình đăng nhập thì cần phải có cơ chế refresh token hay Lấy lại access_token mới để duy trì đăng nhập (tiếp tục call những API có yêu cầu access_token). Mô hình như sau:


Ta có thể dễ dàng nhập thấy cả 2 mô hình gọi API đều thông qua 1 cơ chế Interceptor (bộ đánh chặn cả chiều đi và chiều về). Vậy Interceptor là gì?
Interceptor có thể hiểu như một bước tường lưới chặn các request, response của ứng dụng để cho phép kiểm tra, thêm vào header hoặc thay đổi các param của request, response. Nó cho phép chúng ta kiểm tra các token ứng dụng, Content-Type hoặc tự thêm các header vào request.
Các thành phần chính của Dio Interceptor:
- onRequest(RequestOptions options): dùng để handle request trước khi gửi cho server.
- onResponse(Response response): dùng để handle reponse trước khi gửi cho client.
- onError(DioError error): handle error trước khi gửi cho client.
dio.interceptors.add(InterceptorsWrapper(
    onRequest:(options, handler){
     // Do something before request is sent
     return handler.next(options); //continue
     // If you want to resolve the request with some custom data,
     // you can resolve a `Response` object eg: `handler.resolve(response)`.
     // If you want to reject the request with a error message,
     // you can reject a `DioError` object eg: `handler.reject(dioError)`
    },
    onResponse:(response,handler) {
     // Do something with response data
     return handler.next(response); // continue
     // If you want to reject the request with a error message,
     // you can reject a `DioError` object eg: `handler.reject(dioError)`
    },
    onError: (DioError e, handler) {
     // Do something with response error
     return  handler.next(e);//continue
     // If you want to resolve the request with some custom data,
     // you can resolve a `Response` object eg: `handler.resolve(response)`.
    }
));
Cấu hình Interceptor cơ bản
// Khai báo
var dio = Dio();

dio.interceptors
        .add(InterceptorsWrapper(onRequest: (options, handler) async {
      if (!options.path.contains('http')) {
		// Cấu hình đường path để call api, thành phần gồm
		// - Enviroment.api: Enpoint api theo môi trường, có thể dùng package dotenv
		// để cấu hình biến môi trường. Ví dụ: https://api-tech.com/v1
		// - options.path: đường dẫn cụ thể API. Ví dụ: "user/user-info"

        options.path = Enviroment.apiUrl + options.path;
      }
	  // Đoạn này dùng để config timeout api từ phía client, tránh việc call 1 API
	  // bị lỗi trả response quá lâu.
      options.connectTimeout = 3000;
      options.receiveTimeout = 3000;
       // Gắn access_token vào header, gửi kèm access_token trong header mỗi khi call API
			options.headers['Authorization'] = "Bearer $accessToken";
    }, onResponse: (Response response, handler) {
      // Do something with response data
      return handler.next(response);
    }, onError: (DioError error, handler) async {
      return handler.next(error);
    }));
Cơ chế refresh token
// Khai báo
var dio = Dio();

dio.interceptors
        .add(InterceptorsWrapper(onRequest: (options, handler) async {
      final _prefs = await SharedPreferences.getInstance();

      if (!options.path.contains('http')) {
		// Cấu hình đường path để call api, thành phần gồm
		// - Enviroment.api: Enpoint api theo môi trường, có thể dùng package dotenv
		// để cấu hình biến môi trường. Ví dụ: https://api-tech.com/v1
		// - options.path: đường dẫn cụ thể API. Ví dụ: "user/user-info"

        options.path = Enviroment.apiUrl + options.path;
      }
	 // Đoạn này dùng để config timeout api từ phía client, tránh việc call 1 API
	 // bị lỗi trả response quá lâu.
      options.connectTimeout = 3000;
      options.receiveTimeout = 3000;

	  // Lấy các token được lưu tạm từ local storage
      String? accessToken = _prefs.getString('accessToken');
      String? expiredTime = _prefs.getString('expiredTime');
      String? refreshToken = _prefs.getString('refreshToken');

      // Kiểm tra xem user có đăng nhập hay chưa. Nếu chưa thì call handler.next(options)
	  // để trả data về tiếp client
      if (accessToken == null || expiredTime == null || refreshToken == null) {
        return handler.next(options);
      }

      // Tính toán thời gian token expired
      final expiredTimeConvert = DateTime.parse(expiredTime);
      final isExpired = DateTime.now().isAfter(expiredTimeConvert);

      if (isExpired) {
        try {
          final response = await dio.post(
            'https://api-tech.com/v1/auth/user-refresh-token',
            data: refreshToken,
          );
          if (response.statusCode == 200) {
            //! EXPIRED SESSION
            if (response.data != false) {
              options.headers['Authorization'] =
                  "Bearer ${response.data["accessToken"]}";
              final expiredTime = DateTime.now()
                  .add(Duration(seconds: response.data["expiresIn"] - 240));
              await _prefs.setString(
                  "accessToken", response.data["accessToken"]);
              await _prefs.setString("expiredTime", expiredTime.toString());
            } else {
               logout();
            }
          } else {
             logout();
          }
          return handler.next(options);
        } on DioError catch (error) {
          logout();
          return handler.reject(error, true);
        }
      } else {
		// Gắn access_token vào header, gửi kèm access_token trong header mỗi khi call API
        options.headers['Authorization'] = "Bearer $accessToken";
        return handler.next(options);
      }
    }, onResponse: (Response response, handler) {
      // Do something with response data
      return handler.next(response);
    }, onError: (DioError error, handler) async {
	  // Ghi log những lỗi gửi về Sentry hoặc Firebase crashlytics
	  SentryLogError().additionalData(error);
      if (error.response?.statusCode == 401) {
		// Đăng xuất khi hết session
        logout();
      }
      return handler.next(error);
    }));
InterceptorsWrapper vs QueuedInterceptorsWrapper
Đoạn code trên sử dụng InterceptorsWrapper. Vậy thì InterceptorsWrapper với QueuedInterceptorsWrapper khác nhau những gì:
- InterceptorsWrapper: có thể được thực hiện đồng thời, nghĩa là tất cả các yêu cầu nhập vào trình chặn cùng một lúc, thay vì thực hiện tuần tự.
- QueuedInterceptorsWrapper: cung cấp cơ chế truy cập tuần tự (từng cái một) cho các thiết bị chặn.
Cụ thể trường hợp trên sẽ bị 1 vấn đề như sau: Nếu có 3 API được gọi cùng lúc khi khởi chạy app thì Interceptor sẽ run 3 API cùng lúc, khi 1 trong 3 API lấy được access_token mới thì 2 API còn lại vẫn dùng access_token → Bị fail 2 API đó.
→ Vì thế chúng ta thay InterceptorsWrapper bằng QueuedInterceptorsWrapper để 3 API vào Interceptor 1 cách tuần tự. Khi 1 trong 3 API lấy được access_token thì sẽ đính kèm access_token mới vào header → 2 API còn lại sẽ dùng access_token để call API lấy được data.
Khi nào thì refresh token
Thông thường ta có thể refresh token bằng 1 trong 2 cách sau:
- Kiểm tra expired time để refresh token trước khi access_token hết hạn (như cách trên). Ưu điểm của cách này sẽ:
- Không tốn 1 lần call API bị fail với access_token cũ → Gọi lại api bị lỗi với access_token mới → Success.
- Tăng tính bảo mật hơn vì người khác sẽ khó phân biệt được lỗi 401 từ api trả về là do user hết session hay bị expired access_token.
- Khi access_token đã hết hạn, gọi API mới thì trả về 401. Lỗi này sẽ được báo ở hàm onError của Dio Interceptor.
onError: (DioError error, handler) async {
	final _prefs = await SharedPreferences.getInstance()
	String? refreshToken = _prefs.getString('refreshToken');

	if ((error.response?.statusCode == 401 &&
    error.response?.data['message'] == "Invalid JWT")) {
	  if (refreshToken) {
		  await refreshTokenFunc();
      return handler.resolve(await _retry(error.requestOptions));
    }
   }
   return handler.next(error);
}
Để gọi lại API bị lỗi access_token hết hạn
Future<void> refreshTokenFunc() async {
    final refreshToken = await _storage.read(key: 'refreshToken');
    final response =
        await dio.post('/auth/refresh', data: {'refreshToken': refreshToken});
    if (response.statusCode == 201) {
      accessToken = response.data;
    } else {
      accessToken = null;
      await preferences.clear();
    }
  }
Tài liệu tham khảo
https://pub.dev/packages/dio#interceptors
Lời kết
Qua bài viết vừa rồi, chúng ta đã tìm hiểu các khái niệm về Interceptor trong Dio và triển khai một Cơ chế Xác thực người dùng cơ bản. Hẹn gặp các bạn ở bài viết tiếp theo nhé. Best regards.
All rights reserved