Messenger với React Native!
Bài đăng này đã không được cập nhật trong 6 năm
Hello các bạn, nhân tiện facebook ra thêm tính năng Dating và Secret Crush mình cũng thử cover lại app Messenger  )) của họ sử dụng React Native xem sao, và dưới đây là kết quả của mình.
Bài viết này tập chung về phía giao diện cho các bạn có cái nhìn chung trước!
Oke bắt đầu, đầu tiên mình cần tạo 1 app, nếu các bạn còn chưa cài React Native thì có thể xem lại bài trước của mình , mình có hướng dẫn cài đặt React Native từng bước một nên các bạn yên tâm nhá:
react-native init MessengerRN
1. Khung chương trình
Ta tạo 1 thư mục App cho dễ quản lý, đầu tiên cần phải sửa lại file App.js của project:
import App from './App/index'

export default App
import React, { Component } from 'react'
import { View, FlatList, Text } from 'react-native'
import data from './data'
import Item from './Item'
import styles from './style'

class Home extends Component {
   render() {
       return(
           <View style={styles.wrapper}>
               <View>
                   <Text style={styles.title}>My Crush</Text>
               </View>
               <FlatList
                   ref={"flatList"}
                   data={ data }
                   renderItem={({ item }) => (
                       <Item item={ item } />
                   )}
                   keyExtractor={(item) => item.id } // tránh trùng các item với nhau
                   parentFlatList={this} //để lát làm swipe left và swipe right
               />
           </View>
       )
   }
}

export default Home
Ở trên mình có tạo ra 1 list item, và truyền từng Item sang 1 component khác cho dễ quản lý
renderItem={({ item }) => (
  <Item item={ item } />
)}
Các bạn cũng thấy mình tách style ra làm một file riêng, các bạn cứ thử tưởng tượng về sau mình maintain 1 feature mà tất cả code trong 1 file xem sao, oải thật sự =)).
import { StyleSheet, Dimensions } from 'react-native'

const { width } = Dimensions.get('window')

export default styles = StyleSheet.create({
   wrapper: {
       flex: 1,
       backgroundColor: 'white'
   },
   title: {
       fontSize: 24,
       fontWeight: 'bold',
       color: 'black',
       padding: 20
   },
   container: {
       flex: 1,
       flexDirection: 'row',
       paddingHorizontal: 10,
       paddingVertical: 5,
   },
})
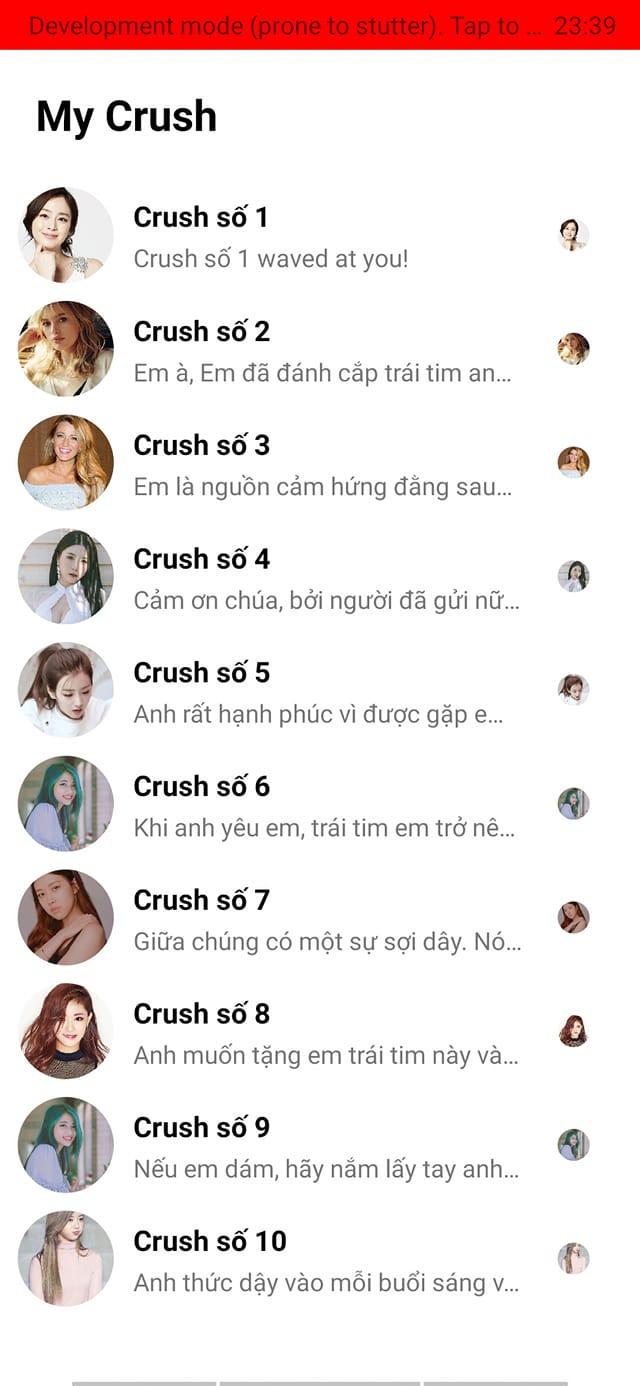
MÌnh cũng có tạo sẵn data cho chúng ta test rồi đây 
export default data = [
   {
       id: 1,
       avatar: 'http://woridnews.com/wp-content/uploads/2016/10/cd3e35dbcf23269780779b3f7b9e2fcc.png',
       name: 'Crush số 1',
       description: 'Crush số 1 waved at you!'
   },
   {
       id: 2,
       avatar: 'http://sphm-female-site-production.s3-ap-southeast-1.amazonaws.com/2017/07/w111-750x500.jpg',
       name: 'Crush số 2',
       description: 'Em à, Em đã đánh cắp trái tim anh. Vì thế anh sẽ đánh cắp nụ hôn của em'
   },
   {
       id: 3,
       avatar: 'https://bellanyc.com/wp-content/uploads/2017/06/blake-lively.jpg',
       name: 'Crush số 3',
       description: 'Em là nguồn cảm hứng đằng sau tất cả những gì anh làm, làm nguồn gốc của những điều tốt lành trong cuộc sống của anh'
   },
   {
       id: 4,
       avatar: 'https://d1o7cxaf8di5ts.cloudfront.net/file/brand/member-girlcrush-BM.jpg?d=200',
       name: 'Crush số 4',
       description: 'Cảm ơn chúa, bởi người đã gửi nữ thần xinh đẹp nhất của thiên đường vào cuộc sống của con.'
   },
   {
       id: 5,
       avatar: 'https://pbs.twimg.com/profile_images/652669289326092288/RsXc7UnS_400x400.jpg',
       name: 'Crush số 5',
       description: 'Anh rất hạnh phúc vì được gặp em, em là điều tuyệt vời nhất trong cuộc sống của anh.'
   },
   {
       id: 6,
       avatar: 'https://qph.fs.quoracdn.net/main-qimg-bd14ad5123f2a0b5b7fd457a18e23de8',
       name: 'Crush số 6',
       description: 'Khi anh yêu em, trái tim em trở nên ấm áp. Hãy để tình yêu ngọt ngào của chúng ta lớn lên theo từng ngày'
   },
   {
       id: 7,
       avatar: 'https://66.media.tumblr.com/2ffbcea054ae96a839d0583f4c56ce38/tumblr_ots4vdLKgl1w0bqvso2_250.gif',
       name: 'Crush số 7',
       description: 'Giữa chúng có một sự sợi dây. Nó buộc trái tim chúng ta lại với nhau vì vậy chúng ta luôn cảm thấy gần nhau dù có cách xa như thế nào?'
   },
   {
       id: 8,
       avatar: 'http://static.global.mnet.com/data/ucc/000/132/089',
       name: 'Crush số 8',
       description: 'Anh muốn tặng em trái tim này và em hãy giữ nó, bởi anh rất vụng về, anh sợ rằng anh sẽ làm mất hoặc dễ dàng tặng nó cho một ai khác'
   },
   {
       id: 9,
       avatar: 'https://qph.fs.quoracdn.net/main-qimg-bd14ad5123f2a0b5b7fd457a18e23de8',
       name: 'Crush số 9',
       description: 'Nếu em dám, hãy nắm lấy tay anh và dẫn anh đến trái tim của em. Anh muốn cảm nhận tình yêu của em.'
   },
   {
       id: 10,
       avatar: 'https://data.whicdn.com/images/148584794/large.jpg',
       name: 'Crush số 10',
       description: 'Anh thức dậy vào mỗi buổi sáng với sự phấn khích của một đứa trẻ vào ngày Giáng sinh, chỉ để biết rằng anh vẫn ở cạnh em.'
   }
];
Oke giờ hiện thị từng Item ra thôi, trước đó các bạn cài giúp mình 2 lib:
- react-native install react-native-swipeout
- react-native install react-native-vector-icons
react-native-swipeout là 1 lib hỗ trợ chúng ta có thể scroll sang trái, phải item, và nó chứa nhiều component bên trong phù hợp với mục đích của mình hiện tại.
react-native-vector-icons: là 1 lib hỗ trợ rất nhiều icon như: FontAwesome, IonIcons, MaterialIcons, AntDesign, ... các bạn qua 2 docs này lib này để hiểu thêm.
import React, { Component } from 'react'
import { View, Text, Image ,TouchableOpacity } from 'react-native'
import Swipeout from 'react-native-swipeout'
import Icon from 'react-native-vector-icons/FontAwesome5'
import styles from './style'

class Item extends Component {
   render() {
       const {item} = this.props

       return (
           <TouchableOpacity>
               <View style={styles.container}>
                   <View style={styles.bgAvatar}>
                       <Image
                           source={{uri: item.avatar}}
                           style={styles.avatar}
                       />
                   </View>
                   <View style={styles.info}>
                       <Text style={styles.name}>{item.name}</Text>
                       <Text numberOfLines={1}>{item.description}</Text>
                   </View>
                   <View style={styles.bgSeen}>
                       <Image
                           source={{uri: item.avatar}}
                           style={styles.avatarSeen}
                       />
                   </View>
               </View>
           </TouchableOpacity>
       )
   }
}

export default Item
thêm 1 chút style
...

bgAvatar: {
       flex: 2
   },
   avatar:{
       width: width*15/100,
       height: width*15/100,
       borderRadius: width*10/100,
   },
   info: {
       flex: 8,
       flexDirection: 'column',
       paddingLeft: 10,
       justifyContent: 'center'

   },
   name: {
       fontWeight: 'bold',
       color: 'black',
       fontSize: 16,
       paddingBottom: 3
   },
   bgSeen: {
       flex: 2,
       alignItems: 'center',
       justifyContent: 'center'
   },
   avatarSeen: {
       width: width*5/100,
       height: width*5/100,
       borderRadius: width*2.5/100,
   },
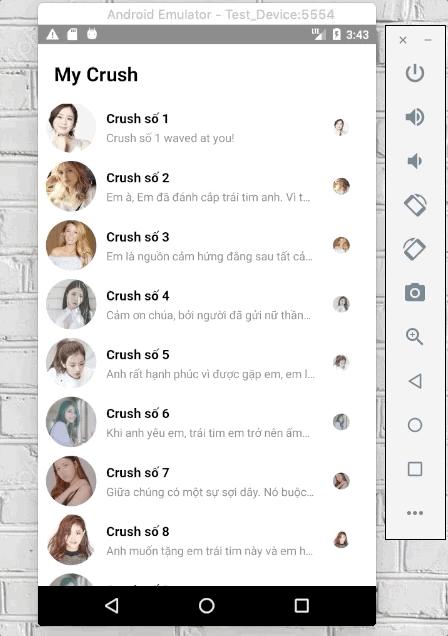
Oke, giờ ta thử run nên và xem kết quả nào  , và đây chúng ta đã có giao diện khá giống với Messenger.
2. Swipeout
Muốn sử dụng Swipeout ta cần bọc tất cả code trong nó:
return {
    <Swipeout
       {...swipeSettings}
       backgroundColor='white'
   >
       <TouchableOpacity>
           ...
       </TouchableOpacity>
   </Swipeout>
}
Mình sẽ cấu hình tất cả trong swipeSettings
    ...
constructor(props) {
    super(props);
    this.state = {
        activeRowKey: null, //set item active
        numberOfRefresh: 0,
    };
}

_onOpen = () => {
    this.setState({
        activeRowKey: this.props.item.key
    });
}
_onClose = () => {
    if(this.state.activeRowKey != null) {
        this.setState({
            activeRowKey: null
        });
    }
}

render() {
    ...
    const swipeSettings = {
        autoClose: true, //sẽ tự động đóng khi ta click vào buton nào đó trong item được swipe
        onOpen: this._onOpen, //khi open swipe thì nên set row nào được active để tránh nhầm lẫn khi ta click sự kiện bên trong các item.
        onClose: this._onClose, //xóa row active

        //tiếp theo ta sẽ làm swipe phía bên trái
        left: [
                {
                    onPress: () => {},
                    component: (
                        <View style={styles.item}>
                            <View style={[styles.inItem, {backgroundColor: '#45B8AC'}]}>
                                <Icon name="camera" style={[styles.icon, {color: 'white'}]} />
                            </View>
                        </View>
                    ),
                    backgroundColor: 'white'
                },
                {
                    onPress: () => {},
                    component: (
                        <View style={styles.item}>
                            <Icon name="phone" style={styles.icon} />
                        </View>
                    ),
                    backgroundColor: 'white'
                },
                {
                    onPress: () => {},
                    component: (
                        <View
                            style={styles.item}
                        >
                            <Icon name="video" style={styles.icon} />
                        </View>
                    ),
                    backgroundColor: 'white'
                }
            ],
            rowId: this.props.index,
            sextionId: 1
       };
}

    return(
        ...
    )
}
Mình giải thích 1 chút về phần left phía trên:
gồm có 1 button đó là: camera, call, video, mỗi 1 {} là 1 button.
trong left có rất nhiều props như
- component: ta có thể tạo component trong đó, truyền style thoải mái
- backgroundColor: set backgroundColor cho button đó.
- onPress: tương tự như props của button
Và còn nhiều props hữu ích các bạn có thể tham khảo trên Docs.
À chút thì quên mình cần thêm 1 chút style nhá:
...

item: {
    flex: 1,
    alignItems: 'center',
    justifyContent: 'center',
    borderRadius: 100
},
inItem: {
    alignItems: 'center',
    justifyContent: 'center',
    width: 40,
    height: 40,
    borderRadius: 20
},
icon: {
    fontSize: width*6/100,
}
Oke Các bạn thử run nên à scroll Item sang bên trái và trải nghiệm nào
Tiếp theo chúng ta làm phần bên phải cũng tương tự với các button lần lượt là menu, notify, delete:
...
    left: [...],
    right: [
            {
                onPress: () => {},
                component: (
                    <View style={styles.item}>
                        <Icon name="bars" style={styles.icon} />
                    </View>
                ),
                backgroundColor: 'white'
            },
            {
                onPress: () => {},
                component: (
                    <View style={styles.item}>
                        <Icon name="bell" style={styles.icon} />
                    </View>
                ),
                backgroundColor: 'white'
            },
            {
                onPress: () => {},
                component: (
                    <View style={styles.item}>
                        <View style={[styles.inItem, {backgroundColor: '#E94B3C'}]}>
                            <Icon name="trash" style={[styles.icon, {color: 'white'}]} />
                        </View>
                    </View>
                ),
                backgroundColor: 'white',
            }
        ],
    ...
Và kết quả đã gần giống với những gì chúng ta mong muốn rồi phải không? Các bạn có để ý trên Messenger khi giữ lâu 1 message thì message đó swipe sang bên phải không , cái này cũng dễ thôi.
Đơn giản bạn chỉ cần, thêm 1 props openRight có trong component root của lib, và check xem khi nào user giữ item 1 thời gian thì sẽ swipe sang bên phải
 constructor(props) {
        super(props);
        this.state = {
            activeRowKey: null,
            numberOfRefresh: 0,
            isRightOpen: false
        };
    }

_onLongPress = () => {
    this.setState({
        isRightOpen: true
    })
}

__scroll = () => {
    this.setState({
        isRightOpen: false
    })
}

    ...
    return (
            <Swipeout
                {...swipeSettings}
                openRight={this.state.isRightOpen}
                backgroundColor='white'
                scroll={this.__scroll}
            >
                <TouchableOpacity
                    onLongPress={this._onLongPress}
                >
                   ...
                </TouchableOpacity>
            </Swipeout>
        )
    ...
Bài viết này của mình xin kết thúc tại đây, Thank you for watching!!  , mình rất hy vọng có thời gian để hoàn thành các chức năng còn lại, mong mọi người ủng hộ mình.
À quên nếu các bạn có suggest thêm feature nào thì comment cho mình biết nhá
All rights reserved
