Hướng dẫn React Native P.1
Bài đăng này đã không được cập nhật trong 10 năm

React Native là một framework được phát triển bởi Facebook giúp bạn xây dựng những ứng dụng iOS và Android native bằng Javascript.
Chúng ta đã biết tới những framework như PhoneGap, hỗ trợ xây dựng những ứng dụng di động bằng bao nội dung web vào trong WebView, với phương châm là "Viết một lần, chạy mọi nơi" (Write once, run everywhere). Tuy nhiên những framework đó bộc lộ nhiều nhược điểm về hiệu năng cũng như trải nghiệm không hoàn toàn "native", vì vậy mà các lập trình viên vẫn thường ưa chuộng viết native app hơn.
React Native khác so với những framework trên, nó sử các Javascript component được hỗ trợ bởi các native component của IOS, Android vì vậy mà app bạn tạo nên là hoàn toàn native.
React Native không phải là một framework "Viết một lần, chạy mọi nơi". Bạn xây dựng UI bằng những component dành cho một nền tảng nhất định, vì vậy bạn không thể mang code đã viết cho iOS sang Android để chạy. Cái mà React Native làm là giúp bạn học được những kiến thức để phát triển ứng dụng trên đa nền tảng, còn được gọi là "Học một lần, viết mọi nơi" (Learn once, write everywhere). Bài hướng dẫn này, mình sẽ giới thiệu với các bạn cách phát triển một ứng dụng iOS đơn giản bằng React Native.
Thiết lập môi trường
Yêu cầu:
- Bạn cần có OS X và Xcode 7.0 hoặc cao hơn
- Homebrew cần để cài Watchman
- Cài đặt Node.js 4.0 hoặc mới hơn, cài nvm
Cài đặt: Nếu bạn chưa có Node, bạn có thể cài bằng
brew install node
Cài Watchman, chương trình theo dõi thay đổi của file của Facabook
brew install watchman
Cài React Native
npm install -g react-native-cli
Sau đó, bạn có thể khởi tạo chương trình, ở đây mình sẽ tạo một chương trình tìm kiếm sách, vì vậy mình đặt tên nó là BookSearch
react-native init BookSearch
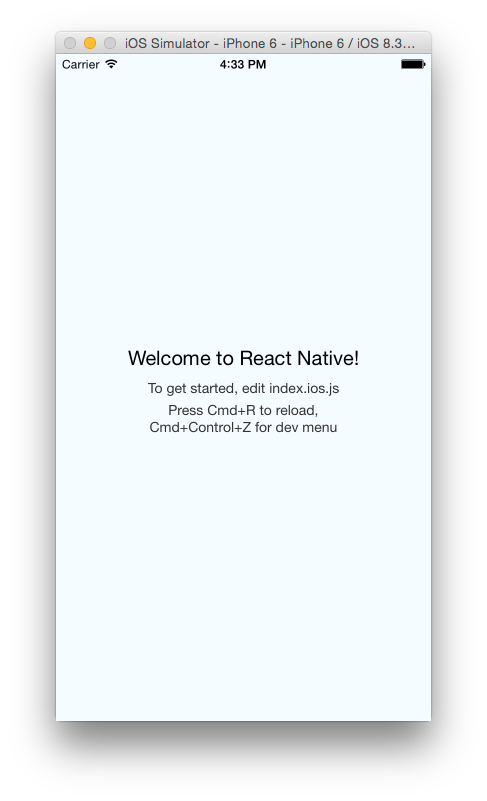
Lệnh trên sẽ tạo một dự án mới. Bạn dùng Xcode để mở dự án lên và ấn Command + R để chạy nó. Chương trình mặc định của chúng ta sẽ có giao diện như sau:

Như trên màn hình đã hướng dẫn, bạn cần sửa file index.ios.js. Và mỗi lần sửa xong, bạn có thể ấn Command + R để reload lại trang này.
Bây giờ chúng ta sẽ vào file index.ios.js xem qua nội dung của nó.
'use strict';
Dòng này kích hoạt chế độ Strict Mode, nó tăng cường khả năng xử lí lỗi của Javascript.
import React, {
  AppRegistry,
  StyleSheet,
  Text,
  View,
} from 'react-native';
Đoạn này sẽ load module react-native, gán vào biến React. Đồng thời gán các thuộc tính của React như React.AppRegistry, React.StyleSheet vào các biến tương tự cùng tên. Điều này giúp bạn viết code ngắn gọn hơn, ví dụ viết AppRegistry thay vì React.AppRegistry.
var BookSearch = React.createClass({
  render: function() {
    return (
      <View style={styles.container}>
        <Text style={styles.welcome}>
          Welcome to React Native!
        </Text>
        <Text style={styles.instructions}>
          To get started, edit index.ios.js
        </Text>
        <Text style={styles.instructions}>
          Press Cmd+R to reload,{'\n'}
          Cmd+Control+Z for dev menu
        </Text>
      </View>
    );
  }
});
Đoạn này sẽ tạo ra một class chỉ có function duy nhất là render. Hàm render sẽ return lại những gì sẽ được hiển thị lên màn hình. Đoạn code trong phần return sử dụng JSX (Javascript syntax extension). Nếu bạn đã làm việc với React.JS thì đoạn code trên rất quen thuộc.
var styles = StyleSheet.create({
  container: {
    flex: 1,
    justifyContent: 'center',
    alignItems: 'center',
    backgroundColor: '#F5FCFF',
  },
  welcome: {
    fontSize: 20,
    textAlign: 'center',
    margin: 10,
  },
  instructions: {
    textAlign: 'center',
    color: '#333333',
    marginBottom: 5,
  },
});
Đoạn trên là style dùng cho code JSX bên trên. Đoạn code này rất quen thuộc với những ai làm web vì React Native sử dụng CSS để làm style cho giao diện app. Nếu bạn nhìn lên code JSX ở trên thì bạn sẽ thấy cách mỗi style được sử dụng. Ví dụ component View có style={styles.container} thì các định nghĩa về giao diện của container sẽ được dùng cho View.
AppRegistry.registerComponent('BookSearch', () => BookSearch);
Đoạn này định nghĩa điểm khởi đầu cho chương trình, nơi mà Javascript bắt đầu thực thi.
Đó là cấu trúc cơ bản của React Native UI. Sau này, tất cả các view chúng ta làm ra đều tuân theo cấu trúc cơ bản như vậy.
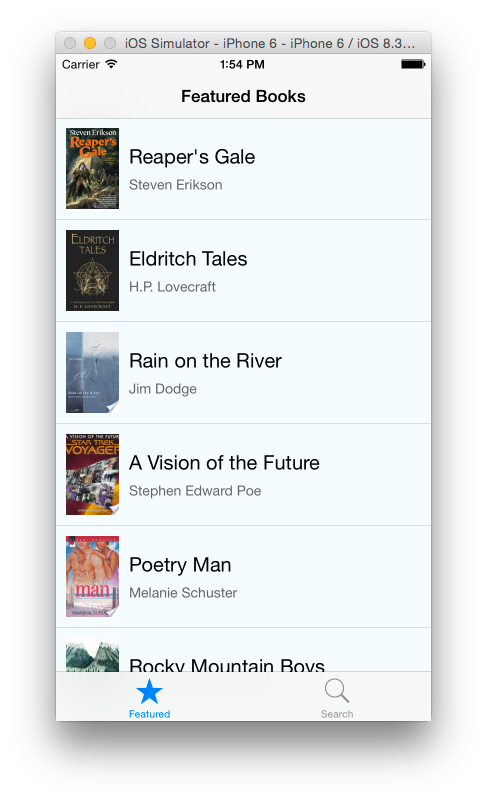
Trong bài hướng dẫn này, mình sẽ giúp các bạn viết một ứng dụng có khả năng hiển thị những featured book và tìm kiếm sách bằng Google Books API. Để cho dễ hình dung, chương trình của chúng ta sau khi hoàn thành sẽ như sau:

Tạo Tab Bar
Chương trình sẽ có 1 tab bar với 2 phần tử: Featured và Search.
Tạo 2 file Javascript trong thư mục gốc (cùng thư mục với index.ios.js), đặt tên là search.js và featured.js. Mở featured.js và thêm đoạn code sau:
'use strict';

var React = require('react-native');

var {
    StyleSheet,
    View,
    Text,
    Component
   } = React;

var styles = StyleSheet.create({
    description: {
        fontSize: 20,
        backgroundColor: 'white'
    },
    container: {
        flex: 1,
        justifyContent: 'center',
        alignItems: 'center'
    }
});

class Featured extends Component {
    render() {
        return (
  	    <View style={styles.container}>
	        <Text style={styles.description}>
        	  Featured Tab
	        </Text>
	    </View>
        );
    }
}

module.exports = Featured;
Nó rất giống với code index.ios.js mà bạn đã thấy, chúng ta sẽ hiển thị dòng chữ Featured Tab ở tab này. Các style đều rất quen thuộc, nhưng có thể bạn sẽ thấy có 1 thuộc tính hơi lạ là flex: 1. Đây là flexbox, một phần mới được thêm vào đặc tả của CSS gần đây. flex: 1 ở đây có nghĩa là phần tử sẽ chiếm toàn bộ khoảng trống trên màn hình mà không bị chiếm bởi các phần tử ngang hàng khác. Chúng ta sẽ nói về flex sau. Để tìm hiểu kĩ hơn, bạn có thể tham khảo link này: https://css-tricks.com/snippets/css/a-guide-to-flexbox/
Đối với file search.js, bạn thêm nội dung sau:
'use strict';

var React = require('react-native');

var {
    StyleSheet,
    View,
    Text,
    Component
   } = React;

var styles = StyleSheet.create({
    description: {
        fontSize: 20,
        backgroundColor: 'white'
    },
    container: {
        flex: 1,
        justifyContent: 'center',
        alignItems: 'center'
    }
});

class Search extends Component {
    render() {
        return (
  	    <View style={styles.container}>
	        <Text style={styles.description}>
        	  Search Tab
	        </Text>
	    </View>
        );
    }
}

module.exports = Search;
Nó cũng giống như featured.js, chỉ khác là hiển thị ra màn hình dòng chữ 'Search Tab'
Trong file index.iso.js, bạn hãy xoá hết mọi thứ và paste đoạn sau đây vào:
'use strict';

var React = require('react-native');
var Featured = require('./Featured');
var Search = require('./Search');

var {
    AppRegistry,
    TabBarIOS,
    Component
   } = React;

class BookSearch extends Component {

    constructor(props) {
        super(props);
        this.state = {
            selectedTab: 'featured'
        };
    }

    render() {
        return (
            <TabBarIOS selectedTab={this.state.selectedTab}>
                <TabBarIOS.Item
                    selected={this.state.selectedTab === 'featured'}
                    icon={{uri:'featured'}}
                    onPress={() => {
                        this.setState({
                            selectedTab: 'featured'
                        });
                    }}>
                    <Featured/>
                </TabBarIOS.Item>
                <TabBarIOS.Item
                    selected={this.state.selectedTab === 'search'}
                    icon={{uri:'search'}}
                    onPress={() => {
                        this.setState({
                            selectedTab: 'search'
                        });
                    }}>
                    <Search/>
                </TabBarIOS.Item>
            </TabBarIOS>
        );
    }
}

AppRegistry.registerComponent('BookSearch', () => BookSearch);
Ở đây chúng ta require 2 modules mà đã export từ 2 những file đã tạo và gán vào những biến Featured và Search. Trong class, chúng ta tạo ra một constructor, trong đó tạo ra một state là selectedTab và gán giá trị mặc định cho nó là 'featured'. Chúng ta sẽ sử dụng nó để xác định xem tab nào đang được active.
Trong hàm render, chúng ta dùng component TabBarIOS để tạo một tab bar, đây là một component hoàn toàn native của iOS. Sau đó chúng ta tạo ra 2 phần tử tab và gán thuộc tính selected cho nó, cũng như xử lí sự kiện onPress.
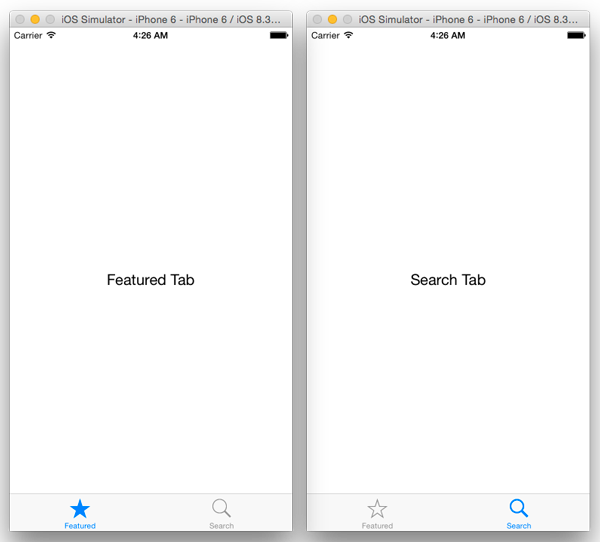
Chuyển qua simulator, và ấn Command + R để reload lại app. Giao diện của chương trình bây giờ sẽ trông như sau:

Thêm Navigation Bar
Giờ chúng ta sẽ tập trung vào tab Featured trước. Chúng ta sẽ thêm 1 file booklist.js có nội dung như sau:
'use strict';

var React = require('react-native');

var {
    StyleSheet,
    View,
    Component
   } = React;

var styles = StyleSheet.create({

});

class BookList extends Component {
    render() {
        return (
            <View>
	    </View>
        );
    }
}

module.exports = BookList;
Đây là một trang với nội dung trống, không có gì đặc biệt. Chúng ta chuyển sang sửa file featured.js như sau:
'use strict';

var React = require('react-native');
var BookList = require('./BookList');

var {
    StyleSheet,
    NavigatorIOS,
    Component
   } = React;

var styles = StyleSheet.create({
    container: {
        flex: 1
    }
});

class Featured extends Component {
    render() {
        return (
            <NavigatorIOS
                style={styles.container}
                initialRoute={{
            title: 'Featured Books',
            component: BookList
            }}/>
        );
    }
}

module.exports = Featured;
Bên trên chúng ta sử dụng NavigatorIOS để tạo ra một navigation controller, và gán route mặc định cho nó là component BookList, đồng thời đặt tiêu đề sẽ hiển thị trên navigation bar.
Reload lại app, và chúng ta được như sau: xxx
Lấy và hiển thị dữ liệu
Bây giờ chúng ta bắt đầu thêm dữ liệu vào view. Đầu tiên, chúng ta sẽ tạo ra dữ liệu giả trước sau đó sẽ sử dụng dữ liệu thật từ API.
Trong file booklist.js thêm đoạn sau vào đầu file:
var FAKE_BOOK_DATA = [
    {volumeInfo: {title: 'The Catcher in the Rye', authors: "J. D. Salinger", imageLinks: {thumbnail: 'http://books.google.com/books/content?id=PCDengEACAAJ&printsec=frontcover&img=1&zoom=1&source=gbs_api'}}}
];
Thêm các component cần dùng
var {
    Image,
    StyleSheet,
    Text,
    View,
    Component,
   } = React;
và thêm các style sau:
var styles = StyleSheet.create({
    container: {
        flex: 1,
        flexDirection: 'row',
        justifyContent: 'center',
        alignItems: 'center',
        backgroundColor: '#F5FCFF',
        padding: 10
    },
    thumbnail: {
        width: 53,
        height: 81,
        marginRight: 10
    },
    rightContainer: {
        flex: 1
    },
    title: {
        fontSize: 20,
        marginBottom: 8
    },
    author: {
        color: '#656565'
    }
});
Và sửa lại class như sau:
class BookList extends Component {
    render() {
	var book = FAKE_BOOK_DATA[0];
        return (
            <View style={styles.container}>
                <Image source={{uri: book.volumeInfo.imageLinks.thumbnail}}
                            style={styles.thumbnail} />
                <View style={styles.rightContainer}>
                    <Text style={styles.title}>{book.volumeInfo.title}</Text>
                    <Text style={styles.author}>{book.volumeInfo.authors}</Text>
                </View>
            </View>
        );
    }
}
Reload lại app, và bạn sẽ thấy như sau

Trong đoạn code trên, chúng ta đã tạo ra 1 JSON object tương tự với object mà chúng ta sẽ nhận được từ API. Chúng ta chọn flexDirection: row cho container. Nó sẽ làm cho các phần tử con hiển thị theo chiều ngang thay vì chiều dọc. Vì vậy mà Image và View sẽ nằm ngang với nhau. Chúng ta đặt style flex: 1 cho rightContainer. Điều này giúp cho nó chiếm nốt phần khoảng trống còn lại không bị chiếm bởi Image.
Thêm ListView
React Native có một component gọi là ListView, nó sẽ hiển thị tương tự với table view trong iOS.
Đầu tiên, chúng ta thêm ListView vào danh sách component cần dùng và đặt style cho nó.
var {
    Image,
    StyleSheet,
    Text,
    View,
    Component,
    ListView,
    TouchableHighlight
   } = React;

...
var styles = StyleSheet.create({
    ...
    separator: {
       height: 1,
       backgroundColor: '#dddddd'
   }
});
Sau đó, thêm constructor và componentDidMount vào trong BookList class
constructor(props) {
       super(props);
       this.state = {
           dataSource: new ListView.DataSource({
               rowHasChanged: (row1, row2) => row1 !== row2
           })
       };
   }

componentDidMount() {
    var books = FAKE_BOOK_DATA;
    this.setState({
        dataSource: this.state.dataSource.cloneWithRows(books)
    });
   }
Trong contructor, chúng ta tạo ra đối tượng ListView.DataSource và gán nó vào state dataSource. DataSource là một interface mà ListView dùng để xác định xem những dòng nào đã thay đổi để cập nhật lên UI.
conponentDidMount được gọi khi component đó được mount vào trong UI view. Khi function này được gọi, chúng ta đặt state dataSource với giá trị từ dữ liệu sách của chúng ta.
Thêm hàm renderBook và sửa lại hàm render như sau:
renderBook(book) {
   return (
        <TouchableHighlight>
            <View>
                <View style={styles.container}>
                    <Image
                        source={{uri: book.volumeInfo.imageLinks.thumbnail}}
                        style={styles.thumbnail} />
                    <View style={styles.rightContainer}>
                        <Text style={styles.title}>{book.volumeInfo.title}</Text>
                        <Text style={styles.author}>{book.volumeInfo.authors}</Text>
                    </View>
                </View>
                <View style={styles.separator} />
            </View>
        </TouchableHighlight>
   );
}

render() {
    return (
        <ListView
            dataSource={this.state.dataSource}
            renderRow={this.renderBook.bind(this)}
            style={styles.listView}
            />
    );
}
Đoạn code trên tạo một component ListView trong render(). Ở đây, giá trị dataSource được gán bằng dataSource đã định nghĩa trong state, và hàm renderBook được gọi để render những row trong ListView. Trong renderBook(), chúng ta dùng component TouchableHighlight dùng để phản hồi lại những action touch của người dùng.
Giờ chúng ta sẽ load dữ liệu thật vào chương trình. Trước hết, xoá FAKE_BOOK_DATA ra khỏi file, và thêm đường dẫn đến API cần dùng:
var REQUEST_URL = 'https://www.googleapis.com/books/v1/volumes?q=subject:fiction';
Cập nhật lại danh sách component, style, constructor
var {
    Image,
    StyleSheet,
    Text,
    View,
    Component,
    ListView,
    TouchableHighlight,
    ActivityIndicatorIOS
   } = React;
...
var styles = StyleSheet.create({
...
    listView: {
       backgroundColor: '#F5FCFF'
   },
   loading: {
       flex: 1,
       alignItems: 'center',
       justifyContent: 'center'
   }

constructor(props) {
   super(props);
   this.state = {
       isLoading: true,
       dataSource: new ListView.DataSource({
           rowHasChanged: (row1, row2) => row1 !== row2
       })
   };
}
Sửa lại hàm componentDidMount() và thêm fetchData(). fetchData() sẽ gọi một API request đến Google Books API và đặt state.dataSource với giá trị mà nó nhận được từ response. Đồng thời gán isLoading bằng true.
componentDidMount() {
   this.fetchData();
}

fetchData() {
   fetch(REQUEST_URL)
   .then((response) => response.json())
   .then((responseData) => {
       this.setState({
           dataSource: this.state.dataSource.cloneWithRows(responseData.items),
           isLoading: false
       });
   })
   .done();
}
Sửa lại render() như sau và thêm hàm renderLoadingView(). Chúng ta sẽ kiểm tra xem có đang isLoading không, nếu có chúng ta sẽ hiển thị Loading books.... Khi load xong, chúng ta sẽ có danh sách featured books.
render() {
       if (this.state.isLoading) {
           return this.renderLoadingView();
       }

       return (
            <ListView
                dataSource={this.state.dataSource}
                renderRow={this.renderBook.bind(this)}
                style={styles.listView}
                />
        );
}

renderLoadingView() {
    return (
        <View style={styles.loading}>
            <ActivityIndicatorIOS
                size='large'/>
            <Text>
                Loading books...
            </Text>
        </View>
    );
}
Chuyển sang Xcode và ấn Command + R Và đây là thành quả:

Phần 1 mình xin kết thúc tại đây. Phần 2 mình sẽ nói tiếp về làm trang Search.
Tham khảo
http://www.appcoda.com/react-native-introduction/
http://www.raywenderlich.com/99473/introducing-react-native-building-apps-javascript
https://facebook.github.io/react-native/docs/getting-started.html
All rights reserved