Sử dụng FireBase trong React Native
Bài đăng này đã không được cập nhật trong 7 năm
Giới thiệu
Xin chào các bạn, trong bài viết này mình sẽ làm một demo hướng dẫn các bạn kết hợp giữa React Native và Firebase. Cụ thể ở đây, chúng ta sẽ làm tính năng Authentication sử dụng email và password nhé.
Nguồn tham khảo : https://medium.com/react-native-training/react-native-firebase-authentication-7652e1d2c8a2
Thư viện sử dụng
- React Native : 0.57.0
- React Native Firebase: 5.0.0 (https://www.npmjs.com/package/react-native-firebase)
- React Navigation: 2.14.2 (https://www.npmjs.com/package/react-navigation)
Getting Started
Dưới đây là diagram về demo mà chúng ta sẽ làm.
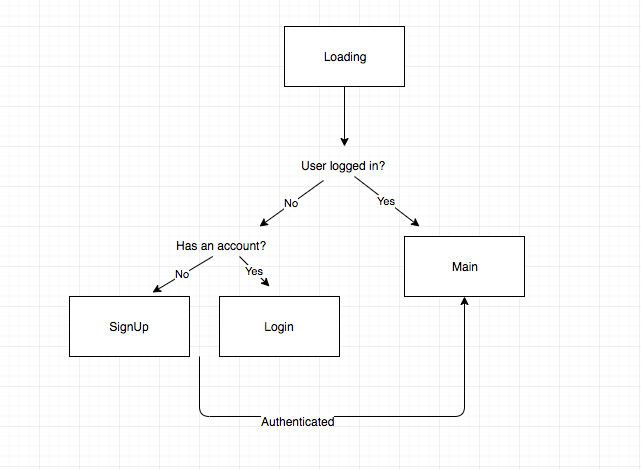
Theo như diagram, chúng ta sẽ có 4 màn hình: Loading, SignUp, Login, Main.
Màn hình Loading sẽ được hiển thị cho đến khi xác định được trạng thái của người dùng, màn hình SignUp là nơi để người dùng đăng ký tài khoản, màn hình Login là nơi để người dùng có thể login, và màn hình Main là nơi chúng ta hiển thị người dùng đã xác thực.
Chúng ta sẽ sử dụng react-navigation để điều hướng giữa 4 màn hình.
Loading.js
// Loading.js
import React from 'react'
import { View, Text, ActivityIndicator, StyleSheet } from 'react-native'
export default class Loading extends React.Component {
  render() {
    return (
      <View style={styles.container}>
        <Text>Loading</Text>
        <ActivityIndicator size="large" />
      </View>
    )
  }
}
const styles = StyleSheet.create({
  container: {
    flex: 1,
    justifyContent: 'center',
    alignItems: 'center',
  }
})
SignUp.js
// SignUp.js
import React from 'react'
import { StyleSheet, Text, TextInput, View, Button } from 'react-native'
export default class SignUp extends React.Component {
  state = { email: '', password: '', errorMessage: null }
handleSignUp = () => {
  // TODO: Firebase stuff...
  console.log('handleSignUp')
}
render() {
    return (
      <View style={styles.container}>
        <Text>Sign Up</Text>
        {this.state.errorMessage &&
          <Text style={{ color: 'red' }}>
            {this.state.errorMessage}
          </Text>}
        <TextInput
          placeholder="Email"
          autoCapitalize="none"
          style={styles.textInput}
          onChangeText={email => this.setState({ email })}
          value={this.state.email}
        />
        <TextInput
          secureTextEntry
          placeholder="Password"
          autoCapitalize="none"
          style={styles.textInput}
          onChangeText={password => this.setState({ password })}
          value={this.state.password}
        />
        <Button title="Sign Up" onPress={this.handleSignUp} />
        <Button
          title="Already have an account? Login"
          onPress={() => this.props.navigation.navigate('Login')}
        />
      </View>
    )
  }
}
const styles = StyleSheet.create({
  container: {
    flex: 1,
    justifyContent: 'center',
    alignItems: 'center'
  },
  textInput: {
    height: 40,
    width: '90%',
    borderColor: 'gray',
    borderWidth: 1,
    marginTop: 8
  }
})
Login.js
// Login.js
import React from 'react'
import { StyleSheet, Text, TextInput, View, Button } from 'react-native'
export default class Login extends React.Component {
  state = { email: '', password: '', errorMessage: null }
  handleLogin = () => {
    // TODO: Firebase stuff...
    console.log('handleLogin')
  }
  render() {
    return (
      <View style={styles.container}>
        <Text>Login</Text>
        {this.state.errorMessage &&
          <Text style={{ color: 'red' }}>
            {this.state.errorMessage}
          </Text>}
        <TextInput
          style={styles.textInput}
          autoCapitalize="none"
          placeholder="Email"
          onChangeText={email => this.setState({ email })}
          value={this.state.email}
        />
        <TextInput
          secureTextEntry
          style={styles.textInput}
          autoCapitalize="none"
          placeholder="Password"
          onChangeText={password => this.setState({ password })}
          value={this.state.password}
        />
        <Button title="Login" onPress={this.handleLogin} />
        <Button
          title="Don't have an account? Sign Up"
          onPress={() => this.props.navigation.navigate('SignUp')}
        />
      </View>
    )
  }
}
const styles = StyleSheet.create({
  container: {
    flex: 1,
    justifyContent: 'center',
    alignItems: 'center'
  },
  textInput: {
    height: 40,
    width: '90%',
    borderColor: 'gray',
    borderWidth: 1,
    marginTop: 8
  }
})
Main.js
// Main.js
import React from 'react'
import { StyleSheet, Platform, Image, Text, View } from 'react-native'
export default class Main extends React.Component {
  state = { currentUser: null }
render() {
    const { currentUser } = this.state
return (
      <View style={styles.container}>
        <Text>
          Hi {currentUser && currentUser.email}!
        </Text>
      </View>
    )
  }
}
const styles = StyleSheet.create({
  container: {
    flex: 1,
    justifyContent: 'center',
    alignItems: 'center'
  }
})
Sau khi đã dựng 4 màn hình, phần navigation sẽ được viết trong App.js
App.js
import React from 'react'
import { StyleSheet, Platform, Image, Text, View } from 'react-native'
import { SwitchNavigator } from 'react-navigation'
// import the different screens
import Loading from './Loading'
import SignUp from './SignUp'
import Login from './Login'
import Main from './Main'
// create our app's navigation stack
const App = SwitchNavigator(
  {
    Loading,
    SignUp,
    Login,
    Main
  },
  {
    initialRouteName: 'Loading'
  }
)
export default App
Nếu khởi động app lúc này, bạn sẽ thấy màn hình Loading cùng vời ActivityIndicator đang quay tròn. Đây chính xác là điều mà chúng ta đang mong muốn, vì chúng ta cần xác định xem người dùng có được xác thực hay không?
Setup Firebase
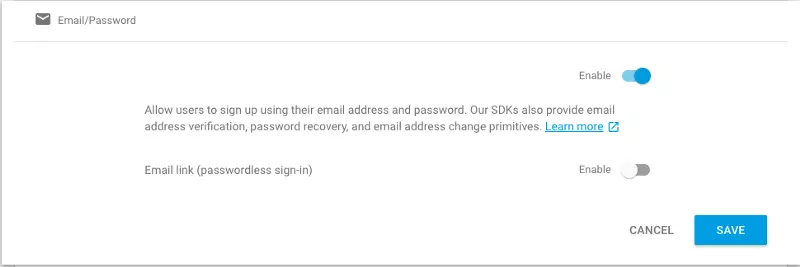
Đầu tiên, hãy mở (https://console.firebase.google.com/) và setup project của bạn. Vì demo của chúng ta sử dụng email và password nên các bạn hãy enable ở firebase console bằng cách sau:
Chọn Project mà bạn vừa tạo -> Develop -> Authentication -> Sign-in Method -> Ở Sign-in provider chọn Email/Password. Enable và save lại.
Ngoài ra, các bạn đọc kỹ documentaion của React Native Firebase (https://rnfirebase.io/docs/v5.x.x/getting-started) để setup riêng cho iOS và Android.
Implement Firebase
Bây giờ chúng ta sẽ thực hiện việc đưa firebase vào các màn hình để xác thực người dùng.
Determining if a user is authenticated
Quay lại với màn hình Loading. Nếu được xác thực, app sẽ chuyển đến màn hình Main, nếu không chúng ta sẽ chuyển đến màn hình SignUp.
// Loading.js
// Omitted other imports...
import firebase from 'react-native-firebase'
export default class Loading extends React.Component {
  componentDidMount() {
    firebase.auth().onAuthStateChanged(user => {
      this.props.navigation.navigate(user ? 'Main' : 'SignUp')
    })
  }
// Omitted the rest of the file...
Ở đây chúng ta sử dụng onAuthStateChanged để lắng nghe trạng thái hiện tại của user.
Hiện tại chúng ta chưa login, nên sẽ ở mản hình Loading một thời gian ngắn. Sau đó sẽ được điều hướng sang màn hình SignUp.
Signing a user up
Ở màn hình SignUp, chúng ta sẽ viết codetrong method handleSignUp để xử lý việc đăng ký của người dùng.
// Omitted other imports...
import { StyleSheet, Text, TextInput, View, Button, Alert } from 'react-native'
import firebase from 'react-native-firebase'

export default class SignUp extends React.Component {
  state = { email: '', password: '', errorMessage: null }
  handleLogin = () => {
    const { email, password } = this.state
    console.log(password)
    if(email.trim() != "" && password.trim() != "") {
    firebase
      .auth()
      .signInWithEmailAndPassword(email, password)
      .then(() => this.props.navigation.navigate('Main'))
      .catch(error => this.setState({ errorMessage: error.message }))
    } else {
      Alert.alert(
        'Warning',
        'Enter email and password',
        [
          {text: 'OK', onPress: () => console.log('OK Pressed')},
        ],
        { cancelable: true }
      )
    }
  }
// Omitted the rest of the file...
Sau khi đăng ký, createUserWithEmailAndPassword nếu thành công sẽ điều hướng đến Main. Và nếu có lỗi xảy ra, chúng ta sẽ hiển thị nó lên.
Displaying the current user on the Main screen
Chúng ta sẽ thấy màn hình Main khi user log in thành công. Chúng ta sẽ lấy thông tin của currentUser từ firebase và hiển thị email của họ.
// Main.js
// Omitted other imports...
import { StyleSheet, Platform, Image, Text, View, Button } from 'react-native'
import firebase from 'react-native-firebase'

export default class Main extends React.Component {
  state = { currentUser: null }

  componentDidMount() {
    const { currentUser } = firebase.auth()
    this.setState({ currentUser })
  }

  handleSignOut = () => {
    if(this.state.currentUser != null) {
      firebase
      .auth()
      .signOut()
      .then(() => this.props.navigation.navigate('Loading'))
      .catch(error => this.setState({ errorMessage: error.message }))
    }
  }

  render() {
    const { currentUser } = this.state
    return (
      <View style={styles.container}>
        <Text>
          Hi {currentUser && currentUser.email}!
        </Text>
        <Button title="Sign Out" onPress={this.handleSignOut} />
      </View>
    )
  }
}
// Omitted the rest of the file...
Hiển tại, chúng ta sẽ thấy màn hình Main hiển thị email của user và có nút "Sign Out". Ở method signOut() nếu thành công app sẽ quay lại màn hình Loading.
Logging an already existing user in
Bước cuối cùng trong demo của chúng ta, update màn hình Login để người dùng có thể đăng nhập nếu đã có tài khoản.
// Login.js
// Omitted other imports...
import { StyleSheet, Text, TextInput, View, Button, Alert } from 'react-native'
import firebase from 'react-native-firebase'

export default class Login extends React.Component {
  state = { email: '', password: '', errorMessage: null }

  handleLogin = () => {
    const { email, password } = this.state
    console.log(password)
    if(email.trim() != "" && password.trim() != "") {
    firebase
      .auth()
      .signInWithEmailAndPassword(email, password)
      .then(() => this.props.navigation.navigate('Main'))
      .catch(error => this.setState({ errorMessage: error.message }))
    } else {
      Alert.alert(
        'Warning',
        'Enter email and password',
        [
          {text: 'OK', onPress: () => console.log('OK Pressed')},
        ],
        { cancelable: true }
      )
    }
  }
  // Omitted the rest of the file...
Như vậy chúng ta đã hoàn thành 1 demo đơn giản về authentication kết hợp giữa React Native & Firebase. Và nếu như bạn vẫn chưa thành công. Hãy thử tham khảo source code của mình, hoặc để lại câu hỏi nhé. https://github.com/oNguyenManhDuc/rn-demo-firebase
Chúc các bạn thành công!
All rights reserved
