Custom StepView in android
Bài đăng này đã không được cập nhật trong 4 năm
Cả tháng nên kế hoạch và Tìm hiểu để tài cuối cùng đến cuối tháng cũng không nghĩ ra được cái nào hay để viết. Đang loay hoay không biết nên tập trung viết theo cái mình đã chọn từ đầu tháng hay nghĩ cái khác thì lại nhớ ra mình cũng phải tìm hiểu cách Custom Step từ view nên tháng này quyết đinh viết một bài demo việc tạo một hiệu ứng Step.
Nếu để tạo được như trên thì cũng có rất nhiều cách có thể Custom nên cũng k tránh khỏi việc khi các bạn đọc bài này sẽ bữu mỗi "làm gì phải tạo kiểu này cho mất công" hay "cái này dễ ẹc" nhưng như mình nói lúc đầu là mình chủ yếu vừa tìm hiểu vừa làm nên cũng cần góp ý.
Bước 1: tạo class customview StepsViewIndicator.java extends view Ở class này ra thực hiện vẽ hình line và các circle bên trong
tạo kích thươc cho line và các Circle
private void init() {
        mLineHeight = 0.01f * THUMB_SIZE;
        mThumbRadius = 0.3f * THUMB_SIZE;
        mCircleRadius = 0.3f * mThumbRadius;
        mPadding = 0.2f * THUMB_SIZE;
    }
- trong hàm onDraw ta thực hiên vẽ:
 @Override
    protected synchronized void onDraw(Canvas canvas) {
        super.onDraw(canvas);
        mDrawListener.onReady();
        // Draw rect bounds
        paint.setAntiAlias(true);
        paint.setColor(mBarColor);
        paint.setStyle(Paint.Style.STROKE);
        paint.setStrokeWidth(2);
        selectedPaint.setAntiAlias(true);
        selectedPaint.setColor(mProgressColor);
        selectedPaint.setStyle(Paint.Style.STROKE);
        selectedPaint.setStrokeWidth(2);
        // Draw rest of the circle'Bounds
        for (int i = 0; i < mThumbContainerXPosition.size(); i++) {
            canvas.drawCircle(mThumbContainerXPosition.get(i), mCenterY, mCircleRadius,
                    (i <= mCompletedPosition + 1) ? selectedPaint : paint);
        }
        paint.setStyle(Paint.Style.FILL);
        selectedPaint.setStyle(Paint.Style.FILL);
        for (int i = 0; i < mThumbContainerXPosition.size() - 1; i++) {
            final float pos = mThumbContainerXPosition.get(i);
            final float pos2 = mThumbContainerXPosition.get(i + 1);
            canvas.drawRect(pos, mLeftY, pos2, mRightY,
                    (i < mCompletedPosition + 1) ? selectedPaint : paint);
        }
        // Draw rest of circle
        for (int i = 0; i < mThumbContainerXPosition.size(); i++) {
            final float pos = mThumbContainerXPosition.get(i);
            canvas.drawCircle(pos, mCenterY, mCircleRadius,
                    (i <= mCompletedPosition + 1) ? selectedPaint : paint);
        }
    }
- Tạo 1 interface để có thể implements bên StepView custom. ở bên trong onDraw các bạn có thể thấy mình gọi hàm mDrawListener.onReady();
 public interface OnDrawListener {
        public void onReady();
    }
Bước 2: Sau bước 1 ta đã có 1 view custom có line và cricle.bước 2 ta sẽ tạo 1 layot
- tạo 1 layout có tên là widget_steps_view.xml
widget_steps_view.xml
<?xml version="1.0" encoding="utf-8"?>
<LinearLayout xmlns:android="http://schemas.android.com/apk/res/android"
    android:layout_width="match_parent"
    android:layout_height="match_parent"
    android:background="@android:color/white"
    android:orientation="vertical">

    <LinearLayout
        android:orientation="vertical"
        android:layout_width="match_parent"
        android:layout_height="wrap_content">

        <ImageView
            android:id="@+id/pen"
            android:layout_marginRight="5dp"
            android:layout_width="wrap_content"
            android:layout_marginBottom="-20dp"
            android:layout_height="wrap_content"
            android:background="@drawable/ic_cute"/>

        <com.example.toanpc.customstepview.StepsViewIndicator
            android:id="@+id/steps_indicator_view"
            android:layout_width="match_parent"
            android:layout_height="wrap_content" />
    </LinearLayout>

    <TextView
        android:id="@+id/title_step"
        android:layout_width="match_parent"
        android:layout_height="wrap_content"
        android:background="@color/colorAccent"
        android:gravity="center_vertical"
        android:textStyle="bold"/>
</LinearLayout>
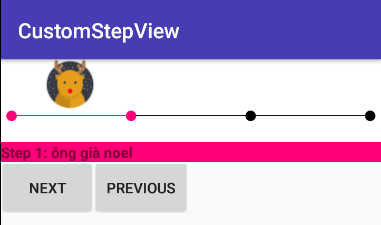
- ở trên mình có tạo 1 layout có Image chứa hình đầu con hươu và 1 textview sẽ hiển thị title của từng bước
- tạo 1 custom lineatlayout StepsView.java extends LinearLayout
public class StepsView extends LinearLayout implements StepsViewIndicator.OnDrawListener {
    private StepsViewIndicator mStepsViewIndicator;
    private TextView mTextStep;
    private String mTitleStep;
    private ImageView mImagePen;
    private ImageView mImageView;
    private int mNumberSteps;
    private int mProgressColorIndicator = Color.YELLOW;
    private int mBarColorIndicator = Color.BLACK;
    private int mStep = 0;

    public StepsView(Context context) {
        this(context, null);
    }

    public StepsView(Context context, AttributeSet attrs) {
        this(context, attrs, 0);
    }

    public StepsView(Context context, AttributeSet attrs,
                     int defStyleAttr) {
        super(context, attrs, defStyleAttr);
        init();
    }

    private void init() {
        View rootView = LayoutInflater.from(getContext()).inflate(R.layout.widget_steps_view, this);
        mStepsViewIndicator = (StepsViewIndicator) rootView.findViewById(R.id.steps_indicator_view);
        mStepsViewIndicator.setDrawListener(this);
        mTextStep = (TextView) rootView.findViewById(R.id.title_step);
        mImagePen = (ImageView) rootView.findViewById(R.id.pen);;
    }

    public String getTitleStep() {
        return mTitleStep;
    }

    public StepsView setTitleStep(String titleStep) {
        mTitleStep = titleStep;
        return this;
    }

    public int getNumberSteps() {
        return mNumberSteps;
    }

    public StepsView setNumberSteps(int numberSteps) {
        mNumberSteps = numberSteps + 1;
        mStepsViewIndicator.setNumberStep(numberSteps + 1);
        return this;
    }

    public int getProgressColorIndicator() {
        return mProgressColorIndicator;
    }

    public StepsView setProgressColorIndicator(int progressColorIndicator) {
        mProgressColorIndicator = progressColorIndicator;
        mStepsViewIndicator.setProgressColor(mProgressColorIndicator);
        return this;
    }

    public int getBarColorIndicator() {
        return mBarColorIndicator;
    }

    public StepsView setBarColorIndicator(int barColorIndicator) {
        mBarColorIndicator = barColorIndicator;
        mStepsViewIndicator.setBarColor(mBarColorIndicator);
        return this;
    }

    public int getStep() {
        return mStep;
    }

    public StepsView setStep(int step) {
        if (step < mNumberSteps) {
            mStep = step - 1;
            mStepsViewIndicator.setStep(mStep);
        }
        return this;
    }

    public void drawView() {
        if (mNumberSteps == 0) {
            throw new IllegalArgumentException("labels must not be null.");
        }
        if (mStep < 0 || mStep > mNumberSteps - 1) {
            throw new IndexOutOfBoundsException(
                    String.format("Index : %s, Size : %s", mStep, mNumberSteps));
        }
        mStepsViewIndicator.invalidate();
    }

    @Override
    public void onReady() {
        drawLabels();
        drawPen();
    }

    private void drawLabels() {
        if (mTitleStep != null) {
            mTextStep.setText(mTitleStep);
        }
    }

    private void drawPen() {
        List<Float> indicatorPosition = mStepsViewIndicator.getThumbContainerXPosition();
        float positision = (indicatorPosition.get(mStep) + indicatorPosition.get
                (mStep + 1)) / 2-50;
        mImagePen.setX(positision);
    }
}
- ở trên mình có tạo các method như setTitle, setStep,SetColorIndicator cho line.
Bước 3: sử dụng
- sau 1 quá trình custom thì việc sử dụng sẽ dễ dàng hơn khi ta đã xây dựng các hàm set get cần thiết.
- ở layout bạn muộn sử dụng bạn chỉ cẩn
<com.example.toanpc.customstepview.StepsView
        android:id="@+id/stepview"
        android:layout_width="match_parent"
        android:layout_height="wrap_content"/>
- và ở class bạn chỉ cần
.stepsview.setNumberSteps(mNumberSteps)
            .setBarColorIndicator(ContextCompat.getColor(getContext(), R.color.colorLineGrey))
            .setProgressColorIndicator(ContextCompat.getColor(getContext(), R.color.colorPrimary))
            .setStep(mStepsTwo)
            .setTitleStep(R.string.text_step2)
            .drawView();
Đôi khi chỉ cần tìm hiểu và nghiên cứu 1 chút ta có thể tạo được 1 custom view chứa hiệu ứng làm cho nguời sử dụng cảm thấy thú vị hơn.
All rights reserved
