Simple way to create a custom Analog clock in Android
Bài đăng này đã không được cập nhật trong 4 năm

Android is a very popular operating system developed by Google which is a widely-used open-source project to become a huge platform of customized apps. Nowadays, many app developers as well as investors like to customize the UI portion of their apps. Going with the flow, I am going to describe about creating a custom analog clock in a simple way!
Before going to start, you may look at the Google source code of Analog-Clock. However, this article is biased to do it according to the following simple steps.
Step - 1: Create a custom view class in Java
First of all, let's create a blank android project where you can add a custom View class namely CustomAnalogClock.java as following:
public class CustomAnalogClock extends View {

    public CustomAnalogClock(Context context, AttributeSet attrs) {
        super(context, attrs);
    }

    public CustomAnalogClock(Context context, AttributeSet attrs, int defStyleAttr) {
        super(context, attrs, defStyleAttr);
    }

    @Override
    protected void onDraw(Canvas canvas) {
          // TODO: Implementation of the analog-clock UI in runtime goes here.
    }
}
Step - 2: Design the clock UI
Suppose, we are going to create a round analog clock by extending View class which will be looked like the following picture.
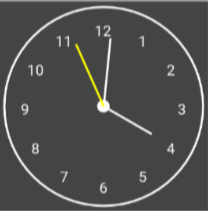
So, basically we will need:
- Round border (you can use rectangle or any other shape).
- 03 clock hands denoting hour, minute and second (I am denoting the "second" clock-hand using yellow color & the height of "hour" clock-hand is smaller comparetively to other 02 hands).
- Center point by which the 03 clock hands will be rotated.
- Hour points (e.g. 12 points/locations for 1h, 2h, 3h, .... ,12h), the hour points can be donoted by dots or numeric numbers.
Step - 3: Declaring necessesary variables
We need some variables to process the UI in runtime using the onDraw() method as declaring below.
public class CustomAnalogClock extends View {

    /** height, width of the clock's view */
    private int mHeight, mWidth = 0;

    /** numeric numbers to denote the hours */
   private int[] mClockHours = {1, 2, 3, 4, 5, 6, 7, 8, 9, 10, 11, 12};

    /** spacing and padding of the clock-hands around the clock round */
    private int mPadding = 0;
    private int mNumeralSpacing = 0;

    /** truncation of the heights of the clock-hands,
    hour clock-hand will be smaller comparetively to others */
    private int mHandTruncation, mHourHandTruncation = 0;

    /** others attributes to calculate the locations of hour-points */
    private int mRadius = 0;
    private Paint mPaint;
    private Rect mRect = new Rect();
    private boolean isInit;  // it will be true once the clock will be initialized.

    public CustomAnalogClock(Context context, AttributeSet attrs) {
        super(context, attrs);
    }

    ...
}
Step - 4: Implement the UI & logic using the onDraw() method
Now, it's time to create a runtime UI logic for the analog-clock. Since, a View can draw only a single image-like representation, so we need to utilize the onDraw() method to redraw the every representation when time changes. And, everytime we need to update the UI of the hand-clocks as the second, minute and hour change. That's the way works as following:
public class CustomAnalogClock extends View {
  ....
   @Override
   protected void onDraw(Canvas canvas) {
       /** initialize necessary values */
       if (!isInit) {
           mPaint = new Paint();
           mHeight = getHeight();
           mWidth = getWidth();
           mPadding = mNumeralSpacing + 50;  // spacing from the circle border
           int minAttr = Math.min(mHeight, mWidth);
           mRadius = minAttr / 2 - mPadding;

           // for maintaining different heights among the clock-hands
           mHandTruncation = minAttr / 20;
           mHourHandTruncation = minAttr / 17;

           isInit = true;  // set true once initialized
       }

       /** draw the canvas-color */
       canvas.drawColor(Color.DKGRAY);
  }
}
Now, we can create a border and a clock-center as following:
public class CustomAnalogClock extends View {

   @Override
   protected void onDraw(Canvas canvas) {

       /** circle border */
       mPaint.reset();
       mPaint.setColor(Color.WHITE);
       mPaint.setStyle(Paint.Style.STROKE);
       mPaint.setStrokeWidth(4);
       mPaint.setAntiAlias(true);
       canvas.drawCircle(mWidth / 2, mHeight / 2, mRadius + mPadding - 10, mPaint);

       /** clock-center */
       mPaint.setStyle(Paint.Style.FILL);
       canvas.drawCircle(mWidth / 2, mHeight / 2, 12, mPaint);  // the 03 clock hands will be rotated from this center point.
   }
}
After basic setup, it's time to create the vital part of the UI. In this stage, we need to make a round border of the 12 points denoting the hours as following:
public class CustomAnalogClock extends View {

    @Override
    protected void onDraw(Canvas canvas) {

        /** border of hours */

        int fontSize = (int) TypedValue.applyDimension(TypedValue.COMPLEX_UNIT_SP, 14, getResources().getDisplayMetrics());
        mPaint.setTextSize(fontSize);  // set font size (optional)

        for (int hour : mClockHours) {
            String tmp = String.valueOf(hour);
            mPaint.getTextBounds(tmp, 0, tmp.length(), mRect);  // for circle-wise bounding

             // find the circle-wise (x, y) position as mathematical rule
            double angle = Math.PI / 6 * (hour - 3);
            int x = (int) (mWidth / 2 + Math.cos(angle) * mRadius - mRect.width() / 2);
            int y = (int) (mHeight / 2 + Math.sin(angle) * mRadius + mRect.height() / 2);

            canvas.drawText(String.valueOf(hour), x, y, mPaint);  // you can draw dots to denote hours as alternative
        }
    }
}
Finally, we need to write the runtime logic for the clock-hands to rotate as following:
public class CustomAnalogClock extends View {

    @Override
    protected void onDraw(Canvas canvas) {

        /** draw clock hands to represent the every single time */

        Calendar calendar = Calendar.getInstance();
        float hour = calendar.get(Calendar.HOUR_OF_DAY);
        hour = hour > 12 ? hour - 12 : hour;

        drawHandLine(canvas, (hour + calendar.get(Calendar.MINUTE) / 60) * 5f, true, false); // draw hours
        drawHandLine(canvas, calendar.get(Calendar.MINUTE), false, false); // draw minutes
        drawHandLine(canvas, calendar.get(Calendar.SECOND), false, true); // draw seconds

        /** invalidate the appearance for next representation of time  */
        postInvalidateDelayed(500);
        invalidate();
    }

    private void drawHandLine(Canvas canvas, double moment, boolean isHour, boolean isSecond) {
        double angle = Math.PI * moment / 30 - Math.PI / 2;
        int handRadius = isHour ? mRadius - mHandTruncation - mHourHandTruncation : mRadius - mHandTruncation;
        if (isSecond) mPaint.setColor(Color.YELLOW);
        canvas.drawLine(mWidth / 2, mHeight / 2, (float) (mWidth / 2 + Math.cos(angle) * handRadius), (float) (mHeight / 2 + Math.sin(angle) * handRadius), mPaint);
    }
}
After writing all the above code-snaps, the analog-clock view class is ready to test as the following snap:

All rights reserved
