Bắt đầu với Rails 5: [Phần 1] Cài đặt và ứng dụng đầu tiên
Bài đăng này đã không được cập nhật trong 4 năm
Bài viết này mình sẽ viết dành cho những người chưa từng làm việc với Ruby on Rails và bắt đầu tìm hiểu để làm việc được với Rails. Trong khuôn khổ bài viết lần này mình sẽ hướng dẫn cách cài đặt những thứ cần thiết để bắt đầu với Rails và build ứng dụng đơn giản đầu tiên.
I. Cài đặt.
Hiện tại version mới nhất của rails là version 5.1.2 release ngày 26/6/2017. Mình sẽ hướng dẫn các bạn cài đặt Rails 5.1.2 và một editor đó là VIM.
1. Cài đặt Rails 5.1.2
Để cài đặt được Rails 5.1.2 thì Ruby version phải >=2.2.2 nên các bạn cần kiểm tra lại ruby version hiện tại đang là bao nhiêu. Nếu ruby version hiện tại mà chưa lớn hơn 2.2 thì cài đặt như sau nhé:
Install RVM
\curl -sSL https://get.rvm.io | bash -s stable --ruby
Install ruby 2.3
rvm install 2.3
Sau khi cài đặt được ruby 2.3 rồi thì chúng ta cài đặt rails 5.1.2 như sau nhé:
gem install rails -v 5.1.2
2. Cài đặt Vim
- update vim using homebrew
brew update brew install vim - setup VUNDLER.VIM
kdir ~/.vim mkdir ~/.vim/bundle git clone https://github.com/gmarik/Vundle.vim.git ~/.vim/bundle/Vundle.vim - Setup sử dụng ~/.vimrc
touch ~/.vimrc vim ~/.vimrc - Copy những config sau vào file ~/.vimrc
set nocompatible              " be iMproved, required
filetype off                  " required

" set the runtime path to include Vundle and initialize
set rtp+=~/.vim/bundle/Vundle.vim
call vundle#begin()
" alternatively, pass a path where Vundle should install plugins
"call vundle#begin('~/some/path/here')

" let Vundle manage Vundle, required
Plugin 'gmarik/Vundle.vim'

" The following are examples of different formats supported.
" Keep Plugin commands between vundle#begin/end.
" plugin on GitHub repo
"Plugin 'tpope/vim-fugitive'
" plugin from http://vim-scripts.org/vim/scripts.html
"Plugin 'L9'
" Git plugin not hosted on GitHub
"Plugin 'git://git.wincent.com/command-t.git'
" git repos on your local machine (i.e. when working on your own plugin)
"Plugin 'file:///home/gmarik/path/to/plugin'
" The sparkup vim script is in a subdirectory of this repo called vim.
" Pass the path to set the runtimepath properly.
"Plugin 'rstacruz/sparkup', {'rtp': 'vim/'}
" Avoid a name conflict with L9
"Plugin 'user/L9', {'name': 'newL9'}

" My plugins
Plugin 'tpope/vim-rails'
Plugin 'tpope/vim-rake'
Plugin 'tpope/vim-bundler'
Plugin 'scrooloose/nerdtree'
Plugin 'tpope/vim-projectionist'
Plugin 'jlanzarotta/bufexplorer'
Plugin 'scrooloose/nerdcommenter'

" All of your Plugins must be added before the following line
call vundle#end()            " required
filetype plugin indent on    " required
" To ignore plugin indent changes, instead use:
filetype plugin on
"
" Brief help
" :PluginList          - list configured plugins
" :PluginInstall(!)    - install (update) plugins
" :PluginSearch(!) foo - search (or refresh cache first) for foo
" :PluginClean(!)      - confirm (or auto-approve) removal of unused plugins

" see :h vundle for more details or wiki for FAQ
" Put your non-Plugin stuff after this line
syntax on
:set tabstop=2
:set shiftwidth=2
:set expandtab
II. Ứng dụng đầu tiên
1. Để tạo một ứng dụng mới bằng Rails dùng lệnh dưới đây
rails _5.1.2_ new hello_app
Rails sẽ tự động tạo ra các file ban đầu cần thiết cho một ứng dụng
 create
      create  README.md
      create  Rakefile
      create  config.ru
      create  .gitignore
      create  Gemfile
      create  app
      create  app/assets/config/manifest.js
      create  app/assets/javascripts/application.js
      create  app/assets/javascripts/cable.js
      create  app/assets/stylesheets/application.css
      create  app/channels/application_cable/channel.rb
      create  app/channels/application_cable/connection.rb
      create  app/controllers/application_controller.rb
      .
      .
      .
      create  tmp/cache/assets
      create  vendor/assets/javascripts
      create  vendor/assets/javascripts/.keep
      create  vendor/assets/stylesheets
      create  vendor/assets/stylesheets/.keep
      remove  config/initializers/cors.rb
         run  bundle install
Fetching gem metadata from https://rubygems.org/..........
Fetching additional metadata from https://rubygems.org/..
Resolving dependencies...
Installing rake 11.1.2
Using concurrent-ruby 1.0.2
.
.
.
Your bundle is complete!
Use `bundle show [gemname]` to see where a bundled gem is installed.
         run  bundle exec spring binstub --all
* bin/rake: spring inserted
* bin/rails: spring inserted
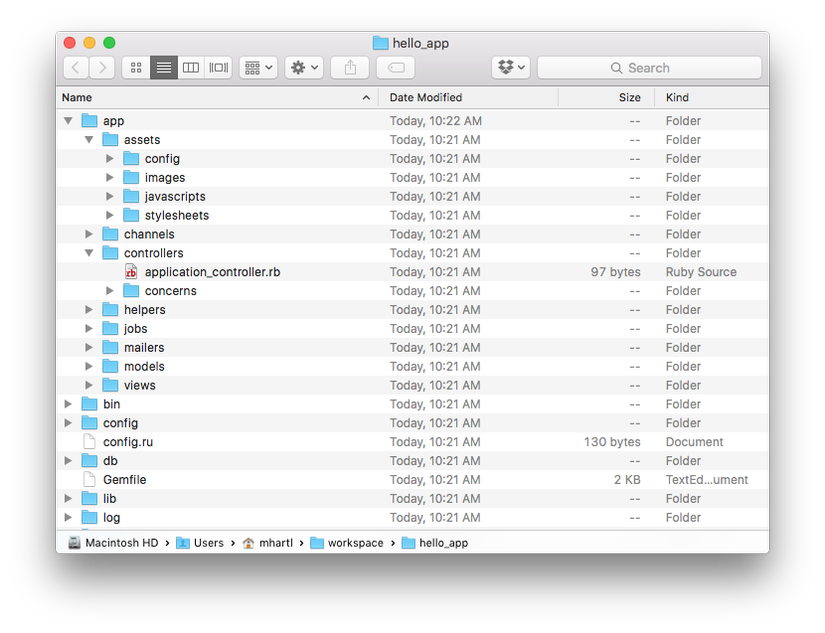
2. Cấu trúc thư mục

- app/ thư mục để code Core application (app), bao gồm models, views, controllers, and helpers
- app/assets thư mục để Applications assets như là cascading style sheets (CSS), JavaScript files, and images
- bin/ thư mục để file thực thi
- config/ thư mục để config cho Application
- db/ thư mục để Database files
- doc/ thư mục để documentation cho application
- lib/ thư mục để các module thư viện
- lib/assets thư mục để các file assets của thư viện như là cascading style sheets (CSS), JavaScript files, and images
- log/ thư mục để file log
- public/ dữ liệu có thể access public như là error pages
- bin/rails 1 nơi để sinh ra code mở các session console và starting a local server
- test/ thư mục để file test của application
- tmp/ thư mục để file tạm
- vendor/ thư mục để code của bên thứ 3
- vendor/assets các file asset của bên thứ 3 cascading style sheets (CSS), JavaScript files, and images
- README.md file miêu tả application
- Rakefile task tiện ích chạy thông qua rake
- Gemfile Gem yêu cầu cho app
- Gemfile.lock list các gem đang sử dụng để đảm bảo khi copy app thì sử dụng đúng version của gem
- config.ru file config cho Rack middleware
- .gitignore file bỏ qua bởi Git
3. Start server của Rails
Di chuyển đến folder của app và chạy lệnh
rails server
=> Booting Puma
=> Rails application starting on http://localhost:3000
=> Run `rails server -h` for more startup options
=> Ctrl-C to shutdown server
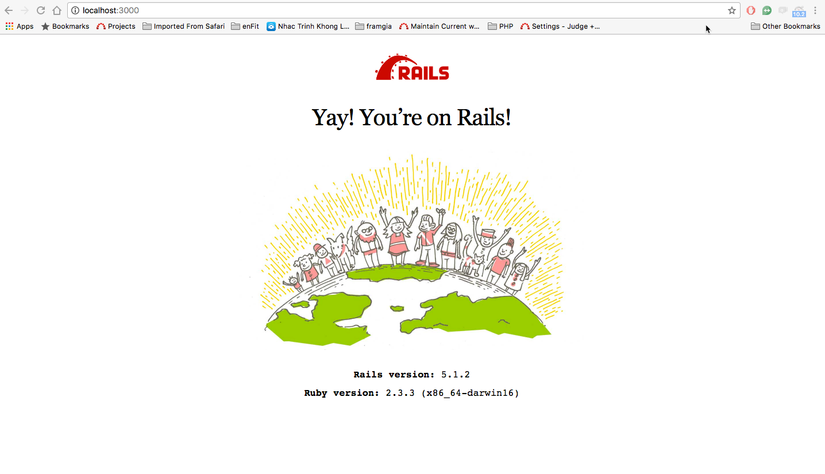
Và giờ bạn vào trình duyệt để kiểm tra kết quả.

Tài liệu tham khảo: https://www.railstutorial.org/book/beginning#cha-beginning https://rvm.io/rvm/install https://coderwall.com/p/1b5zcg/setup-vim-for-ruby-on-rails-osx
All rights reserved