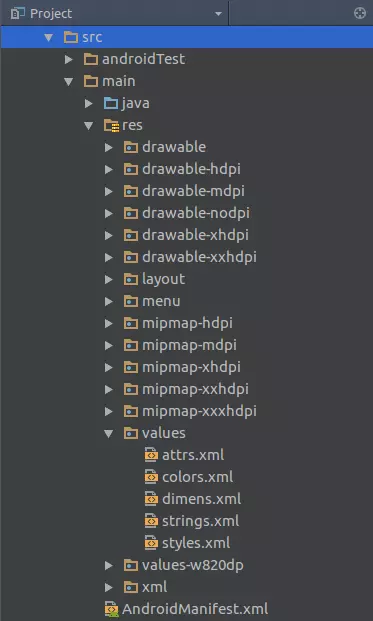
List of Android Resources
Bài đăng này đã không được cập nhật trong 4 năm
There are lots of resources needed to design the UI(User Interface) of the Andorid applications like animation, color, layout, drawable, values, menu, raw or xml items. All of these resources are kept separately in various sub-directories under res/ folder inside the project's parent folder. There is a basic skeleton is given below about how the resources are organized.

Basically, the common resources are mostly used are enlisted following:
- Animation (example of sub-directory: res/anim)
- Drawable (example of sub-directory: res/drawable, res/drawable-hdpi, res/no-drawable)
- Layout (example of sub-directory: res/layout, res/layout-port, res/layout-land)
- Mipmap (example of sub-directory: res/mipmap-hdpi, res/mipmap-mdpi)
- Values (example of sub-directory: res/values, res/values-en, res/values-jp)
- Raw (example of sub-directory: res/raw)
- Menu (example of sub-directory: res/menu)
- Xml (example of sub-directory: res/xml)
This article is going to make a summary about all the resources at a glance.
Animation
A good Android application needs animation to show different transition flows. The developers use res/anim directory to keep the xml files of animation.
Example:
res/anim/blink.xml
<?xml version="1.0" encoding="utf-8"?>
<set xmlns:android="http://schemas.android.com/apk/res/android">
    <alpha android:fromAlpha="0.0"
        android:toAlpha="1.0"
        android:interpolator="@android:anim/accelerate_interpolator"
        android:duration="600"
        android:repeatMode="reverse"
        android:repeatCount="infinite"/>
</set>
To use it inside Java:
// load animation
Animation animBlink = AnimationUtils.loadAnimation(getApplicationContext(), R.anim.blink);
// set animation listener
animBlink.setAnimationListener(this);
That's how, you can make lots of animation files. There are more examples : http://www.androidhive.info/2013/06/android-working-with-xml-animations/
Drawable
We need many drawable files like .png, .jpg, .gif or xml which are compiled into bitmaps, state lists, shape or animation drawable. Usually these files are saved into res/drawable directory. There are several types of drawable directories which maintain the files to support user interface in multiple screen. You can see the official article about this issue : https://developer.android.com/guide/practices/screens_support.html Also, there is a nice article about various kind of drawable files creation & implementation here : http://www.vogella.com/tutorials/AndroidDrawables/article.html
Layout
This is the most important part of UI resources for an Android project. All the xml layout files are kept inside the res/layout directory. Also, there is various cases like res/layout-port or res/layout-land to support potrait & landscape screen. There is a basic tutorial about how to design the layouts : https://developer.android.com/guide/topics/ui/declaring-layout.html
Mipmap
According to Google's blog, the mipmap folders are responsible to keep the launcher icons only. Of course, any other drawable files should be kept in the relevant drawable folders as before. The mipmap is introduced since Android 4.3 to provide a quality image and various image scales, which can be particularly useful if you expect your image to be scaled during an animation. You can use a mipmap icon as following:
android:icon="@mipmap/ic_launcher"
Values
res/values is another important directory which is used to keep several important files to store string, dimension, color, style or different attributes. Also, you can keep the string data to support different languages, here is the details: https://developer.android.com/training/basics/supporting-devices/languages.html
Example:
res/values/string.xml
<resources>
    <string name="app_name">My Application</string>
</resources>
res/values-jp/string.xml
<resources>
    <string name="app_name">私のアプリケーション</string>
</resources>
res/values/array.xml
<resources>
    <string-array name="gender">
        <item>Male</item>
        <item>Female</item>
        <item>Other</item>
    </string-array>
</resources>
res/values/attrs.xml
<resources>
    <declare-styleable name="CustomTextView">
        <attr name="textStyle" format="integer"/>
    </declare-styleable>
</resources>
res/values/colors.xml
<resources>
  <color name="primary">#E91E63</color>
  <color name="primary_dark">#C2185B</color>
  <color name="primary_light">#F8BBD0</color>
  <color name="accent">#03A9F4</color>
  <color name="primary_text">#212121</color>
  <color name="secondary_text">#757575</color>
  <color name="divider">#BDBDBD</color>
</resources>
res/values/dimens.xml
<resources>
    <dimen name="activity_horizontal_margin">16dp</dimen>
    <dimen name="activity_vertical_margin">16dp</dimen>
</resources>
res/values/styles.xml
<resources>
    <style name="AppTheme" parent="Theme.AppCompat.Light.NoActionBar">
        <item name="colorPrimary">@color/primary</item>
        <item name="colorPrimaryDark">@color/primary_dark</item>
        <item name="colorAccent">@color/accent</item>
    </style>
</resources>
res/values/public.xml
This is a special file is used to assign fixed resource IDs to Android resources. For example, let's consider a string resources:
<resources>
    <string name="string1">ABC</string>
    <string name="string3">ABCDEFGHI</string>
</resources>
After compiled, we will find an assigned ID in the R.class file:
public final class R {
    public static final class string {
        public static final int string1=0x7f040000;  // ID  - 1
        public static final int string3=0x7f040001;  // ID  - 2
    }
}
Now, after adding string2 :
<resources>
    <string name="string1">ABC</string>
    <string name="string2">ABCDEF</string>
    <string name="string3">ABCDEFGHI</string>
</resources>
public final class R {
    public static final class string {
        public static final int string1=0x7f040000;  // ID  - 1
        public static final int string2=0x7f040001;  // ID  - 2
        public static final int string3=0x7f040002;  // ID  - 3, before it was 0x7f040001
    }
}
That's how, the assigned IDs are changed for the new resources. You can use res/values/public.xml file to prevent this ID changing. There is a demo of public.xml file is given below:
<?xml version="1.0" encoding="utf-8"?>
<resources>
    <public type="attr" name="commentTextColor" id="0x7f010007" />
    <public type="drawable" name="add_icon" id="0x7f020000" />
    <public type="drawable" name="add_icon_pressed_bl" id="0x7f020001" />
 </resources>
Also, there are more resources are well documented in the official site : https://developer.android.com/guide/topics/resources/more-resources.html
Raw
Android automatically generates an ID for any file located inside res/raw directory. This ID is then stored an the R class that will act as a reference to a file, meaning it can be easily accessed from other Android classes and methods and even in Android XML files. Using the automatically generated ID is the fastest way to have access to a file in Android. There is a basic difference in-between raw & asset folder that is the asset folder is an “appendix” directory. The R class does not generate IDs for the files placed there but for the res/raw directory it does. You can keept several files inside raw folder like image, pdf, text or media files.
For example, to read a wav file from the raw folder you need to write Java code as following:
MediaPlayer player = MediaPlayer.create(this, R.raw.music_wav);
player.start();
Menu
The Android applications consist of action bar which have to show menu items via popup. Those menu items are declared into xml files which are kept into res/menu directory to access. There is an xml file declaring menu items are given below:
<menu xmlns:android="http://schemas.android.com/apk/res/android">
    <item android:id="@+id/menu_toggle_log"
          android:showAsAction="always"
          android:title="@string/sample_show_log" />
</menu>
Xml
The res/xml directory is for keeping arbitrary XML files that can be read at runtime by calling Resources.getXML(). This is a special directory is used to keep the xml files for providing the user interface with several configuration at various purposes like saving data into preferences, search interface etc. It's said that the best practices for keeping preference XML file location is res/xml.
More details : https://developer.android.com/guide/topics/resources/index.html
All rights reserved