Hướng dẫn xuất file pdf trong ứng dụng iOS
Bài đăng này đã không được cập nhật trong 7 năm
I. Giới thiệu
Xuất file pdf là một chức năng không thường xuyên xuất hiện trong ứng dụng iOS, vì vậy nhiều khi chúng ta không để ý rằng chúng ta hoàn toàn có thể trực tiếp xuất file pdf ngay trên ứng dụng. Trong bài viết này, tôi xin giới thiệu cách xuất file pdf trong ứng dụng iOS.
II. Nội dung
Để xuất file pdf, chúng ta sẽ phải làm lần lượt các bước sau:
-
- Tạo file html cho nội dung cần in pdf
-
- in file pdf dựa vào nội dung từ html
Sau đây, chúng ta sẽ thực hiện từng bước thông qua ứng dụng demo cụ thể.
1. tạo project
Bây giờ chúng ta sẽ tạo một ứng dụng xuất hoá đơn pdf từ dữ liệu có sẵn
Đầu tiên, các bạn mở Xcode, tạo một project mới với ngôn ngữ Swift và đặt tên PrintPDFTutorial
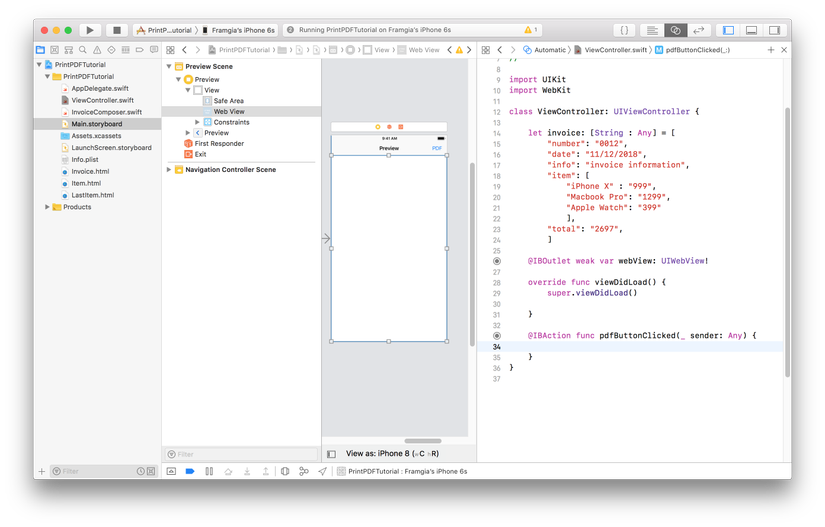
Tiếp theo, các bạn mở Main.storyboard lần lượt làm các việc sau:
- Thêm navigation cho ViewController: Editor -> Embed In -> Navigation Controller
- Thêm Right Bar Button Item với tên PDF
- Đặt title cho màn là Preview
- Thêm UIWebView vào ViewController và thêm các constraint top, trailing, leading, bottom cho UIWebView đó
- Mở Assistant editor, kéo IBOutlet cho UIWebView và IBAction cho button PDF
- Thêm code sau trong class ViewController:
    let invoice: [String : Any] = [
        "number": "0012",
        "date": "11/12/2018",
        "info": "invoice information",
        "item": [
            "iPhone X" : "999",
            "Macbook Pro": "1299",
            "Apple Watch": "399"
            ],
        "total": "2697",
    ]
Sau khi hoàn thành các việc bên trên, chúng ta sẽ được như hình sau:
2. Tạo html template
Để tập chung vào nội dung chính của bài viêt là xuất file pdf, nên khi tạo project, chúng ta đã tạo dữ liệu với một hoá đơn cố định (Dictionary invoice bên trên). Tuy nhiên trong ứng dụng thực tế, data đầu vào chắc chắn sẽ không phải cố định, vì thế chúng ta sẽ phải tạo 1 template html với khung trước, lần lượt qua các bước sau:
- Chọn File -> New -> File… -> Other -> Empty để tạo một file trống
- Đổi tên file thành Invoice.html
- Mở file Invoice.html và điền nội dung như sau:
<!DOCTYPE html>
<html>
    <head>
        <meta content="text/html; charset=utf-8" http-equiv="content-type">
            <title>A simple, clean, and responsive HTML invoice template</title>
            <style>
                .invoice-box{
                    max-width:800px;
                    margin:auto;
                    padding:30px;
                    /*border:1px solid #eee;*/
                    /*box-shadow:0 0 10px rgba(0, 0, 0, .15); */
                    font-size:16px;
                    line-height:24px;
                    font-family:'Helvetica Neue', 'Helvetica', Helvetica, Arial, sans-serif;
                    color:#555;
                }

            .invoice-box table{
                width:100%;
                line-height:inherit;
                text-align:left;
            }

            .invoice-box table td{
                padding:5px;
                vertical-align:top;
            }

            .invoice-box table tr td:nth-child(2){
                text-align:right;
            }

            .invoice-box table tr.top table td{
                padding-bottom:20px;
            }

            .invoice-box table tr.top table td.title{
                font-size:45px;
                line-height:45px;
                color:#333;
            }

            .invoice-box table tr.information table td{
                padding-bottom:40px;
            }

            .invoice-box table tr.heading td{
                background:#eee;
                border-bottom:1px solid #ddd;
                font-weight:bold;
            }

            .invoice-box table tr.details td{
                padding-bottom:20px;
            }

            .invoice-box table tr.item td{
                border-bottom:1px solid #eee;
            }

            .invoice-box table tr.item.last td{
                border-bottom:none;
            }

            .invoice-box table tr.total td:nth-child(2){
                border-top:2px solid #eee;
                font-weight:bold;
            }

            @media only screen and (max-width: 600px) {
                .invoice-box table tr.top table td{
                    width:100%;
                    display:block;
                    text-align:center;
                }

                .invoice-box table tr.information table td{
                    width:100%;
                    display:block;
                    text-align:center;
                }
            }
            </style>
            </head>
    <body>
        <div class="invoice-box">
            <table cellpadding="0" cellspacing="0">
                <tbody>
                    <tr class="top">
                        <td colspan="2">
                            <table>
                                <tbody>
                                    <tr>
                                        <td class="title"> <img src="#LOGO_IMAGE#" style="width:100%; max-width:300px; background-color: #cdcdcd">
                                            </td>
                                        <td> Invoice #: #INVOICE_NUMBER#<br>
                                            #INVOICE_DATE#<br>
                                            #DUE_DATE# </td>
                                    </tr>
                                </tbody>
                            </table>
                        </td>
                    </tr>
                    <tr class="information">
                        <td colspan="2">
                            <table>
                                <tbody>
                                    <tr>
                                        <td> #SENDER_INFO# </td>
                                        <td> #RECIPIENT_INFO# </td>
                                    </tr>
                                </tbody>
                            </table>
                        </td>
                    </tr>
                    <tr class="heading">
                        <td> Payment Method </td>
                        <td> <br>
                        </td>
                    </tr>
                    <tr class="details">
                        <td> #PAYMENT_METHOD# </td>
                        <td> <br>
                        </td>
                    </tr>
                    <tr class="heading">
                        <td> Item </td>
                        <td> Price </td>
                    </tr>
                    #ITEMS#
                    <tr class="total">
                        <td><br>
                        </td>
                        <td> Total: #TOTAL_AMOUNT# </td>
                    </tr>
                </tbody>
            </table>
        </div>

    </body>
</html>
Làm tương tự các bước bên trên để tạo file Item.html và LastItem.html với nội dung sau:
<tr class="item"> <td>#ITEM_DESC#</td> <td>#PRICE#</td> </tr> <tr class="item last"> <td>#ITEM_DESC#</td> <td>#PRICE#</td> </tr>3. Hiển thị nội dung html
Bây giờ chúng ta sẽ thực hiện việc hiển thị nội dung html ra webView.
Đầu tiên, chúng ta tạo một file với tên InvoiceComposer.swift và nội dung như sau:
import Foundation
import UIKit

class InvoiceComposer: NSObject {

    let pathToInvoiceHTMLTemplate = Bundle.main.path(forResource: "Invoice", ofType: "html")

    let pathToSingleItemHTMLTemplate = Bundle.main.path(forResource: "Item", ofType: "html")

    let pathToLastItemHTMLTemplate = Bundle.main.path(forResource: "LastItem", ofType: "html")

    let senderInfo = "My Dinh Bus Station<br>123 Pham Hung Str.<br>10000 - Hanoi<br>VietNam"

    let dueDate = ""

    let paymentMethod = "Wire Transfer"

    let logoImageURL = "https://cdn.viblo.asia/img/logo_full.fbfe575.svg"

    var invoiceNumber: String!

    var pdfFilename: String!

    override init() {
        super.init()
    }
}
class InvoiceComposer sẽ là nơi chúng ta viết các hàm để tạo invoice html và invoice pdf. Các property bên trên là path đến các template html và các thông tin chúng ta sẽ điền vào các template đó. Nếu để ý file Invoice.html, các bạn có thể thấy nhiều chỗ có dạng #INVOICE_NUMBER#, #INVOICE_DATE#,… để chúng ta replace và fill dữ liệu vào template.
Bây giờ chúng ta sẽ thêm hàm render html cho class InvoiceComposer như sau:
func renderInvoice(invoiceNumber: String, invoiceDate: String, recipientInfo: String, items: [String: String], totalAmount: String) -> String! {
        self.invoiceNumber = invoiceNumber

        do {
            // 1
            var HTMLContent = try String(contentsOfFile: pathToInvoiceHTMLTemplate!)

            // 2
            HTMLContent = HTMLContent.replacingOccurrences(of: "#LOGO_IMAGE#", with: logoImageURL)

            HTMLContent = HTMLContent.replacingOccurrences(of: "#INVOICE_NUMBER#", with: invoiceNumber)

            HTMLContent = HTMLContent.replacingOccurrences(of: "#INVOICE_DATE#", with: invoiceDate)

            HTMLContent = HTMLContent.replacingOccurrences(of: "#DUE_DATE#", with: dueDate)

            HTMLContent = HTMLContent.replacingOccurrences(of: "#SENDER_INFO#", with: senderInfo)

            HTMLContent = HTMLContent.replacingOccurrences(of: "#RECIPIENT_INFO#", with: recipientInfo.replacingOccurrences(of: "\n", with: "<br>"))

            HTMLContent = HTMLContent.replacingOccurrences(of: "#PAYMENT_METHOD#", with: paymentMethod)

            HTMLContent = HTMLContent.replacingOccurrences(of: "#TOTAL_AMOUNT#", with: totalAmount)

            // 3
            var allItems = ""
            for (index, item) in items.enumerated() {
                var itemHTMLContent: String!
                // 4
                if index != items.count - 1 {
                    itemHTMLContent = try String(contentsOfFile: pathToSingleItemHTMLTemplate!)
                }
                else {
                    itemHTMLContent = try String(contentsOfFile: pathToLastItemHTMLTemplate!)
                }

                itemHTMLContent = itemHTMLContent.replacingOccurrences(of: "#ITEM_DESC#", with: item.key)
                itemHTMLContent = itemHTMLContent.replacingOccurrences(of: "#PRICE#", with: item.value)
                allItems += itemHTMLContent
            }
            // 5
            HTMLContent = HTMLContent.replacingOccurrences(of: "#ITEMS#", with: allItems)

            return HTMLContent
        }
        catch {
            print("Unable to open and use HTML template files.")
        }

        return nil
    }
Trong code trên, chúng ta lần lượt làm các bước sau:
- 1: Lấy nội dung html từ file Invoice.html
- 2: Lần lượt replace các placeholder text bằng data thực
- 3: Riêng đối với dữ liệu item có thể có nhiều, chúng ta thực hiện vòng lặp để tạo string html cho tất cả các item
- 4: Dựa vào vị trí của item có phải cuối cùng hay không để load nội dung từ file Item.html hay LastItem.html
- 5: Gắn dữ liệu các item vào html string và trả về html String cuối cùng
Bây giờ chúng ta đã có được hàm tạo nội dung html, tiếp theo chúng ta cần hiển thị nội dung ra ViewController. Mở file ViewController.swift và thêm code như sau:
	var invoiceComposer: InvoiceComposer?

    var htmlContent: String!

	func showInvoiceInHtml() {
        invoiceComposer = InvoiceComposer()
        if let invoiceHTML = invoiceComposer?.renderInvoice(invoiceNumber: invoice["number"] as! String,
                                                            invoiceDate: invoice["date"] as! String,
                                                            recipientInfo: invoice["info"] as! String,
                                                            items: invoice["item"] as! [String: String],
                                                            totalAmount: invoice["total"] as! String) {
            webView.loadHTMLString(invoiceHTML, baseURL: URL(string: invoiceComposer!.pathToInvoiceHTMLTemplate!)!)
            htmlContent = invoiceHTML
        }
    }
Tiếp theo, gọi showInvoiceInHtml() viewDidLoad( như sau:
	override func viewDidLoad() {
        super.viewDidLoad()

        showInvoiceInHtml()
    }
Vậy là chúng ta đã hiển thị được nội dung html lên webView. build chạy thử ứng dụng, các bạn sẽ được kết quả như hình sau:
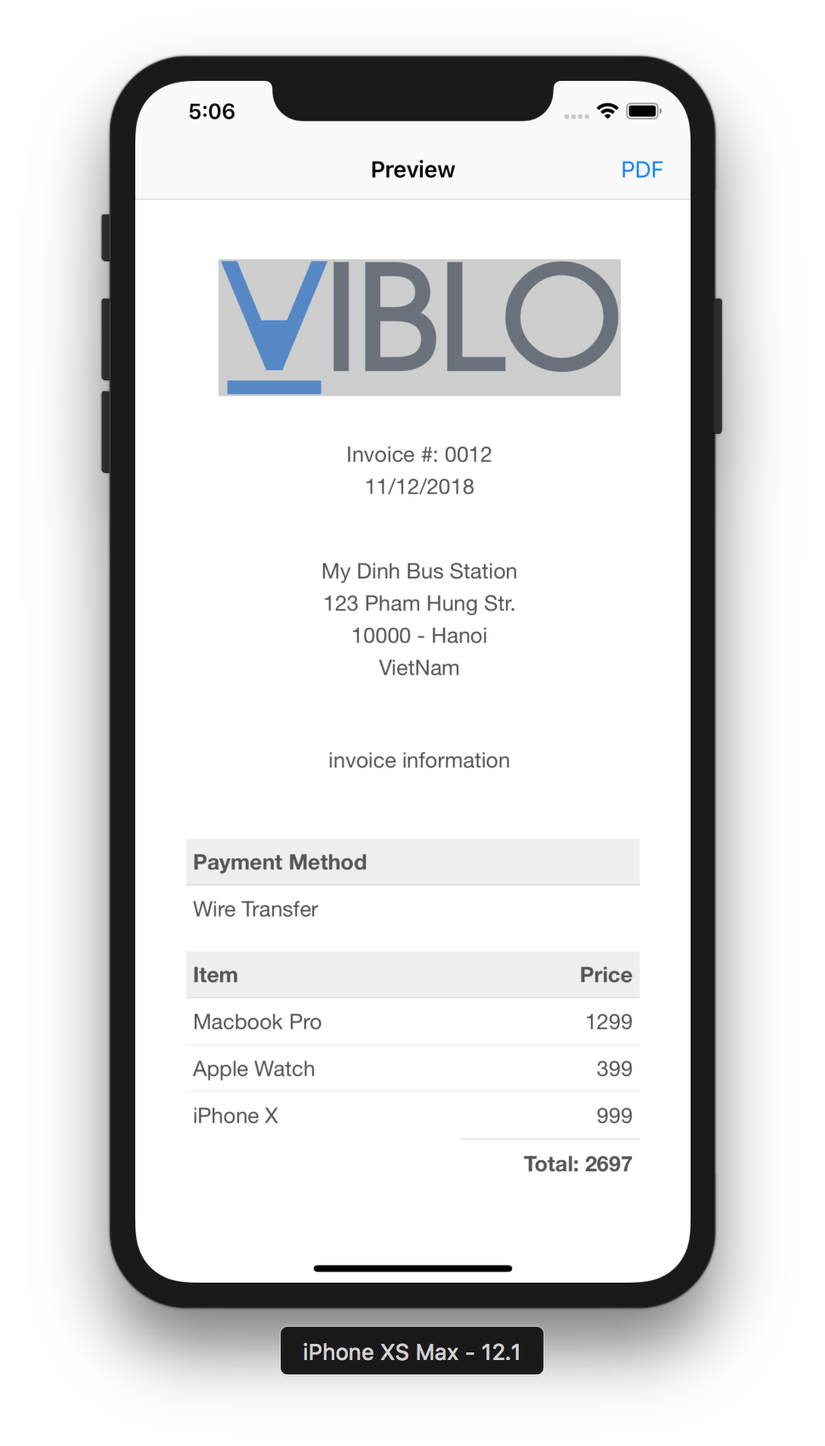 https://images.viblo.asia/bc0720c0-a41e-48eb-9d10-a11ff491c7df.png
4. In nội dung html ra pdf
Đầu tiên, chúng ta tạo file CustomPrintPageRenderer.swift với class CustomPrintPageRenderer thừa kế từ UIPrintPageRenderer. Thêm code cho class CustomPrintPageRenderer như sau:
import UIKit

class CustomPrintPageRenderer: UIPrintPageRenderer {
    let A4PageWidth: CGFloat = 595.2

    let A4PageHeight: CGFloat = 841.8


    override init() {
        super.init()

        let pageFrame = CGRect(x: 0.0, y: 0.0, width: A4PageWidth, height: A4PageHeight)

        // 1
        self.setValue(NSValue(cgRect: pageFrame), forKey: "paperRect")
        // 2
        self.setValue(NSValue(cgRect: pageFrame), forKey: "printableRect")
        // 3
        self.setValue(NSValue(cgRect: pageFrame.insetBy(dx: 10.0, dy: 10.0)), forKey: "printableRect")
    }
Trong đoạn code trên, chúng ta lần lượt:
- 1: Gán giá trị page frame cho file pdf
- 2: Gán giá trị inset cho nội dung của file pdf
- 3: Trong trường hợp chúng ta muốn inset của nội dung khác 0, chúng ta làm như code này
Bây giờ, thêm các function sau vào class InvoiceComposer:
	func drawPDFUsingPrintPageRenderer(printPageRenderer: UIPrintPageRenderer) -> NSData! {
        let data = NSMutableData()
        // 5
        UIGraphicsBeginPDFContextToData(data, CGRect.zero, nil)

        UIGraphicsBeginPDFPage()

        printPageRenderer.drawPage(at: 0, in: UIGraphicsGetPDFContextBounds())

        UIGraphicsEndPDFContext()

        return data
    }

    func exportHTMLContentToPDF(HTMLContent: String) {
		// 1
        let printPageRenderer = CustomPrintPageRenderer()
        // 2
        let printFormatter = UIMarkupTextPrintFormatter(markupText: HTMLContent)
        printPageRenderer.addPrintFormatter(printFormatter, startingAtPageAt: 0)
        // 3
        let pdfData = drawPDFUsingPrintPageRenderer(printPageRenderer: printPageRenderer)

        let documentDirectory = NSSearchPathForDirectoriesInDomains(.documentDirectory, .userDomainMask, true)[0]

        pdfFilename = "\(documentDirectory)/Invoice\(invoiceNumber!).pdf"
        // 4
        pdfData?.write(toFile: pdfFilename, atomically: true)

        print(pdfFilename)
    }
Toàn bộ quá trình export pdf được thực thi trong 2 hàm bên trên, từ việc lấy page html, vẽ lên pdf data, lưu kết quả ra file pdf. Chúng ta lần lượt phân tích các dòng code trong đoạn code trên:
- 1: tạo instance printPageRenderer của CustomPrintPageRenderer để thực hiện tạo file pdf
- 2: tạo instance printFormatter của UIMarkupTextPrintFormatter và set printFormatter cho printPageRenderer
- 3: gọi hàm drawPDFUsingPrintPageRenderer(printPageRenderer:) để thực thi việc vẽ pdf và trả về data
- 4: lưu data vào file pdf
- 5: đây chính là quá trình vẽ page html ra pdf. Nếu để ý các hàm UIGraphicsBeginPDFContextToData, UIGraphicsEndPDFContext, các bạn sẽ thấy nó có vẻ gần gần tương tự với các hàm tạo ảnh: UIGraphicsBeginImageContext(size:), UIGraphicsEndImageContext()
Việc cuối cùng chúng ta cần làm là viết code gọi đến hàm exportHTMLContentToPDF(HTMLContent:). Mở ViewController.swift và thêm code sau vào hàm pdfButtonClicked(_ sender:)
	@IBAction func pdfButtonClicked(_ sender: Any) {
        invoiceComposer?.exportHTMLContentToPDF(HTMLContent: htmlContent)
    }
Vậy là quá trình code đã hoàn thành. Các bạn build chạy thử app trên simulator, bấm vào nút PDF trên màn hình để ứng dụng xuất file pdf. Dựa vào đường dẫn đến file trong Console log của Xcode, các bạn có thể tìm thấy file Invoice0012.pdf trong thư mục Documents của simulator
III. Kết luận
Trên đây tôi đã giới thiệu cách tạo file pdf từ ứng dụng iOS. File pdf là một chuẩn file rất thông dụng, vì vậy đây là kiến thức chúng ta nên biết để sử dụng khi cần thiết. Hi vọng bài viết này sẽ giúp ích được cho các bạn trong quá trình thực hiện export file pdf trong iOS.
Cuối cùng, xin cảm ơn các bạn đã theo dõi bài viết này, have a nice day ^_^!
All rights reserved
