Tích hợp SwiftUI trong UIKit project và ngược lại
Bài đăng này đã không được cập nhật trong 5 năm
I. Giới thiệu
Sự ra đời của SwiftUI đã mang lại một cuộc cách mạng trong lập trình iOS. Tuy nhiên trong quá trình viết App thực tế, nhiều trường hợp chúng ta sẽ phải sử dụng đồng thời cả SwiftUI và UIKit:
- Nhúng SwiftUI view vào UIKit project: xảy ra khi chúng ta đã có project viết bằng UIKit từ trước, bây giờ muốn thêm code SwiftUI để tận dụng những lợi thế của nó, nhưng lại không có đủ thời gian để đập project đi xây lại
- Nhúng UIKit view vào SwiftUI project: xảy ra khi chúng ta muốn thêm thư viện/code có sẵn viết bằng UIKit vào SwiftUI project. Việc này thường xuyên xảy ra, do SwiftUI vẫn còn rất mới, nhiều thư viện vẫn chưa có phiên bản viết bằng SwiftUI, vì thế việc nhúng thư viện UIKit là bắt buộc phải làm
Trong bài viết này, tôi sẽ trình bày cách nhúng(Host) SwiftUI view vào UIKit project, và cách nhúng(Host) UIKit view vào SwiftUI project.
II. Nội dung
Bài viết này giả định là các bạn đã quen thuộc với UIKit, và cũng đã làm quen ít nhiều với SwiftUI. Nếu chưa biết một tí gì về SwiftUI, thì các bạn nên tìm hiểu 1 chút về SwiftUI trước. Có thể tham khảo các bài viết về SwiftUI tôi đã viết trên Viblo ở đây
Vì bài viết này sẽ tập chung vào việc kết hợp giữa SwiftUI và UIKit, nên tôi sẽ chỉ tập chung vào nội dung này, còn nội dung App sẽ đơn giản nhất có thể.
1. Host SwiftUI view vào UIKit project
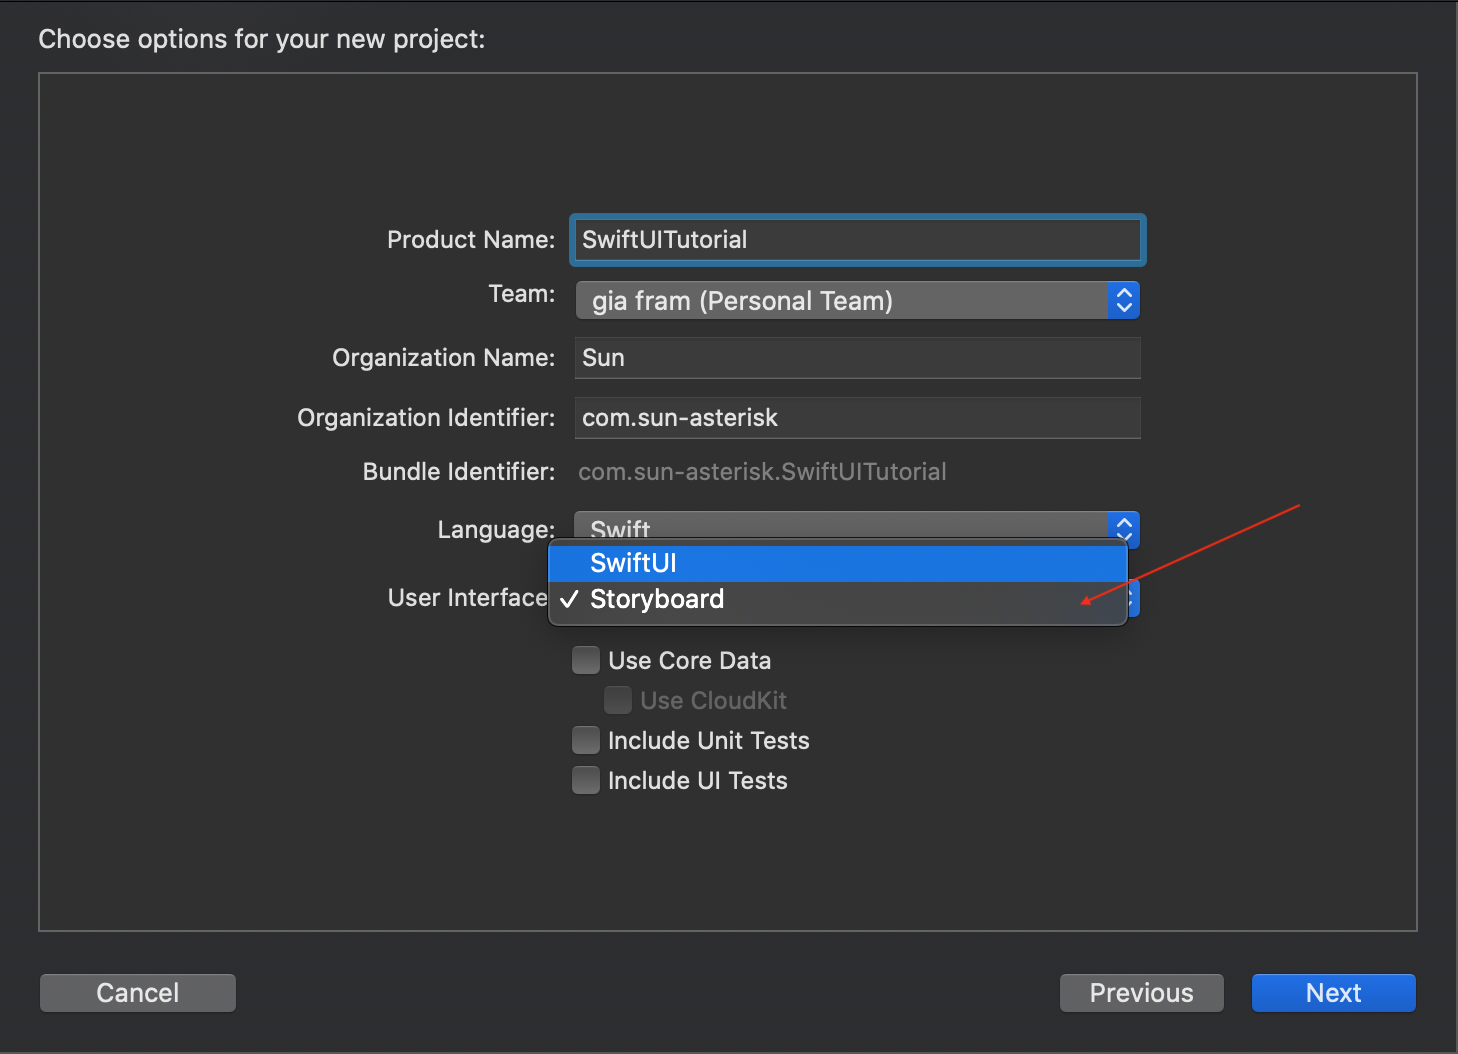
Đầu tiên, chúng ta cần tạo UIKit project trước. Để tạo project dùng UIKit thì chúng ta tạo project như mọi khi thôi. Ở bước chọn User Interface thì các bạn chọn Storyboard và tạo project -> done
Tiếp theo, chúng ta đơn giản tạo 1 button cho ViewController với tên “Show SwiftUI”, thêm auto layout, thêm @IBAction cho nó trong ViewController.swift như sau:
	@IBAction func handleShowSwiftUIButtonClicked(_ sender: Any) {

    }
Để có thể Host SwiftUI view, chúng ta cần có code SwiftUI trước đã. Các bạn tạo thêm file SwiftUI như sau: File -> New -> File -> SwiftUI View -> đặt tên SwiftUIView -> create file
Nội dung của SwiftUIView cũng rất đơn giản, chỉ gồm 1 button để khi click vào thì chúng ta quay trở lại màn ViewController. Các bạn thêm code vào SwiftUIView.swift như sau:
import SwiftUI

struct SwiftUIView: View {
    var body: some View {
        Button(action: {
            // TODO: handle back to UIKit
        }) {
            Text("Back to UIKit")
        }
    }
}

struct SwiftUIView_Previews: PreviewProvider {
    static var previews: some View {
        SwiftUIView()
    }
}
OK, bây giờ chúng ta trở lại với công việc cần làm, host SwiftUIView view vào ViewController view. Để làm được việc này, chúng ta implement ViewController.swift như sau:
import UIKit
// 1
import SwiftUI

class ViewController: UIViewController {

    override func viewDidLoad() {
        super.viewDidLoad()

    }

    @IBAction func handleShowSwiftUIButtonClicked(_ sender: Any) {
        // 2
        let hostingController = UIHostingController(rootView: SwiftUIView())
        // 3
        present(hostingController, animated: true, completion: nil)
    }
}
Bên trên, chúng ta chỉ cần làm các việc đơn giản:
- 1: import SwiftUI framework
- 2: tạo instance của UIHostingController với rootView là instance của SwiftUIView
- 3: modal present instance của UIHostingController để hiển thị SwiftUIView
Quá đơn giản phải không? Thực tế thì tất cả SwiftUI view đều được nhúng trong UIHostingController, vì thế để nhúng SwiftUI vào UIKit, chỉ cần nhúng vào UIHostingController là xong.
Bây giờ, để back từ SwiftUI về UIKit, chúng ta có thể đơn giản sử dụng Notification như sau:
struct SwiftUIView: View {
    var body: some View {
        Button(action: {
            NotificationCenter.default.post(name: NSNotification.Name(rawValue: "BackToViewControllerNotification"), object: nil)
        }) {
            Text("Back to UIKit")
        }
    }
}
	override func viewDidLoad() {
        super.viewDidLoad()

        NotificationCenter.default.addObserver(self, selector: #selector(handeDismissNotification), name: NSNotification.Name(rawValue: "BackToViewControllerNotification"), object: nil)
    }

    deinit {
        NotificationCenter.default.removeObserver(self)
    }

    @objc func handeDismissNotification() {
        dismiss(animated: true, completion: nil)
    }
2. Host UIViewController vào SwiftUI
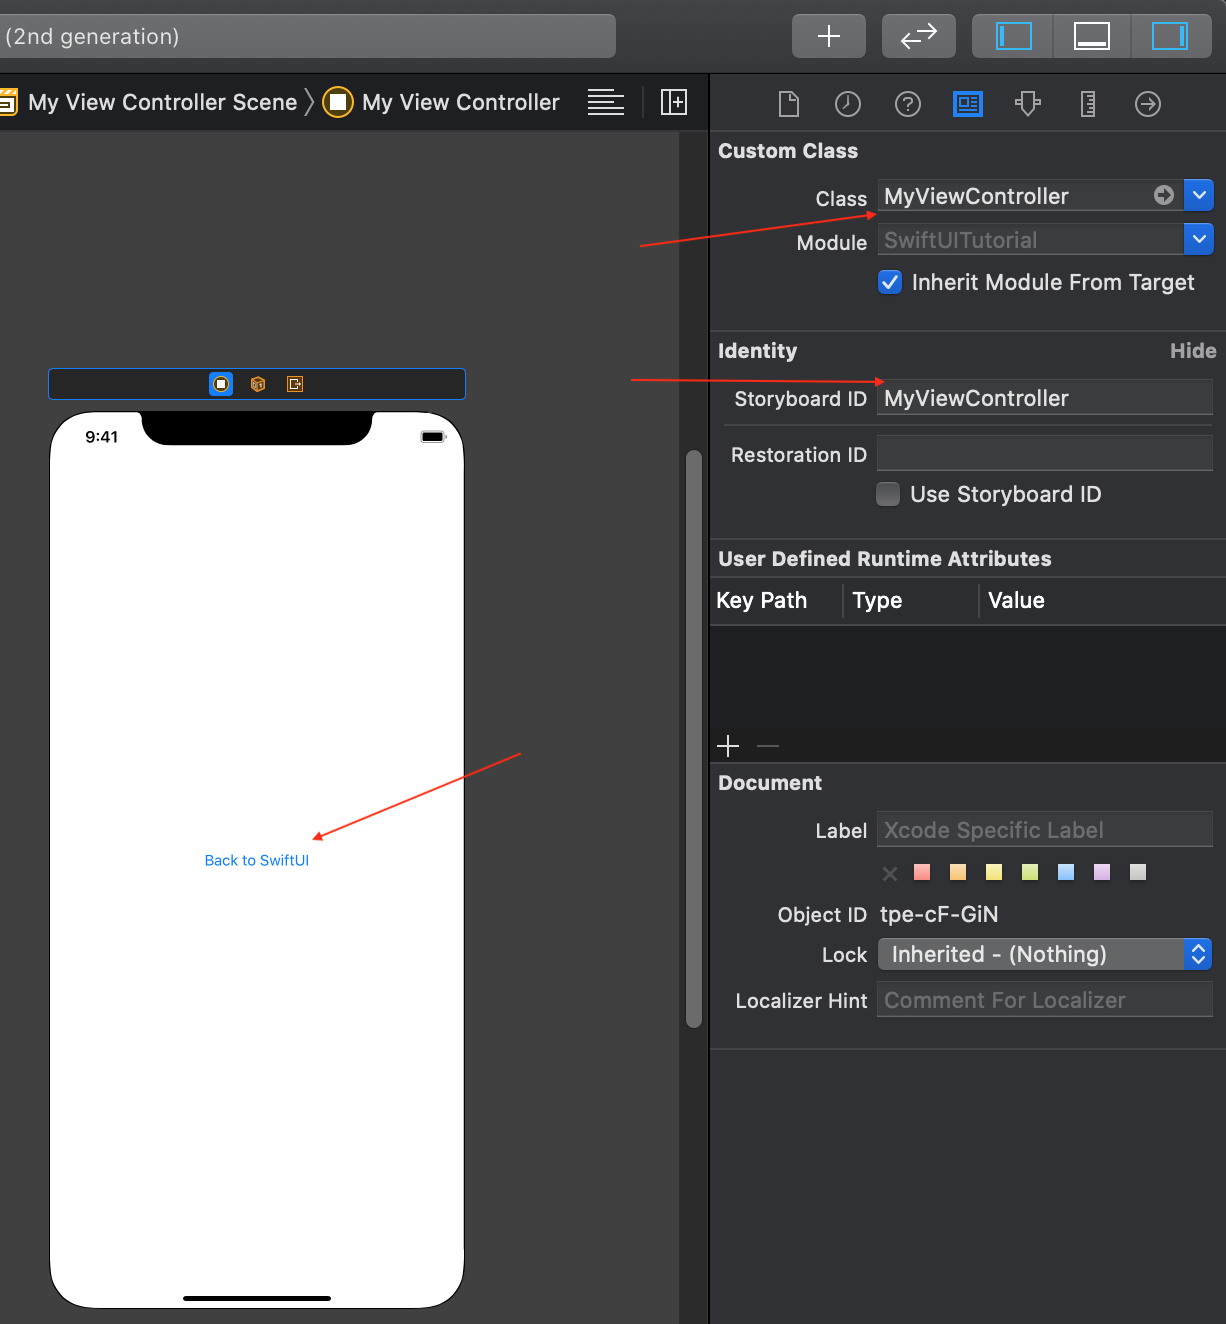
Để host UIViewController vào SwiftUI thì chúng ta lại cần nhúng UIViewController vào UIViewControllerRepresentable. Giả sử đang từ SwiftUIView, chúng ta cần present 1 UIViewController, chúng ta cần làm lần lượt những việc sau: Đầu tiên, tạo file MyViewController.swift, là subclass của UIViewController: File -> New -> File… -> Cocoa Touch Class -> UIViewController subclass -> create Tiếp Theo, vào Main.storyboard, thêm 1 ViewController. Trong Identity inspector điền Class, Storyboard ID điền MyViewController. Thêm Button với tên “Back to SwiftUI” như hình sau:
Tiếp theo, chúng ta implement MyViewController.swift với code sau:
import UIKit
// 1
import SwiftUI

class MyViewController: UIViewController {

    override func viewDidLoad() {
        super.viewDidLoad()

    }

    // 2
    @IBAction func handleBackToSwiftUIButtonClicked(_ sender: Any) {
        dismiss(animated: true, completion: nil)
    }

}

// 3
struct MyViewControllerRepresentation: UIViewControllerRepresentable {
    // 4
    typealias UIViewControllerType = MyViewController

    // 5
    func makeUIViewController(context: Context) -> MyViewController {
        UIStoryboard(name: "Main", bundle: nil).instantiateViewController(withIdentifier: "MyViewController") as! MyViewController
    }

    // 6
    func updateUIViewController(_ uiViewController: MyViewController, context: Context) {

    }
}
Bên trên, chúng ta lần lượt làm các việc:
- 1: import framework SwiftUI
- 2: thêm @IBAction cho button để dismiss MyViewController. Vì SwiftUI thực chất là view nhúng vào UIHostingController, nên instance của MyViewController chính là presentedViewController của UIHostingController
- 3: tạo struct MyViewControllerRepresentation comform UIViewControllerRepresentable protocol. Đây chính là struct sẽ giữ instance của MyViewController để tương tác với SwiftUI
- 4: tạo typealias UIViewControllerType là MyViewController. Việc này sẽ giúp MyViewControllerRepresentation hiểu được nó đang quản lý instance của class MyViewController
- 5: function makeUIViewController khởi tạo instance của MyViewController. Đây là function bắt buộc để conform UIViewControllerRepresentable protocol
- 6: function updateUIViewController cũng là function bắt buộc để conform UIViewControllerRepresentable protocol. Hàm này được gọi khi cần update ViewController khi data bên SwiftUI có thay đổi. Ở đây chúng ta không cần update gì nên chỉ cần bỏ trống hàm này
Tiếp theo, kéo IBAction vừa tạo cho Button trong Main.storyboard.
Bây giờ, chúng ta thêm code cho SwiftUIView.swift để present MyViewController như sau:
struct SwiftUIView: View {
    // 1
    @State var showMyVC = false

    var body: some View {
        // 2
        VStack {
            Button(action: {
                NotificationCenter.default.post(name: NSNotification.Name(rawValue: "BackToViewControllerNotification"), object: nil)
            }) {
                Text("Back to UIKit")
            }
            // 3
            Divider()
            // 4
            Button(action: {
                // 5
                self.showMyVC = true
            }) {
                Text("Present MyViewController")
            }.sheet(isPresented: $showMyVC) { // 6
                MyViewControllerRepresentation()
            }
        }
    }
}
Bên trên, chúng ta lần lượt làm các việc:
- 1: Khai báo State property showMyVC, chúng ta sử dụng showMyVC để present instance của MyViewController
- 2: Vì có nhiều button nên chúng ta phải nhúng vào VStack
- 3: Thêm Divider view để tách biệt các Button view ra cho đẹp
- 4: Thêm button với chức năng present MyViewController khi click vào
- 5: Handle action khi click button, ở đây chúng ta gán giá trị cho property showMyVC, giá trị showMyVC thay đổi sẽ được binding vào sheet để hiển thị sheet
- 6: Thực hiện present MyViewController. Trong SwiftUI chúng ta sẽ sử dụng sheet thay cho present modal của UIKit. MyViewControllerRepresentation chính là struct quản lý MyViewController mà chúng ta đã code bên trên.
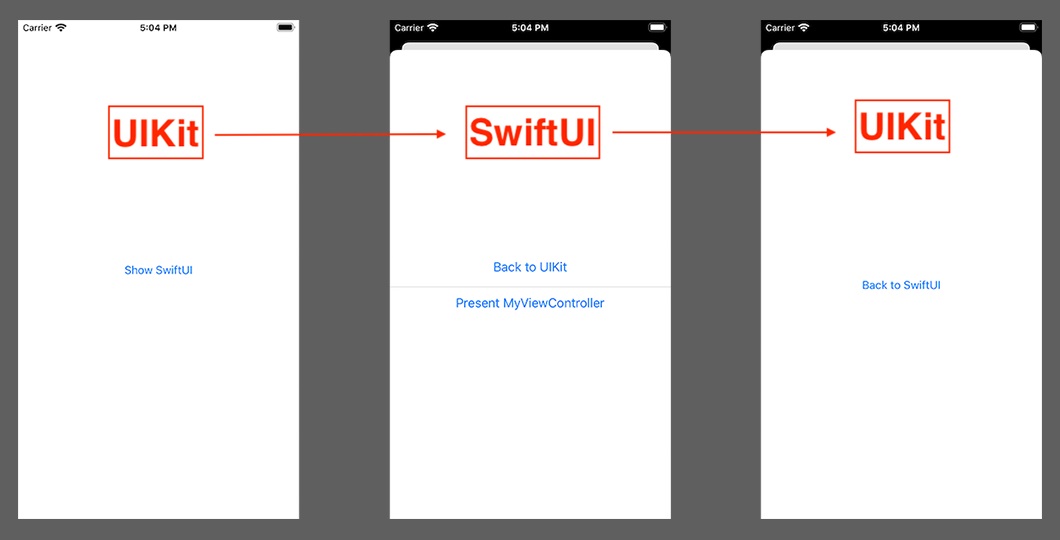
Build chạy project, chúng ta sẽ được kết quả như hình sau:
3.Host UIView vào SwiftUI
Nhiều trường hợp chúng ta chỉ cần nhúng 1 UIView vào SwiftUI. Những lúc này, chúng ta không thể sử dụng biện pháp nhúng nguyên cả UIViewController như bên trên được. Phần này tôi sẽ trình bày cách nhúng UIView vào SwiftUI
Giả sử, bây giờ tôi muốn nhúng UISlider view vào SwiftUIView. Tất nhiên SwiftUI cũng có Slider nên nhúng UISlider vào khá là vô dụng, nhưng mà ở đây chúng ta đang tìm hiểu cách host UIView, nên các bạn đừng đặt hỏi tại sao lại làm 1 việc vô dụng vậy nhé  .
.
Việc Host UIView cũng tương tự như Host UIViewController, chúng ta sẽ tạo 1 struct của SwiftUI, nhúng UIView vào struct và gọi struct từ SwiftUI code. Khác nhau ở chỗ đối với UIViewController chúng ta dùng UIViewControllerRepresentable protocol, còn với UIView chúng ta dùng UIViewRepresentable.
Ok, bây giờ chúng ta sẽ bắt đầu code. Đầu tiên tạo file ColorUISlider.swift và implement với nội dung như sau:
import UIKit
import SwiftUI
// 1
struct ColorUISlider: UIViewRepresentable {
    // 2
    typealias UIViewType = UISlider
    // 3
    var color: UIColor
    @Binding var value: Double
    // 4
    func makeUIView(context: Context) -> UISlider {
        let slider = UISlider(frame: .zero)
        slider.thumbTintColor = color
        slider.value = Float(value)

        slider.addTarget(context.coordinator,
          action: #selector(Coordinator.valueChanged(_:)), for: .valueChanged)

        return slider
    }
    // 5
    func updateUIView(_ uiView: UISlider, context: Context) {
        uiView.value = Float(self.value)
    }
    // 6
    func makeCoordinator() -> ColorUISlider.Coordinator {
        Coordinator(value: $value)
    }
    // 7
    class Coordinator: NSObject {

        var value: Binding<Double>

        init(value: Binding<Double>) {
            self.value = value
        }

        @objc func valueChanged(_ sender: UISlider) {
            self.value.wrappedValue = Double(sender.value)
        }
    }
}
Bên trên, chúng ta lần lượt làm các việc sau:
- 1: Tạo struct ColorUISlider comform protocol UIViewRepresentable. UIKit view sẽ được wrap trong struct này để tương tác với SwiftUI
- 2: Giống bên trên với UIViewControllerRepresentable, tạo typealias để ColorUISlider hiểu nó đang wrap UIView dạng UISlider
- 3: khai báo property. Ở đây value là dạng @Binding, data sẽ được pass từ SwiftUI sang
- 4: Cũng giống với UIViewControllerRepresentable, đây là hàm khởi tạo instance của UIKit view cho ColorUISlider. Các bạn lưu ý, chúng ta cần thêm hàm addTarget() với event .valueChanged cho slider để mỗi khi slider thay đổi, giá trị sẽ được pass lại cho SwiftUI view
- 5: Hàm này update UIKit view, cụ thể ở đây là UISlider mỗi khi @State property của SwiftUI có sự thay đổi
- 6, 7: Các đoạn code này cần được viết để truyền giá trị thay đổi từ UISlider về property của SwiftUI. Kết hợp với code addTarget() bên trên, mỗi khi value của UISlider được update, value sẽ được gửi trả về SwiftUI.
Tiếp theo, chúng ta thêm code vào SwiftUIView.swift như sau:
struct SwiftUIView: View {

    @State var showMyVC = false
    // 1
    @State var sliderValue: Double = 0

    var body: some View {
        VStack {
            Button(action: {
                NotificationCenter.default.post(name: NSNotification.Name(rawValue: "BackToViewControllerNotification"), object: nil)
            }) {
                Text("Back to UIKit")
            }
            Divider()
            Button(action: {
                self.showMyVC = true
            }) {
                Text("Present MyViewController")
            }.sheet(isPresented: $showMyVC) {
                MyViewControllerRepresentation()
            }
            Divider()
            // 2
            ColorUISlider(color: UIColor.red, value: $sliderValue)
                .padding(.horizontal, 10)
            Divider()
            // 3
            Text("Slider value \(sliderValue)")
        }
    }
}
Bên trên, chúng ta lần lượt làm các việc:
- 1: Thêm State property sliderValue, property này sẽ được sử dụng cho Slider
- 2: thêm Slider vào view, vì UISlider được nhúng vào ColorUISlider, nên chúng ta chỉ cần khởi tạo instance ColorUISlider là được, và bind sliderValue cho Slider
- 3: Hiển thị giá trị từ Slider ra Text
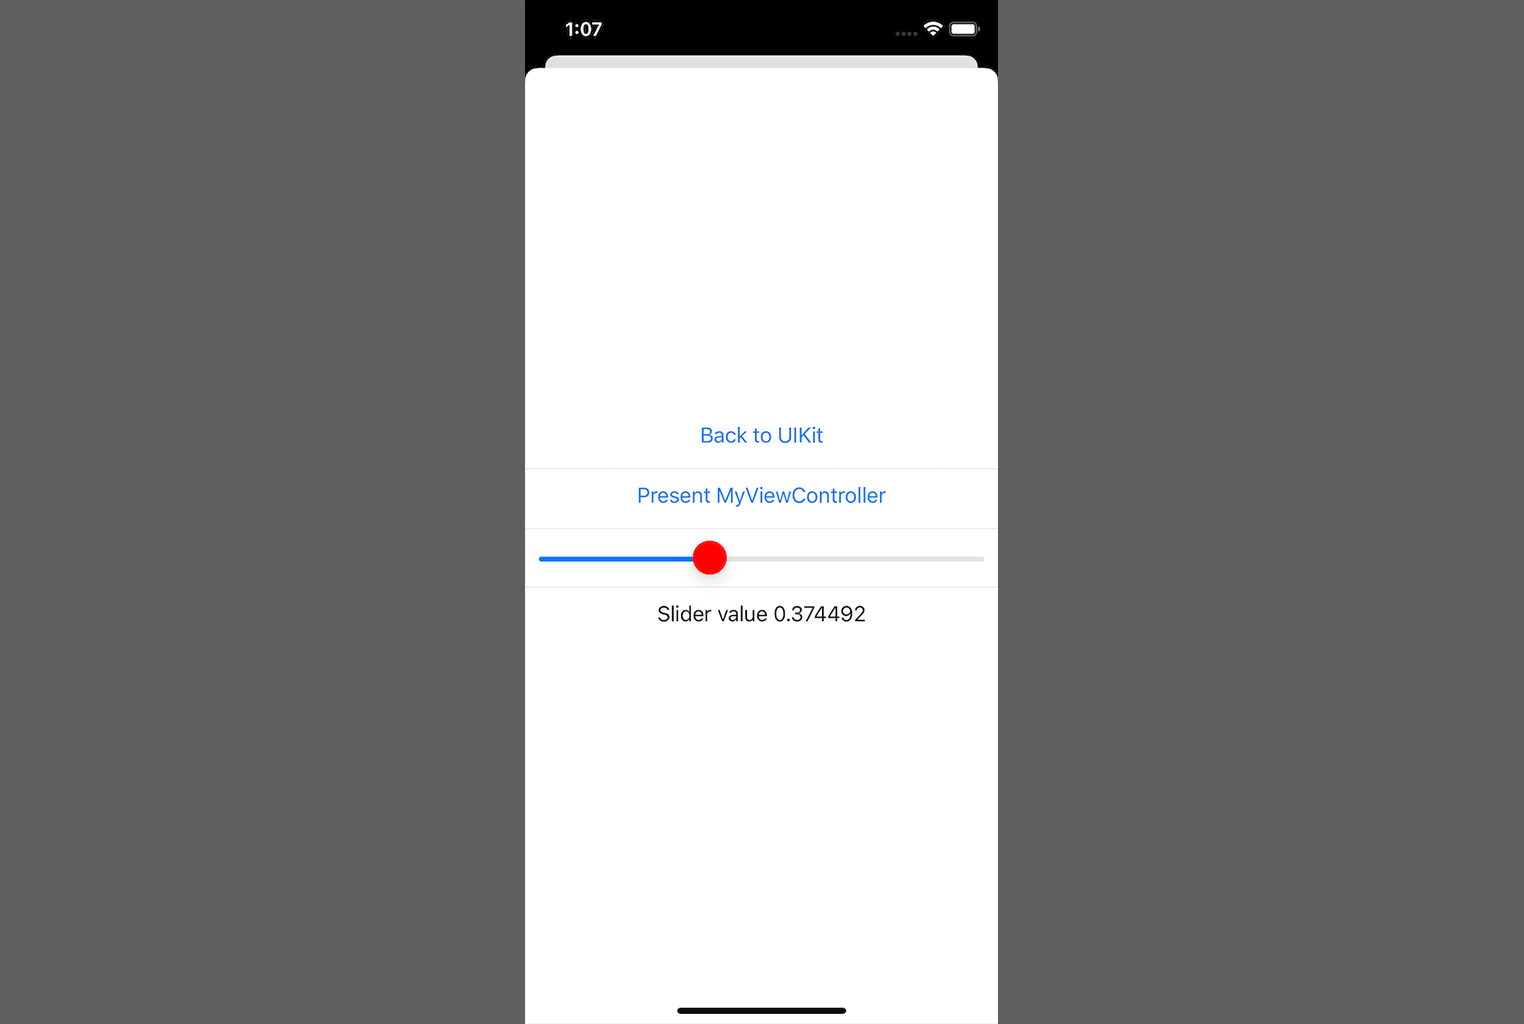
Build chạy project, chuyển sang màn SwiftUIView, chúng ta được kết quả như hình sau:
III. Kết luận
Trên đây tôi đã giới thiệu cách nhúng UIKit View/ViewController vào SwiftUI View và ngược lại. Thực tế khi code bằng SwiftUI, chúng ta sẽ thường xuyên phải nhúng UIKit View vào SwiftUI, hi vọng bài viết này sẽ giúp ích cho các bạn trong những tình huống như vậy. Cuối cùng, xin cảm ơn các bạn đã theo dõi bài viết, have a nice day ^_^!
All rights reserved
