Tìm hiểu về SwiftUI (Phần 5): Xây dựng Search bar cho ListView
This post hasn't been updated for 6 years
I. Giới thiệu
Search là chức năng cơ bản, rất hay gặp trong ứng dụng. Tuy nhiên, nếu như trong UIKit, chúng ta được cung cấp sẵn UISearchBar và UISearchController, thì SwiftUI hiện tại vẫn chưa có một View nào liên quan đến search cả.
Trong bài viết này, chúng ta sẽ cùng nhau tìm hiểu cách tạo một search bar View từ những View có sẵn của SwiftUI: TextField, Button, Image,…
II. Nội dung
1. Starter project
Nội dung bài này sẽ bắt đầu với project đã hoàn thành trong phần 4 của serial này. Các bạn có thể đọc lại các bài trước của serial tại đây
Với các bạn không muốn đọc nội dung các bài trước, các bạn có thể thêm những file với code sau:
Contentview.swift
import SwiftUI

struct ContentView: View {

    @State var phones: Array = phoneData

    var body: some View {
        NavigationView {
            List(phones) { phone in
                NavigationLink(destination: PhoneDetail(phone: phone)) {
                    PhoneCell(phone: phone)
                        .contextMenu {
                            Button(action: {
                                self.setAsBought(item: phone)
                            }) {
                                HStack {
                                    Text("Mark as bought")
                                    Image(systemName: "checkmark")
                                }
                            }

                            Button(action: {
                                self.delete(item: phone)
                            }) {
                                HStack {
                                    Text("Delete")
                                    Image(systemName: "trash")
                                }
                            }
                    }
                }
            }
            .navigationBarTitle("List iPhone")
        }
    }

    private func setAsBought(item phone: Phone) {
        if let index = self.phones.firstIndex(where: { $0.id == phone.id }) {
            self.phones[index].didBuy.toggle()
        }
    }

    private func delete(item phone: Phone) {
        if let index = self.phones.firstIndex(where: { $0.id == phone.id }) {
            self.phones.remove(at: index)
        }
    }
}

struct ContentView_Previews: PreviewProvider {
    static var previews: some View {
        ContentView(phones: phoneData)
    }
}
PhoneCell.swift
import SwiftUI

struct PhoneCell: View {

    var phone: Phone

    var body: some View {
        HStack() {
            VStack(alignment: .leading) {
                Text(phone.name)
                    .font(.largeTitle)
                    .foregroundColor(Color.orange)
                    .background(Color.gray)
                Text(phone.price)
                    .border(Color.gray, width: 1)
                    .foregroundColor(Color.red)
            }

            if phone.didBuy == true {
                Spacer()

                Image(systemName: "checkmark")
                    .foregroundColor(.yellow)
            }
        }
    }
}

struct PhoneCell_Previews: PreviewProvider {
    static var previews: some View {

        PhoneCell(phone: phoneData[0])
    }
}
Phone.swift
import Foundation

struct Phone: Identifiable {
    var id = UUID()
    var name: String
    var price: String
    var didBuy = false
}

let phoneData = [
    Phone(name: "iPhone 11 Pro Max", price: "1099$"),
    Phone(name: "iPhone 11 Pro", price: "999$"),
    Phone(name: "iPhone 11", price: "699$"),
    Phone(name: "iPhone XR", price: "599$"),
    Phone(name: "iPhone 8", price: "449$")
]
PhoneDetail.swift
import SwiftUI

struct PhoneDetail: View {
    var phone: Phone

    var intro = "The iPhone is a line of smartphones designed and marketed by Apple Inc. All generations of the iPhone use Apple's iOS mobile operating system software. The first-generation iPhone was released on June 29, 2007, and multiple new hardware iterations with new iOS releases have been released since."

    var body: some View {
        VStack(alignment: .center) {
            Text(phone.name)
                .font(.largeTitle)
            Divider()
            Text(phone.price)
                .font(.title)
            Divider()
            Text(intro)
                .font(.headline)
                .multilineTextAlignment(.center)
                .lineLimit(10)
        }
        .padding()
        .navigationBarTitle(phone.name)
    }
}

struct PhoneDetail_Previews: PreviewProvider {
    static var previews: some View {
        PhoneDetail(phone: phoneData[0])
    }
}
2. Tạo search bar
Đầu tiên, cấu tạo của 1 thanh search bar giống như Search bar trong UIKit phải bao gồm 2 phần cơ bản nhất:
- Một TextField để user gõ text
- Một nút cancel để user huỷ thao tác search
import SwiftUI

struct SearchBar: View {
	// 1
    @Binding var text: String
	// 2
    @State private var isEditing = false

    var body: some View {
        HStack {
			// 3
            TextField("Search ...", text: $text)
                .padding(7)
                .padding(.horizontal, 25)
                .background(Color(.systemGray6))
                .cornerRadius(8)
                .padding(.horizontal, 10)
                .onTapGesture {
                    self.isEditing = true
                }
			// 4
            if isEditing {
                Button(action: {
                    self.isEditing = false
                    self.text = ""
				    UIApplication.shared.sendAction(#selector(UIResponder.resignFirstResponder), to: nil, from: nil, for: nil)
                }) {
                    Text("Cancel")
                }
                .padding(.trailing, 10)
                .transition(.move(edge: .trailing))
                .animation(.default)
            }
        }
    }
}

struct SearchBar_Previews: PreviewProvider {
    static var previews: some View {
        SearchBar(text: .constant(""))
    }
}
Bên trên, chúng ta lần lượt làm các việc:
-
- Khai báo State isEditing biểu thị trạng thái search hiện tại của search bar, với giá trị mặc định là false, tức là user chưa search. Trạng thái edit của search bar thì chỉ cần chính nó biết thôi, nên chúng ta để @State.
-
- Tạo TextField cho search bar, gán binding $text và placeholder text, thêm các attribute padding, background color,… để căn chỉnh giao diện cho thanh search, và thêm event tap.
-
- Trường hợp user sử dụng search bar, chúng ta hiển thị thêm button cancel. SwiftUI cùng với State thật lợi hại, chúng ta chỉ cần thêm condition để show Cancel button, mà không cần phải thêm code để hide button khi user không search nữa
Tiếp theo, để cho giống với search bar của UIKit, chúng ta cần thêm:
- icon search ở đầu thanh search bar
- button close ở cuối thanh search bar, hiển thị khi user bắt đầu search, với tác dụng bấm vào thì sẽ clear text mà user đang search
Để thêm các view trên, chúng ta thêm overlay cho TextField như sau:
	var body: some View {
        HStack {
            TextField("Search ...", text: $text)
                .padding(7)
                .padding(.horizontal, 25)
                .background(Color(.systemGray6))
                .cornerRadius(8)
				// 1
                .overlay(
                    HStack {
						// 2
                        Image(systemName: "magnifyingglass")
                            .foregroundColor(.gray)
                            .frame(minWidth: 0, maxWidth: .infinity, alignment: .leading)
                            .padding(.leading, 8)
                 		// 3
                        if isEditing {
                            Button(action: {
                                self.text = ""
                            }) {
                                Image(systemName: "xmark.circle.fill")
                                    .foregroundColor(.gray)
                                    .padding(.trailing, 8)
                            }
                        }
                    }
                )
                .padding(.horizontal, 10)
                .onTapGesture {
                    self.isEditing = true
                }

            if isEditing {
                Button(action: {
                    self.isEditing = false
                    self.text = ""
                    UIApplication.shared.sendAction(#selector(UIResponder.resignFirstResponder), to: nil, from: nil, for: nil)
                }) {
                    Text("Cancel")
                }
                .padding(.trailing, 10)
                .transition(.move(edge: .trailing))
                .animation(.default)
            }
        }
    }
Bên trên, chúng ta lần lượt làm các việc:
-
- Thêm overlay View vào TextField. Overlay View ở đây là một HStack, và sẽ hiển thị đè lên trên TextField
-
- Thêm icon search với alignment leading để hiển thị ở đầu ô search
-
- Thêm condition cho State isEditing, trường hợp user đang edit thì sẽ hiển thị button clear, với action xoá text khi bấm vào button
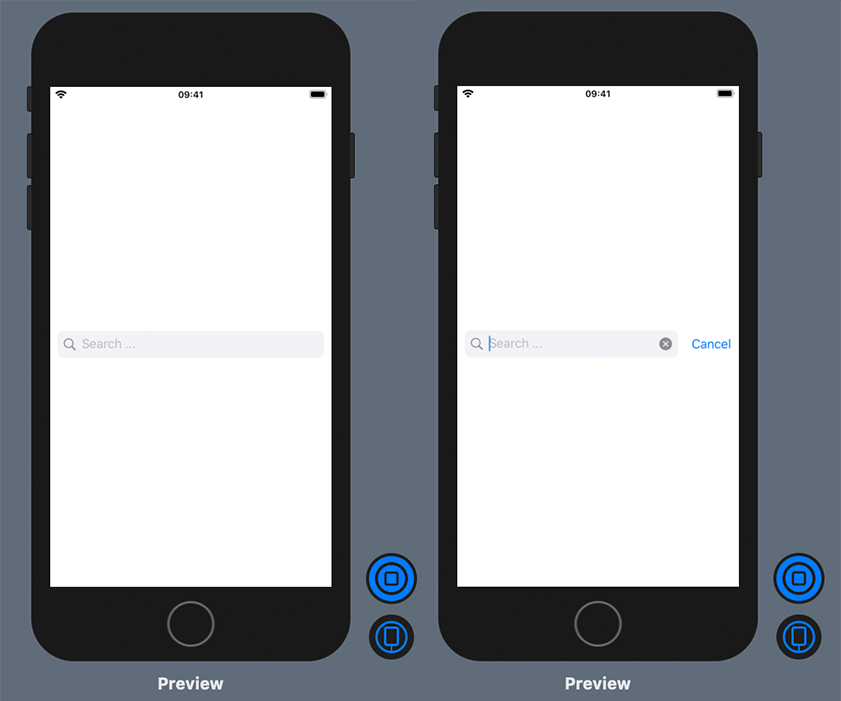
Sử dụng chức năng live preview của SwiftUI, chúng ta có được thanh search bar khi chưa search/đang search như ảnh sau:
3. Thêm search bar vào View
Chúng ta thêm code vào ContentView.swift với nội dung như sau:
struct ContentView: View {

    @State var phones: Array = phoneData
    // 1
    @State private var searchText = ""
    var body: some View {
        NavigationView {
            // 2
            VStack {
                // 3
                SearchBar(text: $searchText)
                // 4
                List(phones.filter { searchText.isEmpty ? true : $0.name.contains(searchText)}) { phone in
                    NavigationLink(destination: PhoneDetail(phone: phone)) {
                        PhoneCell(phone: phone)
                            .contextMenu {
                                Button(action: {
                                    self.setAsBought(item: phone)
                                }) {
                                    HStack {
                                        Text("Mark as bought")
                                        Image(systemName: "checkmark")
                                    }
                                }

                                Button(action: {
                                    self.delete(item: phone)
                                }) {
                                    HStack {
                                        Text("Delete")
                                        Image(systemName: "trash")
                                    }
                                }
                        }
                    }
                }
            }
            .navigationBarTitle("List iPhone")
        }
    }

    private func setAsBought(item phone: Phone) {
        if let index = self.phones.firstIndex(where: { $0.id == phone.id }) {
            self.phones[index].didBuy.toggle()
        }
    }

    private func delete(item phone: Phone) {
        if let index = self.phones.firstIndex(where: { $0.id == phone.id }) {
            self.phones.remove(at: index)
        }
    }
}
Code bên trên chúng ta lần lượt làm các việc sau:
-
- Thêm State searchText. Ơn giời, State của search text đây rồi. Đây chính là property sẽ được binding sang text của search bar.
-
- Nhúng ListView vào trong VStack, bởi vì NavigationView cần return 1 View, nên phải nhúng ListView vào trong VStack để còn thêm SearchBar nữa.
-
- Tạo SearchBar View, bind property searchText sang property text của SearchBar
-
- Thêm filter vào ListView, để lọc kết quả hiển thị trên ListView khi user thực hiện hành động search. Oài, nhàn hơn search trên UIKit bao nhiêu, bên UIKit sẽ phải thêm vào 1 loạt hàm của UITableViewDatasource.
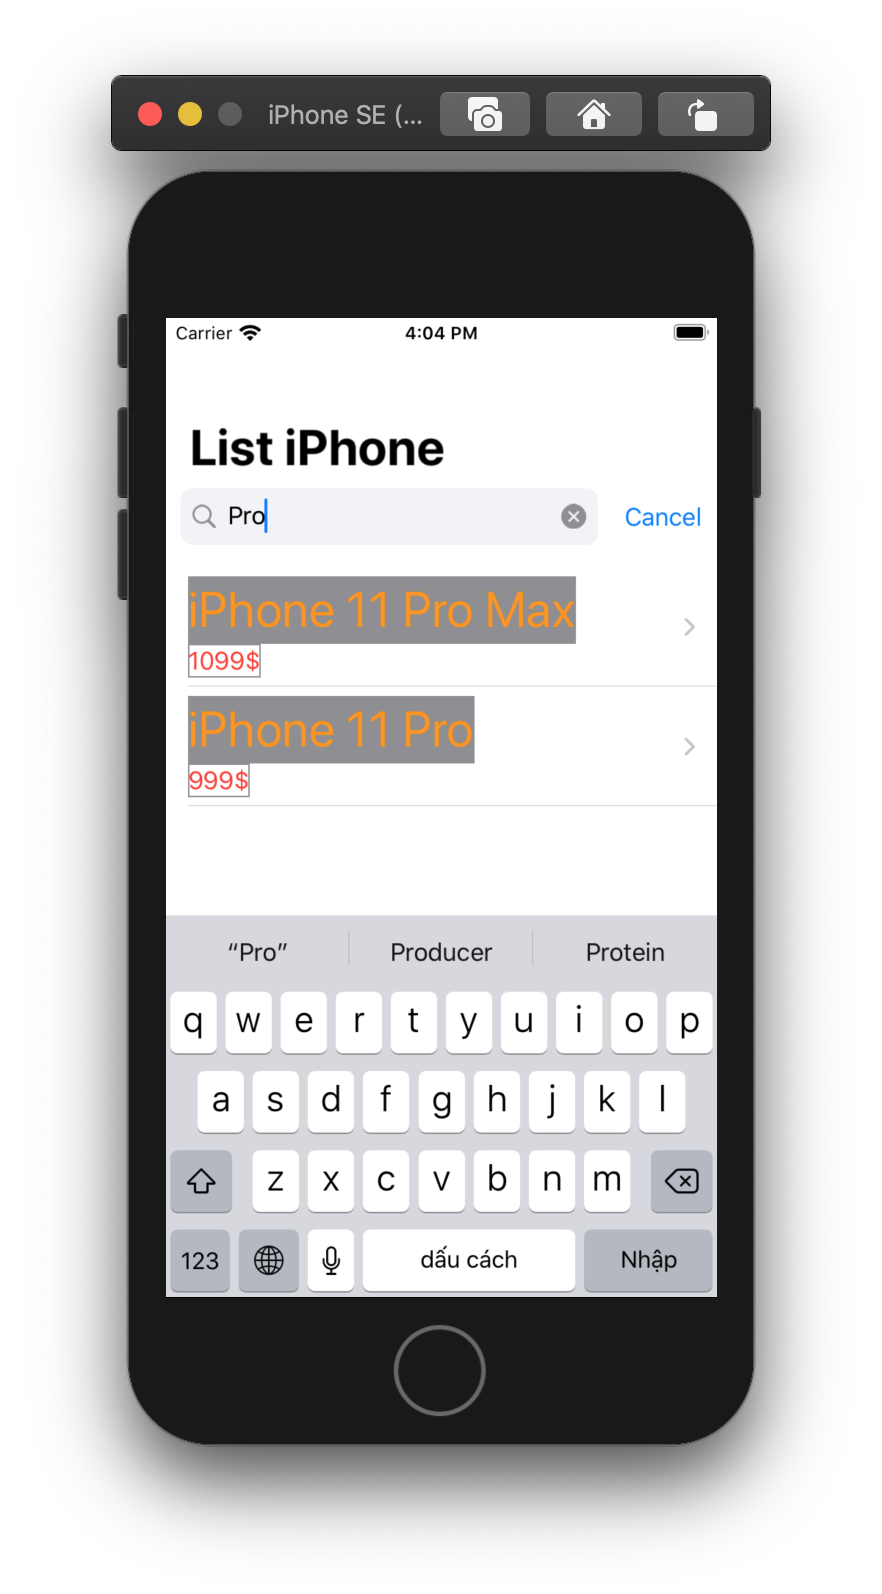
Cuối cùng, build và dùng thử App, chúng ta có kết quả như hình sau:
III. Kết luận
Trên đây chúng ta đã cùng nhau xây dựng 1 search bar View cho App. Trong tương lai, khả năng cao là Apple sẽ thêm những View cơ bản như search bar vào SwiftUI, nên có thể sau này chúng ta không cần phải tự custom search bar nữa. Tuy nhiên, như các bạn đã trải nghiệm, việc xây dựng custom View trên SwiftUI không hề phức tạp, vì thế chúng ta hoàn toàn có thể tự mình viết thêm các custom View còn thiếu của SwiftUI để thực hiện công việc của mình.
Cuối cùng, xin cảm ơn các bạn đã theo dõi bài viết này, have a nice day 
All Rights Reserved
