In-App Purchase trong ứng dụng iOS
Bài đăng này đã không được cập nhật trong 6 năm
In-app purchase là một tính năng được tích hợp trong ứng dụng, để giúp người dùng có thể mua những tính năng bổ sung của ứng dụng. Bài viết này mình sẽ hướng dẫn các bạn các bước implement in-app purchase auto renewal trong ứng dụng iOS. Bạn xem thêm ở link này https://www.raywenderlich.com/5456-in-app-purchase-tutorial-getting-started để biết thêm thông tin về các gói, cách tạo các product và tài khoản tester.
Nguồn: https://medium.com/swift-india/auto-renewable-subscriptions-for-ios-b3f7e9b4d644
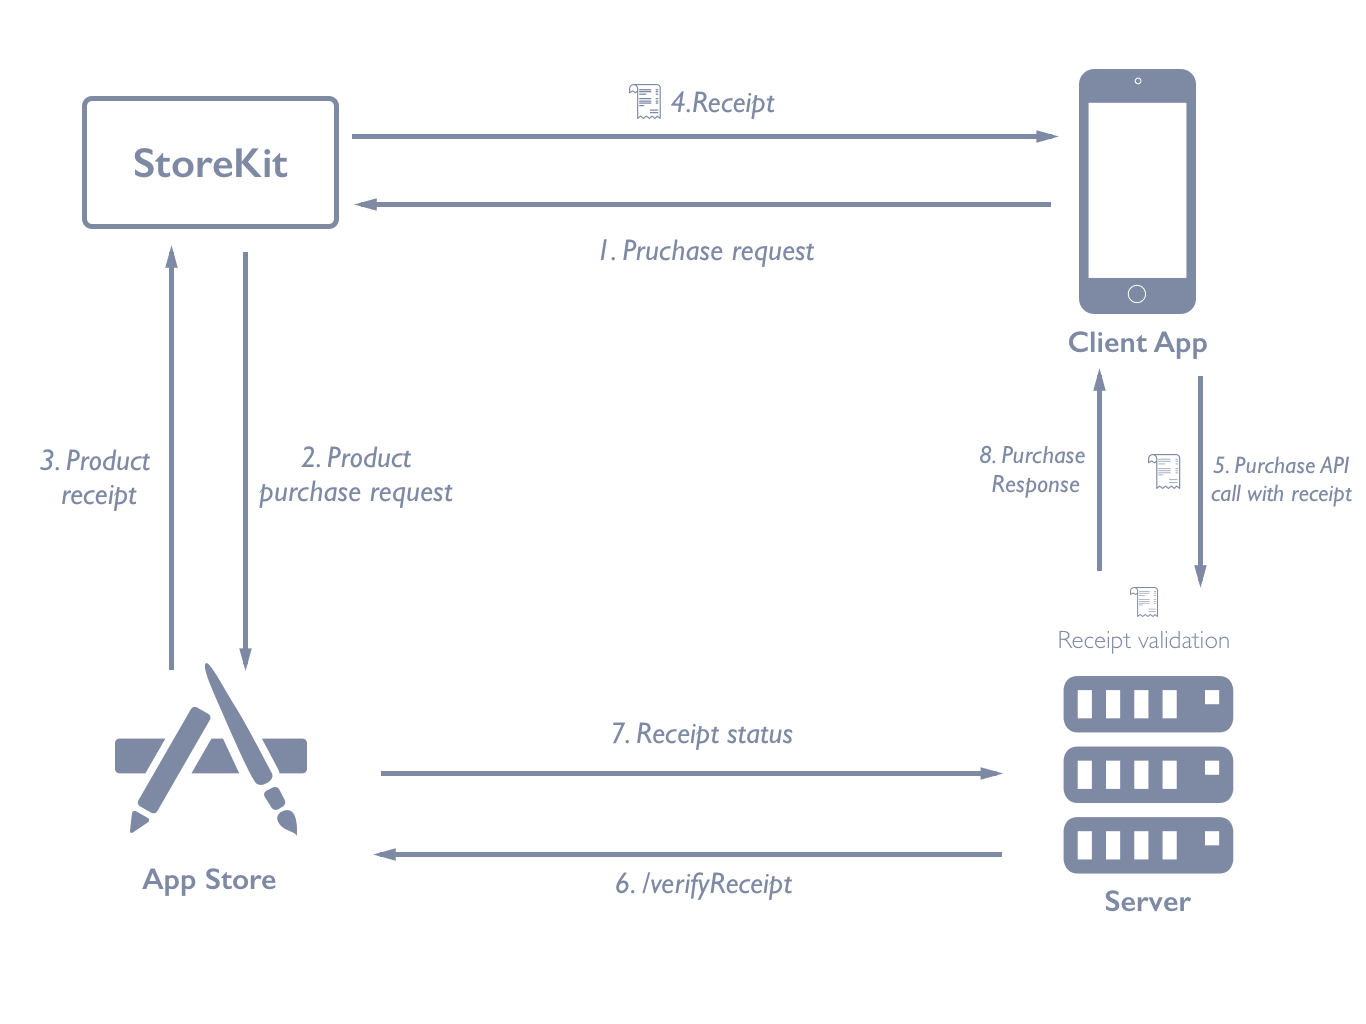
Mô hình sử dụng
Mình sử dụng server là bên thứ 3:

1. Purchase request
StoreKit cho phép ứng dụng communicate với iTunes Connect, request thông tin products và xử lý thanh toán. Import StoreKit để implement logic payment:
import StoreKit
Tạo object SKProductsRequest để load product đã tạo trong iTunes Connect.
var productIdentifier = "xxx.xxx.sampleProductId" //Get it from iTunes connect
var productID = ""
var productsRequest = SKProductsRequest()
var iapProducts = [SKProduct]()
Bây giờ thực hiện request products lên iTunes Connect để lấy thông tin về sản phẩm bằng StoreKit.
func fetchAvailableProducts() {
     // Put here your IAP Products ID's
    let productIdentifiers = NSSet(objects: productIdentifier)
    guard let identifier = productIdentifiers as? Set<String> else { return }
    productsRequest = SKProductsRequest(productIdentifiers: identifier)
    productsRequest.delegate = self
    productsRequest.start()
}
Adapt SKProductsRequestDelegate:
extension Test: SKProductsRequestDelegate {
    func productsRequest(_ request: SKProductsRequest, didReceive response: SKProductsResponse) {
        if response.products.count > 0 {
                iapProducts = response.products
        }
    }
}
2. Requesting Payment
Bây giờ bạn đã có thông tin sản phẩm được hiển thị cho người dùng. Bước tiếp theo sẽ là bắt đầu thanh toán.
public func buyProduct(_ product: SKProduct) {
  print("Buying \(product.productIdentifier)...")
  let payment = SKPayment(product: product)
  SKPaymentQueue.default().add(payment)
}
Trạng thái purchase sẽ có trong delegate này:
extension Test: SKPaymentTransactionObserver {

  public func paymentQueue(_ queue: SKPaymentQueue,
                           updatedTransactions transactions: [SKPaymentTransaction]) {
    for transaction in transactions {
      switch transaction.transactionState {
      case .purchased:
        complete(transaction: transaction)
        break
      case .failed:
        fail(transaction: transaction)
        break
      case .restored:
        restore(transaction: transaction)
        break
      case .deferred:
        break
      case .purchasing:
        break
      }
    }
  }
}
Sử dụng các trạng thái này để thay đổi giao diện người dùng.
3. Receipt
Bạn đã thanh toán xong, bây giờ bạn lấy thông tin thanh toán từ App Store, chính là receipt. Sau khi bạn nhận được receipt, bạn gửi reciept này lên server (bước 5) để phân tích và xác thực (bước 6, 7). Bạn có thể xem phần validate receipt ở đây: https://developer.apple.com/library/archive/releasenotes/General/ValidateAppStoreReceipt/Chapters/ValidateRemotely.html#//apple_ref/doc/uid/TP40010573-CH104-SW1. Việc xử lý hoá đơn trên server đáng tin cậy hơn vì việc debug và xử lý vấn đề user là khả thi hơn.
Sau khi server xử lý xong receipt sẽ response về cho người dùng (bước 8), bạn sử dụng reponse này để update lại giao diện người dùng (người dùng có thêm tính năng nếu purchase success). Quá trình purchase kết thúc.
Việc purchase đã xong, bạn có thể xem link này https://medium.com/swift-india/auto-renewable-subscriptions-for-ios-3a4068f11acd để biết cách test in-app purchase bằng môi trường Sandbox.
All rights reserved