Bài 16: Sử dụng axios để gọi Laravel API trong VueJS
Bài đăng này đã không được cập nhật trong 2 năm
Mình đã cập nhật lại tất cả các bài với các thay đổi ở hiện tại ở năm 2024: Vue 3, Vite, Laravel 11x,...
Cập nhật gần nhất: 09/06/2024
Hello các bạn lại là mình đây 👋
Chào mừng các bạn quay trở lại với series học VueJS với Laravel của mình, ở bài trước mình đã hướng dẫn các bạn cách sử dụng Scoped CSS trong VueJS, ở bài này chúng ta sẽ tìm hiểu về cách gọi API từ backend là Laravel sử dụng axios nhé. 
Setup
Sau khi khởi tạo project Laravel xong (hiện tại là Laravel 11), chúng ta cần chạy thêm command sau để khởi tạo phần frontend VueJS nữa nhé (nếu các bạn đã làm từ các bài trước trong series rồi thì bỏ qua nhé):
composer require laravel/ui
php artisan ui vue
npm install
Đầu tiên chúng ta vào resources/js/components tạo một component Vue mới đặt tên là ApiCalling.vue với nội dung như sau:
<template>
  <div class="api-calling">
    API CALLING
  </div>
</template>

<script setup>

</script>
Sau đó ta khai báo tạo app VueJS với component này là root trong resources/js/app.js như sau:
import './bootstrap';
import { createApp } from 'vue';
import ApiCalling from './components/ApiCalling.vue';

const app = createApp(ApiCalling);

app.mount('#app');
Cuối cùng là update file welcome.blade.php:
<!DOCTYPE html>
<html lang="{{ str_replace('_', '-', app()->getLocale()) }}">
    <head>
        <meta charset="utf-8">
        <meta name="viewport" content="width=device-width, initial-scale=1">

        <title>Laravel</title>

        @vite(['resources/sass/app.scss', 'resources/js/app.js'])
    </head>
    <body class="antialiased">
        <div id="app">
        </div>
    </body>
</html>
Tiếp theo chúng ta sẽ setup backend Laravel nhé.
Đầu tiên các bạn tạo một database laravel, sau đó chỉnh sửa thông tin db trong file .env cho chính xác nhé, ví dụ DB local của mình:
DB_CONNECTION=mysql
DB_HOST=127.0.0.1
DB_PORT=3307
DB_DATABASE=laravel
DB_USERNAME=myuser
DB_PASSWORD=myuserpass
Ở bài này chúng ta sẽ dùng axios để gọi API thêm, sửa, xoá, get danh sách sản phẩm từ backend. Mặc định khi tạo project mới thì axios cũng được cài vào luôn (ta có thể kiểm tra ở package.json)
Để làm điều đó đầu tiên ta tạo một model Product trong laravel bằng command sau:
php artisan make:model Product -m
(option -m để tạo luôn 1 migration cho model Product)
Sau đó chúng ta vào database/migrations/create_products_table.php và sửa lại hàm up() như sau:
public function up()
{
    Schema::create('products', function (Blueprint $table) {
        $table->id();
        $table->string('name');
        $table->double('price');
        $table->timestamps();
    });
}
Các bạn có thể thấy ta sẽ tạo ra một bảng tên là products, với các trường như mã sản phẩm (id), tên sản phẩm (name), giá (price), và biến thời gian biểu thị cho ngày tạo/chỉnh sửa sản phẩm.
Tiếp theo chúng ta vào App/Models/Product.php và sửa lại như sau:
<?php

namespace App\Models;

use Illuminate\Database\Eloquent\Factories\HasFactory;
use Illuminate\Database\Eloquent\Model;

class Product extends Model
{
    use HasFactory;

    protected $fillable = [
    	'name', 'price'
    ];
}
Nhân tiện đây mình cũng muốn giải thích cho các bạn một số điều như sau:
- Mặc định trong Laravel sẽ mapping model Product với bảng
products(thêm 's' ở cuối), nếu các bạn sử dụng tên bảng khác thì ta phải khai báo thêm như sau:
protected $table = '<table_name>';
- Nếu ở migration mà các bạn không có
timestamps()thì bên modelProductta khai báo như sau:
public $timestamps = false;
- Với các field mà chúng ta muốn kiểm soát khi thay đổi giá trị (ví dụ như các giá trị này được post từ form html về chẳng hạn), thì ta cứ bỏ vào biến array
$fillableđể báo cho Laravel biết là cá field này có thể thay đổi giá trị bởi người dùng. - Ngược lại với
$fillablelà biến array$guarded, biến này sẽ chứa các field mà người dùng không được phép thay đổi. Ở đây các bạn thấy giá trị của field ‘id’ sẽ tự động tăng khi insert một record mới (MySQL tự động làm việc này). - Trong một số trường hợp, khi chúng ta lấy tất cả các field của các record, và trong đó, chúng ta không muốn hiển thị một số field nào đó, ví dụ ở đây mình muốn là không hiển thị 2 field là
passwordvàremember_token, khi đó tui sẽ đặt 2 field này vào trong biến array$hidden. Điều này có nghĩa là tui báo với Laravel rằng tui sẽ lấy hết các field trừ 2 fieldpasswordvàremember_token.
Ok thế là ổn rùi đó nhỉ, tiếp theo chúng ta chạy command:
php artisan migrate
Chú ý nếu ở bước này các bạn gặp lỗi error:...key too long. Thì ta mở file App/Providers/AppServiceProvider và sửa lại như sau (sau đó migrate lại là được nhé):
use Illuminate\Support\Facades\Schema;
//
public function boot()
{
    Schema::defaultStringLength(191);
}
Ở bài này ta làm các thao tác đơn giản như thêm, sửa, xoá, get,...ta sử dụng Route::resource cho tiện nhé.
Tiếp theo ta tạo ProductController bằng cách:
php artisan make:controller ProductController --resource
Sau đó các bạn mở file routes/web.php và sửa lại như sau:
<?php

use Illuminate\Support\Facades\Route;
use App\Http\Controllers\ProductController;

Route::get('/', function () {
    return view('welcome');
});

Route::resource('products', ProductController::class);
Sau đó ta mở file app/Http/Controllers/ProductController.php lên, ở đó ta thấy đã có sẵn một số phương thức cho việc CRUD.
Gọi API
Thêm mới
Bây giờ chúng ta quay trở lại component ApiCalling.vue và tạo một form tạo sản phẩm mới như sau:
<template>
  <div class="api-calling container mt-5">
    <h1>Create Product</h1>
    <div class="form-group">
      <label>Name</label>
      <input v-model="product.name" type="text" class="form-control" placeholder="Name...">
    </div>
    <div class="form-group">
      <label>Price</label>
      <input v-model="product.price" type="text" class="form-control" placeholder="Price...">
    </div>
    <button class="btn btn-primary mt-2" @click="createProduct">Create</button>
  </div>
</template>

<script setup>
import axios from 'axios'
import { ref } from 'vue'

const product = ref({
  name: '',
  price: 0
})

const createProduct = async () => {
  try {
    const response = await axios.post('/products', {
      name: product.value.name,
      price: product.value.price
    })
    console.log(response.data.product)
  } catch (error) {
    console.log(error)
  }
}
</script>
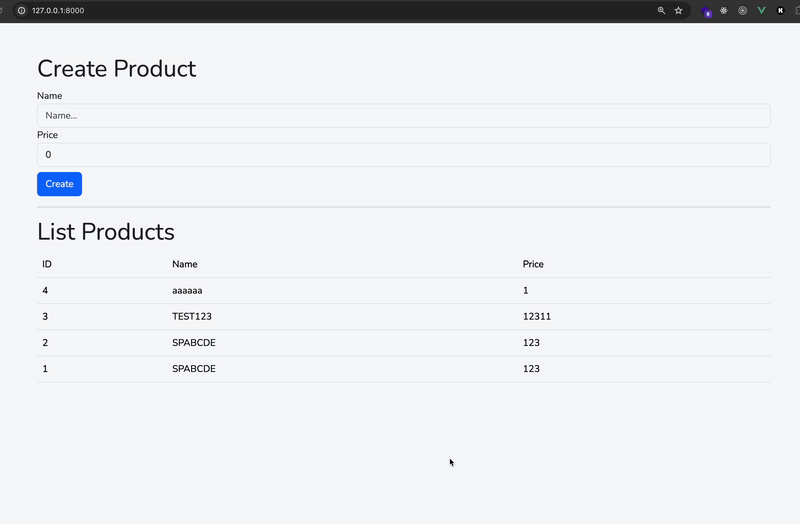
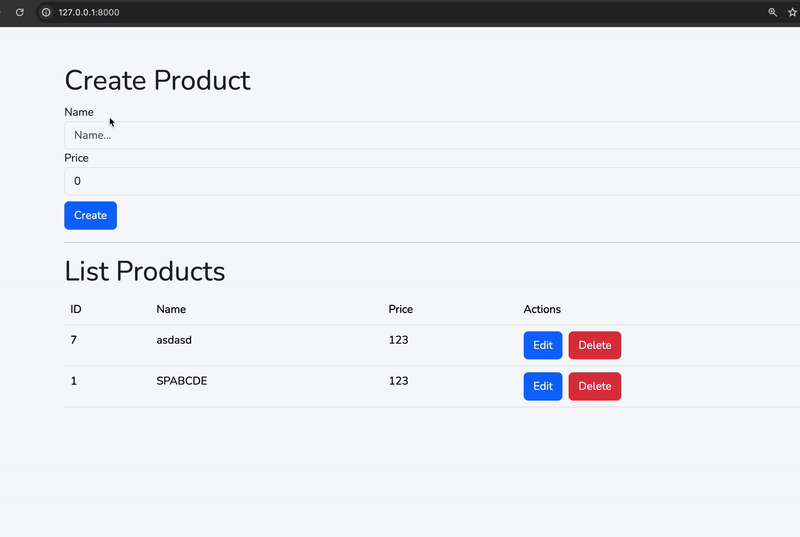
Sau đó các bạn quay trở lại trình duyệt bấm F5 và ta sẽ thấy như sau:
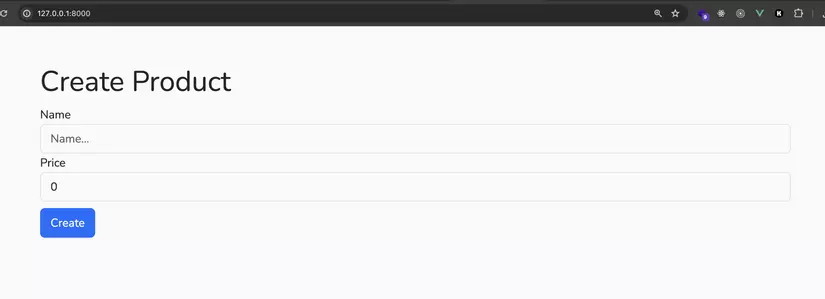
Ở đây phần code HTML chắc các bạn có thể hiểu được (có gì thắc mắc comment bên dưới cho mình nha).
Mình sẽ giải thích phần code trong script. Ở đó ta có một async function là createProduct. Function này sẽ sử dụng axios để tạo một post request đến route /products với 2 tham số là name và price. Có thể các bạn sẽ thắc mắc:
- các bạn tự hỏi là tự dưng tạo sản phẩm sao biết route
/productsvới method làpostmà gọi? Thì các bạn xem hình bên dưới nhé (mình lấy ở trang chủ Laravel):
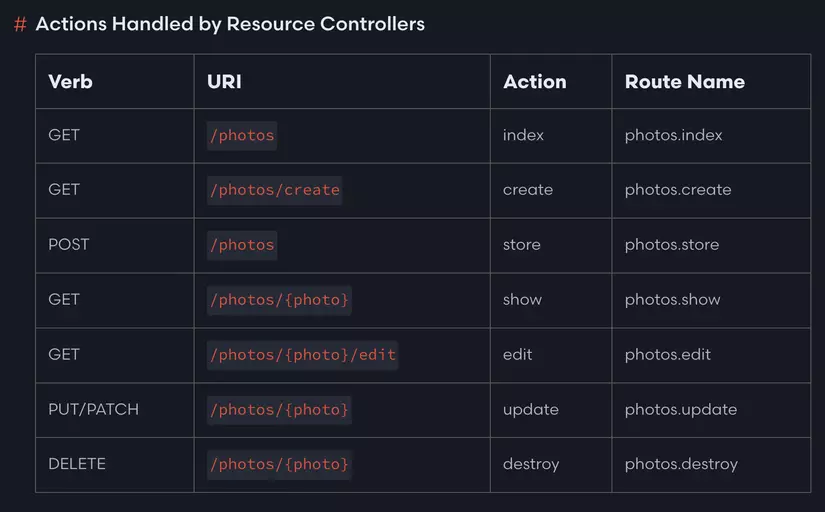
Ở đây khi tạo sản phẩm ta cần gọi tới phương thức store trong ProductController, không phải phương thức create nhé, cái đó dành cho việc show form tạo sản phẩm thôi (điều này ta tự làm bên Vue được).
Ok khá ổn rồi đó nhỉ, giờ ta vào ProductController.php để lấy dữ liệu từ Vue và insert vào DB nhé. Ta sửa lại hàm store như sau (nhớ use App\Product; nhé):
use App\Models\Product;
...
public function store(Request $request)
{
    $validated = $request->validate( [
        'name' => 'required|min:5',
        'price' => 'required|numeric|gt:0',
    ]);
    $product = Product::create([
        'name'     => $request->input('name'),
        'price'    => $request->input('price'),
    ]);
    return response([
        'product' => $product
    ], 200);
}}
Ở trên các bạn có thể thấy mình validate request với một vài điều kiện trước khi thêm nó vào trong DB, nếu thành công thì sẽ trả về mã 200 và sản phẩm vừa lưu cho frontend nhé.
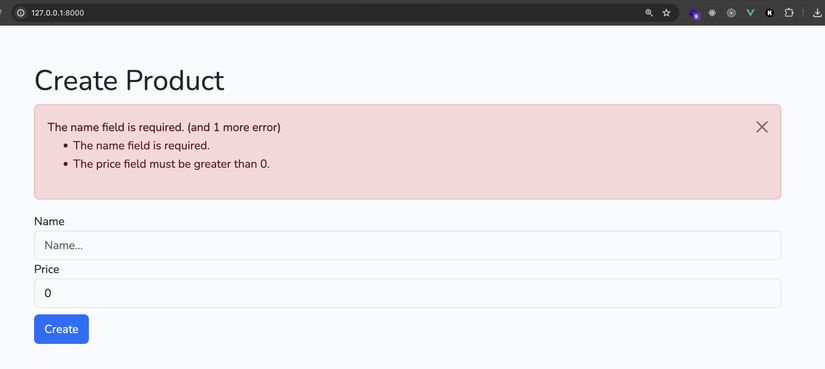
Bởi vì mình có validate, nên bên Vue ta sửa lại chút để in ra lỗi nếu có nhé:
<template>
 <div class="api-calling container mt-5">
   <h1>Create Product</h1>
   <div class="alert alert-danger alert-dismissible fade show" role="alert" v-if="error">
     <b>{{ error.message }}</b>
     <ul>
       <li v-for="(errorName, index) in error.errors" :key="index">
         {{ errorName[0] }}
       </li>
     </ul>
     <button type="button" class="btn-close" @click="error = null">
     </button>
   </div>
   <div class="form-group">
     <label>Name</label>
     <input v-model="product.name" type="text" class="form-control" placeholder="Name...">
   </div>
   <div class="form-group">
     <label>Price</label>
     <input v-model="product.price" type="text" class="form-control" placeholder="Price...">
   </div>
   <button class="btn btn-primary mt-2" @click="createProduct">Create</button>
 </div>
</template>

<script setup>
import axios from 'axios'
import { ref } from 'vue'

const product = ref({
 name: '',
 price: 0
})
const error = ref(null)

const createProduct = async () => {
 try {
   error.value = null
   const response = await axios.post('/products', {
     name: product.value.name,
     price: product.value.price
   })
   console.log(response.data.product)
 } catch (e) {
   error.value = e.response.data
 }
}
</script>
Sau đó các bạn thử load lại trang và xem kết quả nhé (thử nhập tên sản phẩm ít hơn 5 kí tự xem sao ).
Lấy danh sách sản phẩm
Để lấy danh sách sản phẩm từ DB ra ta sửa lại hàm index trong ProductController như sau:
public function index()
{
   return Product::orderBy('created_at', 'desc')->get();
}
Ở trên ta đơn giản là lấy ra tất cả các sản phẩm và order (sắp xếp) theo thứ tự sản phẩm mới nhất đặt lên trước.
Sau đó ở bên Vue ta sửa lại một chút như sau để load ra danh sách sản phẩm nhé:
<template>
 <div class="api-calling container mt-5">
   <h1>Create Product</h1>
   <div class="alert alert-danger alert-dismissible fade show" role="alert" v-if="error">
     <b>{{ error.message }}</b>
     <ul>
       <li v-for="(errorName, index) in error.errors" :key="index">
         {{ errorName[0] }}
       </li>
     </ul>
     <button type="button" class="btn-close" @click="error = null">
     </button>
   </div>
   <div class="form-group">
     <label>Name</label>
     <input v-model="product.name" type="text" class="form-control" placeholder="Name...">
   </div>
   <div class="form-group">
     <label>Price</label>
     <input v-model="product.price" type="text" class="form-control" placeholder="Price...">
   </div>
   <button class="btn btn-primary mt-2" @click="createProduct">Create</button>
   <hr>
   <h1>List Products</h1>
   <table class="table">
     <thead>
       <tr>
         <th scope="col">ID</th>
         <th scope="col">Name</th>
         <th scope="col">Price</th>
       </tr>
     </thead>
     <tbody>
       <tr v-for="product in listProducts" :key="product.id">
         <th scope="row">{{ product.id }}</th>
         <td>{{ product.name }}</td>
         <td>{{ product.price }}</td>
       </tr>
     </tbody>
   </table>
 </div>
</template>

<script setup>
import axios from 'axios'
import { onBeforeMount, ref } from 'vue'

const product = ref({
 name: '',
 price: 0
})
const error = ref(null)
const listProducts = ref([])

onBeforeMount(() => {
 getListProducts()
})

const createProduct = async () => {
 try {
   error.value = null
   const response = await axios.post('/products', {
     name: product.value.name,
     price: product.value.price
   })
   console.log(response.data.product)
 } catch (e) {
   error.value = e.response.data
 }
}

const getListProducts = async () => {
 try {
   const response = await axios.get('/products')
   listProducts.value = response.data
 } catch (e) {
   error.value = e.response.data
 }

}
</script>
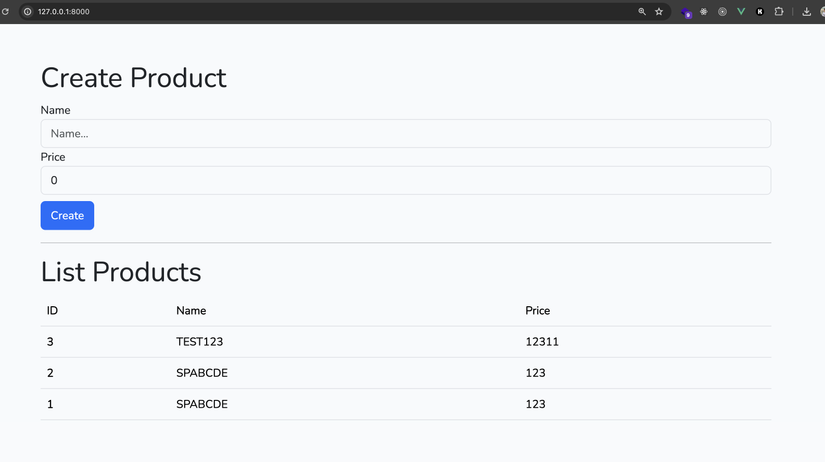
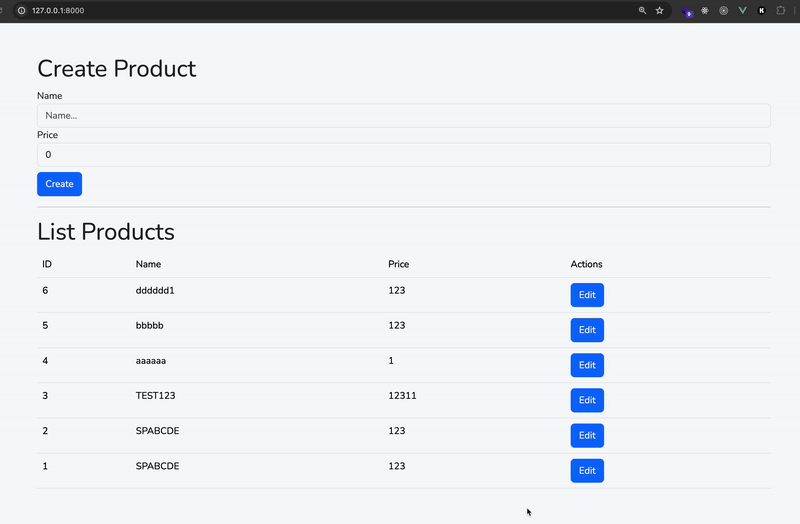
Ở đây ta tạo hàm getListProducts trong đó sử dụng axios gọi đến route /products với phương thức get, route này sẽ gọi đến hàm index và trả về danh sách sản phẩm, sau đó ta chỉ việc load danh sách này ra khi component created bằng cách sử dụng v-for. Nhớ thêm thuộc tính key với v-for nhé 
Các bạn thử load lại trang và xem kết quả nhé (nhớ insert trước một vài sản phẩm nha).
Ở đây có một chỗ chưa hợp lý, đó là khi ta thêm sản phẩm mới thì danh sách hiển thị sản phẩm chưa được cập nhật lại, vì nó chỉ được làm mới một lần duy nhất mỗi khi component created.
Nhưng ta cũng không nên gọi hàm getListProducts liên tục mỗi khi insert thành công một bản ghi, vì điều đó sẽ làm cho ứng dụng của chúng ta trở nên chậm hơn do mất thời gian query lại toàn bộ danh sách sản phẩm từ database.
Do đó để hiển thị sản phẩm ngay lập tức khi ta vừa insert vào DB thành công, ta làm như sau. Sửa lại một chút ở hàm createProduct:
const createProduct = async () => {
  try {
    error.value = null
    const response = await axios.post('/products', {
      name: product.value.name,
      price: product.value.price
    })

    listProducts.value.unshift(response.data.product)

    // reset giá trị form về ban đầu
    product.value = {
      name: '',
      price: 0
    }
  } catch (e) {
    error.value = e.response.data
  }
}
Ở đây mỗi khi thêm sản phẩm thành công (hoàn tất insert vào DB), ta sẽ thêm ngay 1 bản ghi vào mảng listProducts với giá trị product được trả về từ server. Ở trên ta dùng hàm unshift để thêm phần tử vào vị trí đầu tiên của Array (khác với push là thêm vào cuối của array nhé)
Sau đó các bạn thử load lại trang và thử insert vài product và có thể thấy danh sách đã được cập nhật ngay lập tức.
Sửa thông tin sản phẩm
Tiếp theo để sửa thông tin sản phẩm, đầu tiên ta sửa lại hàm update trong ProductController như sau:
public function update(Request $request, string $id)
{
    $validated = $request->validate([
        'name' => 'required|min:5',
        'price' => 'required|numeric|gt:0',
    ]);

    $product = Product::find($id);

    $product->name = $request->input('name');
    $product->price = $request->input('price');

    $product->save();

    return response([
        'product' => $product
    ], 200);
}
Bên Vue ta sửa lại như sau:
<template>
  <div class="api-calling container mt-5">
    <h1>Create Product</h1>
    <div class="alert alert-danger alert-dismissible fade show" role="alert" v-if="error">
      <b>{{ error.message }}</b>
      <ul>
        <li v-for="(errorName, index) in error.errors" :key="index">
          {{ errorName[0] }}
        </li>
      </ul>
      <button type="button" class="btn-close" data-bs-dismiss="alert" aria-label="Close"></button>
    </div>
    <div class="form-group">
      <label>Name</label>
      <input v-model="product.name" type="text" class="form-control" placeholder="Name...">
    </div>
    <div class="form-group">
      <label>Price</label>
      <input v-model="product.price" type="text" class="form-control" placeholder="Price...">
    </div>
    <button class="btn btn-primary mt-2" @click="createProduct">Create</button>

    <hr>
    <h1>List Products</h1>
    <table class="table">
      <thead>
        <tr>
          <th scope="col">ID</th>
          <th scope="col">Name</th>
          <th scope="col">Price</th>
          <th scope="col">Actions</th>
        </tr>
      </thead>
      <tbody>
        <tr v-for="(product, index) in listProducts" :key="product.id">
          <th scope="row">{{ product.id }}</th>
          <td v-if="!product.isEdit">
            {{ product.name }}
          </td>
          <td v-else>
            <input type="text" v-model="selectedProduct.name" class="form-control">
          </td>
          <td v-if="!product.isEdit">
            {{ product.price }}
          </td>
          <td v-else>
            <input type="text" v-model="selectedProduct.price" class="form-control">
          </td>
          <td v-if="!product.isEdit">
            <button class="btn btn-primary" @click="selectProduct(product)">Edit</button>
          </td>
          <td v-else>
            <button class="btn btn-primary" @click="updateProduct(index)">Save</button>
            <button class="btn btn-danger ms-2" @click="product.isEdit = false">Cancel</button>
          </td>
        </tr>
      </tbody>
    </table>
  </div>
</template>

<script setup>

import axios from 'axios'
import { onBeforeMount, ref } from 'vue';

const product = ref({
  name: '',
  price: 0
})

const listProducts = ref([])
const error = ref(null)
const selectedProduct = ref(null)

onBeforeMount(() => {
  getListProducts()
})

const createProduct = async () => {
  try {
    error.value = null
    const response = await axios.post('/products', {
      name: product.value.name,
      price: product.value.price
    })
    listProducts.value.unshift({
      ...response.data.product,
      isEdit: false
    })

    // reset giá trị form về ban đầu
    product.value = {
      name: '',
      price: 0
    }
  } catch (e) {
    error.value = e.response.data
  }
}

const getListProducts = async () => {
  try {
    const response = await axios.get('/products')
    listProducts.value = response.data
    listProducts.value.forEach(item => {
      item.isEdit = false
    })
  } catch (e) {
    error.value = e.response.data
  }
}

const selectProduct = (product) => {
  product.isEdit = true
  selectedProduct.value = { ...product }
}

const updateProduct = async (index) => {
  try {
    const response = await axios.put('/products/' + selectedProduct.value.id, {
      name: selectedProduct.value.name,
      price: selectedProduct.value.price
    })

    listProducts.value[index].name = response.data.product.name
    listProducts.value[index].price = response.data.product.price
    listProducts.value[index].isEdit = false
  } catch (e) {
    error.value = e.response.data
  }
}
</script>
Một số sự thay đổi mình mới thêm vào như sau:
- Ta thêm vào 1 ref
selectedProduct, mỗi khi ta click edit 1 sản phẩm thì copy giá trị của sản phẩm đó choselectedProduct. Tại sao không làm trực tiếp, lý do là nếu ta bind trực tiếp giá trị của 1 sản phẩm vào, lát nữa khi user chỉnh sửa, họ có thể thay đổi các thông tin, nhưng sau đó lại bấmCancelkhông muốn sửa nữa, khi đó thì giá trị của sản phẩm đã bị thay đổi, ta không thể hiển thị lại giá trị cũ. - Thêm vào function
selectProductđể gán giá trị choselectedProductvà setisEdit = true(mục đích để hiển thị form edit) - Chúng ta thêm vào function
updateProductđể update thông tin của sản phẩm, sử dụng routeput - Một điều cần chút ý là các bạn có thể thấy mình sửa lại thêm một thuộc tính là
isEditcho tất các bản ghi trong danh sách sản phẩm. FunctiongetListProductssau khi lấy được danh sách mình set thêm cho nó thuộc tínhisEdit, ở đây ta dùngVue.setđể thêm vì như thế thì thuộc tínhisEditmới làreactive data, tức là sau này nó thay đổi thì DOM sẽ được re-render, còn không là ta click buttonEdithoài mà không thấy gì xảy ra đâu nhé
- Tương tự ở function
createProductta cũng thêmisEditkhiunshiftvàolistProducts(mình dùng toán tử...để lấy toàn bộ giá trị bên trong object và gán thêm 1 thuộc tính mới làisEdit, khi code mình dùng rất nhiều...vì nó rất tiện) - Ở
updateProduct, tham số nhận vào là chỉ số của product trong mảng, khi thêm thành công ở backend thì mình sửa lại giá trị của product trong mảng (thay bằng giá trị củaselectedProduct). - Ở
createProductđoạnunshiftproduct vào danh sách sản phẩm ta cũng phải thêm cho nó luôn 1 thuộc tínhisEdit = false
Khá ổn rồi đó, các bạn load lại trang và thử edit một sản phẩm bất kì xem kết quả thế nào nhé
Ta để ý rằng sau khi sửa thành công, data được backend Laravel lưu vào database, thì khi ta F5 trình duyệt sẽ thấy data hiển thị như ta vừa update nhé 😎
Xoá sản phẩm
Để xoá một sản phẩm đầu tiên ta cần sửa lại hàm destroy trong ProductController như sau:
public function destroy($id)
{
    $product = Product::find($id);
    $product->delete();
    return response([
        'result' => 'success'
    ], 200);
}
Sau đó ở bên Vue ta sửa lại như sau:
<template>
    <!-- ... -->
    <td v-if="!product.isEdit">
         <button class="btn btn-primary" @click="selecteProduct(product)">Edit</button>
         <button class="btn btn-danger ms-2" @click="deleteProduct(product, index)">Delete</button>
    </td>
</template>

<script>
//...

const deleteProduct = async (product, index) => {
  try {
    await axios.delete('/products/' + product.id)
    listProducts.value.splice(index, 1)
  } catch (e) {
    error.value = e.response.data
  }
}
</script>
Ở phần này mình thêm một số chỗ như sau:
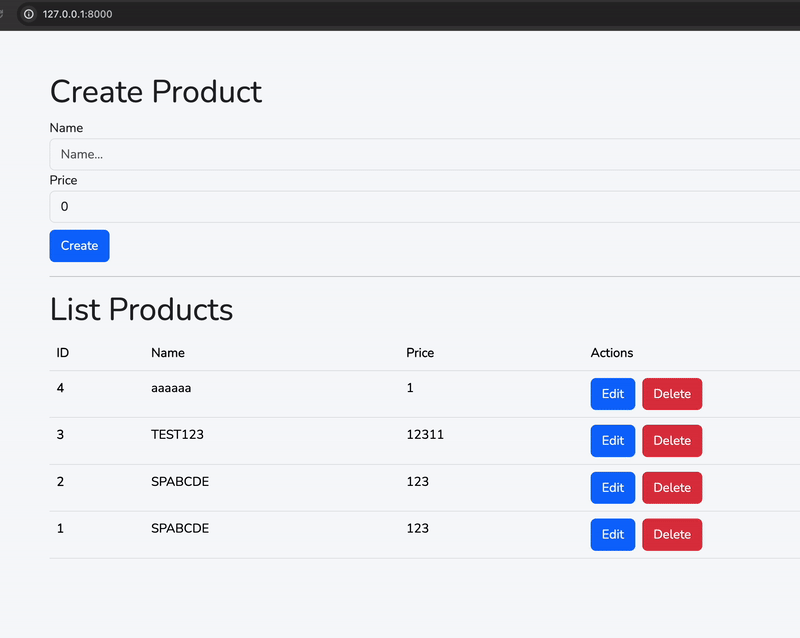
- Bên dưới một chút ta thêm button
Delete(cạnh button Edit), với sự kiện click vào sẽ gọi đến hàmdeleteProduct - Ta có function
deleteProductnhận 2 tham số làproductvàindexlà vị trí của product trong mảnglistProducts. Trong function này ta đơn giản là gọi đến routedeleteđể gọi đến hàmdestroytrongProductController. Sau khi delete xong ta cần phải hiển thị lại danh sách sản phẩm cho chính xác. Nhưng ta sẽ không gọi hàmgetListProductsvì như thế sẽ tốn thời gian query lại vào DB, mà ta đơn giản là xoá nó đi dùngArray.splice. VìlistProductslàreactive state, nên mỗi khi nó thay đổi thì Vue sẽ re-render lại DOM và ta có thể thấy danh sách đã được thay đổi ngay lập tức
Bonus
Phần này chúng ta sẽ làm thêm chút animation để khi thêm mới, sửa, xoá hoặc show error message trông cho nó mượt dùng transition của Vue nhé.
Transition là 1 feature cực kì hữu ích trong việc làm Animation/Transition mà Vue mang lại cho chúng ta đó
Cùng với đó ta sẽ làm thêm tính năng pagination nữa nhé.
Tạo transition cho thông báo lỗi
Đầu tiên ta thấy là mỗi lần thêm sản phẩm, xảy ra lỗi thì sẽ show ra error message, nhưng cái error đó giờ trông không mượt tí nào, show đánh cái "bụp" phát giật cả mình, ứ thích  , ta làm cho nó mượt chút nhé.
Đầu tiên các bạn thêm vào cuối file ApiCalling.vue
<style lang="scss" scoped>
.fade-enter-active,
.fade-leave-active {
  transition: opacity 0.5s ease;
}

.fade-enter-from,
.fade-leave-to {
  opacity: 0;
}
</style>
Sau đó ở trên phần template đoạn xử lý error message ta lồng nó vào cặp thẻ transition là được:
<transition name="fade">
  <div class="alert alert-danger alert-dismissible fade show" role="alert" v-if="error">
    <b>{{ error.message }}</b>
    <ul>
      <li v-for="(errorName, index) in error.errors" :key="index">
        {{ errorName[0] }}
      </li>
    </ul>
    <button type="button" class="btn-close" data-bs-dismiss="alert" aria-label="Close" @click="error = null"></button>
  </div>
</transition>
Các bạn chú ý rằng ở trên ta đặt tên cho transition là fade do vậy ở đoạn xử lý CSS, các class dành cho việc transition ta đều phải dùng tiền tố fade nhé.
Ở phần xử lý CSS ta sẽ phải thao tác với các phase (giai đoạn) của 1 transition (enter/leave, active/inactive). Các bạn nên xem thêm về transition của VueJS để hiểu hơn nhé. Sau mình sẽ viết bài kĩ hơn về nó.
Sau đó các bạn quay trở lại trình duyệt thử thêm mới sản phẩm để xảy ra lỗi và xem thành quả nhé
Source code đầy đủ của ApiCalling.vue đến bước này:
<template>
  <div class="api-calling container mt-5">
    <h1>Create Product</h1>
    <transition name="fade">
      <div class="alert alert-danger alert-dismissible fade show" role="alert" v-if="error">
        <b>{{ error.message }}</b>
        <ul>
          <li v-for="(errorName, index) in error.errors" :key="index">
            {{ errorName[0] }}
          </li>
        </ul>
        <button type="button" class="btn-close" data-bs-dismiss="alert" aria-label="Close" @click="error = null"></button>
      </div>
    </transition>
    <div class="form-group">
      <label>Name</label>
      <input v-model="product.name" type="text" class="form-control" placeholder="Name...">
    </div>
    <div class="form-group">
      <label>Price</label>
      <input v-model="product.price" type="text" class="form-control" placeholder="Price...">
    </div>
    <button class="btn btn-primary mt-2" @click="createProduct">Create</button>

    <hr>
    <h1>List Products</h1>
    <table class="table">
      <thead>
        <tr>
          <th scope="col">ID</th>
          <th scope="col">Name</th>
          <th scope="col">Price</th>
          <th scope="col">Actions</th>
        </tr>
      </thead>
      <tbody>
        <tr v-for="(product, index) in listProducts" :key="product.id">
          <th scope="row">{{ product.id }}</th>
          <td v-if="!product.isEdit">
            {{ product.name }}
          </td>
          <td v-else>
            <input type="text" v-model="selectedProduct.name" class="form-control">
          </td>
          <td v-if="!product.isEdit">
            {{ product.price }}
          </td>
          <td v-else>
            <input type="text" v-model="selectedProduct.price" class="form-control">
          </td>
          <td v-if="!product.isEdit">
            <button class="btn btn-primary" @click="selectProduct(product)">Edit</button>
            <button class="btn btn-danger ms-2" @click="deleteProduct(product, index)">Delete</button>
          </td>
          <!-- ... -->
          <td v-else>
            <button class="btn btn-primary" @click="updateProduct(index)">Save</button>
            <button class="btn btn-danger ms-2" @click="product.isEdit = false">Cancel</button>
          </td>
        </tr>
      </tbody>
    </table>
  </div>
</template>

<script setup>

import axios from 'axios'
import { onBeforeMount, ref } from 'vue';

const product = ref({
  name: '',
  price: 0
})

const listProducts = ref([])
const error = ref(null)
const selectedProduct = ref(null)

onBeforeMount(() => {
  getListProducts()
})

const createProduct = async () => {
  try {
    error.value = null
    const response = await axios.post('/products', {
      name: product.value.name,
      price: product.value.price
    })
    listProducts.value.unshift({
      ...response.data.product,
      isEdit: false
    })

    // reset giá trị form về ban đầu
    product.value = {
      name: '',
      price: 0
    }
  } catch (e) {
    error.value = e.response.data
  }
}

const getListProducts = async () => {
  try {
    const response = await axios.get('/products')
    listProducts.value = response.data
    listProducts.value.forEach(item => {
      item.isEdit = false
    })
  } catch (e) {
    error.value = e.response.data
  }
}

const selectProduct = (product) => {
  product.isEdit = true
  selectedProduct.value = { ...product }
}

const updateProduct = async (index) => {
  try {
    const response = await axios.put('/products/' + selectedProduct.value.id, {
      name: selectedProduct.value.name,
      price: selectedProduct.value.price
    })

    listProducts.value[index].name = response.data.product.name
    listProducts.value[index].price = response.data.product.price
    listProducts.value[index].isEdit = false
  } catch (e) {
    error.value = e.response.data
  }
}

const deleteProduct = async (product, index) => {
  try {
    await axios.delete('/products/' + product.id)
    listProducts.value.splice(index, 1)
  } catch (e) {
    error.value = e.response.data
  }
}
</script>

<style lang="scss" scoped>
.fade-enter-active,
.fade-leave-active {
  transition: opacity 0.5s ease;
}

.fade-enter-from,
.fade-leave-to {
  opacity: 0;
}
</style>
Transition cho các thao tác CRUD sản phẩm
Ta để ý thấy rằng hiện tại mỗi khi thêm/xoá sản phẩm nó cứ hiện đánh cái "bụp" hoặc xoá cái "bụp" nhát, trông rất là kém sang  , thay vào đó có 1 chút transition nhẹ thì app của chúng ta trông sẽ mượt hơn nhiều.
Bởi vì ta có 1 list danh sách các sản phẩm, mỗi sản phẩm lại là 1 element HTML, do đó để animate cái list sản phẩm này thì ta cần dùng tới transition-group - dùng để tạo transition cho 1 group (nhóm) các phần tử HTML.
Đầu tiên các bạn thêm vào đoạn css sau:
<style lang="scss" scoped>
.fade-enter-active,
.fade-leave-active {
  transition: opacity 0.5s ease;
}

.fade-enter-from,
.fade-leave-to {
  opacity: 0;
}

// ------ THÊM VÀO ĐOẠN BÊN DƯỚI
.list-enter-active,
.list-leave-active {
  transition: all 0.5s ease;
}
.list-enter-from,
.list-leave-to {
  opacity: 0;
  transform: translateX(30px);
}
</style>
Sau đó quay trở lại template, ở đoạn table, các bạn tìm tới thẻ tbody, thay thế nó bằng thẻ transition-group , nội dung nom sẽ như sau:
<transition-group name="list" tag="tbody">
    <tr v-for="(product, index) in listProducts" :key="product.id">
        <th scope="row">{{ product.id }}</th>
        <td v-if="!product.isEdit">
            {{ product.name }}
        </td>
        <td v-else>
            <input type="text" v-model="selectedProduct.name" class="form-control">
        </td>
        <td v-if="!product.isEdit">
            {{ product.price }}
        </td>
        <td v-else>
            <input type="text" v-model="selectedProduct.price" class="form-control">
        </td>
        <td v-if="!product.isEdit">
            <button class="btn btn-primary" @click="selecteProduct(product)">Edit</button>
            <button class="btn btn-danger" @click="deleteProduct(product, index)">Delete</button>
        </td>
        <td v-else>
            <button class="btn btn-primary" @click="updateProduct(index)">Save</button>
            <button class="btn btn-danger" @click="product.isEdit = false">Cancel</button>
        </td>
    </tr>
</transition-group>
Ở trên ta có transition-group bao bọc thẻ tr (mỗi thẻ tr này tương ứng với 1 sản phẩm được hiển thị), và khi Vue animate là sẽ animate các thẻ tr này, ta có thuộc tính tag=tbody ý bảo Vue lúc render sẽ thay thế transition-group = tbody, vì mặc định thì transition-group sẽ không render ra thẻ nào cả nên nó sẽ làm cho layout của chúng ta bị vỡ.
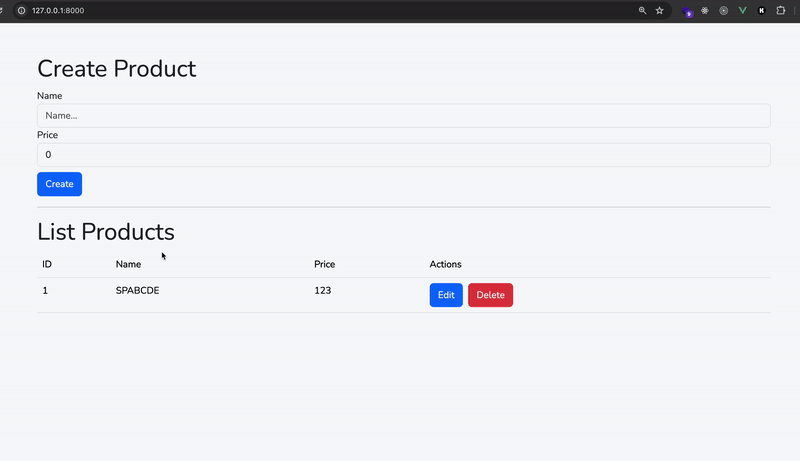
Ổn rồi đó các bạn quay trở lại trình duyệt F5 và tận hưởng thành quả thoai . Thử thêm/xoá sản phẩm xem sao nhé:
Transition trong Vue làm quá đơn giản phải ko nào
Thêm Pagination
Khi làm thật thì danh sách sản phẩm của chúng ta thường sẽ nhiều và đương nhiên ta không muốn load 1 lần ra hết tất cả data vì sẽ rất nặng và lâu, trong khi đó đâu phải lúc nào ta cũng cần xem hết cả danh sách sản phẩm, do vậy thường ta sẽ thêm pagination cho data để mỗi lần load ta chỉ load 1 trang sản phẩm, dữ liệu trả về sẽ nhẹ và nhanh hơn nhiều.
Đầu tiền ở phía backend các bạn mở lại ProductController hàm index ta sửa lại như sau:
    public function index()
    {
        return Product::orderBy('created_at', 'desc')->paginate(5);
    }
Ở trên ta phân trang với mỗi trang có 5 phần tử
Sau đó ta quay lại ApiCalling.vue, sửa lại ở data():
...
listProducts: {}, // -> đổi thành Object
Update lại method getListProducts như sau:
async getListProducts(page = 1) {
    try {
        const response = await axios.get('/products?page=' + page)
        this.listProducts = response.data
        this.listProducts.data.forEach(item => {
            Vue.set(item, 'isEdit', false)
        })
    } catch (error) {
        this.error = error.response.data
    }
},
Ở trên các bạn thấy rằng bây giờ ta sẽ load danh sách sản phẩm theo page, mặc định không nói gì thì sẽ lấy từ page=1, và dữ liệu trả về từ Laravel thì danh sách sản phẩm nằm trong trường data nên giờ ta phải dùng this.listProducts.data để truy cập vào danh sách sản phẩm.
Ở method createProduct, đoạn unshift, ta sửa lại như sau:
this.listProducts.data.unshift({
     ...response.data.product,
    isEdit: false
})
Tương tự ở updateProduct và deleteProduct ta phải sửa lại this.listProducts thành this.listProducts.data:
async updateProduct(index) {
    try {
        const response = await axios.put('/products/' + this.selectedProduct.id, {
            name: this.selectedProduct.name,
            price: this.selectedProduct.price
        })

        this.listProducts.data[index].name = response.data.product.name
        this.listProducts.data[index].price = response.data.product.price
        this.listProducts.data[index].isEdit = false
    } catch (error) {
        this.error = error.response.data
    }
},
async deleteProduct(product, index) {
    try {
        await axios.delete('/products/' + product.id)
        this.listProducts.data.splice(index, 1)
    } catch (error) {
        this.error = error.response.data
    }
}
Quay trở lên tempate đoạn v-for ta cũng phải update như vậy:
<tr v-for="(product, index) in listProducts.data" :key="product.id">
Cuối cùng phần chính đó là hiển thị thông tin pagination, ở ngay bên dưới table ta thêm vào:
<table>
    ....................
</table>
<div>
    {{ listProducts.from }} - {{ listProducts.to }} of {{ listProducts.total }}
</div>
<ul class="pagination">
    <li
        class="page-item"
        :class="{ 'disabled': listProducts.prev_page_url === null }"
        @click="listProducts.prev_page_url && getListProducts(listProducts.current_page - 1)"
    >
        <a class="page-link" href="#">Previous</a>
    </li>
    <li class="page-item" v-if="listProducts.prev_page_url" @click="getListProducts(listProducts.current_page - 1)">
        <a class="page-link" href="#">{{ listProducts.current_page - 1 }}</a>
    </li>
    <li class="page-item active">
        <a class="page-link" href="#">{{ listProducts.current_page }}</a>
    </li>
    <li class="page-item" v-if="listProducts.next_page_url" @click="getListProducts(listProducts.current_page + 1)">
        <a class="page-link" href="#">{{ listProducts.current_page + 1 }}</a>
    </li>
    <li
        class="page-item"
        :class="{ 'disabled': listProducts.next_page_url === null }"
        @click="listProducts.next_page_url && getListProducts(listProducts.current_page + 1)"
    >
        <a class="page-link" href="#">Next</a>
    </li>
</ul>
Ở trên mình dùng pagination cung cấp sẵn bởi Bootstrap, thêm chút xử lý của Vue để ẩn hiện các page trước sau, thêm event click vào từng page. Bài dài máy giật tưng bừng ko giải thích nhiều phần này cho các bạn được, có gì thắc mắc các bạn để lại comment cho mình nhé
Sau đó F5 lại trình duyệt và xem thành quả thôi nào:
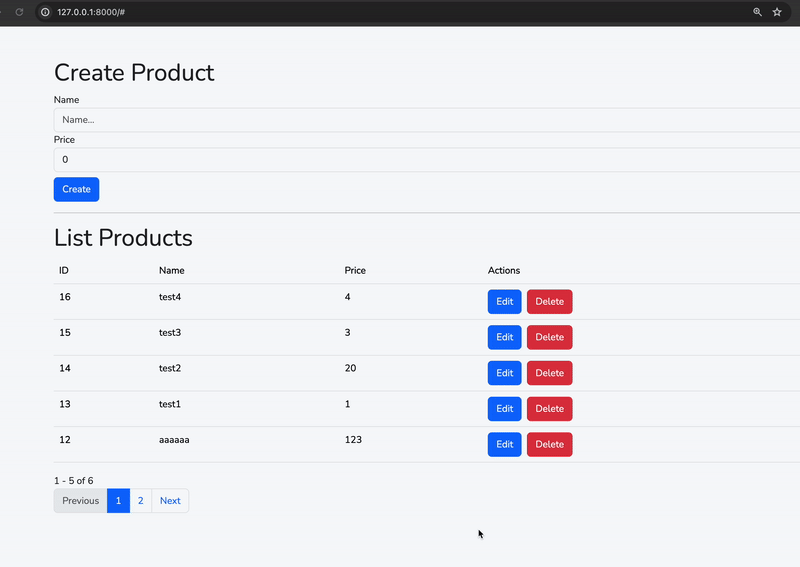
Thêm pagination vào thành ra đoạn transition cho danh sách sản phẩm nom lại hơi bị chuối 😂😂
Full source của ApiCalling.vue tới bước này:
<template>
  <div class="api-calling container mt-5">
    <h1>Create Product</h1>
    <transition name="fade">
      <div class="alert alert-danger alert-dismissible fade show" role="alert" v-if="error">
        <b>{{ error.message }}</b>
        <ul>
          <li v-for="(errorName, index) in error.errors" :key="index">
            {{ errorName[0] }}
          </li>
        </ul>
        <button type="button" class="btn-close" data-bs-dismiss="alert" aria-label="Close"
          @click="error = null"></button>
      </div>
    </transition>
    <div class="form-group">
      <label>Name</label>
      <input v-model="product.name" type="text" class="form-control" placeholder="Name...">
    </div>
    <div class="form-group">
      <label>Price</label>
      <input v-model="product.price" type="text" class="form-control" placeholder="Price...">
    </div>
    <button class="btn btn-primary mt-2" @click="createProduct">Create</button>

    <hr>
    <h1>List Products</h1>
    <table class="table">
      <thead>
        <tr>
          <th scope="col">ID</th>
          <th scope="col">Name</th>
          <th scope="col">Price</th>
          <th scope="col">Actions</th>
        </tr>
      </thead>
      <transition-group name="list" tag="tbody">
        <tr v-for="(product, index) in listProducts.data" :key="product.id">
          <th scope="row">{{ product.id }}</th>
          <td v-if="!product.isEdit">
            {{ product.name }}
          </td>
          <td v-else>
            <input type="text" v-model="selectedProduct.name" class="form-control">
          </td>
          <td v-if="!product.isEdit">
            {{ product.price }}
          </td>
          <td v-else>
            <input type="text" v-model="selectedProduct.price" class="form-control">
          </td>
          <td v-if="!product.isEdit">
            <button class="btn btn-primary" @click="selectProduct(product)">Edit</button>
            <button class="btn btn-danger ms-2" @click="deleteProduct(product, index)">Delete</button>
          </td>
          <!-- ... -->
          <td v-else>
            <button class="btn btn-primary" @click="updateProduct(index)">Save</button>
            <button class="btn btn-danger ms-2" @click="product.isEdit = false">Cancel</button>
          </td>
        </tr>
      </transition-group>
    </table>
    <div>
      {{ listProducts.from }} - {{ listProducts.to }} of {{ listProducts.total }}
    </div>
    <ul class="pagination">
      <li class="page-item" :class="{ 'disabled': listProducts.prev_page_url === null }"
        @click="listProducts.prev_page_url && getListProducts(listProducts.current_page - 1)">
        <a class="page-link" href="#">Previous</a>
      </li>
      <li class="page-item" v-if="listProducts.prev_page_url" @click="getListProducts(listProducts.current_page - 1)">
        <a class="page-link" href="#">{{ listProducts.current_page - 1 }}</a>
      </li>
      <li class="page-item active">
        <a class="page-link" href="#">{{ listProducts.current_page }}</a>
      </li>
      <li class="page-item" v-if="listProducts.next_page_url" @click="getListProducts(listProducts.current_page + 1)">
        <a class="page-link" href="#">{{ listProducts.current_page + 1 }}</a>
      </li>
      <li class="page-item" :class="{ 'disabled': listProducts.next_page_url === null }"
        @click="listProducts.next_page_url && getListProducts(listProducts.current_page + 1)">
        <a class="page-link" href="#">Next</a>
      </li>
    </ul>
  </div>
</template>

<script setup>

import axios from 'axios'
import { onBeforeMount, ref } from 'vue';

const product = ref({
  name: '',
  price: 0
})

const listProducts = ref({})
const error = ref(null)
const selectedProduct = ref(null)

onBeforeMount(() => {
  getListProducts()
})

const createProduct = async () => {
  try {
    error.value = null
    const response = await axios.post('/products', {
      name: product.value.name,
      price: product.value.price
    })
    listProducts.value.data.unshift({
      ...response.data.product,
      isEdit: false
    })

    // reset giá trị form về ban đầu
    product.value = {
      name: '',
      price: 0
    }
  } catch (e) {
    error.value = e.response.data
  }
}

const getListProducts = async (page = 1) => {
  try {
    const response = await axios.get('/products?page=' + page)
    listProducts.value = response.data
    listProducts.value.data.forEach(item => {
      item.isEdit = false
    })
  } catch (e) {
    error.value = e.response.data
  }
}

const selectProduct = (product) => {
  product.isEdit = true
  selectedProduct.value = { ...product }
}

const updateProduct = async (index) => {
  try {
    const response = await axios.put('/products/' + selectedProduct.value.id, {
      name: selectedProduct.value.name,
      price: selectedProduct.value.price
    })

    listProducts.value.data[index].name = response.data.product.name
    listProducts.value.data[index].price = response.data.product.price
    listProducts.value.data[index].isEdit = false
  } catch (e) {
    error.value = e.response.data
  }
}

const deleteProduct = async (product, index) => {
  try {
    await axios.delete('/products/' + product.id)
    listProducts.value.data.splice(index, 1)
  } catch (e) {
    error.value = e.response.data
  }
}
</script>

<style lang="scss" scoped>
.fade-enter-active,
.fade-leave-active {
  transition: opacity 0.5s ease;
}

.fade-enter-from,
.fade-leave-to {
  opacity: 0;
}

// ------ THÊM VÀO ĐOẠN BÊN DƯỚI
.list-enter-active,
.list-leave-active {
  transition: all 0.5s ease;
}

.list-enter-from,
.list-leave-to {
  opacity: 0;
  transform: translateX(30px);
}
</style>
Kết luận
Phù...cuối cùng chúng ta đã kết thúc một bài khá dài, mong rằng các bạn đã xem từ đầu đến cuối và có thể biết được cách gọi API từ Vue sang backend Laravel như thế nào từ đó áp dụng vào thực tế. Toàn bộ code các bạn có thể xem ở đây nhé.
Bài dài nên có thể có chỗ sai sót, hoặc các bạn có thắc mắc gì thì comment bên dưới cho mình nhé. Cám ơn các bạn đã theo dõi. Nếu các bạn có yêu cầu mình làm nội dung về một vấn đề nào đó thì cũng comment bên dưới nhé .
Cám ơn các bạn đã theo dõi ^^!
All rights reserved
