Bài 9: Chia ứng dụng thành component và giao tiếp giữa các component trong VueJS
Bài đăng này đã không được cập nhật trong 2 năm
Mình đã cập nhật lại tất cả các bài với các thay đổi ở hiện tại ở năm 2024: Vue 3, Vite, Laravel 11x,...
Cập nhật gần nhất: 05/06/2024
Chào mừng các bạn đã quay trở lại với series học VueJS với Laravel của mình, ở bài trước mình đã hướng dẫn các bạn các sử dụng v-for trong VueJS, ở bài này mình cùng các bạn sẽ tìm hiểu các chia ứng dụng của chúng ta ra thành các component và giao tiếp giữa chúng nhé.
Bài này mình đánh giá khá quan trọng vì đó là điểm mạnh của Vue, và nhờ đó các bạn có thể chia ứng dụng lớn thành các component nhỏ hơn để dễ xử lý và quản lý. Mình sẽ hướng dẫn chi tiết nhất có thể để các bạn có thể hiểu được nhé 
Chuẩn bị
Ta vẫn bắt đầu bài này bằng project Laravel + VueJS như mọi khi nhé (bạn nào không dùng Laravel thì cũng làm theo được bình thường nha)
Đầu tiên ta có file app.js
import './bootstrap';
import { createApp } from 'vue';
import ExampleComponent from './components/ExampleComponent.vue';

const app = createApp(ExampleComponent);

app.mount('#app');
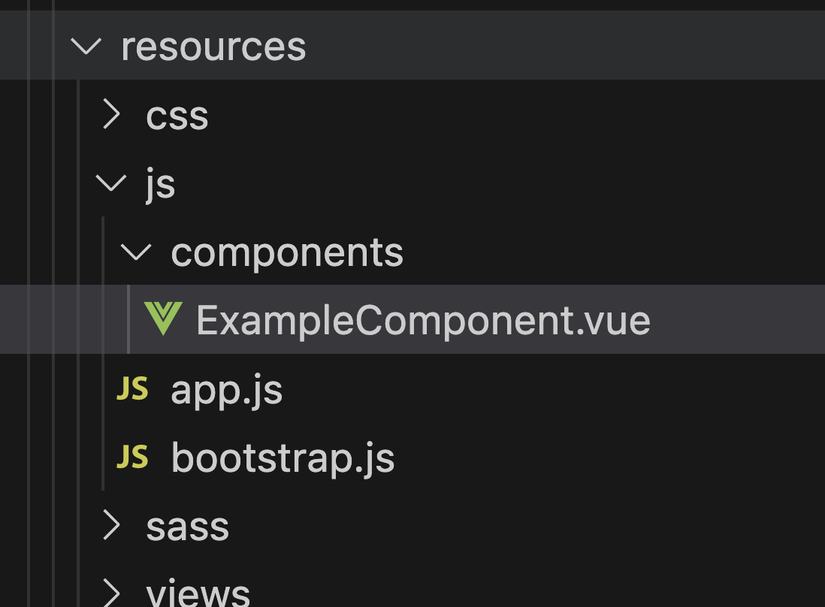
1 file ExampleComponent.vue mặc định không có gì:
<template>

</template>

<script setup>
</script>
Project của ta nom như sau:
Chia ứng dụng thành các component
Để bắt tay vào bài này hôm nay trước hết chúng ta sẽ tạo các file như sau, tất cả đều trong folder components nhé:
UserDashboard.vue
<template>
  <div class="user-dashboard">
    This is user dashboard
  </div>
</template>

<script setup>

</script>

<style lang="scss" scoped></style>
ListUser.vue
<template>
  <div class="list-user">
    This is List user
  </div>
</template>

<script setup>

</script>

<style lang="scss" scoped></style>
UserDetail.vue
<template>
  <div class="user-detail">
    This is user detail
  </div>
</template>

<script setup>

</script>

<style lang="scss" scoped></style>
Ý tưởng là chúng ta sẽ tạo component UserDashboard là cha chứa 2 component con là UserDetail và ListUser.
Tiếp theo ta import UserDashboard vào ExampleComponent nhé:
<template>
  <UserDashboard />
</template>

<script setup>
import UserDashboard from './UserDashboard.vue';
</script>
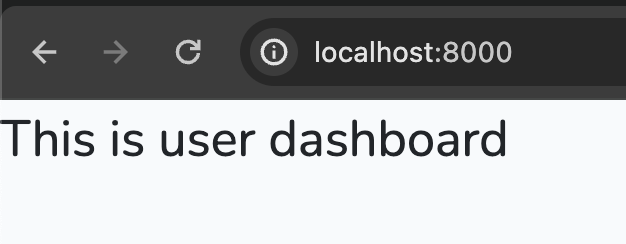
Nhớ luôn chạy php artisan serve và npm run dev nhé mọi người. Chạy thử trước xem trên màn hình có xuất hiện This is user dashboard không nhé (vì hiện tại ta mới chỉ có duy nhất component UserDashboard).
Để đưa 2 component ListUser và UserDetail vào component cha là UserDashboard chúng ta làm như sau:
<template>
  <div class="user-dashboard">
    <div class="list-user-comp">
      <ListUser></ListUser>
    </div>
    <div class="user-detail-comp">
      <UserDetail></UserDetail>
    </div>
  </div>
</template>

<script setup>
import ListUser from './ListUser.vue'
import UserDetail from './UserDetail.vue'

</script>

<style lang="scss" scoped>
.user-dashboard {
  padding: 1rem;
}
</style>
Ở đây các bạn có thể thấy đầu tiên chúng ta phải import 2 component vào component cha. Sau đó là các bạn có thể cho nó vào đâu tuỳ ý trên component cha.
Các bạn thử load lại trang và xem kết quả nhé. Mở Vue devtool chúng ta có thể thấy:

Đã có 2 component ListUser và UserDetail là con của UserDashboard là ok rồi nhé. Rất đơn giản phải không nào. Nếu các bạn xem qua React thì ở đó vẫn có chia component nhưng với mỗi component riêng biệt chúng ta phải để code HTML của component ở trong hàm render() cộng thêm mấy dấu ngoặc ngoặc nhìn hơi rối mắt xíu, còn với Angular thì thôi khỏi nói, với mình vẫn là ác mộng, ngày hôm nay ở trên phòng làm việc vật lộn cả ngày với nó, mỗi component phải có 1 file HTML, 1 file controller, 1 file css, đọc hiểu được flow xong xuất được tí HTML ra giao diện thì cũng đủ mệt rồi  (sorry các bạn fan Angular nhé).
Đổ dữ liệu và giao tiếp giữa các component
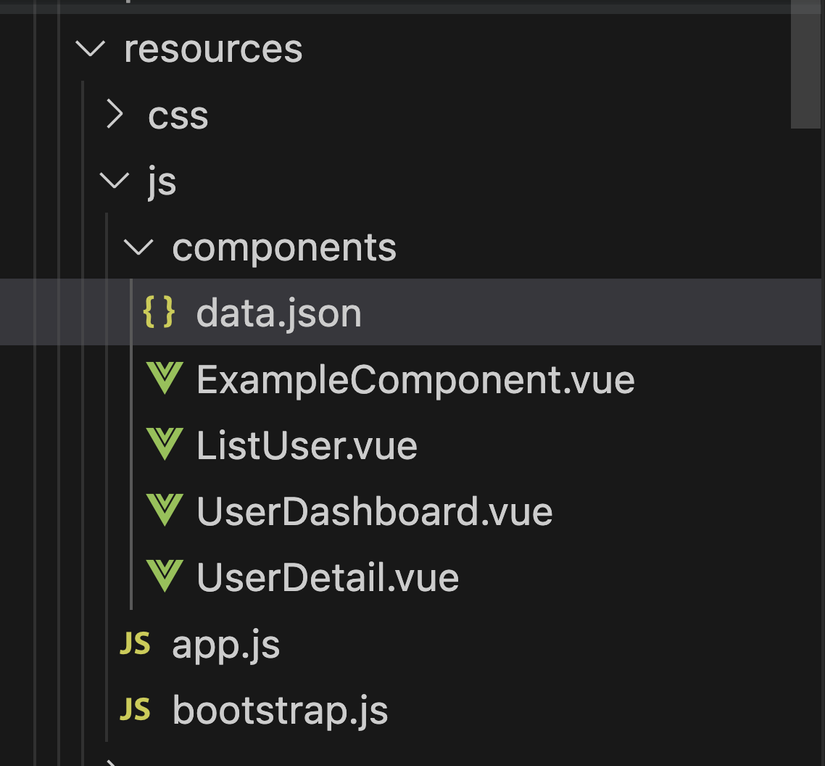
Để hướng dẫn các bạn phần này chúng ta sẽ cùng sử dụng một chút dữ liệu để các bạn có thể dễ hình dung nhé. Các bạn chuẩn bị file json ở đây. Ở đó các bạn có thể thấy ta có một file JSON chứa thông tin cá nhân của 3 users. Các bạn tải về (hoặc tạo file mới copy nội dung) rồi đem vào thư mục components chung với 3 component bên trên nhé, thư mục của ta nom sẽ như sau:
Sau đây chúng ta sẽ tiến hành đổ dữ liệu ra component ListUser như sau, trước hết ta sẽ import thử vào và xem dữ liệu có chuẩn không nhé:
<template>
  <div class="list-user">
    This is List user
  </div>
</template>

<script setup>
import { ref } from 'vue';
import data from './data.json'
const userData = ref(data)
</script>

<style lang="scss" scoped></style>
Sau đó các bạn load lại trang, mở Vue-devtool và xem dữ liệu như thế này là oke nhé:

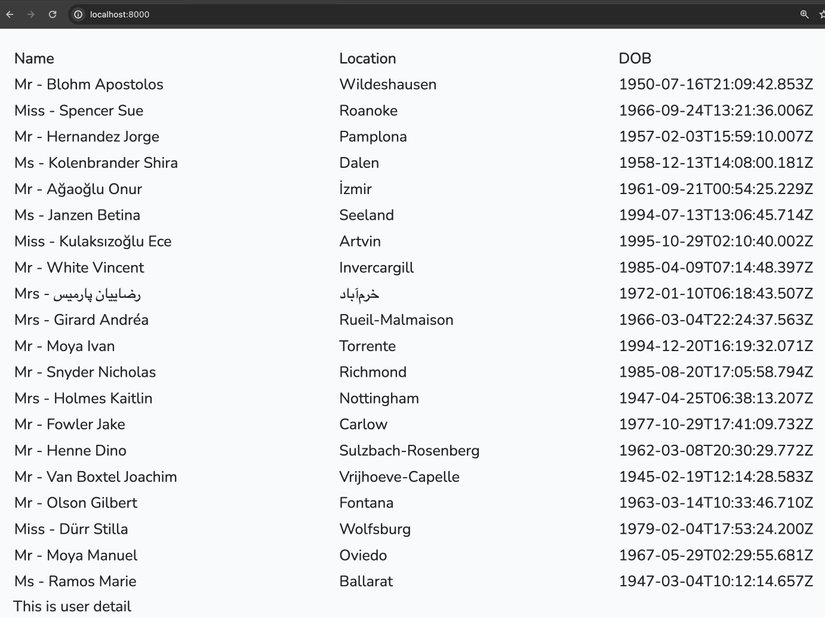
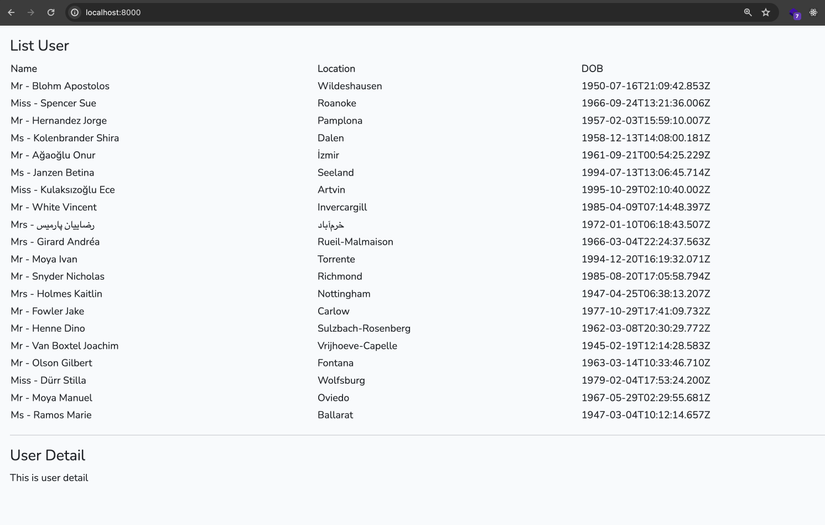
Sau đây ta sẽ đổ dữ liệu ra table nhé các bạn:
<template>
  <div class="list-user">
    <table class="tbl-list-user">
      <thead>
        <th>Name</th>
        <th>Location</th>
        <th>DOB</th>
      </thead>
      <tbody>
        <tr v-for="user in userData">
          <td><a>{{ user.name.title }} - {{ user.name.last }} {{ user.name.first }}</a></td>
          <td>{{ user.location.city }}</td>
          <td>{{ user.dob.date }}</td>
        </tr>
      </tbody>
    </table>
  </div>
</template>

<script setup>
import { ref } from 'vue';
import data from './data.json'
const userData = ref(data)
</script>

<style lang="scss" scoped>
.tbl-list-user {
  width: 100%;
}
</style>
Ở đây các bạn có thể thấy mình dùng v-for để load các user trong userData (link bài viết về v-for ở đây). Vì thông tin của người dùng khá nhiều trường nên mình sẽ chỉ liệt kê ra một số trường cơ bản, thông tin chi tiết chúng ta sẽ để ở trong component UserDetail nhé. Phần code trên nếu có gì thắc mắc các bạn comment bên dưới nhé.
Hiện tại danh sách của ta chỉ in ra chứ không có cập nhật gì nên ta chưa cần
key
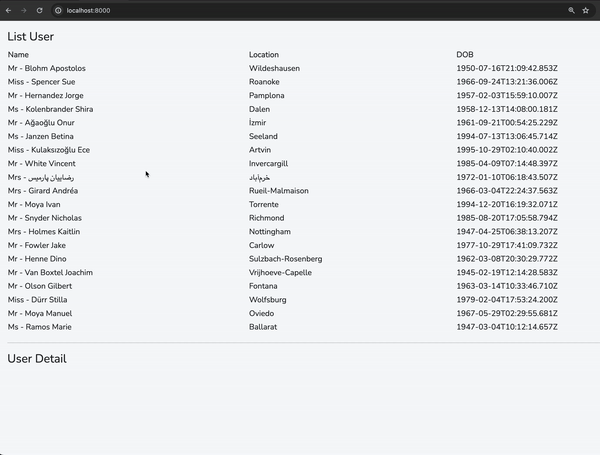
Sau đó các bạn thử load lại trang ta có kết quả như sau:
Ta mông má lại chút xíu ở bên component UserDashboard để hiện thị rõ hơn nhé:
<template>
  <div class="user-dashboard">
    <div class="list-user-comp">
      <h4>List User</h4>
      <ListUser></ListUser>
    </div>
    <hr>
    <div class="user-detail-comp">
      <h4>User Detail</h4>
      <UserDetail></UserDetail>
    </div>
  </div>
</template>

<script setup>
import ListUser from './ListUser.vue'
import UserDetail from './UserDetail.vue'

</script>

<style lang="scss" scoped>
.user-dashboard {
  padding: 1rem;
}
</style>
Test thử xem sao nào các bạn ơi :
Khá là oke rồi đó, nhưng bây giờ mình muốn khi click vào tên của một user thì bên dưới sẽ xuất hiện thông tin chi tiết của người đó. Chúng ta sẽ làm theo luồng xử lý như sau: click vào dòng dữ liệu ở ListUser -> dữ liệu được đẩy lên cho cha là UserDashboard -> sau đó được đưa vào UserDetail.
Ta cùng làm từng bước một nhé. Trước hết ta quay lại ListUser và sửa như sau để mỗi khi click vào tên user ta sẽ đưa dữ liệu lên component cha là UserDashboard bằng cách sử dụng emit:
<template>
  <div class="list-user">
    <table class="tbl-list-user">
      <thead>
        <th>Name</th>
        <th>Location</th>
        <th>DOB</th>
      </thead>
      <tbody>
        <tr v-for="user in userData">
          <!-- This line below -->
          <td><a @click="selectUser(user)">{{ user.name.title }} - {{ user.name.last }} {{ user.name.first }}</a></td>
          <td>{{ user.location.city }}</td>
          <td>{{ user.dob.date }}</td>
        </tr>
      </tbody>
    </table>
  </div>
</template>

<script setup>
import { ref } from 'vue';
import data from './data.json'

// This line
const emit = defineEmits(['userSelected'])
const userData = ref(data)


// And this line
function selectUser(user) {
  emit('userSelected', user)
}
</script>

<style lang="scss" scoped>
.tbl-list-user {
  width: 100%;
}
</style>
Mình chỉ sửa lại 3 dòng chỗ comment:
- ở trên là khi click vào tên user thì gọi hàm
selectUservà truyền đối tượng user vào đó - tiếp theo ta cần
defineEmits, ở đó ta định nghĩa tất cả các event mà ta muốn emit lên cha, bởi vì ta sẽemitở trong phần code Javascript nên ta cần tạo biếnconst emit - ở hàm
selectUserta sẽ sử dụngemitvới tên sự kiện làuserSelectedvà truyền đối tượng user lên component cha. Việc này giống như cách nói: cha ơi vừa có 1 user được chọn(eventuserSelected), và nó là thằng này này (objectuser).
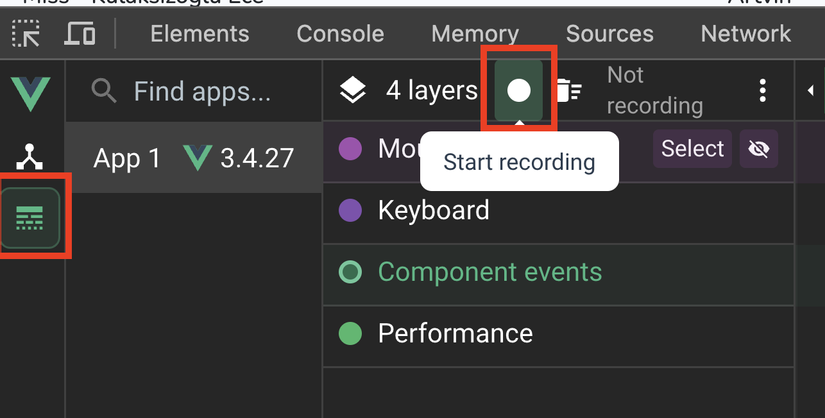
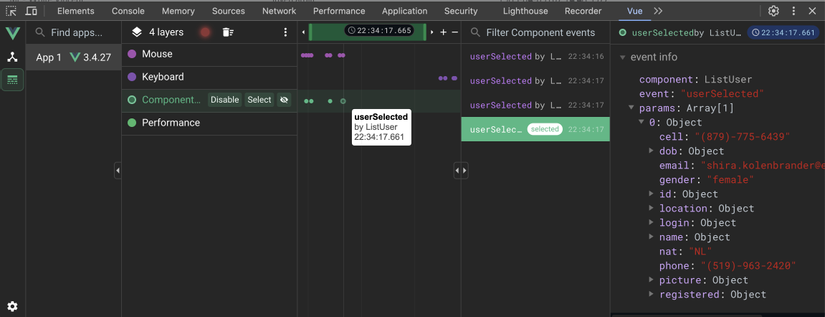
Các bạn save file tải lại trang, bật Vue-devtool và chuyển sang tab Timeline, Bấm nút recording sau đó thử click vào tên một user sẽ thấy xuất hiện như sau là event đã được emit thành công nhé:
Vọc chút nhé 😁
Ta có thể emit thẳng từ <template> mà không cần gọi vào function như sau:
<template>
  <div class="list-user">
    <table class="tbl-list-user">
      <thead>
        <th>Name</th>
        <th>Location</th>
        <th>DOB</th>
      </thead>
      <tbody>
        <tr v-for="user in userData">
          <!-- This line below -->
          <td><a @click="$emit('userSelected', user)">{{ user.name.title }} - {{ user.name.last }} {{ user.name.first }}</a></td>
          <td>{{ user.location.city }}</td>
          <td>{{ user.dob.date }}</td>
        </tr>
      </tbody>
    </table>
  </div>
</template>

<script setup>
import { ref } from 'vue';
import data from './data.json'

// This line
defineEmits(['userSelected'])
const userData = ref(data)
</script>

<style lang="scss" scoped>
.tbl-list-user {
  width: 100%;
}
</style>
Ở trên vì ta không truy cập emit ở phần <script> nên ta không cần const emit... nữa mà chỉ cần defineEmits(['userSelected']) thôi
Mà ủa cái defineEmits này ở đâu ra vậy????? chả thấy import ở đâu ra cả mà vẫn dùng được 🙄🙄
Cái đó nó gọi là compiler macro, Vue 3 cho chúng ta một số macro như defineProps() , defineEmits() and defineExpose(), mục đích là để ta đỡ phải mất công setup lặp đi lặp lại một (hoặc một số) việc nào đó mà ta hay cần phải làm. Cái này gọi là compiler macro vì ở bước compile Vue sẽ thay thế macro bằng một đoạn code cụ thể. Các bạn có thể tìm thêm Google về cái này nha
Tiếp tục quay trở lại bài, bây giờ ở cha chúng ta sẽ lắng nghe "con" của nó "nói" nhé
<template>
  <div class="user-dashboard">
    <div class="list-user-comp">
      <h4>List User</h4>
      <!-- Here -->
      <ListUser @userSelected="childrenSelectUser"></ListUser>
    </div>
    <hr>
    <div class="user-detail-comp">
      <h4>User Detail</h4>
      <UserDetail></UserDetail>
    </div>
  </div>
</template>

<script setup>
import ListUser from './ListUser.vue'
import UserDetail from './UserDetail.vue'

// And here
function childrenSelectUser(user) {
  console.log(user)
}
</script>

<style lang="scss" scoped>
.user-dashboard {
  padding: 1rem;
}
</style>
Mình chỉ thêm 2 chỗ dòng comment thôi nên các bạn chú ý nhé. Để lắng nghe sự kiện tử component con ta sử dụng @<Tên sự kiện của con gửi lên>=<Hàm xử lý ở cha>. Và ở hàm xử lý ở cha trong ví dụ này ta chỉ đơn giản là in nó ra ở console nhé. Các ta load lại trang sau đó xem thành quả nhé  :
:
Chú ý rằng ở trên ta lắng nghe event emit từ con lên bằng @userSelected, nhưng Vue khuyến khích ta dùng @user-selected, cái này tuỳ các bạn nhé. Thôi thì ta cứ theo cái họ khuyên nha 😂, dùng như sau:
<ListUser @user-selected="childrenSelectUser"></ListUser>
(Sẽ có một số chú ý về việc truyền nhiều hơn 1 đối tượng lên cha hoặc ở cha vừa nhận đối tượng của con và vừa chèn thêm tham số trong 1 hàm xử lý mình sẽ giải thích ở cuối bài nhé)
Tiếp theo nhiệm vụ của chúng ta là đưa thông tin vừa có được từ component cha và đưa vào UserDetail và hiển thị chi tiết của user được chọn. Việc này chúng ta sẽ truyền qua prop nhé.
Chúng ta sửa lại code của UserDashboard như sau:
<template>
  <div class="user-dashboard">
    <div class="list-user-comp">
      <h4>List User</h4>
      <ListUser @user-selected="childrenSelectUser"></ListUser>
    </div>
    <hr>
    <div class="user-detail-comp">
      <h4>User Detail</h4>
      <UserDetail :userDetailInfo="userSelectedFromChild"></UserDetail>
    </div>
  </div>
</template>

<script setup>
import ListUser from './ListUser.vue'
import UserDetail from './UserDetail.vue'
import { ref } from 'vue'

const userSelectedFromChild = ref({})

function childrenSelectUser(user) {
  console.log(user)
  userSelectedFromChild.value = user
}
</script>

<style lang="scss" scoped>
.user-dashboard {
  padding: 1rem;
}
</style>
Ở trên ta tạo biến userSelectedFromChild là 1 cái ref với giá trị chính là user mà ta mới emit từ ListUser. Sau đó chúng ta truyền biến này vào UserDetail thông qua một props là userDetailInfo.
Sau đó ta mở UserDetail.vue lên và sửa lại như sau:
<template>
  <div class="user-detail">
    This is user detail
  </div>
</template>

<script setup>
defineProps(['userDetailInfo'])
</script>

<style lang="scss" scoped></style>
Ở trên ta khai báo với Vue rằng component này sẽ nhận vào 1 props là userDetailInfo bằng cách dùng defineProps (đây cũng là 1 compiler macro như mình đã nói ở trên)
Sau đó các bạn save lại và load lại trang, mở Vue-devtool click chọn component UserDetail và ta thử click vào tên một user sẽ thấy sự thay đổi của props trong UserDetail nhé:
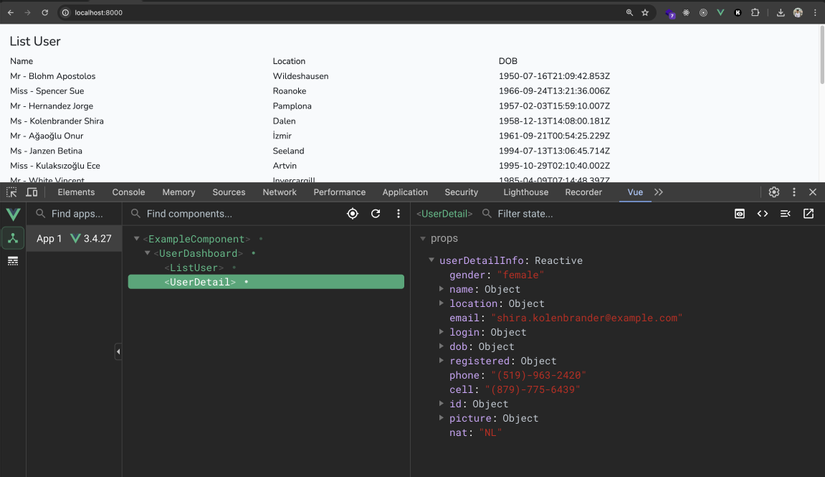
Cuối cùng việc của chúng ta là in ra màn hình nữa thôi nhé :
<template>
  <div class="user-detail">
    <div class="user-detail-container" v-if="Object.keys(userDetailInfo).length !== 0">
      <div class="user-name">
        Name: {{ userDetailInfo.name.last }} {{ userDetailInfo.name.first }}
      </div>
      <div class="user-email">
        Email: {{ userDetailInfo.email }}
      </div>
      <div class="user-dob">
        DOB: {{ userDetailInfo.dob.date }}
      </div>
      <div class="user-gender">
        Gender: {{ userDetailInfo.gender }}
      </div>
      <div class="user-address">
        Address: {{ userDetailInfo.location.city }}
      </div>
    </div>
  </div>
</template>

<script setup>
defineProps(['userDetailInfo'])
</script>

<style lang="scss" scoped></style>
Cuối cùng là test thôi nào:
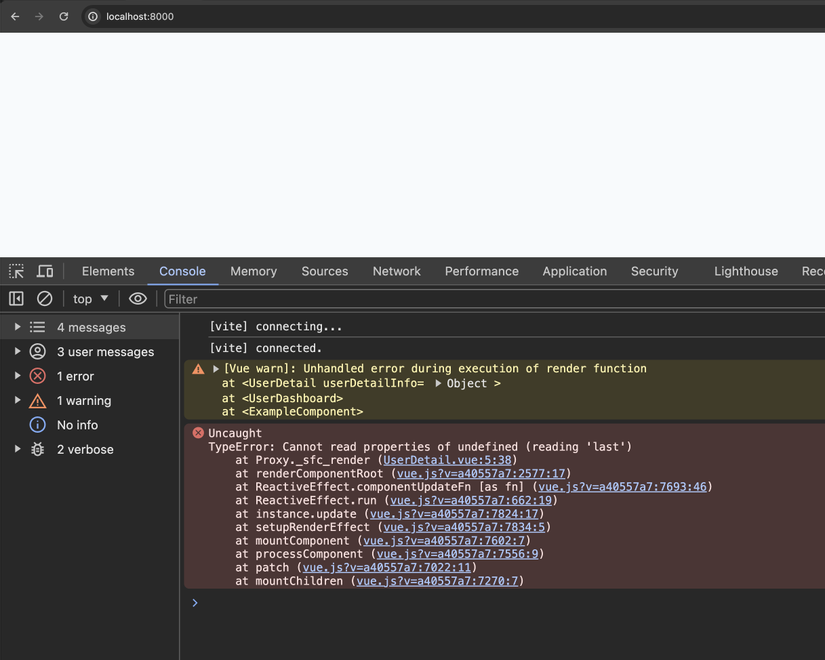
Lý giải vì sao mình có để một v-if bao bên ngoài bởi vì ngay từ ban đầu ta đã render ra component UserDetail nên Vue sẽ cố gắng để in ra thông tin của props UserDetailInfo nhưng không có dữ liệu gì trong đó nên ngoài console sẽ báo lỗi (thực ra điều này cũng không ảnh hưởng gì lắm, lần sau các bạn click vào user có dữ liệu nó vẫn in ra bình thường, nhưng nó có thể ảnh hướng tới ứng dụng trong tương lai), lỗi sẽ trắng màn hình như sau:
Ở trên nếu ta muốn truy cập props ở trong phần code <script> thì ta phải gán cho nó vào một biến lúc defineProps:
<template>
  <div class="user-detail">
    <div class="user-detail-container" v-if="Object.keys(userDetailInfo).length !== 0">
      <div class="user-name">
        Name: {{ userDetailInfo.name.last }} {{ userDetailInfo.name.first }}
      </div>
      <div class="user-email">
        Email: {{ userDetailInfo.email }}
      </div>
      <div class="user-dob">
        DOB: {{ userDetailInfo.dob.date }}
      </div>
      <div class="user-gender">
        Gender: {{ userDetailInfo.gender }}
      </div>
      <div class="user-address">
        Address: {{ userDetailInfo.location.city }}
      </div>
    </div>
  </div>
</template>

<script setup>
import { watch } from 'vue';

const props = defineProps(['userDetailInfo'])

watch(() => props.userDetailInfo, (newVal, oldVal) => {
  console.log('userDetailInfo', newVal)
})
</script>

<style lang="scss" scoped></style>
Một số lưu ý và kết luận
Nếu các bạn đã đọc đến đây thì xin chúc mừng các bạn đã hoàn tất cơ bản được bài này, và dưới đây là những lưu ý rất cần thiết vì rất có thể các bạn sẽ dùng đến nó nhiều trong ứng dụng.
Emit nhiều hơn một biến dữ liệu từ con lên cha
Quay trở lại component ListUser, để có thể emit nhiều hơn 1 biến ta sử dụng như sau:
<template>
  <div class="list-user">
    <table class="tbl-list-user">
      <thead>
        <th>Name</th>
        <th>Location</th>
        <th>DOB</th>
      </thead>
      <tbody>
        <tr v-for="user in userData">
          <!-- This line below -->
          <td><a @click="selectUser(user)">{{ user.name.title }} - {{ user.name.last }} {{ user.name.first }}</a></td>
          <td>{{ user.location.city }}</td>
          <td>{{ user.dob.date }}</td>
        </tr>
      </tbody>
    </table>
  </div>
</template>

<script setup>
import { ref } from 'vue';
import data from './data.json'

const emit = defineEmits(['userSelected'])
const userData = ref(data)
const count = ref(0)
const name = ref('MTD')

function selectUser(user) {
  emit('userSelected', user, count.value, name.value)
}
</script>

<style lang="scss" scoped>
.tbl-list-user {
  width: 100%;
}
</style>
Cứ thêm một biến thì viết liền ra sau cách nhau bởi dấy phẩy nhé mọi người.
Ở component cha UserDashboard ta sẽ thay đổi lại một xíu như sau:
<template>
  <div class="user-dashboard">
    <div class="list-user-comp">
      <h4>List User</h4>
      <ListUser @user-selected="childrenSelectUser"></ListUser>
    </div>
    <hr>
    <div class="user-detail-comp">
      <h4>User Detail</h4>
      <UserDetail :userDetailInfo="userSelectedFromChild"></UserDetail>
    </div>
  </div>
</template>

<script setup>
import ListUser from './ListUser.vue'
import UserDetail from './UserDetail.vue'
import { ref } from 'vue'

const userSelectedFromChild = ref({})

function childrenSelectUser(user, count, name) {
  console.log(user)
  console.log(count, name)
  userSelectedFromChild.value = user
}
</script>

<style lang="scss" scoped>
.user-dashboard {
  padding: 1rem;
}
</style>
Thứ tự các biến truyền vào của hàm nhớ là phải đúng thứ tự như khi emit từ con lên nhé.
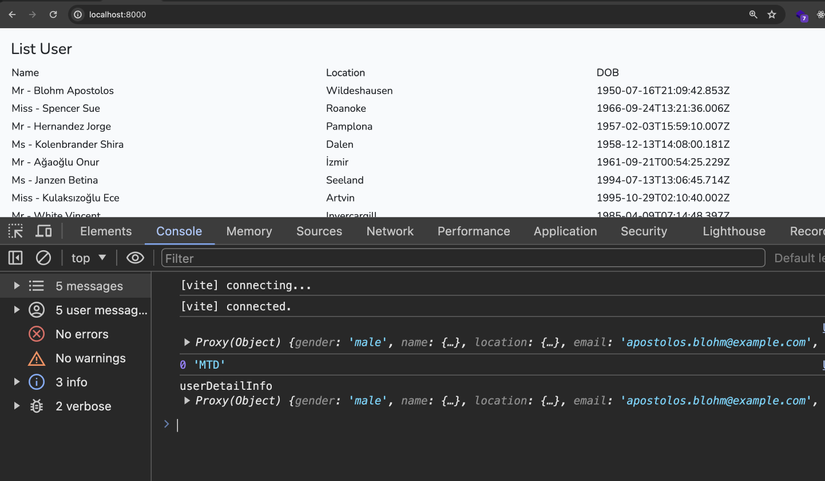
Chạy lên sẽ cho kết quả như sau mỗi khi ta click:
Chèn thêm tham số xử lý với các biến được emit từ con
Nếu ở cha là UserDashboard ta muốn truyền thêm một biến của chính nó (không phải của con nhé) vào hàm childrenSelectUser ta sẽ làm như sau:
<template>
  <div class="user-dashboard">
    <div class="list-user-comp">
      <h4>List User</h4>
      <ListUser @user-selected="(...args) => childrenSelectUser('thing', ...args)"></ListUser>
    </div>
    <hr>
    <div class="user-detail-comp">
      <h4>User Detail</h4>
      <UserDetail :userDetailInfo="userSelectedFromChild"></UserDetail>
    </div>
  </div>
</template>

<script setup>
import ListUser from './ListUser.vue'
import UserDetail from './UserDetail.vue'
import { ref } from 'vue'

const userSelectedFromChild = ref({})

function childrenSelectUser(text, user, count, name) {
  console.log(text)
  console.log(user)
  console.log(count, name)
  userSelectedFromChild.value = user
}
</script>

<style lang="scss" scoped>
.user-dashboard {
  padding: 1rem;
}
</style>
Ở đây các bạn để ý cách mình truyền vào ở phía trên trong thẻ ListUser, như sau:
- Ta cần truyền vào arrow function vì cho khớp với code mà Vue generate (xem comment này)
- Tất cả các biến truyền thêm vào thì ta để ở đầu, khi kết thúc các biến cần truyền thêm ta thêm vào ở sau
...argsý bảo với Vue là còn nhiều tham số truyền từ con lên nữa chứ không phải chỉ có mấy cái này đâu - Sau đó dưới hàm xử lý thì các bạn viết đầy đủ các tham số truyền vào theo đúng thứ tự nhé.
Mô tả chi tiết cho props
Quay trở lại component UserDetail, hiện tại ta chỉ khai báo 1 props và không để chi tiết về nó là gì, việc này thường không khuyến khích, để tránh hạn chế việc truyền vào props sai định dạng từ cha, đồng thời người khác đọc code của chúng ta cũng biết props đó là gì. Ví dụ, nên viết là:
const props = defineProps({
  userDetailInfo: Object
})
Hoặc:
// Càng tốt hơn!
const props = defineProps({
  userDetailInfo: {
    type: Object,
    required: true,
    validator: (value) => {
      return Object.keys(value).length !== 0
    },
  }
})
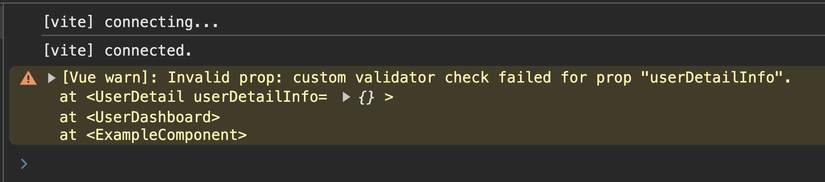
Bằng việc mô tả chi tiết hơn cho props thì Vue sẽ in ra warning báo cho chúng ta biết rằng props của ta có gì bất ổn:
Khi code, ngôn ngữ nào cũng vậy, nếu có thể thì ta nên luôn cố gắng tìm ra lỗi trước khi nó tới tay người dùng 😉
Kết luận
Ôi viết đến đây cũng khá dài rồi, bài dài viết giật tưng bừng (Viblo ơi cải thiện đi thôi), mình toàn viết trên sublime rồi paste vào đây .
Qua bài này mong rằng các bạn đã hiểu được cách truyền dữ liệu giữa các component sử dụng props và emit, với mình đây là cách phổ biến nhất, mình hay dùng nhất trong các dự án mình đã làm, và cũng dễ hiểu nhất .
Ở bài tiếp theo chúng ta sẽ tìm hiểu về vòng đời của Vue nha 💪
Cám ơn các bạn đã theo dõi, nếu có gì thắc mắc các bạn để lại ở comment nhé ^^!
All rights reserved
