Tạo Icon ActionBar hiển thị số đếm
Bài đăng này đã không được cập nhật trong 4 năm
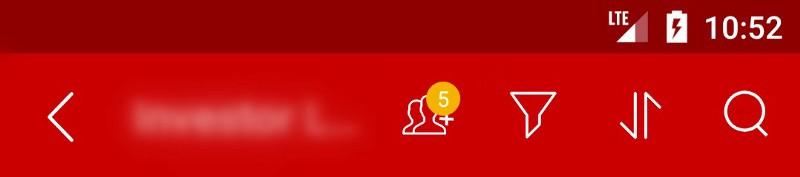
Trong thị trường hiện nay, nếu bạn muốn thành công thì không chỉ cần một app tuyệt vời mà cần có một UX tuyệt vời. Vì vậy, trong ứng dụng android, mỗi khi bạn có chức năng chọn mục và gọi button trên actionbar thì việc hiển thị số mục đã chọn trên button actionbar sẽ tạo một UX tuyệt vời. Ví dụ
 Để tạo icon với số đếm như trên ta sẽ thực hiện như sau:
- Nếu ta chuẩn bị trước mỗi ảnh tướng ứng với một state thì thật tồi tệ vì nếu ta có n state thì ta cần n ảnh, vì vậy ta sẽ custom 1 icon có khả năng hiển thị count khác nhau.
Bước 1. Ta sẽ tạo drawable với layer-list
- Đầu tiên ta cần hiểu layer-list là gì và nó hoạt động như thế nào. Về cơ bản, layer-list được dùng để kết hợp các item khác nhau trong cùng 1 drawable, mỗi item sẽ nằm ở layer trong layer-list. Các layer được liệt kê trước sẽ được vẽ trước khi drawable được load, vì vậy item dưới cùng trong layer-list sẽ được hiển thị trên cùng khi drawable được load.
- Để tạo được group icon như trên ta sẽ chia thành hai layer. Ở layer bên dưới ta sẽ tạo group icon, còn layer trên cùng ta sẽ tạo count drawable để hiển thị count.
actionbar_group_icon.xml
<?xml version="1.0" encoding="utf-8"?>
<layer-list xmlns:android="http://schemas.android.com/apk/res/android">

    <item
        android:drawable="@drawable/ic_group"
        android:gravity="center" />

    <item
        android:id="@+id/ic_group_count"
        android:drawable="@color/transparent" />

</layer-list>
Bước 2. Thêm icon tạo ở trên vào actionbar
tạo file menu sau đó add drawable tạo ở trên vào item như sau
<menu xmlns:android="http://schemas.android.com/apk/res/android"
    xmlns:tools="http://schemas.android.com/tools"
    xmlns:app="http://schemas.android.com/apk/res-auto" >

    <!-- add the following item to your menu.xml -->

    <item
        android:id="@+id/ic_group"
        android:icon="@drawable/actionbar_group_icon.xml"
        android:title="@string/group_title"
        app:showAsAction="always" />
</menu>
Bước 3. Tạo custom component để vẽ count trên layer top Tạo file java CountDrawable.java extend Drawable class
public class CountDrawable extends Drawable {

    private Paint mBadgePaint;
    private Paint mTextPaint;
    private Rect mTxtRect = new Rect();

    private String mCount = "";
    private boolean mWillDraw;

    public CountDrawable(Context context) {
        float mTextSize = context.getResources().getDimension(R.dimen.badge_count_textsize);

        mBadgePaint = new Paint();
        mBadgePaint.setColor(ContextCompat.getColor(context.getApplicationContext(), R.color.background_color));
        mBadgePaint.setAntiAlias(true);
        mBadgePaint.setStyle(Paint.Style.FILL);

        mTextPaint = new Paint();
        mTextPaint.setColor(Color.WHITE);
        mTextPaint.setTypeface(Typeface.DEFAULT);
        mTextPaint.setTextSize(mTextSize);
        mTextPaint.setAntiAlias(true);
        mTextPaint.setTextAlign(Paint.Align.CENTER);
    }

    @Override
    public void draw(Canvas canvas) {

        if (!mWillDraw) {
            return;
        }
        Rect bounds = getBounds();
        float width = bounds.right - bounds.left;
        float height = bounds.bottom - bounds.top;

        // Position the badge in the top-right quadrant of the icon.

	        /*Using Math.max rather than Math.min */

        float radius = ((Math.max(width, height) / 2)) / 2;
        float centerX = (width - radius - 1) +5;
        float centerY = radius -5;
        if(mCount.length() <= 2){
            // Draw badge circle.
            canvas.drawCircle(centerX, centerY, (int)(radius+5.5), mBadgePaint);
        }
        else{
            canvas.drawCircle(centerX, centerY, (int)(radius+6.5), mBadgePaint);
        }
        // Draw badge count text inside the circle.
        mTextPaint.getTextBounds(mCount, 0, mCount.length(), mTxtRect);
        float textHeight = mTxtRect.bottom - mTxtRect.top;
        float textY = centerY + (textHeight / 2f);
        if(mCount.length() > 2)
            canvas.drawText("99+", centerX, textY, mTextPaint);
        else
            canvas.drawText(mCount, centerX, textY, mTextPaint);
    }

    /*
    Sets the count (i.e notifications) to display.
     */
    public void setCount(String count) {
        mCount = count;

        // Only draw a badge if there are notifications.
        mWillDraw = !count.equalsIgnoreCase("0");
        invalidateSelf();
    }

    @Override
    public void setAlpha(int alpha) {
        // do nothing
    }

    @Override
    public void setColorFilter(ColorFilter cf) {
        // do nothing
    }

    @Override
    public int getOpacity() {
        return PixelFormat.UNKNOWN;
    }
}
Bước 4. Sử dụng để set count trên icon ta thực hiện như sau:
@Override
public boolean onPrepareOptionsMenu(Menu menu) {
  setCount(this, "9");
}

public void setCount(Context context, String count) {
    MenuItem menuItem = defaultMenu.findItem(R.id.ic_group);
    LayerDrawable icon = (LayerDrawable) menuItem.getIcon();

    CountDrawable badge;

    // Reuse drawable if possible
    Drawable reuse = icon.findDrawableByLayerId(R.id.ic_group_count);
    if (reuse != null && reuse instanceof CountDrawable) {
        badge = (CountDrawable) reuse;
    } else {
        badge = new CountDrawable(context);
    }

    badge.setCount(count);
    icon.mutate();
    icon.setDrawableByLayerId(R.id.ic_group_count, badge);
}
All rights reserved
