Layout Using Stack Views
Bài đăng này đã không được cập nhật trong 7 năm
Stack Views
Được giới thiệu từ WWDC 2015 UIStackView là một công cụ khá hữu ích giúp các bạn đơn giản hơn trong việc thiết kế, bố trí các view trên màn hình giảm thiểu số lượng constraint. Giúp dễ dang kiểm soát các subview hơn.
Simple Stack View
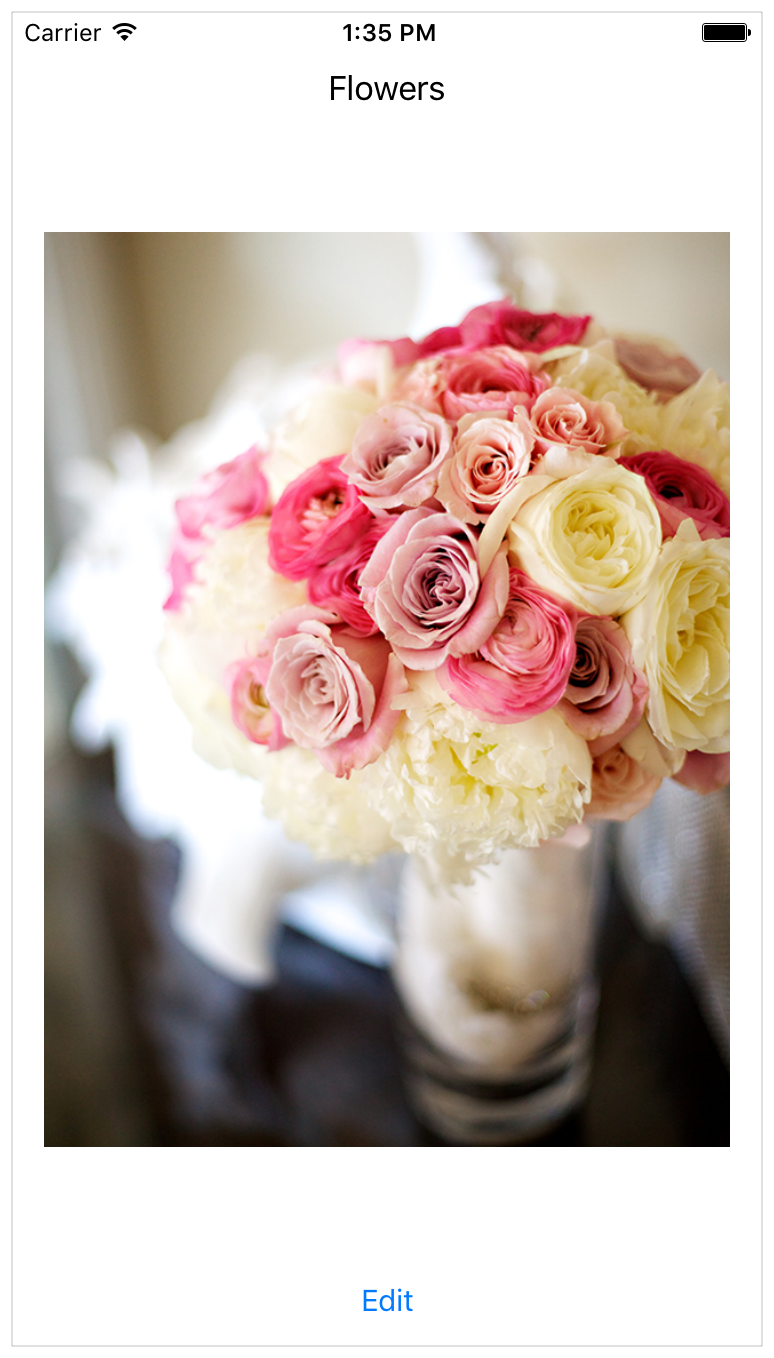
Ví dụ đơn giản nhất màn hình của bạn chỉ có UILabel, UIImageView, và Button.
Views and Constraints
Trên ViewController bạn thực hiện kéo một vertical UIStackView và thêm một UILabel, UIIMageView, UIButton vào trong nó. Sau đó cài đặt constraints như sau.
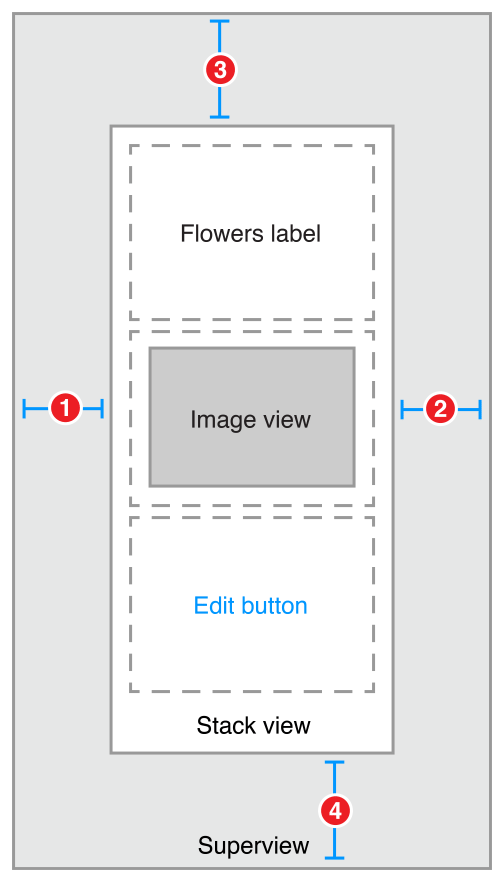
Stack View.Leading = Superview.LeadingMargin

Stack View.Trailing = Superview.TrailingMargin

Stack View.Top = Top Layout Guide.Bottom + Standard

Bottom Layout Guide.Top = Stack View.Bottom + Standard
Attributes
Trong Attributes inspector set các thuộc tính của UIStackview như sau:

Tiếp theo set các thuộc tính của UIImageView như sau:
 Cuối cùng bạn cần chỉnh lại priority cho nó bằng cách select Content Hugging Priority bạn thay đổi các giá trị mặc định của nó. Cụ thể là giảm priority vertical của UIIMageView xuống 249 và Content Compression Resistance Priority vertical xuống 749.
 Vậy là xong. Bạn sẽ thấy UIImageView sẽ tự động fill rộng toàn màn hình và Label và Button sẽ giữ size mà bạn đã set trước đó. Để set đều khoảng cách giữa các phần tử trong stack bạn chú ý đến thuộc tính spacing.
Nested Stack Views
Với những trường hợp phúc tạp hơn trong màn hình của bạn không chỉ có những item xếp theo chiều dọc. Với TH này bạn phải sử dụng các StackView trồng lên nhau.
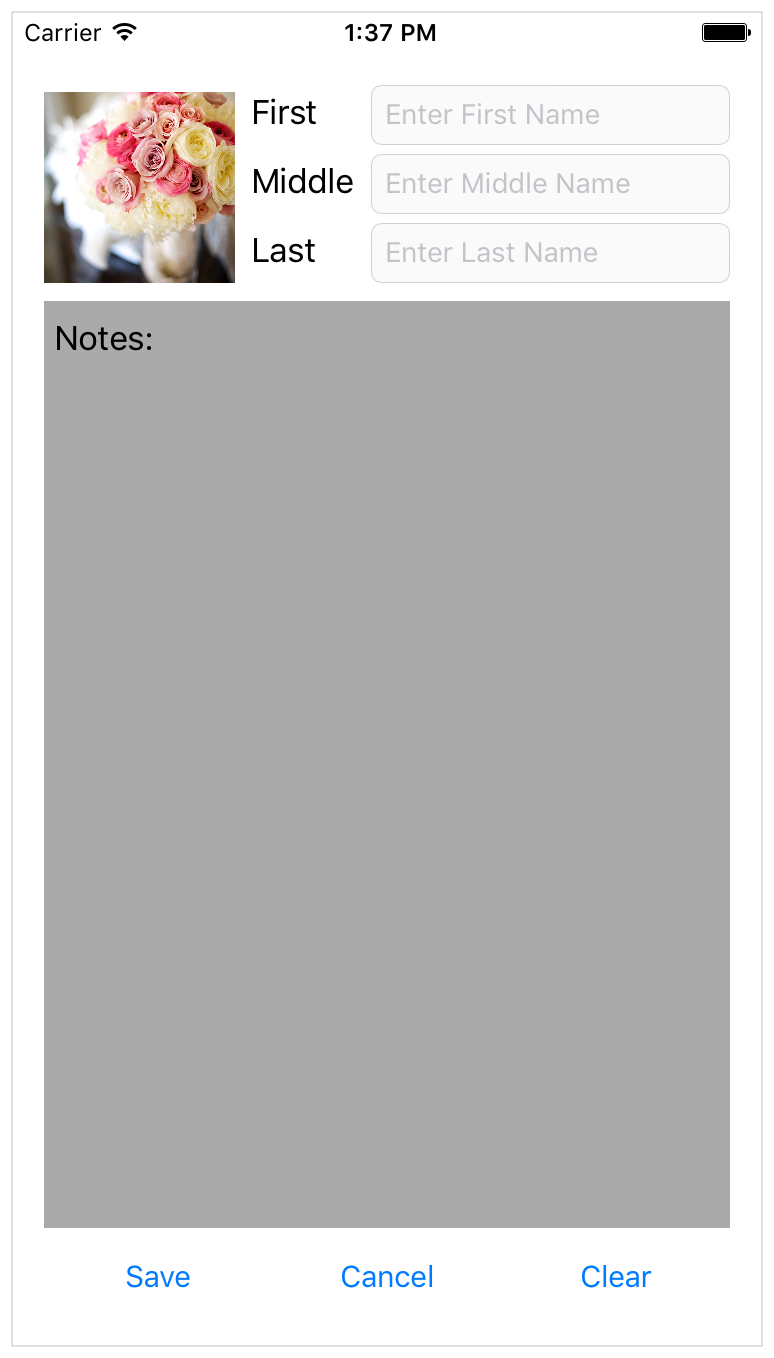 Đầu tiên bạn kéo vào một vertical StackView. Thêm một Stackview nữa để design header. Thêm một UITextView vào giữa để hiển thị body. Cuối cùng thêm một StackView để hiển thị bottom bar. Với Bottom Bar thì bạn chọn horizontal Stackview.
Với Header bạn thấy nó là một horizontal StackView gồm 2 item, left - right. Item left bạn chỉ việc kéo UIIMageView vào để hiển thị thumbnail. Còn right-item thì bạn cần một vertical StackView nữa để hiển thị nó.
Đầu tiên bạn kéo vào một vertical StackView. Thêm một Stackview nữa để design header. Thêm một UITextView vào giữa để hiển thị body. Cuối cùng thêm một StackView để hiển thị bottom bar. Với Bottom Bar thì bạn chọn horizontal Stackview.
Với Header bạn thấy nó là một horizontal StackView gồm 2 item, left - right. Item left bạn chỉ việc kéo UIIMageView vào để hiển thị thumbnail. Còn right-item thì bạn cần một vertical StackView nữa để hiển thị nó.
Sau đó sét lại priority như phần trên mình đã hướng dẫn để textview auto hieght theo size màn hình còn header và footer bạn sẽ set cố định kích thước của nó.
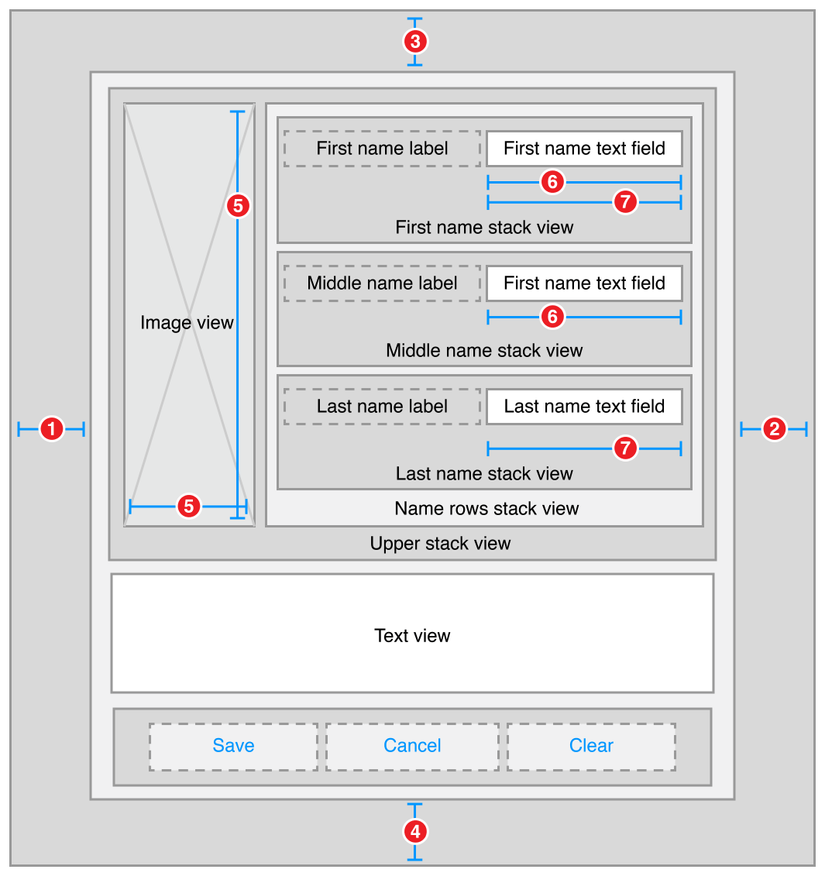
Thông số cơ bản như sau:
Root Stack View.Leading = Superview.LeadingMargin

Root Stack View.Trailing = Superview.TrailingMargin

Root Stack View.Top = Top Layout Guide.Bottom + 20.0

Bottom Layout Guide.Top = Root Stack View.Bottom + 20.0

Image View.Height = Image View.Width

First Name Text Field.Width = Middle Name Text Field.Width

First Name Text Field.Width = Last Name Text Field.Width
Attributes
Update lại các thuộc tính của Stack view.
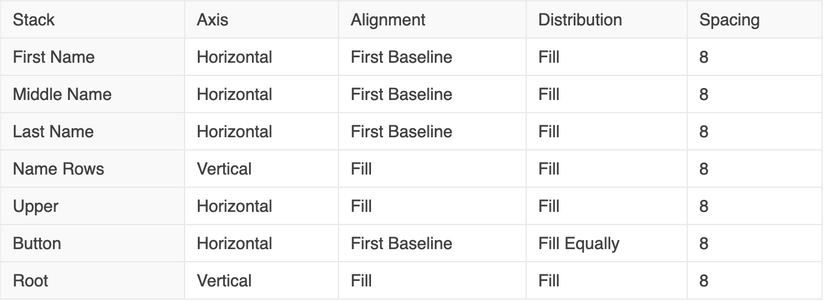 Update thuộc tính của UITextView:
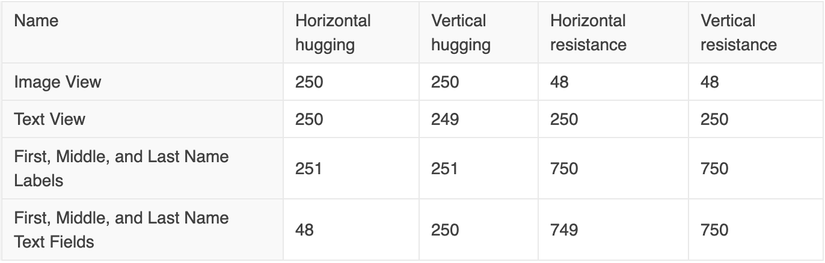
 Cuối cùng update priority:
Bạn thấy hầu hết layout của view đã được set tự động bằng Stackview. Nhưng đấy là TH design của nó là tĩnh. Nghĩa là không thay đổi trong quá trinh sử dụng. Với trường hợp kích thước các item thay đổi theo yêu cầu hoặc thay đổi ratio của image thì cần phải set thêm các constraint cho nó và handle bằng code.
Dynamic Stack View
Như mình đã nói với trường hợp view của bạn có thể thay đổi thì việc sử dụng Stackview sẽ phức tạp hơn cần thêm những xử lý khác.
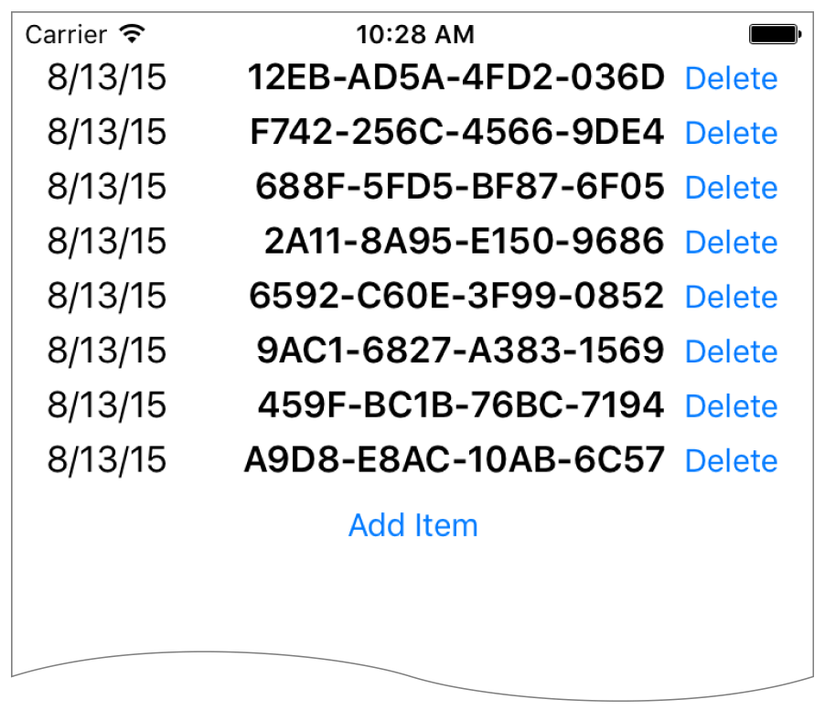
VD với một list đơn giản bạn sử dụng StackView + UISCrollView mà không phải TableView như sau. (Đây là ví dụ còn thực tế mình khuyến cáo các bạn sử dụng TableView hoặc CollectionView).
Thêm các constraints như sau:
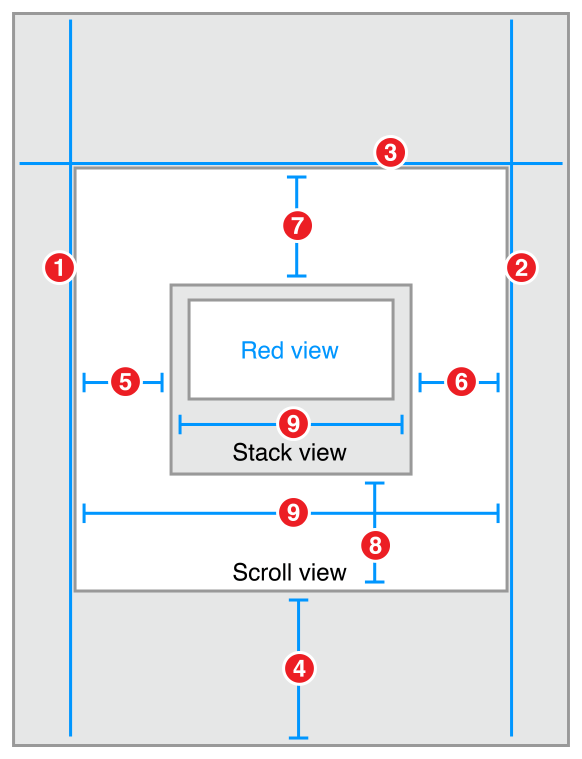
Scroll View.Leading = Superview.LeadingMargin

Scroll View.Trailing = Superview.TrailingMargin

Scroll View.Top = Superview.TopMargin

Bottom Layout Guide.Top = Scroll View.Bottom + 20.0

Stack View.Leading = Scroll View.Leading

Stack View.Trailing = Scroll View.Trailing

Stack View.Top = Scroll View.Top

Stack View.Bottom = Scroll View.Bottom

Stack View.Width = Scroll View.Width
Attributes
Update các thuộc tính của stackview như sau:
 Tiếp theo kéo Outlet cho UISCrollView và UIStackview để handle bằng code:
    @IBOutlet weak private var scrollView: UIScrollView!
    @IBOutlet weak private var stackView: UIStackView!
Tiếp theo override lại viewDidLoad method để setup UISCrollView.
override func viewDidLoad() {
    super.viewDidLoad()

    // setup scrollview
    let insets = UIEdgeInsetsMake(20.0, 0.0, 0.0, 0.0)
    scrollView.contentInset = insets
    scrollView.scrollIndicatorInsets = insets

}
Thêm action khi tap button Add Item
@IBAction func addEntry(sender: AnyObject) {

    let stack = stackView
    let index = stack.arrangedSubviews.count - 1
    let addView = stack.arrangedSubviews[index]

    let scroll = scrollView
    let offset = CGPoint(x: scroll.contentOffset.x,
                         y: scroll.contentOffset.y + addView.frame.size.height)

    let newView = createEntry()
    newView.hidden = true
    stack.insertArrangedSubview(newView, atIndex: index)

    UIView.animateWithDuration(0.25) { () -> Void in
        newView.hidden = false
        scroll.contentOffset = offset
    }
}


// MARK: - Private Methods
private func createEntry() -> UIView {
    let date = NSDateFormatter.localizedStringFromDate(NSDate(), dateStyle: .ShortStyle, timeStyle: .NoStyle)
    let number = "\(randomHexQuad())-\(randomHexQuad())-\(randomHexQuad())-\(randomHexQuad())"

    let stack = UIStackView()
    stack.axis = .Horizontal
    stack.alignment = .FirstBaseline
    stack.distribution = .Fill
    stack.spacing = 8

    let dateLabel = UILabel()
    dateLabel.text = date
    dateLabel.font = UIFont.preferredFontForTextStyle(UIFontTextStyleBody)

    let numberLabel = UILabel()
    numberLabel.text = number
    numberLabel.font = UIFont.preferredFontForTextStyle(UIFontTextStyleHeadline)

    let deleteButton = UIButton(type: .RoundedRect)
    deleteButton.setTitle("Delete", forState: .Normal)
    deleteButton.addTarget(self, action: "deleteStackView:", forControlEvents: .TouchUpInside)

    stack.addArrangedSubview(dateLabel)
    stack.addArrangedSubview(numberLabel)
    stack.addArrangedSubview(deleteButton)

    return stack
}
Mỗi lần add chúng tam thêm một StackView chứa EntryView như design.
Tương tự thêm action delete Entry như sau:
@IBAction func deleteStackView(sender: UIButton) {
    if let view = sender.superview {
        UIView.animateWithDuration(0.25, animations: { () -> Void in
            view.hidden = true
        }, completion: { (success) -> Void in
            view.removeFromSuperview()
        })
    }
}
Conclusion
UIStackview là một công cụ khá hữu ích cho bạn design view. Nó không giúp bạn control hết các TH nhưng nó giúp bạn giảm thiểu tối đa những phần code update UI. Giúp code bạn clear và giảm effort khi phải maintain một ViewController kéo quá nhiều constraint.
All rights reserved
