Android - Swipe layout
Bài đăng này đã không được cập nhật trong 8 năm
Chẳng là mình đang tập tành code kotlin cho android, app của mình cho phép người dùng swipe item trái phải các kiểu và thực hiện các action ứng với mỗi trường hợp người dùng vuốt trái, phải.
Sau một cả ngày mò mẫm thì mình tìm được một thư viện hỗ trợ khá tốt và đáp ứng được nhu cầu của mình - AndroidSwipeLayout
Cài đặt
Gradle: các bạn có thể thay đổi version của recyclerview theo như mình mong muốn
dependencies {
    compile 'com.android.support:recyclerview-v7:21.0.0'
    compile 'com.android.support:support-v4:20.+'
    compile "com.daimajia.swipelayout:library:1.2.0@aar"
}
Maven
<dependency>
	<groupId>com.google.android</groupId>
	<artifactId>support-v4</artifactId>
	<version>r6</version>
</dependency>
<dependency>
	<groupId>com.google.android</groupId>
	<artifactId>recyclerview-v7</artifactId>
	<version>21.0.0</version>
</dependency>
<dependency>
    <groupId>com.daimajia.swipelayout</groupId>
    <artifactId>library</artifactId>
    <version>1.2.0</version>
    <type>apklib</type>
</dependency>
Sử dụng
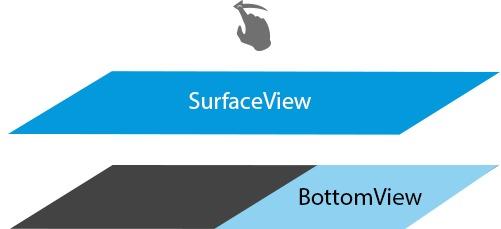
Nguyên lý cơ bản của thư viện này là nó sẽ có 2 layer phục vụ cho việc hiển thị, SurfaceView chính là layer ở phía trên mà bạn vuốt, BottomView là layer ở phía dưới sẽ được hiển thị khi bạn vuốt
<com.daimajia.swipe.SwipeLayout xmlns:android="http://schemas.android.com/apk/res/android"
    android:layout_width="match_parent" android:layout_height="80dp">
    <!-- Bottom View Start-->
     <LinearLayout
        android:background="#66ddff00"
        android:id="@+id/bottom_wrapper"
        android:layout_width="160dp"
        android:weightSum="1"
        android:layout_height="match_parent">
        <!--What you want to show-->
    </LinearLayout>
    <!-- Bottom View End-->

    <!-- Surface View Start -->
     <LinearLayout
        android:padding="10dp"
        android:background="#ffffff"
        android:layout_width="match_parent"
        android:layout_height="match_parent">
        <!--What you want to show in SurfaceView-->
    </LinearLayout>
    <!-- Surface View End -->
</com.daimajia.swipe.SwipeLayout>
Đoạn code ở trên mô tả cấu trúc cơ bản của SwipeLayout, ở phần BottomView, bạn có thể đặt bao nhiêu item cũng được, chỉ cần chú ý rằng SurfaceView chính là layer cuối cùng của SwipeLayout.
Các bạn có thể tham khảo thêm ở đây: swipe_item.xml
Thư viện này hỗ trợ 2 kiểu swipe: LayDown hoặc PullOut, đồng thời hỗ trợ xác định hướng vuốt: LEFT, RIGHT, TOP, BOTTOM
-
LayDown
-
PullOut
Sau khi có SwipeLayout, chúng ta cần cài đặt cho nó.
Dưới đây là một ví dụ sử dụng SwipeLayout cho RecyclerView, chúng ta có một adapter đơn giản có sử dụng callback. Nếu các bạn chỉ sử dụng nó cho một item nào đó thì chỉ cần addSwipeListener và set showMode cho nó là xong
class RecyclerSwipeViewAdapter(
    private val items: List<Item>,
    private val mListener: OnSwipeItem
) : RecyclerSwipeAdapter<RecyclerSwipeViewAdapter.SimpleViewHolder>() {

    override fun onCreateViewHolder(parent: ViewGroup, viewType: Int): SimpleViewHolder {
        val view = LayoutInflater.from(parent.context).inflate(R.layout.swipe_item, parent, false)
        return SimpleViewHolder(view)
    }

    override fun onBindViewHolder(viewHolder: SimpleViewHolder, position: Int) {
        val item = items[position]
        viewHolder.bindItem(item, position)
    }

    override fun getItemCount(): Int {
        return items.size
    }

    override fun getSwipeLayoutResourceId(position: Int): Int {
        return R.id.swipe
    }

    inner class SimpleViewHolder(itemView: View) : RecyclerView.ViewHolder(itemView) {
        private val text: TextView = itemView.text_view
        private val swipeLayout: SwipeLayout = itemView.swipe

        init {
            swipeLayout.addDrag(SwipeLayout.DragEdge.Right, itemView.findViewById(R.id.bottom_right))
            swipeLayout.addDrag(SwipeLayout.DragEdge.Left, itemView.findViewById(R.id.bottom_left))
        }

        fun close() {
            swipeLayout.close()
        }

        fun bindItem(item: Item, position: Int) {
            text.text = item.text

            // Set swipe style
            swipeLayout.showMode = SwipeLayout.ShowMode.PullOut

            // Set listener
            swipeLayout.addSwipeListener(object : SwipeLayout.SwipeListener {
                override fun onClose(layout: SwipeLayout) { }

                override fun onUpdate(layout: SwipeLayout, leftOffset: Int, topOffset: Int) { }

                override fun onStartOpen(layout: SwipeLayout) {}

                override fun onOpen(layout: SwipeLayout) { }

                override fun onStartClose(layout: SwipeLayout) { }

                override fun onHandRelease(layout: SwipeLayout, xvel: Float, yvel: Float) {
                    val edge = layout.dragEdge.name
                    if (layout.openStatus.toString() !== "Close") {
                        when (edge) {
                            SwipeLayout.DragEdge.Right.name -> {
                                // Drag RIGHT
                                mListener.onSwipeRight(item)
                            }
                            SwipeLayout.DragEdge.Left.name -> {
                                // Drag LEFT
                                mListener.onSwipeLeft(item)
                            }
                            SwipeLayout.DragEdge.Top.name -> {
                                // Drag TOP
                                mListener.onSwipeTop(item)
                            }
                            SwipeLayout.DragEdge.Bottom.name -> {
                                // Drag BOTTOM
                                mListener.onSwipeBottom(item)
                            }
                        }
                    }
                }
            })

            text.setOnClickListener {
                mListener.onClickItem(item)
            }
        }
    }

    interface OnSwipeItem {
        fun onSwipeLeft(item: Item)
        fun onSwipeRight(item: Item)
        fun onSwipeTop(item: Item)
        fun onSwipeBottom(item: Item)
        fun onClickItem(item: Item)
    }
}
Trong Activity/Fragment:
private fun setAdapter(items: List<Item>) {
    swipeAdapter = RecyclerSwipeViewAdapter(items, object: RecyclerSwipeViewAdapter.OnSwipeItem {
        override fun onSwipeLeft(item: Item) {}
        override fun onSwipeRight(item: Item) {}
        override fun onSwipeTop(item: Item) {}
        override fun onSwipeBottom(item: Item) {}
        override fun onClickItem(item: Item) {}
    })

    recycler_view.apply {
        layoutManager = LinearLayoutManager(context, LinearLayoutManager.VERTICAL, false)
        addItemDecoration(DividerItemDecoration(context, LinearLayoutManager.VERTICAL))
        adapter = swipeAdapter
    }
}
Note: nếu ứng dụng của bạn chỉ cần nhận diện việc người dùng vuốt theo hướng nào mà ko cần phải hiển thị phần BottomView như ở trên thì bạn có thể tham khảo qua đoạn code dưới đây
abstract class OnSwipeTouchListener(context: Context) : View.OnTouchListener {
    private val gestureDetector: GestureDetector

    init {
        gestureDetector = GestureDetector(context, GestureListener())
    }

    override fun onTouch(v: View, event: MotionEvent): Boolean {
        return gestureDetector.onTouchEvent(event)
    }

    inner class GestureListener : GestureDetector.SimpleOnGestureListener() {
        private val SWIPE_THRESHOLD = 100
        private val SWIPE_VELOCITY_THRESHOLD = 100

        override fun onDown(e: MotionEvent): Boolean {
            return true
        }

        override fun onFling(e1: MotionEvent, e2: MotionEvent, velocityX: Float, velocityY: Float): Boolean {
            var result = false
            try {
                val diffY = e2.y - e1.y
                val diffX = e2.x - e1.x
                if (Math.abs(diffX) > Math.abs(diffY)) {
                    if (Math.abs(diffX) > SWIPE_THRESHOLD && Math.abs(velocityX) > SWIPE_VELOCITY_THRESHOLD) {
                        if (diffX > 0) {
                            onSwipeRight()
                        } else {
                            onSwipeLeft()
                        }
                        result = true
                    }
                } else if (Math.abs(diffY) > SWIPE_THRESHOLD && Math.abs(velocityY) > SWIPE_VELOCITY_THRESHOLD) {
                    if (diffY > 0) {
                        onSwipeBottom()
                    } else {
                        onSwipeTop()
                    }
                    result = true
                }
            } catch (exception: Exception) {
                exception.printStackTrace()
            }

            return result
        }
    }

    abstract fun onSwipeRight()
    abstract fun onSwipeLeft()
    abstract fun onSwipeTop()
    abstract fun onSwipeBottom()
}
Ở đoạn code trên, chúng ta sử dụng GestureDetector.SimpleOnGestureListener để xác định hướng mà người dùng vuốt.
Tiếp theo trong Activity/Fragment chúng ta chỉ cần implement 4 phương thức abstract là xong
text_view.setOnTouchListener(object : OnSwipeTouchListener(this) {
    override fun onSwipeRight() {}

    override fun onSwipeLeft() {}

    override fun onSwipeTop() {}

    override fun onSwipeBottom() {}
})
All rights reserved
