UITableView design pattern.
Bài đăng này đã không được cập nhật trong 8 năm
Tản mạn
Khi đã làm việc với iOS chắc chắn các bạn đều biết đến khái niệm UITableView. Một ứng dụng thông thường có thế bạn phải Implement 1, 2 thậm chí là rất nhiều UITableView. Và công việc của nó không có gì khác nhau là mấy gây ra sự nhàm chán. Với mỗi table view bạn đều phải set delegate, implement datasource của nó rồi handle xử lý các kiểu cell cho nó rồi reuse ...
- Một chú ý nữa: Khi review code mình thấy nhiều bạn code như sau. Với objective c một số bạn chia category xử lý cho tableview implement delegate & data source, với swift thì sử dụng extension nhưng chung quy cho cùng nó vẫn xử lý trực tiếp trên UIViewController khiến cho UIViewController của bạn khá lớn dẫn đến khó khăn cho maintain và scalable sau này.
- Spec thì luôn thay đổi điều đó có nghĩa là bạn phải xây dựng ứng dụng của bạn flexible nhất có thể. Vì biết đâu một ngày nào đó nó sẽ thay đổi.
Ý tưởng
-
Tại sao phải làm đi làm lại những việc giống nhau điều này tốn rất nhiều effort gây ra sự nhàm chán cũng như làm cho code của bạn dài hơn. Vậy tại sao không tạo ra một pattern cho nó. Ở đây mình sẽ tạo một pattern theo mình thì nó khá hữu ích. Hiểu đơn giản là mình sẽ tạo ra một BaseTableView nó là một pattern và khi sử dụng mình chỉ cần thực hiện những thứ mà một tableview cần. Như register nib, get data & parse data fill vào tableview mà thôi.
-
Tách riêng Controller ra khỏi UIViewController hãy để UIViewController chỉ xử lý UI mà thôi (Ở đây mình chỉ làm cho UITableView các UI khác mình chưa nói đến).
Tạo BaseTableController
Them một file swift đặt tên BaseTableController. Subclass của NSObject.
 Thêm một số hàm khởi tạo. Ở đây mình thêm một hàm cơ bản nhất.
    convenience init(initWithTargetTable targetTableView:UITableView) {
        self.init()
        self.initWithTargetTableView(targetTableView)
        fetchData()
    }

    func fetchData() {}

    private func initWithTargetTableView(_ targetTableView:UITableView) {
        _targetTableView = targetTableView
        _targetTableView?.delegate = self
        _targetTableView?.dataSource = self
        self.registerNibWithTargetTableView(targetTableView)
    }
Hàm convenience init(initWithTargetTable targetTableView:UITableView) là hàm khởi tạo của BaseTableController. Sau khi subclass BaseTableController bạn chỉ việc gọi đến nó và truyền vào targetTableView tương ứng với nó là được.
Ở đây mình sẽ gán delegate và datasource của targetTableView bằng chính BaseTableController.
Tiếp đó là gọi đến hàm
func registerNibWithTargetTableView(_ targetTableView: UITableView) {
        assert(false, "This is abstract method, you must implement it in subclass")
    }
Hàm này là một abstract method và ở đây mình bắt buộc bạn phải override nó trong subclass. Ngoài ra bạn cần một số abstract method nữa:
func getCellIdentify(withItem item: AnyObject?, returnClassName: Bool) -> String {
        assert(false, "This is abstact method, you must implement it in subclass")
        return ""
    }

    func getHeaderIdentifiWithItem(_ item: AnyObject, returnClassName: Bool) -> String {
        assert(false, "This is abstract method, you must implement it in subclass")
        return ""
    }
Nó phục vụ cho việc support các loại cell gì. Nó là bắt buộc khi bạn subclass BaseTableController. Sau khi override bạn phải mô tả các condition và các kiểu cell tương ứng. Một số method phục vụ cho việc update or fill data.
     func updateWithListItem(_ listItems:Array<AnyObject>) {
        items = listItems
    }

    func updateWithListItem(_ listItem: Array<AnyObject>, listSections: Array<AnyObject>) {
        sections = listSections
        items = listItem
    }

    func reloadData() {
        _targetTableView?.reloadData()
    }
Ngoài ra bạn có thể viết thêm một số hàm tuỳ vào nhu cầu của bạn. Nhưng nếu nó không phải là tính năng chung thì tốt nhất là không lên viết ở đây.
Implement BaseTableView
Như bên trên mình đã gán delegate và dataSource của targetTableView ở BaseTableController. Điều đó có nghĩa mình sẽ phải implement chúng ở đây. Ok phần này mình nghĩ mọi người cũng đã làm nhiều. Tuy nhiên có một số chuý ý, vì đây là Base lên tất cả nó phải tổng quát nhất có thể.
- Đầu tiên là UITableViewDelegate:
extension BaseTableController: UITableViewDelegate {
    func tableView(_ tableView: UITableView, heightForRowAt indexPath: IndexPath) -> CGFloat {
        return UITableViewAutomaticDimension
    }

    func tableView(_ tableView: UITableView, estimatedHeightForRowAt indexPath: IndexPath) -> CGFloat {
        guard let cell =  NSClassFromString(self.getCellIdentify(withItem: self.itemAtIndexPath(indexPath), returnClassName: true)) as? BaseTableViewCell.Type else {
            return UITableViewAutomaticDimension
        }
        return cell.height(withItem: self.itemAtIndexPath(indexPath))
    }

    func tableView(_ tableView: UITableView, heightForHeaderInSection section: Int) -> CGFloat {
        guard sections.count > section else {
            return 0.0
        }

        let item = sections[section]
        let headerClassName = self.getHeaderIdentifiWithItem(item, returnClassName: true)
        let  header = NSClassFromString(headerClassName) as! BaseHeaderTableView.Type;

        return header.heightWithItem(item)
    }

    func tableView(_ tableView: UITableView, heightForFooterInSection section: Int) -> CGFloat {
        return 0.0
    }

    func tableView(_ tableView: UITableView, viewForHeaderInSection section: Int) -> UIView? {
        guard sections.count > section else {
            return nil
        }

        let item = sections[section]
        let headerIdentifier = self.getHeaderIdentifiWithItem(item, returnClassName: false)

        guard let headerView = tableView.dequeueReusableHeaderFooterView(withIdentifier: headerIdentifier) as? BaseHeaderTableView  else {
            return nil
        }
        headerView.configHeaderWithData(item)

        return headerView
    }
}
Các bạn để ý ở đây mình implement cả heightForRowAt indexPath và estimatedHeightForRowAt. Với trường hợp ko get được cell.height() thì nó sẽ tự estimate chiều cao của TableViewCell và trả về cho targetTableView tương ứng.
Tiếp theo là phần header và footer. Footer ở đây mình chưa xử lý đến (Nó tương tự như header).
Trong heightForHeaderInSection bạn sẽ get Header class tự động nó map trược tiêp với items của bạn.
-
Hiểu đơn giản bảng của bạn có 10 section. và theo design tương ứng với section kiểu A thì bạn phải hiện thị header kiểu A, và B, C .. tương tự. Và thứ tự nó là bất kì control được từ backend. Khi trên server setting thay đổi đảm bảo list của bạn sẽ thay đổi theo, với Cell height cũng tương tự vậy..
-
Tiếp theo là UITableViewDataSource
extension BaseTableController:UITableViewDataSource {
    func numberOfSections(in tableView: UITableView) -> Int {
        return items.count
    }

    func tableView(_ tableView: UITableView, numberOfRowsInSection section: Int) -> Int {
        return items[section].count
    }

    func tableView(_ tableView: UITableView, cellForRowAt indexPath: IndexPath) -> UITableViewCell {
        let item = self.itemAtIndexPath(indexPath)
        let cellIdentify = self.getCellIdentify(withItem: item, returnClassName: false)
        let cell = tableView.dequeueReusableCell(withIdentifier: cellIdentify, for: indexPath)

        if let baseCell = cell as? BaseTableViewCell {
            baseCell.configCellWithData(item)
            baseCell.indexPath = indexPath
        }

        return cell
    }
}
Phần này mình nghĩ cũng không còn xa lạ với các bạn. Mình chỉ giải thích phần dequeueReusableCell. Ở đây mình cũng làm giống với việc emplement header table view.
Hiểu đơn giản các cell của bạn được máp trực tiếp với model object sau khi parse.
Ví dụ tại mộ subclass:
Ngoài ra bạn cần tạo một base table view cell
open class BaseTableViewCell: UITableViewCell {
    var indexPath : IndexPath!

     override open func awakeFromNib() {
        super.awakeFromNib()
        // Initialization code
    }

    class func nib() -> UINib{
        return UINib(nibName:String(describing: self), bundle: Bundle.main)
    }

    class func nibName() -> String{
        return String(describing: self)
    }

    class func height() -> CGFloat{
        return 50.0
    }

    class func height(withItem _item:AnyObject?) -> CGFloat{
        return 50.0
    }

    func configCellWithData(_ data: AnyObject?){}
}
Nếu bạn sử dụng BaseTableController bạn phải sử dụng các table view cell được subclass của BaseTableViewCell. Ở đây mình đã implement một số function chung nhất mà một table view cell cần. đó là get Nib Name, get Nib ....
Về cơ bản BaseTableController chúng ta đã xây dựng xong bây giờ chúng ta chỉ việc subclass và sử dụng chúng.
Subclass BaseTableController
Như mình nói ở trên hãy dừng việc Implement TableView, UICollectionView ... trên UIViewController.
Sau khi xấy dụng xong BaseTableController bây giờ chúng ta sẽ thử sử dụng nó.
Trước tiên bạn không xử dụng trược tiếp nó vì tương ứng với mỗi ViewController của bạn bạn sẽ phải có một bảng tương ứng.
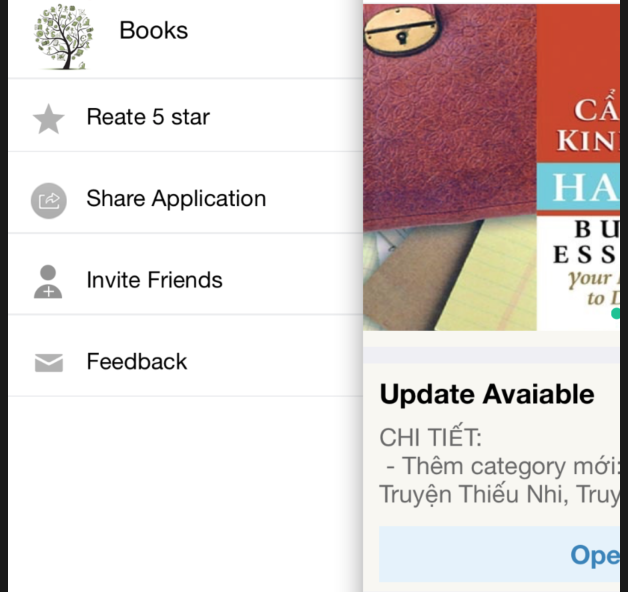
Trong VD này mình sẽ làm một list khá đơn giản như hình dưới. Sẽ có Header, và list cell khá simple.
 https://images.viblo.asia/ab318fd8-4a2c-475e-baeb-bf24010942df.png
- Để tạo một list bận cần thực hiện 3 bước sau:
- Subclass BaseTableController: override các abstract method.
- Subclass BaseTableViewCell: Tạo các cell các bạn sẽ sử dụng trên list đó.
- Gọi khởi tạo list: thực hiện trên UIViewController.
Đầu tiên bạn thêm một subclass của BaseTableController.
class LeftMenuController: BaseTableController {
    override func fetchData() {
        let items = [[["title":"Reate 5 star", "icon":"rate"], ["title":"Share Application","icon":"mv_icon_share"], ["title":"Invite Friends","icon":"icon-invitefriend"], ["title":"Feedback", "icon":"email"]]]
        self.updateWithListItem(items as Array<AnyObject>, listSections: ["Nhạc Số 320" as AnyObject])
    }

    override func registerNibWithTargetTableView(_ targetTableView: UITableView) {
        targetTableView.backgroundColor = ColorConfig.BACKGROUND_LEFT_MENU
        targetTableView.register(cellType: LeftMenuCell.self)
        targetTableView.register(headerType: HeaderMenuView.self)
    }

    override func getCellIdentify(withItem item: AnyObject?, returnClassName: Bool) -> String {
        if returnClassName {
           return  NSStringFromClass(LeftMenuCell.self)
        }
        return LeftMenuCell.nibName()
    }

    override func getHeaderIdentifiWithItem(_ item: AnyObject, returnClassName: Bool) -> String {
        if returnClassName {
            return NSStringFromClass(HeaderMenuView.self)
        }
        return HeaderMenuView.nibName()
    }

    func tableView(_ tableView: UITableView, didSelectRowAtIndexPath indexPath: IndexPath) {
        let item = self.itemAtIndexPath(indexPath)
        if let _item = item as? [String:String] {
            MainViewController.shared.hiddenLeftMenu()
            self.reloadData()
            if _item["title"] == "Reate 5 star" {
                if let appInfo = MainViewController.shared.appInfo {
                    UIApplication.shared.openURL(URL(string: appInfo.getAppURL())!)
                }
            }else if _item["title"] == "Share Application" {
                FacebookManager.shared.shareApplication()
            }else if _item["title"] == "Invite Friends" {
                FacebookManager.shared.inviteFriend()
            }else if _item["title"] == "Feedback" {
                MailManager.shared.sendMailTo(listEmail: [MyAppLication.FeedbackEmail], withSubject: "Sách Hay", withMessage: "Chào XXX!\nTôi có thắc mắc:\n")
            }
        }
    }
}
-
Như ví dụ trên để tạo một menu như hình chúng ta chỉ cần subclass BaseTableController và override lên các function sau.
fetchData()get data để fill lên list (Ở đây minh dummy data).registerNibWithTargetTableView: đăng kí những loại cell sẽ được dung trong targetTableView.getCellIdentify,getHeaderIdentifiWithItem: hai cái này thì khá clear rồi mình cũng đã giải thích ở trên.- Cuối cũng thì mình sẽ handle action UITableview
didSelectRowAtIndexPathở đây. Nếu bạn muốn xử lý action này trên view controller thì mình khuyên bạn tạo thêm delegate của LeftMenuController và gán nó với ViewController tương ứng đó.
-
Đừng quên sublass những cell, header mà bạn cần.
class LeftMenuCell: BaseTableViewCell {
    @IBOutlet private weak var lbTitle: UILabel!
    @IBOutlet private weak var imgIcon: UIImageView!

    override class func height(withItem _item:AnyObject?) -> CGFloat{
        /* height condition
         if _item is A {
            return 50.0
         } else if _item is B {
            return 50.0
         }
         ...etc..
        */
        return 50.0
    }

    override func configCellWithData(_ data: AnyObject?) {
        if let item = data as? [String:String] {
            lbTitle.text = item["title"]! as String
            imgIcon.image = UIImage(named: item["icon"]!)
        }
    }
}
- Cuối cùng bạn cần khơi tạo menu. Việc này sẽ được thực hiện trên View Controller.
class LeftMenuViewController: BaseViewController {
    @IBOutlet weak var tableView: UITableView!
    private var controller: LeftMenuController!

    override func viewDidLoad() {
        super.viewDidLoad()
        // Do any additional setup after loading the view.
        controller = LeftMenuController.init(initWithTargetTable: self.tableView)
    }

    override func didReceiveMemoryWarning() {
        super.didReceiveMemoryWarning()
        // Dispose of any resources that can be recreated.
    }
}
Đó UIViewController của bạn bây giờ nó đơn giản vậy thôi =)) 1 line code. Source: https://github.com/phamminhtien305/MTUITableView
Kết luận
Bài này minh mới hướng dẫn các bạn xây dựng một BaseTableController. Tuỳ vào độ phức tạp của list mà subclass của BaseTableController phực tạp thêm (xử lý các case mà trong base chưa có) nhưng về cơ bản mình thấy phức tạp đến mấy cũng chỉ tầm 200 line mà thôi(Như làm thêm load more). Với mỗi list sẽ có một subclass BaseTableController tương ứng và một khi có vấn đề bạn chỉ việc đến thẳng class đó mà debug và handle error mà thôi. Rất dễ maintain và scalable.
Bài sau có thể mình sẽ hướng dẫn các bạn thực hiện load more phần này mình mới làm cho collectionView mà thôi.
All rights reserved
