How to Write An AndroidAuthenticator
Bài đăng này đã không được cập nhật trong 4 năm

What is Account Authenticator
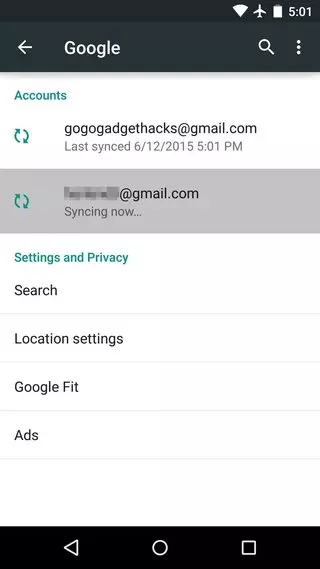
This is a great piece to authenticate user-accounts which is used by many popular applications e.g. Google, DropBox, Facebook, Twitter, Evernote etc. This is a recommended way to authenticate the account-information like username & password which defines the appearance of user’s account in the Accounts & Sync settings page as below:
Benefits of Account Authenticator
-
Useful to create background synchronization mechanism like SyncAdapter.
-
Standard way to authenticate users with supporting different tokens.
-
Account sharing with different privileges.
To implement an Account Authenticator needs 04 basic things are:
-
A Service that returns a subclass of AbstractAccountAuthenticator from the
onBindmethod, -
An Authenticator which extends
AbstractAccountAuthenticatorclass to communicate with the account. -
Activity to prompt the user to enter their credentials (username & password).
-
XML layout file to define the apperance of the authenticator in the settings page.
This article describes about how to write your own Account Authenticator.
Terms to Know
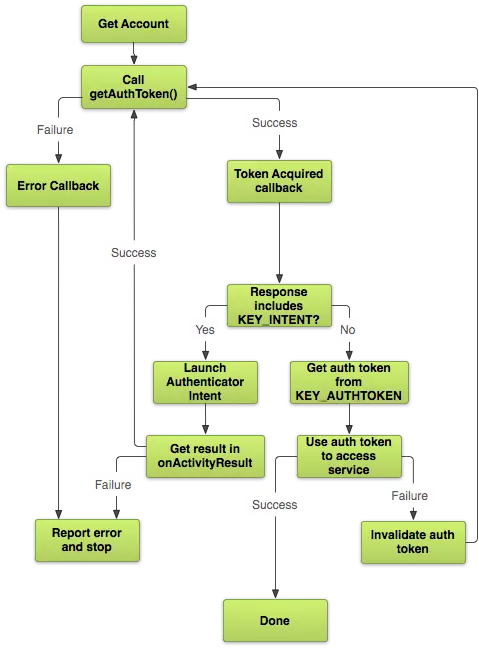
- AccountManager : This is a manager to provide the access to a centralized registry to authenticate credentials (username & password) once per account and helps to request an auth token. Here is a diagram about how to get a token.
AccountManager simplifies the authentication process for few cases:
- When one user tries to change the password of another user then an expired token can help to stop the shit process!
- When you need an UI during a running background service to interact with credintials to manage your account.
- When you feel to have the "login once and get authenticated in all accounts of the related apps" feautre like all Google’s apps.
It can handle multiple token types for a single account (e.g. Read-only vs. Full-access) & easily shares auth-tokens between apps.
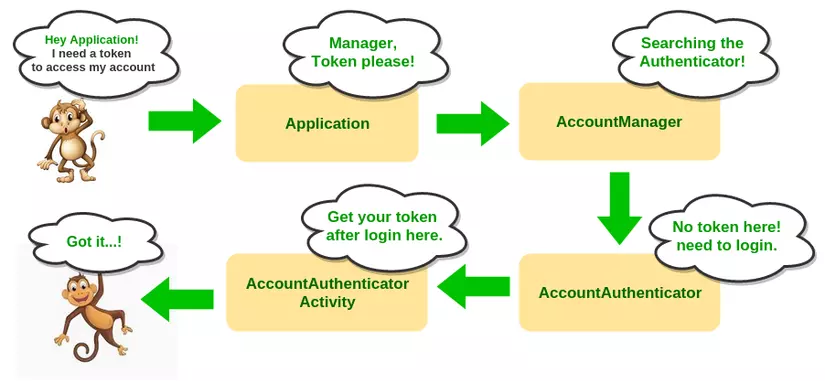
- Authentication Token (auth-token) : This is a security token (or sometimes a authentication token, cryptographic token, software token, virtual token, or key fob) is given to ease authentication. Here is a funny monkey-diagram about how to get a token to access any account!
-
AbstractAccountAuthenticator : An authenticating class containing all logic for working with account (authorization, access rights etc). The
AccountManagerfinds the appropriate AbstractAccountAuthenticator because oneAbstractAccountAuthenticatormay be used by different application (like Google account for Gmail, Calendar, Drive etc). -
AccountAuthenticatorActivity - The base Activity to log-in/create account is called by the AccountManager to identify the user's account.
Now you can start to write your own AndroidAuthenticator for your application. Here is the steps to do:
- Creating an AndroidAuthenticator with extending
AbstractAccountAuthenticatorclass. - Write a AccountAuthenticatorService class to bind the Authenticator.
So, let's do it! (honho)
Creating the Authenticator
First of all, you will need an Authenticator with extending AbstractAccountAuthenticator class as following:
package yourPackageHere;

import android.accounts.AbstractAccountAuthenticator;
import android.accounts.Account;
import android.accounts.AccountAuthenticatorResponse;
import android.accounts.NetworkErrorException;
import android.content.Context;
import android.os.Bundle;

public class MyAccountAuthenticator extends AbstractAccountAuthenticator {

    public MyAccountAuthenticator(Context context) {
        super(context);
    }

    @Override
    public Bundle editProperties(AccountAuthenticatorResponse response, String accountType) {
        return null;
    }

    @Override
    public Bundle addAccount(AccountAuthenticatorResponse response, String accountType, String authTokenType,
                             String[] requiredFeatures, Bundle options) throws NetworkErrorException {
        return null;
    }

    @Override
    public Bundle confirmCredentials(AccountAuthenticatorResponse response, Account account, Bundle options)
            throws NetworkErrorException {
        return null;
    }

    @Override
    public Bundle getAuthToken(AccountAuthenticatorResponse response, Account account, String authTokenType, Bundle options)
            throws NetworkErrorException {
        return null;
    }

    @Override
    public String getAuthTokenLabel(String authTokenType) {
        return null;
    }

    @Override
    public Bundle updateCredentials(AccountAuthenticatorResponse response, Account account, String authTokenType, Bundle options)
            throws NetworkErrorException {
        return null;
    }

    @Override
    public Bundle hasFeatures(AccountAuthenticatorResponse response, Account account, String[] features)
            throws NetworkErrorException {
        return null;
    }
}
You may observe some methods are existing on the above class e.g. addAccount(), getAuthToken(), hasFeatures() etc. You need to add some codesnaps as your requirement. To add a new account you need to do as following:
@Override
    public Bundle addAccount(AccountAuthenticatorResponse response, String accountType, String authTokenType,
                             String[] requiredFeatures, Bundle options) throws NetworkErrorException {

        Intent intent = new Intent(mContext, SignInAuthenticatorActivity.class);
        intent.putExtra(SignInAuthenticatorActivity.ARG_ACCOUNT_TYPE, accountType);
        intent.putExtra(SignInAuthenticatorActivity.ARG_AUTH_TYPE, authTokenType);
        intent.putExtra(SignInAuthenticatorActivity.ARG_IS_ADDING_NEW_ACCOUNT, true);
        intent.putExtra(AccountManager.KEY_ACCOUNT_AUTHENTICATOR_RESPONSE, response);

        Bundle bundle = new Bundle();
        bundle.putParcelable(AccountManager.KEY_INTENT, intent);
        return bundle;
    }
Where, SignInAuthenticatorActivity is reponsible to show an login interface to access your account. In that case, you can also add SignUpActivity to provide the interface to create a new account.
However, You need another method in the authenticator class to get the auth-token as following:
@Override
    public Bundle getAuthToken(AccountAuthenticatorResponse response, Account account, String authTokenType, Bundle options)
            throws NetworkErrorException {

        // If the caller requested an authToken type we don't support, then
        // return an error
        if (!authTokenType.equals(AccountGeneral.AUTHTOKEN_TYPE_READ_ONLY) &&
                !authTokenType.equals(AccountGeneral.AUTHTOKEN_TYPE_FULL_ACCESS)) {
            final Bundle result = new Bundle();
            result.putString(AccountManager.KEY_ERROR_MESSAGE, "invalid authTokenType");
            return result;
        }

        // Extract the username and password from the Account Manager, and ask
        // the server for an appropriate AuthToken.
        AccountManager am = AccountManager.get(mContext);

        String authToken = am.peekAuthToken(account, authTokenType);

        Log.d("" + TAG, " > peekAuthToken returned - " + authToken);

        // Lets give another try to authenticate the user
        if (TextUtils.isEmpty(authToken)) {
            final String password = am.getPassword(account);
            if (password != null) {
                try {
                    Log.d("" + TAG, " > re-authenticating with the existing password");
                    authToken = AccountGeneral.sServerAuthenticate.userSignIn(account.name, password, authTokenType);
                } catch (Exception e) {
                    e.printStackTrace();
                }
            }
        }

        // If we get an authToken - we return it
        if (!TextUtils.isEmpty(authToken)) {
            final Bundle result = new Bundle();
            result.putString(AccountManager.KEY_ACCOUNT_NAME, account.name);
            result.putString(AccountManager.KEY_ACCOUNT_TYPE, account.type);
            result.putString(AccountManager.KEY_AUTHTOKEN, authToken);
            return result;
        }

        Intent intent = new Intent(mContext, SignInAuthenticatorActivity.class);
        intent.putExtra(AccountManager.KEY_ACCOUNT_AUTHENTICATOR_RESPONSE, response);
        intent.putExtra(SignInAuthenticatorActivity.ARG_ACCOUNT_TYPE, account.type);
        intent.putExtra(SignInAuthenticatorActivity.ARG_AUTH_TYPE, authTokenType);
        intent.putExtra(SignInAuthenticatorActivity.ARG_ACCOUNT_NAME, account.name);
        Bundle bundle = new Bundle();
        bundle.putParcelable(AccountManager.KEY_INTENT, intent);
        return bundle;
    }
So far, you need the following user permissions in the AndroidManifest:
<uses-permission android:name="android.permission.USE_CREDENTIALS"/>
<uses-permission android:name="android.permission.GET_ACCOUNTS"/>
<uses-permission android:name="android.permission.MANAGE_ACCOUNTS"/>
<uses-permission android:name="android.permission.AUTHENTICATE_ACCOUNTS"/>
Write a Service class to bind the AccountAuthenticator
The Service class contains an IBinder containing the authenticator as below:
public class MyAuthenticatorService extends Service {
    @Override
    public IBinder onBind(Intent intent) {
        MyAccountAuthenticator authenticator = new MyAccountAuthenticator(this);
        return authenticator.getIBinder();
    }
}
Now, you need to declare the service in your AndroidManifest with required meta data.
<service android:name=".MyAuthenticatorService">
      <intent-filter>
          <action android:name="android.accounts.AccountAuthenticator" />
      </intent-filter>
      <meta-data android:name="android.accounts.AccountAuthenticator"
          android:resource="@xml/authenticator" />
</service>
Where you need to pass a xml file to provide the user interface where users can interact with the AccountAuthenticator. The authenticator.xml file is following:
<?xml version="1.0" encoding="utf-8"?>
<account-authenticator xmlns:android="http://schemas.android.com/apk/res/android"
    android:accountPreferences="@xml/prefs"
    android:accountType="your package here"
    android:icon="@drawable/ic_supervisor_account_normal"
    android:label="@string/settings_label"
    android:smallIcon="@drawable/ic_supervisor_account_small" />
Here, another xml file as prefs.xml is needed to define the preferences layout! (facepalm)
<?xml version="1.0" encoding="utf-8"?>
<PreferenceScreen xmlns:android="http://schemas.android.com/apk/res/android">
    <PreferenceCategory android:title="Preferences Title" />
    <CheckBoxPreference
        android:key="isDebug"
        android:summary="Connecting to a debug server instead of prod server"
        android:title="Use debug server" />
    <SwitchPreference
        android:key="logsVerbose"
        android:summary="Show debug logs on LogCat"
        android:title="Debug Logs" />
</PreferenceScreen>
Adding a New Account
To add a new account you will need a codesnap to submit the user-credentials (username & password) from your login/signup activity as following:
public void submit() {
        final String userName = ((TextView) findViewById(R.id.accountName)).getText().toString();
        final String userPass = ((TextView) findViewById(R.id.accountPassword)).getText().toString();
        final String accountType = getIntent().getStringExtra(ARG_ACCOUNT_TYPE);
        new AsyncTask<String, Void, Intent>() {
            @SuppressLint("LongLogTag")
            @Override
            protected Intent doInBackground(String... params) {
                String authtoken = null;
                Bundle data = new Bundle();
                try {
                    authtoken = AccountGeneral.sServerAuthenticate
                            .userSignIn(userName, userPass, mAuthTokenType);

                    data.putString(AccountManager.KEY_ACCOUNT_NAME, userName);
                    data.putString(AccountManager.KEY_ACCOUNT_TYPE, accountType);
                    data.putString(AccountManager.KEY_AUTHTOKEN, authtoken);
                    data.putString(PARAM_USER_PASS, userPass);

                } catch (Exception e) {
                    data.putString(KEY_ERROR_MESSAGE, e.getMessage());
                }

                final Intent res = new Intent();
                res.putExtras(data);
                return res;
            }

            @Override
            protected void onPostExecute(Intent intent) {
                if (intent.hasExtra(KEY_ERROR_MESSAGE)) {
                    Toast.makeText(getBaseContext(), intent.getStringExtra(KEY_ERROR_MESSAGE),
                            Toast.LENGTH_SHORT).show();
                } else {
                    finishLogin(intent);
                }
            }
        }.execute();
    }

    @SuppressLint("LongLogTag")
    private void finishLogin(Intent intent) {
        String accountName = intent.getStringExtra(AccountManager.KEY_ACCOUNT_NAME);
        String accountPassword = intent.getStringExtra(PARAM_USER_PASS);
        final Account account = new Account(accountName, intent.getStringExtra(AccountManager.KEY_ACCOUNT_TYPE));
        if (getIntent().getBooleanExtra(ARG_IS_ADDING_NEW_ACCOUNT, false)) {
            String authtoken = intent.getStringExtra(AccountManager.KEY_AUTHTOKEN);
            String authtokenType = mAuthTokenType;
            mAccountManager.addAccountExplicitly(account, accountPassword, null);
            mAccountManager.setAuthToken(account, authtokenType, authtoken);
        } else {
            Log.d("SignInAuthenticatorActivity", TAG + "> finishLogin > setPassword");
            mAccountManager.setPassword(account, accountPassword);
        }
        setAccountAuthenticatorResult(intent.getExtras());
        setResult(RESULT_OK, intent);
        finish();
    }
The finishLogin() method basically maintains 02 cases as following:
-
Existing account: There is already a record stored on the AccountManager. The old auth-token will be replaced by the new token but if the user had changed his password you need to update the AccountManager with the new password too.
-
New account: When creating a new account, the auth-token is actually not stored immediately to the AccountManager, it needs to be saved explicitly.
Anyway, After submitting the credentials you will get the returns at onActivityResult():
@Override
    protected void onActivityResult(int requestCode, int resultCode, Intent data) {
        // The sign up activity returned that the user has successfully created an account
        if (requestCode == REQ_SIGNUP && resultCode == RESULT_OK) {
            finishLogin(data);
        } else
            super.onActivityResult(requestCode, resultCode, data);
    }
Okay, that's all (yaoming)
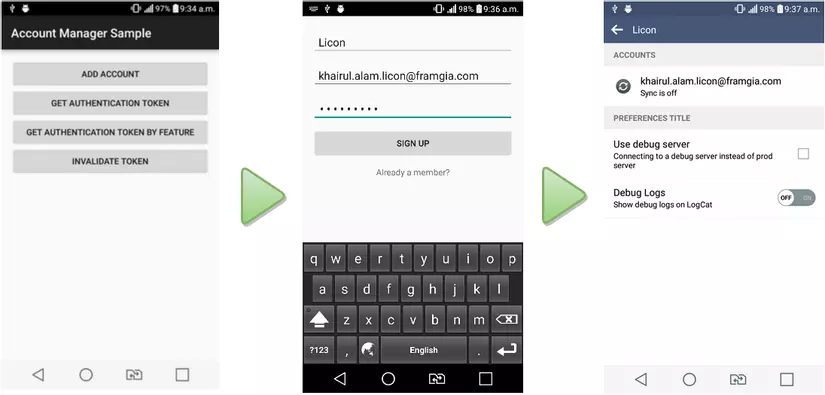
Actually, I want to keep this article as short as possible with providing the minimum knowledge & code base you need to create your own AndroidAuthenticator for your beloved application! But you need to more study before starting to write yourself. For your convenience, I have added a sample AndroidAuthenticator here: AndroidAccountManager. After running the github-sample you will get a sample idea like the following screenshots:
References
- https://developer.android.com/training/sync-adapters/creating-authenticator.html
- https://developer.android.com/training/id-auth/authenticate.html
- https://developer.android.com/training/id-auth/custom_auth.html
- https://developer.android.com/reference/android/accounts/AccountManager.html
- https://developer.android.com/reference/android/accounts/AbstractAccountAuthenticator.html
- http://blog.udinic.com/2013/04/24/write-your-own-android-authenticator/
- http://www.slideshare.net/freesamael/inside-the-android-accountmanager
- http://stackoverflow.com/questions/2720315/what-should-i-use-android-accountmanager-for
Happy Coding!
All rights reserved
