Lỗi khi thực viết migration change field trong Laravel với postgresql
Bạn thử override getTable() bên trong model xem
public function getTable()
{
    return ucfirst(parent::getTable());
}
Câu hỏi liên quan tới chức năng chạy ngầm trong Laravel mong mọi người giúp đỡ...
Bạn kiểm tra method boot() trong model xem
Lỗi khi chạy reactjs
Lỗi cũng khá là rõ rồi mà, do hệ thống hạn chế number of file watchers nên bạn chỉ cần tăng số lượng này lên là được.
Nếu bạn chạy linux hoặc mac thì có thể chạy lệnh sau trong command-line:
echo fs.inotify.max_user_watches=524288 | sudo tee -a /etc/sysctl.conf && sudo sysctl -p
Thắc mắc về cách sử dụng Class.contextType - React Context
Trong ví dụ thứ 2, bạn thiếu mất việc khai báo contextType rồi
Có 2 cách khai báo:
// Provider
const AppContext = React.createContext();

class AppProvider extends React.Component {
  state = {
    number: 10
  };

  static contextType = AppContext // Thêm dòng này

  render() {
    return (
      <AppContext.Provider value={this.state}>
        {this.props.children}
      </AppContext.Provider>
    );
  }
}

// Hoặc
AppProvider.contextType = AppContext
Đây là ví dụ của bạn nhưng được sửa lại 1 chút  https://codesandbox.io/s/2x4yr35m0n
Cách lưu thông tin bảo mật trong Android
Trong câu hỏi của bạn đã có 1 cách rồi, đó là sử dụng sqlite.
Ngoài ra, bạn có thể sử dụng SharedPreferences để lưu. Dữ liệu sẽ được lưu dưới dạng key - value. Chỉ có kiểu giá trị boolean, float, int, long, string mới được hỗ trợ. Vậy nên, do dữ liệu của bạn có nhiều trường, thì bạn cần chuyển nó về dạng đơn giản hơn để lưu (chẳng hạn bạn encode nó thành string và lưu lại, sau này decode nó thành json là xong).
Bình thường mình sẽ dùng Gson để convert json - string cho nhau.
Ví dụ với Kotlin:
data class User(val name: String, val age: Int);

// Somewhere
val user = User("Doanh", 26);
val jsonString = Gson().toJson(user, User::class.java);

// Somewhere
val user = Gson().fromJson(jsonString, User::class.java);
Cần giúp đỡ làm sự kiện on click button trên widget
@Lynk Có lẽ bạn đang gặp vấn đề về việc xác định xem bạn nhấn vào button nào trên widget.
Khi tạo 1 PendingEvent, bạn chỉ cần setAction cho nó và trong hàm onReceive() bạn kiểm tra xem action đó là action nào rồi xử lý tiếp.
public class MyWidgetProvider extends AppWidgetProvider {
    private static final String MyOnClick1 = "myOnClickTag1";
    private static final String MyOnClick2 = "myOnClickTag2";
    private static final String MyOnClick3 = "myOnClickTag3";

    @Override
    public void onUpdate(Context context, AppWidgetManager appWidgetManager, int[] appWidgetIds) {
        Log.d(TAG, "onUpdate()");
        for (int widgetId : appWidgetIds) {
            RemoteViews remoteViews = new RemoteViews(context.getPackageName() ,R.layout.widget_layout);
            remoteViews.setOnClickPendingIntent(R.id.widget_button_stay, getPendingSelfIntent(context, MyOnClick1));
            remoteViews.setOnClickPendingIntent(R.id.widget_button_away, getPendingSelfIntent(context, MyOnClick2));
            remoteViews.setOnClickPendingIntent(R.id.widget_button_diss, getPendingSelfIntent(context, MyOnClick3));
            remoteViews.setTextViewText(R.id.widget_textview, "viblo abc");

            appWidgetManager.updateAppWidget(widgetId, remoteViews);
        }
    }

    protected PendingIntent getPendingSelfIntent(Context context, String action) {
        Intent intent = new Intent(context, getClass());
        intent.setAction(action);
        return PendingIntent.getBroadcast(context, 0, intent, 0);
    }

    @Override
    public void onReceive(Context context, Intent intent) {
        String action = intent.getAction();
        if (action.equals(MyOnClick1)) {
            // your onClick action is here
            Toast.makeText(context, "Button1", Toast.LENGTH_SHORT).show();
            Log.w("Widget", "Clicked button1");
        } else if (action.equals(MyOnClick2)) {
            Toast.makeText(context, "Button2", Toast.LENGTH_SHORT).show();
            Log.w("Widget", "Clicked button2");
        } else if (action.equals(MyOnClick3)) {
            Toast.makeText(context, "Button3", Toast.LENGTH_SHORT).show();
            Log.w("Widget", "Clicked button3");
        }
    }
}
Animation trong Android
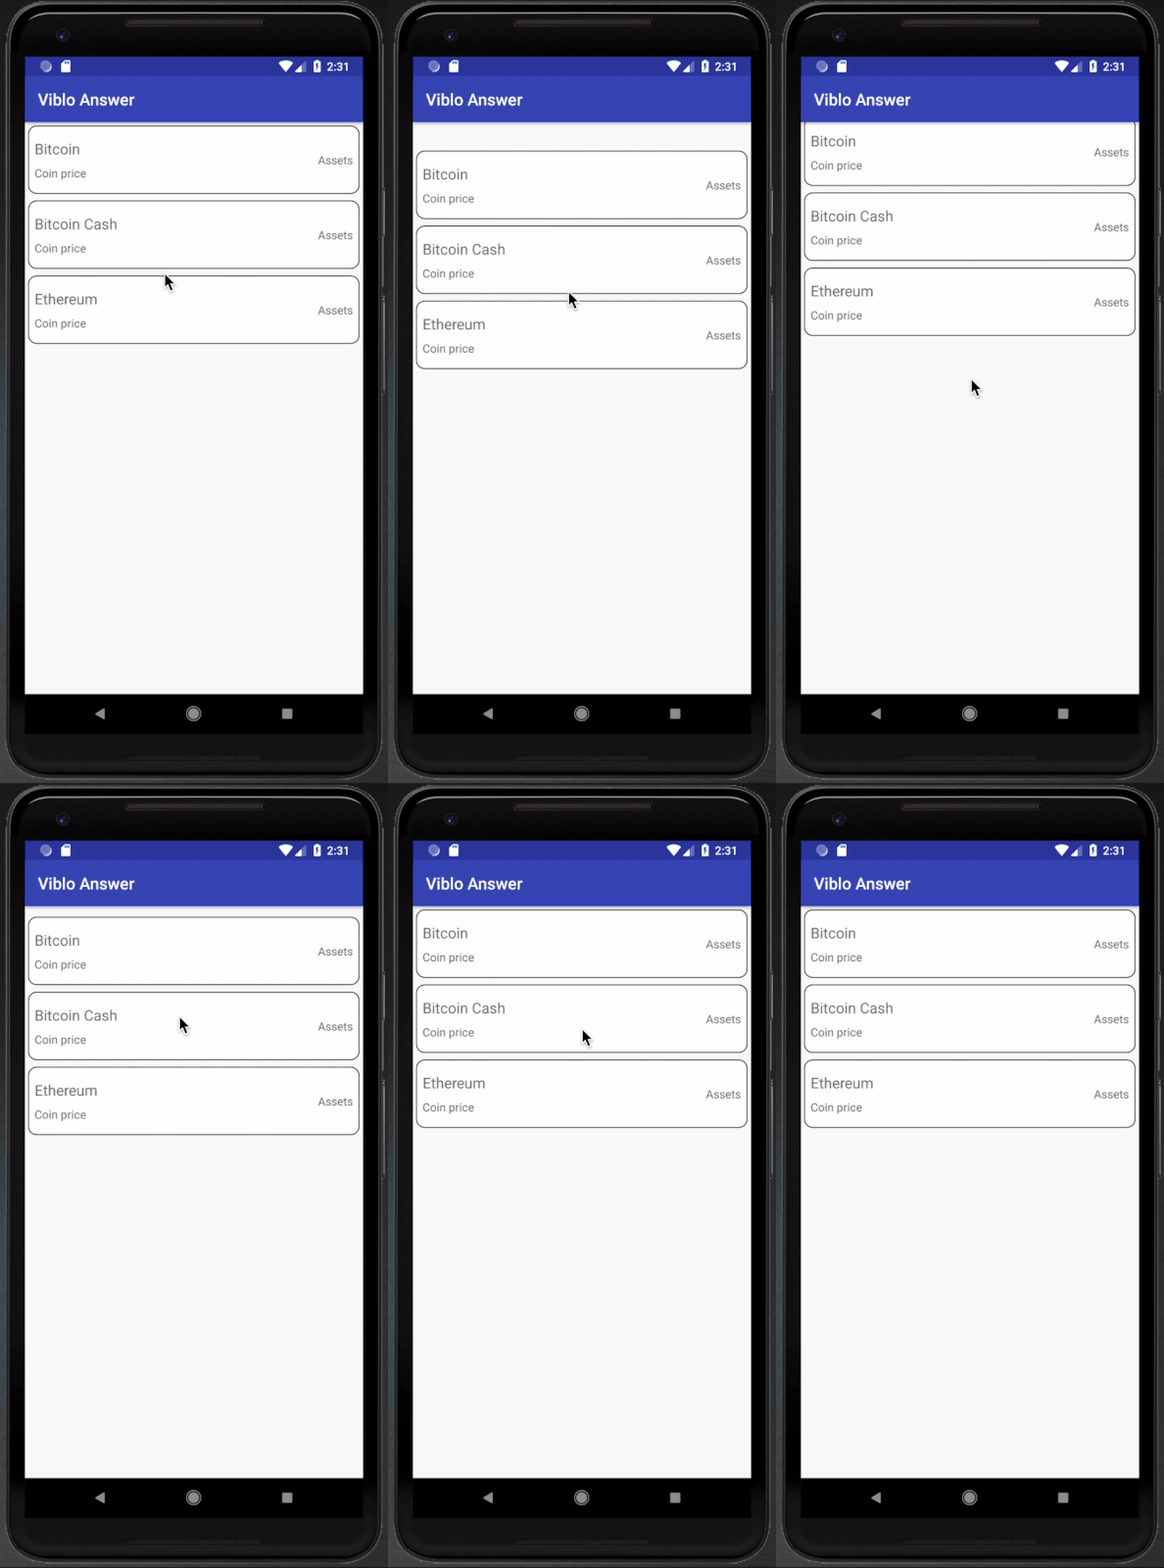
Để làm hiệu ứng này, bạn có thể sử dụng thư viện overscroll-decor. Nó hỗ trợ khá là nhiều kiểu view như RecyclerView, ListView, GridView, ScrollView,... Chi tiết hơn thì bạn có thể vào link ở trên để xem nhé
Ví dụ với RecyclerView:
RecyclerView recyclerView = (RecyclerView) findViewById(R.id.recycler_view);

// Horizontal
OverScrollDecoratorHelper.setUpOverScroll(recyclerView, OverScrollDecoratorHelper.ORIENTATION_HORIZONTAL);
// Vertical
OverScrollDecoratorHelper.setUpOverScroll(recyclerView, OverScrollDecoratorHelper.ORIENTATION_VERTICAL);
Dưới đây là kết quả khi sử dụng nó:

Openid appauthen demo (React - Native)
Bạn có thể tham khảo thư viện này nhé: FormidableLabs/react-native-app-auth
Trên link vừa rồi có sẵn demo rồi nhé

Hỏi về layout Android
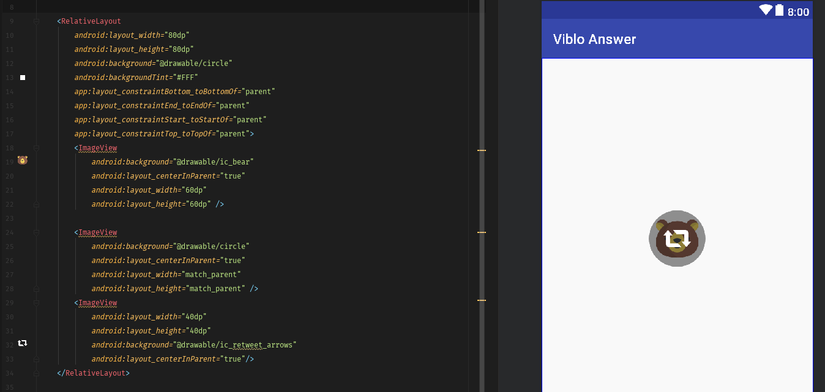
Theo mình hiểu thì bạn chỉ cần chú ý tới thứ tự đặt của các thành phần trong layout của bạn.
Ví dụ như hình này:
 Theo thứ tự thì icon con gấu => 1 lớp màu đen có opacity (
#64000000) => Icon màu trắng
Làm để nào để hiển thị Folder có chứa bài hát local trong android
Trong android có hỗ trợ sẵn phương thức liệt kê các files/folders bên trong một thư mục listFiles(), có phương thức để kiểm tra xem một item trong danh sách đó có phải là file hay folder hay không.
Dưới đây là 1 ví dụ về việc lấy tất cả các file .mp3 trong ExternalStorageDirectory:
final String MEDIA_PATH = Environment.getExternalStorageDirectory().getPath() + "/";
private ArrayList<HashMap<String, String>> songsList = new ArrayList<HashMap<String, String>>();
private String mp3Pattern = ".mp3";

/**
 * Function to read all mp3 files and store the details in ArrayList
 * */
public ArrayList<HashMap<String, String>> getPlayList() {
    System.out.println(MEDIA_PATH);
    if (MEDIA_PATH != null) {
        File home = new File(MEDIA_PATH);
        File[] listFiles = home.listFiles();
        if (listFiles != null && listFiles.length > 0) {
            for (File file : listFiles) {
                System.out.println(file.getAbsolutePath());
                if (file.isDirectory()) {
                    scanDirectory(file);
                } else {
                    addSongToList(file);
                }
            }
        }
    }
    // return songs list array
    return songsList;
}

private void scanDirectory(File directory) {
    if (directory != null) {
        File[] listFiles = directory.listFiles();
        if (listFiles != null && listFiles.length > 0) {
            for (File file : listFiles) {
                if (file.isDirectory()) {
                    scanDirectory(file);
                } else {
                    addSongToList(file);
                }
            }
        }
    }
}

private void addSongToList(File song) {
    if (song.getName().endsWith(mp3Pattern)) {
        HashMap<String, String> songMap = new HashMap<String, String>();
        songMap.put("songTitle", song.getName().substring(0, (song.getName().length() - 4)));
        songMap.put("songPath", song.getPath());

        // Adding each song to SongList
        songsList.add(songMap);
    }
}
Source code: https://stackoverflow.com/a/18268013
Để đạt được mong muốn của bạn, bạn chỉ cần chỉnh sửa phương thức addSongToList() một chút.
Thay vì chỉ thêm songTitle, songPath vào danh sách, bạn tạo một danh sách chứa đường dẫn tới thư mục có chứa bài hát (thực chất là songPath bỏ đi tên của song) cùng với số lượng bài hát có trong đường dẫn ấy (mỗi lần bạn check xem thư mục hiện tại có trong danh sách hay chưa, nếu có rồi thì tăng thêm 1).
Cần các anh giúp Close app trên notification
@Lynk Bạn thử các 1 trong các phương thức dưới này xem thế nào nhé:
- finishAffinity(): API 16+
- finishAndRemoveTask(): API 21+
Nguồn: https://stackoverflow.com/a/45704599
Ngoài ra, hình như bạn đang muốn close app in background, nếu vậy bạn cần thêm android:excludeFromRecents="true" vào AndroidManifest. Ví dụ:
<activity
    android:name=".MainActivity"
    android:excludeFromRecents="true">
    <intent-filter>
        <action android:name="android.intent.action.MAIN" />
        <category android:name="android.intent.category.LAUNCHER" />
    </intent-filter>
</activity>
Cách giải quyết Dropzone không hoạt động trong "modal" của bootstrap??
Mình chưa rõ vấn đề của bạn lắm? Dropzone không hoạt động ở đây là ntn vì mình vừa thử thì chưa thấy vấn đề gì cả.
Font tiếng Nhật trong việc tải file trên Laravel
Cá nhân mình đã từng thực hiện export PDF trong project laravel và mình nghĩ bạn nên thử qua thằng laravel-snappy.
Chỉ cần máy tính (hay server) của bạn cài đặt font tiếng Nhật, nó sẽ hiển thị font tiếng Nhật cho bạn. Và file mà bạn download xuống rất nhẹ 
Nó sử dụng blade tạo template và truyền dữ liệu vào. Style của pdf thì bạn để stlye trực tiếp trong <header> của blade nhé:
Có 2 cách để export khi sử dụng thằng này:
// Load trực tiếp blade
PDF::loadView('dashboard-pdf', ['data' => $data])
    ->setPaper('a4')
    ->setOrientation('landscape');
return $pdf->inline(FILE_NAME . '.pdf');

// Tạo html từ blade sau đó export
$html = view('dashboard-pdf', ['data' => $data])->render();
$pdf = PDF::loadHtml($html)->setPaper('a4')->setOrientation('landscape');
return $pdf->stream(FILE_NAME . '.pdf');
Cần giúp đỡ về ChartJS !
Hiện tại chart của bạn đang hiển thị nhiều số 0 là do phần userCallBack, bạn có thể thử với format này xem:
yAxes: [{
    ticks:
    {
        userCallback: function(value, index, values)
        {
            //value = value.toString();
            //value = value.split(/(?=(?:...)*$)/);
            //value = value.join(',');
            //return value;

            return parseFloat(value).toFixed(1);
        }
    }
}]
Ngoài ra chartjs cho phép bạn update option theo ý muốn, nên bạn có thể check dữ liệu của mình sau đó update lại chart.
Bạn không muốn nó hiển thị trục y thì update option display: false là được
Dưới đây mình update (thêm) option min trong yAxes
var myChart = new Chart(ctx, config);
window.myLine = myChart;
myChart.options.scales.yAxes[0].ticks.min = 1;
myChart.update();
Hỏi về cách phân quyền trong laravel 5.5
Bạn có thể tạo Policy cho User và thêm nó vào __construct() như một middleware.
Nói 1 cách ngắn gọn thì Policy có thể cho biết 1 User có thể thực hiện 1 hay 1 số hành động hay không. Dùng nó khá là tiện lợi.
Ví dụ:
public function __construct()
{
    $this->middleware($this->authMiddleware());
    $this->middleware('can:update', ['only' => ['update', 'delete']]);
}
Bạn đọc thêm về Policy trong document chính thức của Laravel hoặc đọc thêm ở đây https://viblo.asia/p/acl-access-control-list-authorization-in-laravel-51-2p1PvQnJRldr
Preview file trên web
Bạn có thể sử dụng thằng này (của MS) để preview online các file của office (doc, docx, excel,...) mà không phải đăng kí gì hết https://view.officeapps.live.com/op/view.aspx?src=DIRECT_URL Ví dụ:
- Excel: https://view.officeapps.live.com/op/view.aspx?src=http://law.vnu.edu.vn/Fuploads/20170801164533320.xls
- Doc: https://view.officeapps.live.com/op/view.aspx?src=www.hcma3.vn/uploads/doc/52.doc
- Power Point: https://view.officeapps.live.com/op/view.aspx?src=www.lrc-hueuni.edu.vn/is/Kynangthuyettrinh.ppt
[React Native] Nhúng file js vào Webview
Mình thử khá nhiều cách nhưng chưa load trực tiếp file js trên local vào Webview được =_=
Bạn thử các cách dưới đây xem có được không nhé:
- Cách 1: sử dụng
uritrực tiếp đến web mà bạn muốn hiển thị - live preview
import React, { Component } from 'react';
import { WebView } from 'react-native';

export default class App extends Component {
    render() {
        return (
            <WebView
                source={{uri: 'https://viblo.asia'}}
                style={{flex: 1}}
                mixedContentMode='always'
            />
        );
    }
}
- Cách 2: import
scripttrực tiếp từ web - live preview
import React, { Component } from 'react';
import { WebView } from 'react-native';

const html = `
    <html lang="en">
    <head>
        <meta charset="utf-8">
        <title>Simple todo with React</title>
    </head>
    <body>
        <div id="app">Hello</div>
        <script type="text/javascript" src="https://doanhpham.github.io/todo/index.4e87939e32afa4a57454.js"></script>
    </body>
    </html>
`;

export default class App extends Component {
    render() {
        return (
            <WebView
                source={{html, baseUrl: 'web/'}}
                style={{flex: 1}}
                mixedContentMode='always'
            />
        );
    }
}
- Cách 3: sử dụng
inline javascript- live preview
import React, { Component } from 'react';
import { WebView } from 'react-native';

const html = `
    <html lang="en">
    <head>
        <meta charset="utf-8" />
        <meta http-equiv="X-UA-Compatible" content="IE=edge" />
        <meta name="viewport" content="width=device-width, initial-scale=1" />
    </head>
    <body>
        <div id="test-app">Hello world!</div>
        <script type="text/javascript" src="https://cdnjs.cloudflare.com/ajax/libs/jquery/3.2.1/jquery.min.js"></script>
        <style>body {display: flex; font-size: 2em; justify-content: center; align-items: center;}</style>
        <script type="text/javascript">
            $(document).ready(function() {
                $('#test-app').text('Test done!');
            });
        </script>
    </body>
    </html>
`

export default class App extends Component {
    render() {
        return (
            <WebView
                source={{html, baseUrl: 'web/'}}
                style={{flex: 1}}
                mixedContentMode='always'
            />
        );
    }
}
Ngoài ra trong document về Webview, bạn có thể inject function hoặc script trực tiếp vào Webview như sau:
<WebView
    source={{html, baseUrl: 'web/'}}
    injectedJavaScript='./script.js'
    injectJavaScript={this.injectFunction}
    style={{flex: 1}}
    mixedContentMode='always'
/>
Các kĩ năng
Tổ chức
Chưa có tổ chức nào.