Xây dựng blog đơn giản (Node + React)
Bài đăng này đã không được cập nhật trong 8 năm
Dạo gần đây mình khá hứng thú với Nodejs và React. Đối với cá nhân mình, khi học công nghệ mới không nhất thiết phải xây dựng một ứng dụng cao siêu nào cả. Thì đó là cũng lý do, mình quyết định xây dựng một blog cá nhân đơn giản nhất. I love basic, mình rất thích những cái đơn giản vì sự đơn giản giúp mình có hứng thú, động lực hơn, không gây cho mình cảm giác chán nản. Còn hơn là đặt mục tiêu xây dựng ứng dụng lớn rồi cũng chẳng đến đâu. Một blog cá nhân đơn giản thì có cái gì để học chứ, mọi người đừng có mindset như vậy nhé. Sẽ có nhiều vấn đề lắm đấy  . Đây là Github repo để tham khảo.
Backend
- Node server
- Express Framework của Nodejs khá nổi tiếng
- Basic về MongoDB (NoSQL)
- Học cách quản lí MongoDB object modeling
- Xây dựng API theo chuẩn RESTful
Frontend
- Cấu hình config của webpack
- React với các thư viện như Redux, React-Router
- Một chút về SASS Đây là những công nghệ sẽ dùng xuyên suốt khi xây dựng blog cá nhân. Let's GOOO!
Demo: https://youtu.be/BowA_m083aU
Backend (Nodejs)
Trong bài viết này, sẽ không dùng Express application generator generator thay vào đó chúng ta nên tự cấu hình config cho riêng mình. Chứ khi bắt đầu chúng ta cần tạo folder server và trong folder server tạo file app.js có nội dụng như sau:
const path = require('path');
const express = require('express');
const bodyParser = require('body-parser');
const session = require('express-session');
const cors = require('cors');
const errorHandler = require('errorhandler');
const mongoose = require('mongoose');

mongoose.promise = global.Promise;

const isProduction = process.env.NODE_ENV === 'production';

const app = express();

app.use(cors());
app.use(require('morgan')('dev'));
app.use(bodyParser.urlencoded({ extended: false }));
app.use(bodyParser.json());
app.use(express.static(path.join(__dirname, 'public')));
app.use(session({ secret: 'LightBlog', cookie: { maxAge: 60000 }, resave: false, saveUninitialized: false }));

if(!isProduction) {
  app.use(errorHandler());
}

mongoose.connect('mongodb://localhost/lightblog');
mongoose.set('debug', true);

// Add models
// Add routes
app.use(require('./routes'));

app.use((req, res, next) => {
  const err = new Error('Not Found');
  err.status = 404;
  next(err);
});

if (!isProduction) {
  app.use((err, req, res) => {
    res.status(err.status || 500);

    res.json({
      errors: {
        message: err.message,
        error: err,
      },
    });
  });
}

app.use((err, req, res) => {
  res.status(err.status || 500);

  res.json({
    errors: {
      message: err.message,
      error: {},
    },
  });
});

const server = app.listen(8000, () => console.log('Server started on http://localhost:8000'));
Ở đoạn code trên mình đã tạo xong server chạy bằng express. Ở bài viết này, mình xem như các bạn đã biết về express rồi nhé . Ở đoạn code trên có một đoạn chúng ta sẽ ít gặp đó là app.use(require('morgan')('dev'));. Mình giới thiệu sơ qua về thư viện này một chút, morgan thực chất là HTTP request logger middleware. Thư viện khá thích hợp cho môi trường development, với morgan sẽ có rất nhiều option để log. Chẳng hạn như nếu có lỗi xảy ra sẽ log error đến Apache file access.log hoặc STDOUT hoặc là một file chỉ định nào đó cũng được. Bạn có thể tìm hiểu nhiều hơn về thư viện này. Đối với app.use(require('morgan')('dev')); sẽ responses đến console . Khá thú vị phải không?
Chúng ta chắc chắn một điều là tất cả các thư viện cũng cài trong thư mực server với command như sau:
npm i -S path express body-parser express-session cors errorhandler mongoose morgan
Cuối cùng chúng ta cài đặt Nodemon, ở đây mình cài global với câu lệnh như sau:
npm install --g nodemon
Với Nodemon là công cụ khá tuyệt vời, nó giúp chúng ta không phải node app.js nhiều lần khi chúng ta thay đổi nội dung file nào đó. Mọi phiền phức như vậy đã có Nodemon, chúng ta không cần phải re-start nhiều lần khi phát triển sản phẩm. nodemon app.js để restart server.
Tạo Model
Chúng ta tạo model Article có các thuộc tính như sau: timestamp, author, body & title. Trong folder server/models ta tạo file Articles.js với nội dung như sau:
const mongoose = require('mongoose');

const { Schema } = mongoose;

const ArticlesSchema = new Schema({
  title: String,
  body: String,
  author: String,
}, { timestamps: true });

ArticlesSchema.methods.toJSON = function() {
  return {
    _id: this._id,
    title: this.title,
    body: this.body,
    author: this.author,
    createdAt: this.createdAt,
    updatedAt: this.updatedAt,
  };
};

mongoose.model('Articles', ArticlesSchema);
Sau đó chúng ta cần đăng kí model vừa tạo đến server/app.js:
...
mongoose.connect('mongodb://localhost/lightblog');
mongoose.set('debug', true);

// Add models
require('./models/Articles');
// Add routes

app.use((req, res, next) => {
  const err = new Error('Not Found');
  err.status = 404;
  next(err);
});
...
Thiết lập Routing
Việc thiết lập model và server coi như đã xong. Chúng ta cần xây dựng API routing cho Article model với trúc trúc thư mục như sau:
server/
..routes/
....index.js
....api/
Trong file routes/index.js có nội dung như sau:
const express = require('express');
const router = express.Router();

router.use('/api', require('./api'));

module.exports = router;
Sau đó chúng cần tạo file routes/api/index.js nhiệm vụ của file này là đăng kí router cho toàn bộ cấu trúc API của hệ thống. Mỗi model sẽ có API tương ứng, một ứng dụng sẽ có rất nhiều Model nên việc tạo file routes/api/index.js sẽ giúp mình quản lí router trong hệ thống một cách hiệu quả hơn.
const router = require('express').Router();

router.use('/articles', require('./articles'));

module.exports = router;
Trong ta cần tạo routing cho Article nữa là coi như xong, chúng ta cần tạo file routes/api/articles.js:
const mongoose = require('mongoose');
const router = require('express').Router();
const Articles = mongoose.model('Articles');

router.post('/', (req, res, next) => {
  const { body } = req;

  if(!body.title) {
    return res.status(422).json({
      errors: {
        title: 'is required',
      },
    });
  }

  if(!body.author) {
    return res.status(422).json({
      errors: {
        author: 'is required',
      },
    });
  }

  if(!body.body) {
    return res.status(422).json({
      errors: {
        body: 'is required',
      },
    });
  }

  const finalArticle = new Articles(body);
  return finalArticle.save()
    .then(() => res.json({ article: finalArticle.toJSON() }))
    .catch(next);
});

router.get('/', (req, res, next) => {
  return Articles.find()
    .sort({ createdAt: 'descending' })
    .then((articles) => res.json({ articles: articles.map(article => article.toJSON()) }))
    .catch(next);
});

router.param('id', (req, res, next, id) => {
  return Articles.findById(id, (err, article) => {
    if(err) {
      return res.sendStatus(404);
    } else if(article) {
      req.article = article;
      return next();
    }
  }).catch(next);
});

router.get('/:id', (req, res, next) => {
  return res.json({
    article: req.article.toJSON(),
  });
});

router.patch('/:id', (req, res, next) => {
  const { body } = req;

  if(typeof body.title !== 'undefined') {
    req.article.title = body.title;
  }

  if(typeof body.author !== 'undefined') {
    req.article.author = body.author;
  }

  if(typeof body.body !== 'undefined') {
    req.article.body = body.body;
  }

  return req.article.save()
    .then(() => res.json({ article: req.article.toJSON() }))
    .catch(next);
});

router.delete('/:id', (req, res, next) => {
  return Articles.findByIdAndRemove(req.article._id)
    .then(() => res.sendStatus(200))
    .catch(next);
});

module.exports = router;
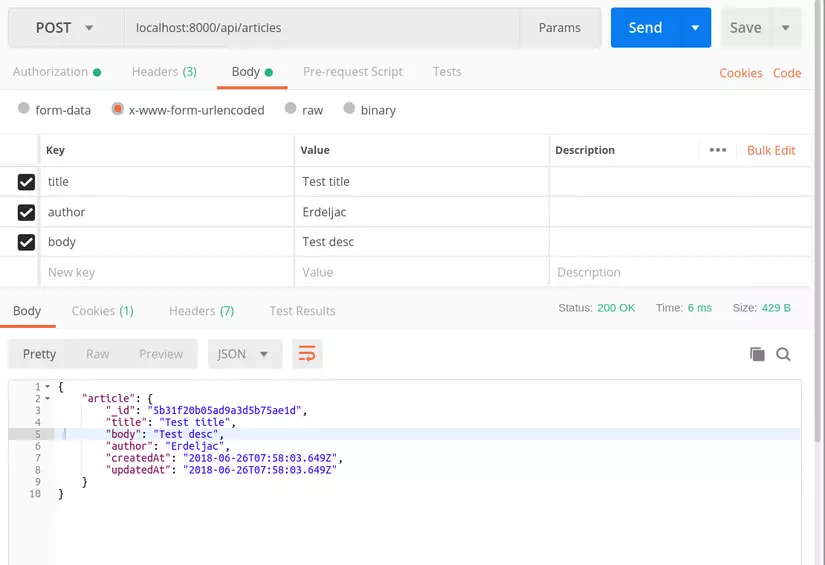
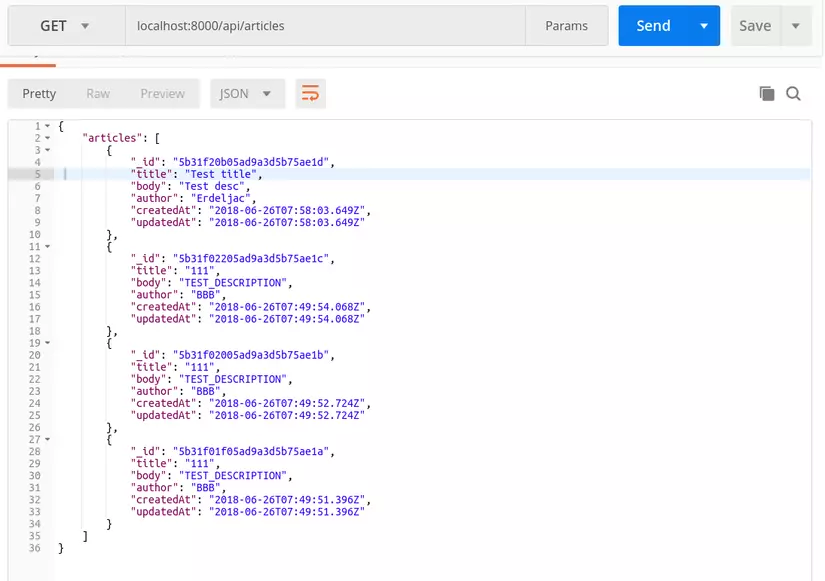
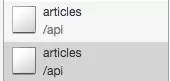
Công việc xây dựng phía backend coi như là hoàn chỉnh, công việc tiếp theo là test API hoạt động như thế nào nhé. POST localhost:8000/api/articles/ để tạo một blog với body như nhau:
{
  "title": "Test title",
  "author": "Erdeljac",
  "body": "Test desc",
}
PATCH localhost:8000/api/articles/:id để update blog với body tương tự với như tạo blog
GET localhost:8000/api/articles Liệt kê tất cả các danh số blog đã tạo
GET localhost:8000/api/articles/:id Hiển thị một blog cụ thể với id
DELETE localhost:8000/api/articles/:id Xóa một blog với tham số id

Frontend (React)
Ở phần trên, chúng ta đã tạo API server và được test bằng PostMan. Phần server coi như là ổn, phần tiếp theo chúng ta sẽ xây dựng cấu trúc cho client. Một công việc không hề dễ dàng tí nào. Phía Frontend mình thấy khó khăn nhất là việc quản lí state, việc quản lí state hiệu quả là bài toán đau đầu cho tất cả Frontend Developer, khi mà state bắt đầu phình to ra. Theo như mình được biết thì khi làm việc react thì pattern redux đã làm rất tốt điều này. Việc kết hợp với giữa react với react-redux tạo nên sức mạnh tuyệt vời khi phát triển ứng dụng. Bắt đầu vào xây dựng phía client thôi (go).
Init NPM Config
Trước tiên, chúng ta cần tạo folder client cùng cấp với folder với server:

Sau đó chúng ta run npm init để khởi tạo npm để quản lí package:
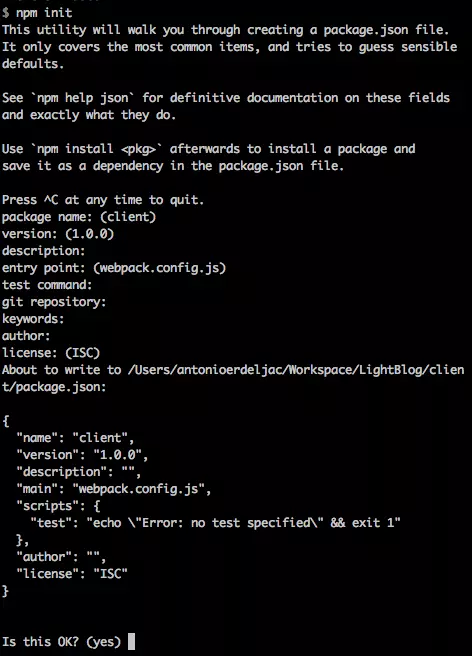
Chúng ta cài đặt một số thư viên để phục vụ cho quá trình xây dựng ứng dụng, đây là những thư viện cần cài đặt, có khá nhiều thư viện mình cần dùng, lưu ý là câu lệnh phía dưới --save-dev có nghĩa là những thư viện này dành cho môi trường development. Hay nói cách khác là toàn bộ tên thư viện được lưu dưới dạng json với key là devDependencies trong file package.json:
npm install --save-dev node-sass html-webpack-plugin style-loader sass-loader css-loader file-loader html-loader webpack webpack-dev-server webpack-cli babel babel-loader babel-plugin-transform-object-rest-spread babel-preset-env babel-preset-react
Trong quá trình cài đặt nếu có phát sinh lỗi thì chạy câu lệnh sau:
npm i -D extract-text-webpack-plugin@next
Sau cùng là chúng ta cần đặt những thư viện phục vụ cho môi trường Development. Chúng ta cần cài đặt dependencies. Sự khác nhau giữa devDependencies
và dependencies trong npm. Mình có thể giải thích đơn giản như dependencies là những thư viện bắt buộc phải cài đặt, devDependencies là những thư viện phục vụ cho môi trường Production.
npm i -S react moment bootstrap babel-polyfill history prop-types react-dom react-redux react-router-dom react-scripts redux axios
Init Webpack Config
Tạo file webpack.config.js trong thư mục client như sau:
const HtmlWebpackPlugin = require('html-webpack-plugin');
const ExtractTextPlugin = require('extract-text-webpack-plugin');

module.exports = {
  entry: [
    'babel-polyfill',
    './src/index.js',
  ],

  output: {
    publicPath: '/',
    filename: './main.js',
  },

  resolve: {
    extensions: ['.js', '.jsx'],
  },

  module: {
    rules: [
      {
        test: /\.(js|jsx)$/,
        exclude: /node_modules/,
        use: ['babel-loader'],
      },

      {
        test: /\.(jpe?g|png|gif|svg)$/i,
        use: {
          loader: 'file-loader',
          options: {
            name: 'public/img/[name].[ext]',
            outputPath: 'dist/img/',
          },
        },
      },

      {
        test: /\.scss$/,
        use: ExtractTextPlugin.extract({
          fallback: 'style-loader',
          use: [{ loader: 'css-loader', options: { minimize: true } }, 'sass-loader'],
        }),
      },
      {
        test: /\.html$/,
        use: {
          loader: 'html-loader',
          options: {
            minimize: true,
          },
        },
      },
      {
        test: /\.(otf|ttf|eot|woff|woff2)$/,
        loader: 'file-loader',
        options: {
          name: 'public/fonts/[name].[ext]',
          outputPath: 'dist/fonts',
        },
      },
    ],
  },

  plugins: [
    new ExtractTextPlugin({ filename: 'style.css' }),
    new HtmlWebpackPlugin({
      template: './resources/index.html',
      filename: './index.html',
      hash: true,
    }),
  ],

  devServer: {
    historyApiFallback: true,
    publicPath: '/',
    contentBase: './dist',
  },
};
Sau đó chúng ta tạo file .babelrc với nội dung như sau:
{
  "presets": ["env", "react"],
  "plugins": ["transform-object-rest-spread"]
}
Chúng ta cần tạo một số câu lệnh script trong file package.json
...
  "scripts": {
    "test": "echo \"Error: no test specified\" && exit 1",
    "build": "webpack --mode production",
    "start": "webpack-dev-server --mode development --open"
  },
...
Khi chạy:
npm run build: dùng cho môi trườngproductionnpm run start: dùng cho môi trườngdevelopment
Tạo Resources
Việc cấu hình webpack coi như là xong, bây giờ chúng ta tạo folder resource để quản lí các file html,css. Chúng ta folder resources chứa folder scss và file index.html, trong folder scss tạo file style.scss file này có nhiệm vụ khai báo global style cho css, với nội dung như sau:
@import url('https://fonts.googleapis.com/css?family=Nunito|Poppins:500|Open+Sans');
@import "~bootstrap/scss/bootstrap";

body, html {
  height: 100%;
  background-color: rgba(0,0,0,.018);
  color: rgba(0,0,0,.75);
  font-family: 'Nunito';
}
Việc config bên phía client coi như là xong, công việc bây giờ là viết react trên nền những config ở trên thôi nào. (go) (go).
React components
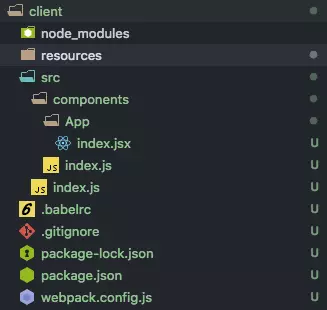
Trong folder client tạo folder src chứa file index.js, file này là nơi để viết react hoặc import các file css,scss.. để tạo bundle file là main.js trong file webpack.config.js đã cấu hình. File này có nội dung như sau:
import React from 'react';
import createHistory from 'history/createBrowserHistory';
import ReactDOM from 'react-dom';
import { Route, Switch, Router } from 'react-router-dom';

import { App } from './components';

import '../resources/scss/style.scss';


ReactDOM.render(
  <Router history={createHistory()}>
    <Switch>
      <Route path="/" component={App} />
    </Switch>
  </Router>,
  document.getElementBimport React from 'react';

const App = (props) => {
  return (
    <p>Hello App</p>
  )
}

export default App;yId('root'),
);
Một điều lưu ý là khi trong lệnh npm thì phải chạy trong folder client
Cài đặt router & App component
Tiếp theo, tạo folder components có file index.jsx, file này có nhiệm vụ là đăng kí toàn bộ router component cho ứng dụng với nội dung như sau:
export { default as App } from './App';
Trong folder components tạo tiếp folder App có file index.jsx với nội dung:
import React from 'react';

const App = (props) => {
  return (
    <p>Hello App</p>
  )
}

export default App;
Nếu hoàn thành bước trên, chúng ta sẽ được kết quả mong đợi như sau:
Bây giờ, edit file App/index.jsx để thêm route cho App/index.jsx:
import React from 'react';
import { withRouter, Switch, Route } from 'react-router-dom';

import { Home } from '../../components';

const App = (props) => {
  return (
    <Switch>
      <Route exact path="/" component={Home} />
    </Switch>
  )
}

export default withRouter(App);
Tiếp theo tạo file index.jsx trong directory components/Home như sau:
import React from 'react';

class Home extends React.Component {
  render() {
    return (
      <div className="container">
        <h1>LightBlog</h1>
      </div>
    );
  }
}

export default Home;
Sau đó đăng kí components ở components/index.jsx nữa là xong:
export { default as App } from './App';
export { default as Home } from './Home';
Nhái hàng một chút khi thành công nào:
Component trên chỉ là để test xem thử hoạt động hay chưa thôi, bây giờ cập nhập nội dung của Home component, nhiệm vụ của Home component là sử dụng comnponent con là Form component để render ra nội dụng của Home:
import React from 'react';

import { Form } from '../../components/Article';

class Home extends React.Component {
  render() {
    return (
      <div className="container">
        <div className="row pt-5">
          <div className="col-12 col-lg-6 offset-lg-3">
            <h1 className="text-center">LightBlog</h1>
          </div>
          <Form />
        </div>
      </div>
    );
  }
}

export default Home;
Article/Form/index.jsx:
import React from 'react';

class Form extends React.Component {
  render() {
    return (
      <div className="col-12 col-lg-6 offset-lg-3">
        <input className="form-control my-3" placeholder="Article Title" />
        <textarea className="form-control my-3" placeholder="Article Description">
        </textarea>
        <input className="form-control my-3" placeholder="Article Author" />
        <button className="btn btn-primary float-right">Submit</button>
      </div>
    )
  }
}

export default Form;
Article/index.js:
export { default as Form } from './Form';
Edit components/index.js:
export { default as App } from './App';
export { default as Home } from './Home';
export { default as Article } from './Article';
Việc tạo form được xem như là hoàn tất:

Xong phần view của form, bây giờ chúng ta xử lí thao tác trên form, component Form sẽ có nhiệm vụ submit gửi request đến server API để tạo một blog với nội dung tương ứng. Endpoint để tạo blog là POST localhost:8000/api/articles, ta phải edit Article/Form/index.jsx:
import React from 'react';
import axios from 'axios';

class Form extends React.Component {
  constructor(props) {
    super(props);

    this.state = {
      title: '',
      body: '',
      author: '',
    }

    this.handleChangeField = this.handleChangeField.bind(this);
    this.handleSubmit = this.handleSubmit.bind(this);
  }

  handleSubmit(){
    const { title, body, author } = this.state;

    return axios.post('http://localhost:8000/api/articles', {
      title,
      body,
      author,
    });
  }

  handleChangeField(key, event) {
    this.setState({
      [key]: event.target.value,
    });
  }

  render() {
    const { title, body, author } = this.state;

    return (
      <div className="col-12 col-lg-6 offset-lg-3">
        <input
          onChange={(ev) => this.handleChangeField('title', ev)}
          value={title}
          className="form-control my-3"
          placeholder="Article Title"
        />
        <textarea
          onChange={(ev) => this.handleChangeField('body', ev)}
          className="form-control my-3"
          placeholder="Article Body"
          value={body}>
        </textarea>
        <input
          onChange={(ev) => this.handleChangeField('author', ev)}
          value={author}
          className="form-control my-3"
          placeholder="Article Author"
        />
        <button onClick={this.handleSubmit} className="btn btn-primary float-right">Submit</button>
      </div>
    )
  }
}

export default Form;
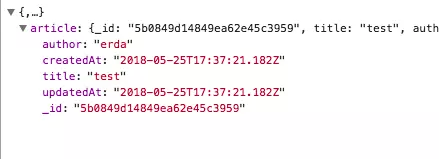
Khi nhập nội dung title, body & author, khi submit tạo blog. Nếu thành công kết quả khi test ở debug của chorme như sau:
Adding Redux
Ở trên chúng ta tạo app chưa có quản lí state, ở đây chúng ta sử dụng redux để làm điều này, bài viết này hạn chế nên mình không thể giải thích hết được, bài viết này chỉ là việc áp dụng redux cho ứng dụng.
src/store.js
import { createStore, combineReducers } from 'redux';

import { home } from './reducers';

const reducers = combineReducers({
  home,
});

const store = createStore(reducers);

export default store;
Tiếp theo chúng ta tạo reducer cho home src/reducers/index.js
export { default as home } from './home';
Cũng giống như folder components tạo file index.js để quản lí toàn bộ component của ứng dụng, cũng giống như reducer vậy.
src/reducers/home.js
export default (state={}, action) => {
  switch(action.type) {
    case 'HOME_PAGE_LOADED':
      return state;
    default:
      return state;
  }
};
Việc đăng kí redux cho ứng dụng nên chúng ta cần thay đổi nội dung của src/index.js như sau:
import React from 'react';
import createHistory from 'history/createBrowserHistory';
import ReactDOM from 'react-dom';
import { Provider } from 'react-redux';
import { Route, Switch, Router } from 'react-router-dom';

import store from './store';
import { App } from './components';

import '../resources/scss/style.scss';


ReactDOM.render(
  <Router history={createHistory()}>
    <Provider store={store}>
      <Switch>
        <Route path="/" component={App} />
      </Switch>
    </Provider>
  </Router>,
  document.getElementById('root'),
);
Hiển thị tất cả các blog
Công việc bây giờ chúng ta ứng dụng redux vào cho Home component thôi nào. Edit src/components/Home/index.jsx:
import React from 'react';
import axios from 'axios';
import { connect } from 'react-redux';

import { Form } from '../../components/Article';

class Home extends React.Component {
  componentDidMount() {
    const { onLoad } = this.props;

    axios('http://localhost:8000/api/articles')
      .then((res) => onLoad(res.data));
  }
  render() {
    const { articles } = this.props;

    return (
      <div className="container">
        <div className="row pt-5">
          <div className="col-12 col-lg-6 offset-lg-3">
            <h1 className="text-center">LightBlog</h1>
          </div>
          <Form />
        </div>
        <div className="row pt-5">
          <div className="col-12 col-lg-6 offset-lg-3">
            {articles.map((article) => {
              return (
                <div className="card my-3">
                  <div className="card-header">
                    {article.title}
                  </div>
                  <div className="card-body">
                    {article.body}
                  </div>
                  <div className="card-footer">
                    <i>{article.author}
                      <p className="float-right">
                        {new Date(article.createdAt).toLocaleDateString()}
                      </p>
                    </i>
                  </div>
                </div>
              )
            })}
          </div>
        </div>
      </div>
    );
  }
}

const mapStateToProps = state => ({
  articles: state.home.articles,
});

const mapDispatchToProps = dispatch => ({
  onLoad: data => dispatch({ type: 'HOME_PAGE_LOADED', data }),
});

export default connect(mapStateToProps, mapDispatchToProps)(Home);
Edit src/reducers/home.js
export default (state={articles: []}, action) => {
  switch(action.type) {
    case 'HOME_PAGE_LOADED':
      return {
        ...state,
        articles: action.data.articles,
      };
    default:
      return state;
  }
};
Nếu bạn có trong database có dữ liệu thì kết quả sẽ trong như thế này, hiển tại tất cả các blog với redux, mỗi action trong sẽ tương ứng với việc thay đổi state khác nhau. Hưởng thụ kết quả:
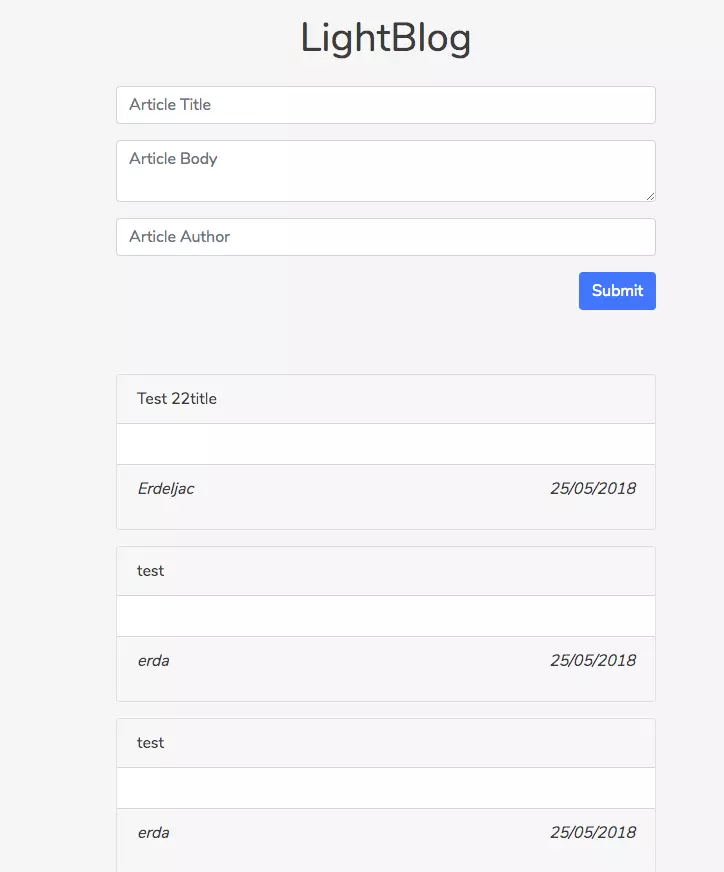
Tạo Blog
Xong hiển thị blog, bây giờ sẽ tạo một blog kết hợp với redux để thay đổi state cho ứng dụng. Edit src/components/Article/Form/index.jsx:
import axios from 'axios';
import React from 'react';
import { connect } from 'react-redux';

class Form extends React.Component {
  constructor(props) {
    super(props);

    this.state = {
      title: '',
      body: '',
      author: '',
    }

    this.handleChangeField = this.handleChangeField.bind(this);
    this.handleSubmit = this.handleSubmit.bind(this);
  }

  handleSubmit(){
    const { onSubmit } = this.props;
    const { title, body, author } = this.state;

    return axios.post('http://localhost:8000/api/articles', {
      title,
      body,
      author,
    })
      .then((res) => onSubmit(res.data));
  }

  handleChangeField(key, event) {
    this.setState({
      [key]: event.target.value,
    });
  }

  render() {
    const { title, body, author } = this.state;

    return (
      <div className="col-12 col-lg-6 offset-lg-3">
        <input
          onChange={(ev) => this.handleChangeField('title', ev)}
          value={title}
          className="form-control my-3"
          placeholder="Article Title"
        />
        <textarea
          onChange={(ev) => this.handleChangeField('body', ev)}
          className="form-control my-3"
          placeholder="Article Body"
          value={body}>
        </textarea>
        <input
          onChange={(ev) => this.handleChangeField('author', ev)}
          value={author}
          className="form-control my-3"
          placeholder="Article Author"
        />
        <button onClick={this.handleSubmit} className="btn btn-primary float-right">Submit</button>
      </div>
    )
  }
}

const mapDispatchToProps = dispatch => ({
  onSubmit: data => dispatch({ type: 'SUBMIT_ARTICLE', data }),
});

export default connect(null, mapDispatchToProps)(Form);
Thêm action cho home reducer
export default (state={articles: []}, action) => {
  switch(action.type) {
    case 'HOME_PAGE_LOADED':
      return {
        ...state,
        articles: action.data.articles,
      };
    case 'SUBMIT_ARTICLE':
      return {
        ...state,
        articles: ([action.data.article]).concat(state.articles),
      }
    default:
      return state;
  }
};
Nhập nội dung của form và submit form xem nào. Mình tin kết quả sẽ không khác kết quả nhau là mấy khi dùng và không dùng redux là mấy, nhưng cấu trúc cách thức sẽ hoàn toàn khác nhau, với redux khi ứng dụng scale up mỗi lúc một lớn, vì dùng redux sẽ đở nhọc nhằng hơn rất nhiều về việc quản lí state đấy. Không phải lúc nào cũng đã dùng react là phải dùng redux đâu nhé . Đây là câu quote của Dan Abramov là creator của Redux có nói một câu:
Redux libraries are like glasses: you’ll know when you need them Vô cùng hack não (yaoming)
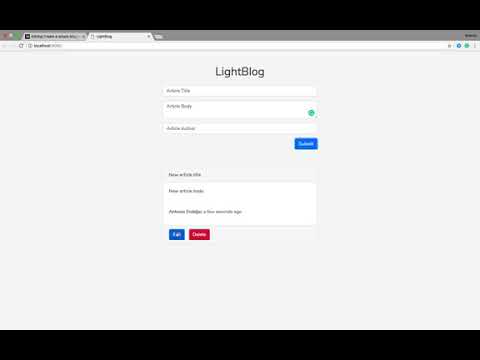
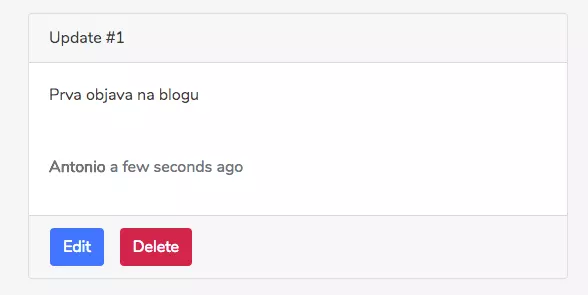
Deleting & Editing Blog
Edit src/components/Home/index.jsx: để style giao diện cho edit và delete blog:
import React from 'react';
import axios from 'axios';
import moment from 'moment';
import { connect } from 'react-redux';

import { Form } from '../../components/Article';

class Home extends React.Component {
  constructor(props) {
    super(props);

    this.handleDelete = this.handleDelete.bind(this);
    this.handleEdit = this.handleEdit.bind(this);
  }

  componentDidMount() {
    const { onLoad } = this.props;

    axios('http://localhost:8000/api/articles')
      .then((res) => onLoad(res.data));
  }

  handleDelete(id) {
    const { onDelete } = this.props;

    return axios.delete(`http://localhost:8000/api/articles/${id}`)
      .then(() => onDelete(id));
  }

  handleEdit(article) {
    const { setEdit } = this.props;

    setEdit(article);
  }

  render() {
    const { articles } = this.props;

    return (
      <div className="container">
        <div className="row pt-5">
          <div className="col-12 col-lg-6 offset-lg-3">
            <h1 className="text-center">LightBlog</h1>
          </div>
          <Form />
        </div>
        <div className="row pt-5">
          <div className="col-12 col-lg-6 offset-lg-3">
            {articles.map((article) => {
              return (
                <div className="card my-3">
                  <div className="card-header">
                    {article.title}
                  </div>
                  <div className="card-body">
                    {article.body}
                    <p className="mt-5 text-muted"><b>{article.author}</b> {moment(new Date(article.createdAt)).fromNow()}</p>
                  </div>
                  <div className="card-footer">
                    <div className="row">
                      <button onClick={() => this.handleEdit(article)} className="btn btn-primary mx-3">
                        Edit
                      </button>
                      <button onClick={() => this.handleDelete(article._id)} className="btn btn-danger">
                        Delete
                      </button>
                    </div>
                  </div>
                </div>
              )
            })}
          </div>
        </div>
      </div>
    );
  }
}

const mapStateToProps = state => ({
  articles: state.home.articles,
});

const mapDispatchToProps = dispatch => ({
  onLoad: data => dispatch({ type: 'HOME_PAGE_LOADED', data }),
  onDelete: id => dispatch({ type: 'DELETE_ARTICLE', id }),
  setEdit: article => dispatch({ type: 'SET_EDIT', article }),
});

export default connect(mapStateToProps, mapDispatchToProps)(Home);
Giao diện sẽ đơn giản như sau:
Edit components/Article/Form/index.jsx:
import axios from 'axios';
import React from 'react';
import { connect } from 'react-redux';

class Form extends React.Component {
  constructor(props) {
    super(props);

    this.state = {
      title: '',
      body: '',
      author: '',
    }

    this.handleChangeField = this.handleChangeField.bind(this);
    this.handleSubmit = this.handleSubmit.bind(this);
  }

  componentWillReceiveProps(nextProps) {
    if(nextProps.articleToEdit) {
      this.setState({
        title: nextProps.articleToEdit.title,
        body: nextProps.articleToEdit.body,
        author: nextProps.articleToEdit.author,
      });
    }
  }

  handleSubmit(){
    const { onSubmit, articleToEdit, onEdit } = this.props;
    const { title, body, author } = this.state;

    if(!articleToEdit) {
      return axios.post('http://localhost:8000/api/articles', {
        title,
        body,
        author,
      })
        .then((res) => onSubmit(res.data))
        .then(() => this.setState({ title: '', body: '', author: '' }));
    } else {
      return axios.patch(`http://localhost:8000/api/articles/${articleToEdit._id}`, {
        title,
        body,
        author,
      })
        .then((res) => onEdit(res.data))
        .then(() => this.setState({ title: '', body: '', author: '' }));
    }
  }

  handleChangeField(key, event) {
    this.setState({
      [key]: event.target.value,
    });
  }

  render() {
    const { articleToEdit } = this.props;
    const { title, body, author } = this.state;

    return (
      <div className="col-12 col-lg-6 offset-lg-3">
        <input
          onChange={(ev) => this.handleChangeField('title', ev)}
          value={title}
          className="form-control my-3"
          placeholder="Article Title"
        />
        <textarea
          onChange={(ev) => this.handleChangeField('body', ev)}
          className="form-control my-3"
          placeholder="Article Body"
          value={body}>
        </textarea>
        <input
          onChange={(ev) => this.handleChangeField('author', ev)}
          value={author}
          className="form-control my-3"
          placeholder="Article Author"
        />
        <button onClick={this.handleSubmit} className="btn btn-primary float-right">{articleToEdit ? 'Update' : 'Submit'}</button>
      </div>
    )
  }
}

const mapDispatchToProps = dispatch => ({
  onSubmit: data => dispatch({ type: 'SUBMIT_ARTICLE', data }),
  onEdit: data => dispatch({ type: 'EDIT_ARTICLE', data }),
});

const mapStateToProps = state => ({
  articleToEdit: state.home.articleToEdit,
});

export default connect(mapStateToProps, mapDispatchToProps)(Form);
Sau cùng chúng add action cho reducers nữa là xong:
export default (state={articles: []}, action) => {
  switch(action.type) {
    case 'HOME_PAGE_LOADED':
      return {
        ...state,
        articles: action.data.articles,
      };
    case 'SUBMIT_ARTICLE':
      return {
        ...state,
        articles: ([action.data.article]).concat(state.articles),
      };
    case 'DELETE_ARTICLE':
      return {
        ...state,
        articles: state.articles.filter((article) => article._id !== action.id),
      };
    case 'SET_EDIT':
      return {
        ...state,
        articleToEdit: action.article,
      };
    case 'EDIT_ARTICLE':
      return {
        ...state,
        articles: state.articles.map((article) => {
          if(article._id === action.data.article._id) {
            return {
              ...action.data.article,
            }
          }
          return article;
        }),
        articleToEdit: undefined,
      }
    default:
      return state;
  }
};
Wrapper up
Như vậy chúng ta đã hoàn thành xây dựng blog đơn giản, chúng ta học rất nhiều thứ từ front-end đến back-end. Cố gắng hoàn thành 1 chức năng đơn giản nhưng không hề đơn giản với những người bắt đầu đâu nhé, trong quá trình làm theo bài viết sẽ có rất nhiều nút thắt cần được giải quyết và research rất nhiều mới hiểu được các vấn đề. Đừng xem nhẹ những ứng dụng nhỏ nhỏ nhé . Happy Coding.
All rights reserved
