Tìm hiểu về ARKit (Part 2): save và restore world maping data
Bài đăng này đã không được cập nhật trong 7 năm
I. Giới thiệu
Trong phần 1 của bài viết, tôi đã giới thiêu cách phát hiện các mặt phẳng ngang trong ARKit. Trong bài viết này, chúng ta sẽ tiếp tục tìm hiểu cách ARKit lưu và khôi phục world mapping data.
Với khả năng save và restore world maping data trong ARKit, chúng ta có thể lưu lại các trạng thái hiện tại của ARWorld, để khi người dùng thoát app, khi quay trở lại, người dùng sẽ có lại những dữ liệu từ lần sử dụng App trước, không phải sử dụng App từ bước ban đầu nữa.
II. Nội dung
1. Tạo project
Sau khi hoàn thành phần 1 , chúng ta đã có project demo detect horizontal plane. Phần 2 này sẽ tiếp tục từ project đã hoàn thành trong phần 1. Trường hợp các bạn chưa có project files, các bạn có thể download tại đây
Tiếp Theo, chúng ta thêm code sau vào class ViewController:
	// 1
    func addTapGestureToSceneView() {
        let tapGestureRecognizer = UITapGestureRecognizer(target: self, action: #selector(didReceiveTapGesture(_:)))
        sceneView.addGestureRecognizer(tapGestureRecognizer)
    }

	// 2
    @objc func didReceiveTapGesture(_ sender: UITapGestureRecognizer) {
        let location = sender.location(in: sceneView)
        guard let hitTestResult = sceneView.hitTest(location, types: [.featurePoint, .estimatedHorizontalPlane]).first
            else { return }
		// 3
        let anchor = ARAnchor(transform: hitTestResult.worldTransform)
        sceneView.session.add(anchor: anchor)
    }

	// 4
    func generateSphereNode() -> SCNNode {
        let sphere = SCNSphere(radius: 0.05)
        let sphereNode = SCNNode()
        sphereNode.position.y += Float(sphere.radius)
        sphereNode.geometry = sphere
        return sphereNode
    }

	func setLabel(text: String) {
        label.text = text
    }
Trong đoạn code trên, chúng ta lần lượt làm các bước sau:
- 1: thêm UITapGestureRecognizer để xác định mỗi khi sceneView được tap
- 2: xử lý sự kiện sceneView được tap
- 3: ở đây chúng ta thêm 1 instance của ARAnchor vào session của sceneView
- 4: thêm helper function generateSphereNode với chức năng tạo một instance hình cầu của SCNNode
2. Sử dụng ARWorldMap
ARWorldMap đại diện cho một không gian ánh xạ trong thế giới vật lý thực. Khi chúng ta sử dụng ARWorldMap, chúng ta có thể lưu dữ liệu của ARWorldMap vào máy. Sau đó, khi cần chúng ta có thể lấy lại dữ liệu của ARWorldMap để sử dụng trong ARKit
Dưới đây, chúng ta sẽ từng bước tìm hiểu cách sử dụng ARWorldMap.
a. Thêm world map url
Chúng ta thêm property cho ViewController như sau:
	var worldMapURL: URL = {
        do {
            return try FileManager.default.url(for: .documentDirectory, in: .userDomainMask, appropriateFor: nil, create: true)
                .appendingPathComponent("worldMapURL")
        } catch {
            fatalError("Error getting world map URL")
        }
    }()
b. Lưu trữ ARWorldMap data
	func archive(worldMap: ARWorldMap) throws {
        let data = try NSKeyedArchiver.archivedData(withRootObject: worldMap, requiringSecureCoding: true)
        try data.write(to: self.worldMapURL, options: [.atomic])
    }
Trong đoạn code trên, chúng ta viết một function với đầu vào là một instance của ARWorldMap và biến đổi instance đó thành dạng Data, lưu vào worldMapUrl mà chúng ta đã define ở bước trên.
c. Thực hiện lưu trữ dữ liệu ARWorldMap
Bây giờ chúng ta sẽ implement code cho func saveBarButtonItemDidTouch(_ sender:) để thực hiện lưu trữ dữ liệu
	@IBAction func saveBarButtonItemDidTouch(_ sender: UIBarButtonItem) {
        // 1
        sceneView.session.getCurrentWorldMap { (worldMap, error) in
            guard let worldMap = worldMap else {
                return self.setLabel(text: "Error getting current world map")
            }

            do {
                // 2
                try self.archive(worldMap: worldMap)
                DispatchQueue.main.async {
                    self.setLabel(text: "World map is saved")
                }
            } catch {
                fatalError("Error: \(error.localizedDescription)")
            }
        }
    }
Trong đoạn code trên, chúng ta lần lượt làm các bước sau:
- 1: lấy instance ARWorldMap của session trong sceneView.
- 2: lưu dữ liệu của ARWorldMap sử dụng func archive(worldMap:) mà chúng ta đã viết bên trên
Các bạn có thể thấy, việc lưu dữ liệu của ARWorldMap được hiện chỉ bằng một vài đoạn code rất đơn giản.
Các bạn chạy thử project, lia camera xung quanh để detect một horizonal plane, sau đó bấm nút save để lưu lại ARWorldMap. Nếu label trên app hiển thị “World map is saved” là chúng ta đã lưu trữ world map thành công.

d. Khôi phục ARWorldMap data
Sau các bước bên trên, từ instance của ARWorldMap, chúng ta đã biến đổi nó trở thành data, và lưu vào file trong device. Bây giờ chúng ta sẽ thực hiện quá trình ngược lại, từ file trong device, lấy data trong file và biến đổi nó thành instance của ARWorldMap
	// 1
    func retrieveWorldMapData(from url: URL) -> Data? {
        do {
            return try Data(contentsOf: self.worldMapURL)
        } catch {
            self.setLabel(text: "Error restoring world map data")
            return nil
        }
    }

    // 2
    func unarchive(worldMapData data: Data) -> ARWorldMap? {
        guard let worldMap = try? NSKeyedUnarchiver.unarchivedObject(ofClass: ARWorldMap.self, from: data)
            else { return nil }
        return worldMap
    }
Trong đoạn code trên, chúng ta lần lượt viết các function để thực hiện các việc:
- 1: lấy dữ liệu Data từ url
- 2: biến đổi dữ liệu từ dạng data về ARWorldMap
e. Thực hiện khôi phục dữ liệu ARWorldMap
chúng ta thêm code vào func loadBarButtonItemDidTouch(_ sender:) để thực hiện việc restore dữ liệu như sau:
	@IBAction func loadBarButtonItemDidTouch(_ sender: UIBarButtonItem) {
        guard let worldMapData = retrieveWorldMapData(from: worldMapURL),
            let worldMap = unarchive(worldMapData: worldMapData) else { return }
        resetTrackingConfiguration(with: worldMap)
    }
Bên trên, chúng ta thực hiện công việc lấy dữ liệu world map và gọi hàm resetTrackingConfiguration(with worldMap:) để thực hiện quá trình restore. Tuy nhiên, bên trong function esetTrackingConfiguration(with worldMap:) chúng ta vẫn chưa xử lý gì cho instance worldMap. Bây giờ chúng ta thêm code xử lý như sau:
	func resetTrackingConfiguration(with worldMap: ARWorldMap? = nil) {
        let configuration = ARWorldTrackingConfiguration()    // 5
        configuration.planeDetection = [.horizontal]    // 6

        let options: ARSession.RunOptions = [.resetTracking, .removeExistingAnchors]    // 7

        if let worldMap = worldMap {
            configuration.initialWorldMap = worldMap
            setLabel(text: "Found saved world map")
        } else {
            setLabel(text: "Move camera around to get horizontal space")
        }

        sceneView.debugOptions = [.showFeaturePoints]     // 8
        sceneView.session.run(configuration, options: options) // 9
    }
Bây giờ, chúng ta cần thêm code trong function viewDidLoad() để thêm tap gesture cho sceneView và function renderer(_ renderer:, didAdd node:, for anchor:) để hiển thị các điểm đã tap trên màn hình như sau:
	override func viewDidLoad() {
        super.viewDidLoad()

        sceneView.delegate = self // 0
        configureLighting() // 1
        addTapGestureToSceneView()
    }

	func renderer(_ renderer: SCNSceneRenderer, didAdd node: SCNNode, for anchor: ARAnchor) {
        // 1
        guard let planeAnchor = anchor as? ARPlaneAnchor else {
            let sphereNode = generateSphereNode()
            DispatchQueue.main.async {
                node.addChildNode(sphereNode)
            }
            return
        }

	……
	}
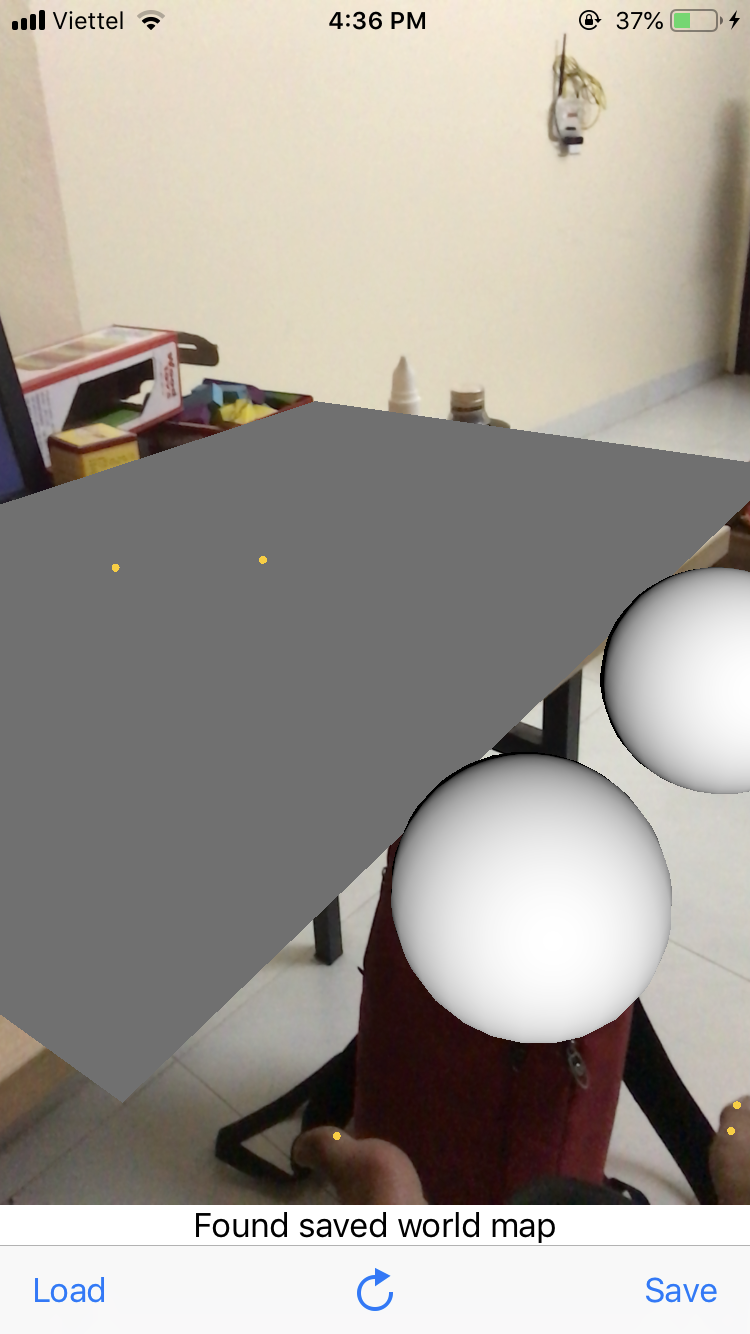
Cuối cùng, build chạy project, lần lượt làm các việc sau:
- quét xung quanh để detect các horizontal plane
- tap vào màn hình để detect các điểm tap
- bấm nút save để lưu lại các điểm đã tạo
- thoát và mở lại app
- bấm nút load để restore lại trạng thái được save của App
Kết quả, chúng ta nhận được đúng vị trí các horizonal plane và các điểm tap hình cầu giống với vị trí khi chúng ta save app
III. Kết luận
Trên đây tôi đã giới thiệu về world map trong ARKit và cách sử dụng ARWorldMap trong project. Hi vọng bài viết này sẽ mang lại thông tin bổ ích cho các bạn trong quá trình tìm hiểu về ARKit.
Cuối cùng, xin cảm ơn các bạn đã Theo dõi bài viết này, have a nice day 
All rights reserved
