Tạo một EmotionalFace bằng CustomView trong android
Bài đăng này đã không được cập nhật trong 6 năm
 Như các bạn đã biết Android cung cấp cho chúng ta rất nhiều loại view mặc định hữu ích.
Nhưng một số trường hợp view bạn cần thì những view mặc định có sẵn không thể giúp bạn giải quyết hoặc nó quá nhiều view phức tạp khiến việc quản lý view trở nên rất khó khăn. Vì thế android có cung cấp cho chúng ta làm điều đó chính là customview, cho phép chúng tùy chỉnh view theo ý muốn.
Ở phần này mình xin chia sẽ custom view một gương mặt biểu cảm mình học được trên mạng, tuy không xịn sò nhưng giúp chúng ta hiểu hơn về công việc này!
1. Tạo một custom view
Bắt đầu với việc tạo một lớp EmotionFaceView. Kế thừa lớp View . View là class cha của tất cả view trong android.
class EmotionalFaceView : View
IDE sẽ báo lỗi:
This type has a constructor, and thus must be initialized here
Đừng vội nhé chúng ta sẽ đi tìm hiểu ở mục tới.
2. Các hàm khởi tạo của view
View có bốn phương thức khởi tạo và chúng ta cần phải override một trong số chúng. Vậy chúng gồm những phần nào, chúng ta cùng tìm hiểu nhé:
constructor(context: Context)Để tạo một đối tượng view từ Kotlin code, và nó cần một tham số là một Activity context.constructor(context: Context, attrs: AttributeSet)Để tạo một đối tượng View từ XML.constructor(context: Context, attrs: AttributeSet, defStyleAttr: Int)Để tạo một đối tượng view từ XML với kiểu từ theme attribute.constructor(context: Context, attrs: AttributeSet, defStyleAttr: Int, defStyleRes: Int)Để tạo một đối tượng từ XML với kiểu từ theme attribute và kiểu của resource.
Ở phần hướng dẫn này mình sẽ dùng hàm dựng thứ hai nhé.
class EmotionalFaceView(context: Context, attrs: AttributeSet) : View(context, attrs)
Bây giờ, chúng ta đã có thể thêm customview của giúp ta trong file layout rồi đó.
<?xml version="1.0" encoding="utf-8"?>
<RelativeLayout
    xmlns:android="http://schemas.android.com/apk/res/android"
    xmlns:app="http://schemas.android.com/apk/res-auto"
    android:layout_width="match_parent"
    android:layout_height="match_parent">

    <TextView
        android:id="@+id/textView"
        android:layout_width="wrap_content"
        android:layout_height="wrap_content"
        android:layout_alignParentTop="true"
        android:layout_centerHorizontal="true"
        android:layout_marginTop="20dp"
        android:text="@string/hello_custom_views" />

    <com.sun_asterisk.emotionalfacecustomview.data.model.EmotionalFaceView
        android:id="@+id/emotionalFace"
        android:layout_width="match_parent"
        android:layout_height="match_parent"
        android:layout_below="@id/textView"
        android:layout_centerInParent="true"
        android:layout_margin="20dp" />
</RelativeLayout>
Build và run thì vẫn chưa có gì ngoài textview đâu nhé.
3. Vẽ view
Bây giờ chúng ta tiến hành vẽ mặt cười bằng Paint và chúng ta sẽ tùy chỉnh lại màu và kiểu cho nó nhé:
// Tạo một đối tượng Paint, ở đây ta sử dụng hàm dựng với
// tham số truyền vào là Paint.ANTI_ALIAS_FLAG để làm gì vậy nhỉ?
// nó giúp làm mượt mà các đường biên của hình vẽ
private val paint = Paint(Paint.ANTI_ALIAS_FLAG)
// Mình sẽ set color nền cho khuôn mặt, mắt và miệng.
private var faceColor = Color.YELLOW
private var eyesColor = Color.BLACK
private var mouthColor = Color.BLACK
private var borderColor = Color.BLACK
// set độ dày cho đường biên.
private var borderWidth = 4.0f
// set kích thước cho khuôn mặt.
private var size = 320
// để vẽ miệng
private val mouthPath = Path()
Tiếp theo chúng ta override lại phương thức onDraw() để bắt đầu vẽ nào. Canvas giống như một tấm màn trong suốt để chúng ta vẽ lên nhé.
override fun onDraw(canvas: Canvas) {
  // luôn gọi super method nhé, để nó giữ bất cứ cái drawing gì liên quan đến view cha.
  super.onDraw(canvas)
}
Một số lưu ý nhỏ: Bạn không nên tạo đối tượng ở đây nhé! Hàm này sẽ được gọi liên tục, vì vậy việc tạo đối tượng ở đây sẽ hiện lên cảnh báo về bộ nhớ.
Thêm một ít thay đổi trong method này nhé:
override fun onDraw(canvas: Canvas) {
super.onDraw(canvas)
drawFaceBackground(canvas)
drawEyes(canvas)
drawMouth(canvas)
}
private fun drawFaceBackground(canvas: Canvas) {
// set màu và kiểu cho khuôn mặt
paint.color = faceColor
paint.style = Paint.Style.FILL
// set bán kích cho khuôn mặt
val radius = size / 2f
// vẽ hình tròn với tọa đồ tâm O (size / 2f, size / 2f), bán kích radius và paint để vẽ
canvas.drawCircle(size / 2f, size / 2f, radius, paint)
// ta set lại màu và kiểu cho đường viền ngoài nhé.
paint.color = borderColor
paint.style = Paint.Style.STROKE
paint.strokeWidth = borderWidth
// vẽ border với cùng tọa độ với vòng tròn trước nhưng với bán kính ngắn hơn
canvas.drawCircle(size / 2f, size / 2f, radius - borderWidth / 2f, paint)
}
private fun drawEyes(canvas: Canvas) {
// set màu và kiểu cho mắt.
paint.color = eyesColor
paint.style = Paint.Style.FILL
// chúng ta dùng size để xác định vị trí của các điểm.
// để vẽ mắt trái ta tạo một đối tượng RectF vởi left, top, right and bottom
// nó tương ứng với (32%, 23%, 43%, 50%)
val leftEyeRect = RectF(size * 0.32f, size * 0.23f, size * 0.43f, size * 0.50f)
canvas.drawOval(leftEyeRect, paint)
// để vẽ mắt phải ta cũng phải tạo một đối tượng RectF vởi left, top, right and bottom
// nó tương ứng với (57%, 23%, 68%, 50%)
val rightEyeRect = RectF(size * 0.57f, size * 0.23f, size * 0.68f, size * 0.50f)
canvas.drawOval(rightEyeRect, paint)
}
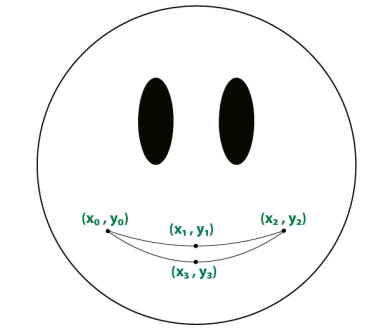
private fun drawMouth(canvas: Canvas) {
// set điểm bắt đầu của path bằng cách sử dụng method moveTo(22%, 70%)
mouthPath.moveTo(size * 0.22f, size * 0.7f)
// vẽ một đường cong từ vị trí (50%, 80%) (môi trên) tới vị trí (78%, 70%) (mép phải)
mouthPath.quadTo(size * 0.50f, size * 0.80f, size * 0.78f, size * 0.70f)
// vẽ một đường cong từ vị trí (50%, 90%) (phần môi dưới) tới vị trí (22%, 70%) (vị trí mép trái lúc bắt đầu
mouthPath.quadTo(size * 0.50f, size * 0.90f, size * 0.22f, size * 0.70f)
// set color và style
paint.color = mouthColor
paint.style = Paint.Style.FILL
// và vẽ dùng Path đẽ vẽ đường cong.
canvas.drawPath(mouthPath, paint)
}
Xem ảnh dưới để các bạn có thể dễ hình dung hơn.
Chạy ứng dụng và xem thử nào!
4. Responsive View
Chúng ta đã custom view thành công, nhưng nó vẫn chưa thực sự hoàn thiện vì chúng ta đã set cứng kích thước cho nó. Nào bây giờ hãy làm cho nó linh hoạt hơn nào bằng các lấy kích thước từ file XML.
override lại method onMeasure(), phương thức nào cung cấp các kích thước của view.
override fun onMeasure(widthMeasureSpec: Int, heightMeasureSpec: Int) {      super.onMeasure(widthMeasureSpec, heightMeasureSpec)
    // ta lấy kích thước nhỏ để làm kích thước của không mặt.
    size = Math.min(measuredWidth, measuredHeight)
    // lưu kích thước chiều ngang và chiều cao của view.
    setMeasuredDimension(size, size)
}
5. Creating Custom XML Attributes
Để có thêm nhiều sự lựa chọn màu sắc, biểu hiện cho view trong quá trình khởi tạo bằng XML thì ta cần tạo thêm một list các thuộc tính.
Vào res -> values -> tạo attrs.xml. Tiến hành khai báo như sau:
<declare-styleable name="EmotionalFaceView">
  <attr name="faceColor" format="color" />
  <attr name="eyesColor" format="color" />
  <attr name="mouthColor" format="color" />
  <attr name="borderColor" format="color" />
  <attr name="borderWidth" format="dimension" />
  <attr name="state" format="enum">
    <enum name="happy" value="0" />
    <enum name="sad" value="1" />
  </attr>
</declare-styleable>
Chúng ta sẽ bắt đầu khai báo màu sắc, kích thước cho từng bộ phận theo ý thích của chúng ta.
Trong file activity_main.xml ta thêm 2 khuôn mặt.
    <com.sun_asterisk.emotionalfacecustomview.data.model.EmotionalFaceView
        android:id="@+id/happyEmotionalFace"
        android:layout_width="80dp"
        android:layout_height="80dp"
        android:layout_margin="12dp"
        android:background="?actionBarItemBackground"
        android:clickable="true"
        android:focusable="true"
        app:state="happy" />

    <com.sun_asterisk.emotionalfacecustomview.data.model.EmotionalFaceView
        android:id="@+id/sadEmotionalFace"
        android:layout_width="80dp"
        android:layout_height="80dp"
        android:layout_alignParentEnd="true"
        android:layout_margin="12dp"
        android:background="?actionBarItemBackground"
        android:clickable="true"
        android:focusable="true"
        app:faceColor="@color/colorPrimary"
        app:state="sad" />
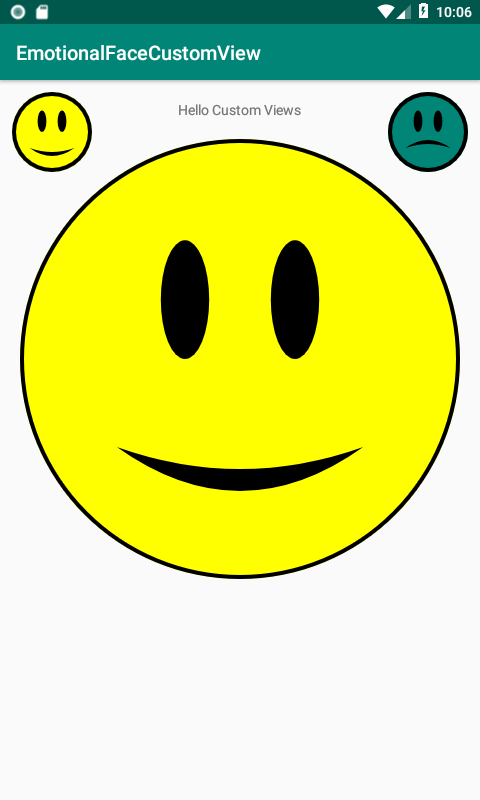
Ở đây mình có set thêm thuộc tính khuôn mặt buồn và mặt vui cho nó.
Bạn hãy chạy ứng dụng và xem. Vẫn chưa có gì thay đổi phải không. Chúng ta mới set thôi chưa sử lý nó mà  .
.
Để mà view có thể nhận biết được những cài đặt của chúng ta trong XML trong class EmotionalFaceView chúng ta cập nhật lại code như sau.
companion object {
      private const val DEFAULT_FACE_COLOR = Color.YELLOW
      private const val DEFAULT_EYES_COLOR = Color.BLACK
      private const val DEFAULT_MOUTH_COLOR = Color.BLACK
      private const val DEFAULT_BORDER_COLOR = Color.BLACK
      private const val DEFAULT_BORDER_WIDTH = 4.0f

      const val HAPPY = 0L
      const val SAD = 1L
}

private var faceColor = DEFAULT_FACE_COLOR
private var eyesColor = DEFAULT_EYES_COLOR
private var mouthColor = DEFAULT_MOUTH_COLOR
private var borderColor = DEFAULT_BORDER_COLOR
private var borderWidth = DEFAULT_BORDER_WIDTH

private val paint = Paint()
private val mouthPath = Path()
private var size = 0

var happinessState = HAPPY
  set(state) {
    field = state
      // cập nhật lại view mỗi khi trạng thái thay đổi.
    invalidate()
  }

// khởi tạo
init {
  paint.isAntiAlias = true
  setupAttributes(attrs)
}

private fun setupAttributes(attrs: AttributeSet?) {
  // typedArray chứa thông tin của view trong xml
  val typedArray = context.theme.obtainStyledAttributes(attrs, R.styleable.EmotionalFaceView,
      0, 0)

  // set dữ liệu của chúng ta theo dữ liệu trong file xml
  happinessState = typedArray.getInt(R.styleable.EmotionalFaceView_state, HAPPY.toInt()).toLong()
  faceColor = typedArray.getColor(R.styleable.EmotionalFaceView_faceColor, DEFAULT_FACE_COLOR)
  eyesColor = typedArray.getColor(R.styleable.EmotionalFaceView_eyesColor, DEFAULT_EYES_COLOR)
  mouthColor = typedArray.getColor(R.styleable.EmotionalFaceView_mouthColor, DEFAULT_MOUTH_COLOR)
  borderColor = typedArray.getColor(R.styleable.EmotionalFaceView_borderColor,
      DEFAULT_BORDER_COLOR)
  borderWidth = typedArray.getDimension(R.styleable.EmotionalFaceView_borderWidth,
      DEFAULT_BORDER_WIDTH)

  // chúng ta thực hiện việc hủy bỏ typedArray sau khi sử dụng
  typedArray.recycle()
}
Chạy ứng dụng để xem thành quả.
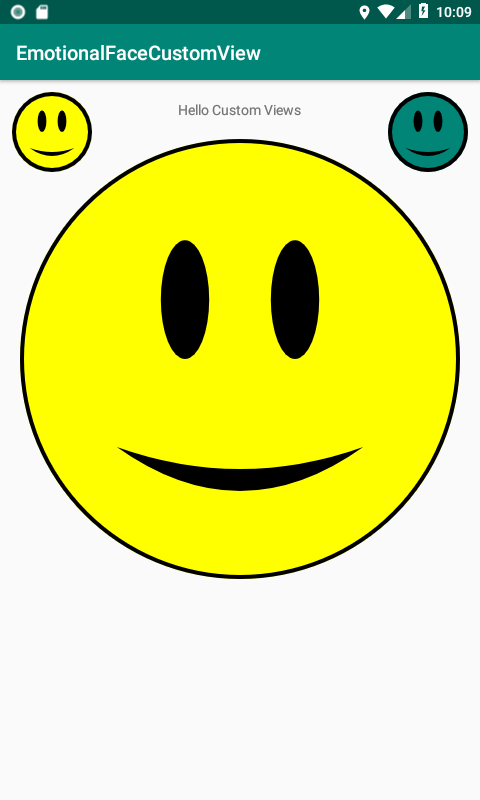
Việc chúng ta set trạng thái khuôn mặt vẫn chưa hoạt động phải không nào. Cả hai khuôn mặt đều là mặt cười.
Nào quay lại phương thức drawMouth(), thực hiện như sau.
private fun drawMouth(canvas: Canvas) {
        // dùng để xóa các thuộc tihs cũ của mouthPath
        mouthPath.reset()

        mouthPath.moveTo(size * 0.22f, size * 0.7f)

        if (happinessState == HAPPY) {
            mouthPath.quadTo(size * 0.50f, size * 0.80f, size * 0.78f, size * 0.70f)
            mouthPath.quadTo(size * 0.50f, size * 0.90f, size * 0.22f, size * 0.70f)
        } else {
            mouthPath.quadTo(size * 0.5f, size * 0.50f, size * 0.78f, size * 0.7f)
            mouthPath.quadTo(size * 0.5f, size * 0.60f, size * 0.22f, size * 0.7f)
        }

        paint.color = mouthColor
        paint.style = Paint.Style.FILL

        canvas.drawPath(mouthPath, paint)
    }
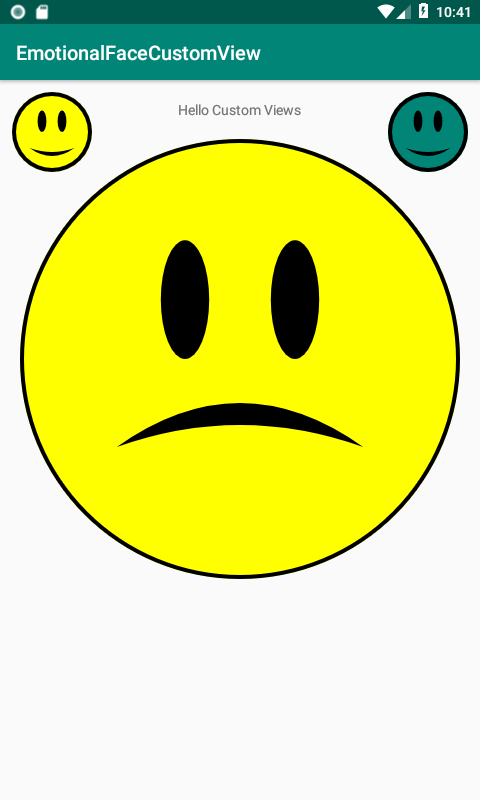
Việc xét mặt buồn cũng tương tự như mặt vui có điều cái miệng sẽ có hình khác nhé.
Build và run lại app chúng ta sẽ được như mong đợi.
6. Tương tác người dùng
Người cũng có lúc vui lúc buồn phải không các bạn. Bây giờ làm sao để ta chuyển đổi từ vui sang buồn và buồn sang vui đây. Nào chúng ta cùng bắt tay vào tiến hành thôi nào.
Nếu các bạn để ý trong những bước trước ta đã thêm thuộc tính happinessState, trong hàm set của thuộc tính này mỗi lần set lại giá trị nó sẽ thực hiện phương thức invalidate() của view. Đây là một phương thức có sẵn của view giúp cập nhật lại text hoặc màu sắc của view.
Ở onCreate() trong MainActivity, ta thực hiện code như bên dưới:
        sadEmotionalFace.setOnClickListener {
             emotionalFace.happinessState = EmotionalFaceView.SAD
        }

        happyEmotionalFace.setOnClickListener {
             emotionalFace.happinessState = EmotionalFaceView.HAPPY
        }
Bạn nhớ import các view trong file MainActivity để tránh việc findViewId nhé .
Build và run ứng dụng, click 2 khuôn mặt nhỏ để xem có thay đổi gì ở khuôn mặt lớn không nhé
Chúc các bạn thành công!
Link tham khảo:
https://www.raywenderlich.com/142-android-custom-view-tutorial
All rights reserved
