Shader Unity - Gradient Pattern: Tạo hiệu ứng đốm sáng lấp lánh
Bài đăng này đã không được cập nhật trong 4 năm
Chào mọi người.
Để tiếp nối với bài shader trước: https://viblo.asia/p/shader-unity-vertex-animation-tao-hieu-ung-la-co-bay-trong-gio-aWj53XrQK6m#comment-dbZNrbmvnZY
Mình sẽ viết thêm về Shader Unity - Gradient Pattern: Tạo hiệu ứng đốm sáng lấp lánh.
Nào chúng ta bắt đầu thôi.

I, Ý tưởng.
Như ta thấy ở hình trên các chấm sáng với độ mờ khác nhau và thay đổi theo thời gian để tạo ra hiệu ứng lấp lánh.
Thứ ta có ban đầu là gì.
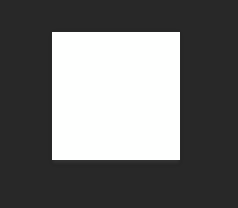 1 image màu trắng có hình vuông.
Vậy đầu tiên ta sẽ biến đổi hình vuông này thành hình tròn bằng shader rồi đổ màu vào image đó, thêm độ mờ và thay đổi theo thời gian.
Rồi nhân hình này thành nhiều hình nhỏ với các thông số color và độ mờ theo thời gian khác nhau ta sẽ tạo ra hiệu ứng lấp lánh đó.
1 image màu trắng có hình vuông.
Vậy đầu tiên ta sẽ biến đổi hình vuông này thành hình tròn bằng shader rồi đổ màu vào image đó, thêm độ mờ và thay đổi theo thời gian.
Rồi nhân hình này thành nhiều hình nhỏ với các thông số color và độ mờ theo thời gian khác nhau ta sẽ tạo ra hiệu ứng lấp lánh đó.
Oke giờ mình code để biến ý tưởng thành hiện thực.
II, Tạo hình tròn bằng Shader.
Ta có đoạn code cơ bản để load hình vuông với texture
   Shader "Custom/CircleFaded"
{
	Properties
	{
		_Color ("Main Color", Color) = (1,1,1,1)
		_MainTex("Main Texture", 2D) = "white" {}
	}

	Subshader
	{
		Pass
		{
			CGPROGRAM
			#pragma vertex vert
			#pragma fragment frag

			uniform half4 _Color;
			uniform sampler2D _MainTex;

			struct vertexInput
			{
				float4 vertex : POSITION;
				float4 texcoord : TEXCOORD0;
			};

			struct vertexOutput
			{
				float4 pos : SV_POSITION;
				float4 texcoord : TEXCOORD0;
			};

			vertexOutput vert(vertexInput v)
			{
				vertexOutput o;
				o.pos = UnityObjectToClipPos( v.vertex);
				o.texcoord.xy = v.texcoord.xy;
				return o;
			}

			half4 frag(vertexOutput i) : COLOR
			{
				float4 col = tex2D(_MainTex, i.texcoord) * _Color;
				return col;
			}
			ENDCG
		}
	}
}
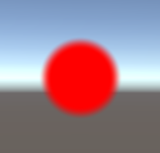
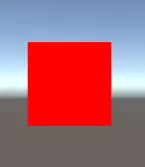 (Mình sẽ đổ màu đỏ cho dễ nhìn.)
Như ta được biết ở bài trước thì vertex shader sẽ thay đổi về tọa độ. Và fragment shader sẽ thay đổi về color. Vậy ta sẽ thực hiện hiệu ứng này trong fragment shader.
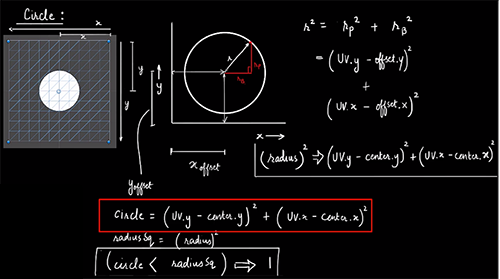 Giờ mình đá qua toán học tí.
Ta có phương trình đường trình như trên (cái này các bạn tự tìm hiểu thêm về làm sao để ra công thức).
Thì đơn giản là nếu tọa độ ở vertex shader đưa xuống cho fragment shader có khoảng cách đến tâm < radius mà ta truyền vào thì sẽ được hiển thị (alpha = 1), ngược lại thì nó sẽ transparent (alpha = 0).
Update code tí
Giờ mình đá qua toán học tí.
Ta có phương trình đường trình như trên (cái này các bạn tự tìm hiểu thêm về làm sao để ra công thức).
Thì đơn giản là nếu tọa độ ở vertex shader đưa xuống cho fragment shader có khoảng cách đến tâm < radius mà ta truyền vào thì sẽ được hiển thị (alpha = 1), ngược lại thì nó sẽ transparent (alpha = 0).
Update code tí
// Upgrade NOTE: replaced 'mul(UNITY_MATRIX_MVP,*)' with 'UnityObjectToClipPos(*)'

Shader "Custom/CircleFaded"
{
	Properties
	{
		_Color ("Main Color", Color) = (1,1,1,1)
		_MainTex("Main Texture", 2D) = "white" {}
		_Center ("Center", Float) = 0.5
		_Radius ("Radius", Range(0,0.5)) = 0.5
	}

	Subshader
	{
		//http://docs.unity3d.com/462/Documentation/Manual/SL-SubshaderTags.html
	    // Background : 1000     -        0 - 1499 = Background
        // Geometry   : 2000     -     1500 - 2399 = Geometry
        // AlphaTest  : 2450     -     2400 - 2699 = AlphaTest
        // Transparent: 3000     -     2700 - 3599 = Transparent
        // Overlay    : 4000     -     3600 - 5000 = Overlay
		Tags { "Queue" = "Transparent" "IgnoreProjector" = "True" "RenderType" = "Transparent" }
		Pass
		{
			Blend SrcAlpha OneMinusSrcAlpha

			CGPROGRAM
			//http://docs.unity3d.com/Manual/SL-ShaderPrograms.html
			#pragma vertex vert
			#pragma fragment frag

			//http://docs.unity3d.com/ru/current/Manual/SL-ShaderPerformance.html
			//http://docs.unity3d.com/Manual/SL-ShaderPerformance.html
			uniform half4 _Color;
			uniform sampler2D _MainTex;
			uniform float4 _MainTex_ST;
			uniform float _Center;
			uniform float _Radius;

			//https://msdn.microsoft.com/en-us/library/windows/desktop/bb509647%28v=vs.85%29.aspx#VS
			struct vertexInput
			{
				float4 vertex : POSITION;
				float4 texcoord : TEXCOORD0;
			};

			struct vertexOutput
			{
				float4 pos : SV_POSITION;
				float4 texcoord : TEXCOORD0;
			};

			vertexOutput vert(vertexInput v)
			{
				vertexOutput o;
				o.pos = UnityObjectToClipPos( v.vertex);
				o.texcoord.xy = (v.texcoord.xy * _MainTex_ST.xy + _MainTex_ST.zw);
				return o;
			}

			float drawCircle(float2 uv, float2 center, float radius)
			{
				float circle = pow((uv.y - center.y), 2) + pow ((uv.x - center.x), 2);
				float radiusSq = pow (radius, 2);

				if (circle < radiusSq)
				{
					return 1;
				}
				return 0;
			}


			half4 frag(vertexOutput i) : COLOR
			{
				float4 col = tex2D(_MainTex, i.texcoord) * _Color;
				col.a = drawCircle(i.texcoord, _Center , _Radius);
				return col;
			}

			ENDCG
		}
	}
}
Ta có hàm drawCircle để trả về độ alpha phù hợp để tạo ra hình tròn.
III, Tạo viền gradient cho hình tròn.
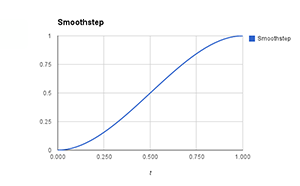
Nâng cấp hình tròn 1 tí để tạo ra hiệu ứng lấp lánh được tốt nhất. Đó là chúng ta sẽ tạo viền gradient theo alpha cho hình tròn. Unity cho cung cấp cho chúng ta viết hàm smoothstep(max,mix,delta) nó sẽ trả về giá trị float như đồ thị dưới.
Update code thêm 1 tí
			float drawCircle(float2 uv, float2 center, float radius,float feather)
			{
				float circle = pow((uv.y - center.y), 2) + pow ((uv.x - center.x), 2);
				float radiusSq = pow (radius, 2);

				if (circle < radiusSq)
				{
					return smoothstep(radiusSq,radiusSq-feather,circle);
				}
				return 0;
			}


			half4 frag(vertexOutput i) : COLOR
			{
				float4 col = tex2D(_MainTex, i.texcoord) * _Color;
				col.a = drawCircle(i.texcoord, _Center , _Radius,_Feather);
				return col;
			}
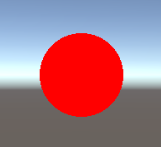
Và ta có kết quả
IV, Tạo hiệu ứng lấp lánh.
Để tạo ra hiệu ứng 1 điều chúng ta cần là thời gian và đồ thị hình sin(x) như bài trước.
Update full code
Shader "Custom/CircleFaded"
{
    Properties
    {
        _Color ("Main Color", Color) = (1,1,1,1)
        _MainTex("Main Texture", 2D) = "white" {}
        _Center ("Center", Float) = 0.5
		_Radius ("Radius", Range(0,0.5)) = 0.5
		_Feather ("Feather", Range(0,0.3)) = 0.1
		_Speed("Speed",Float) = 0.5
	}

	Subshader
	{
		//http://docs.unity3d.com/462/Documentation/Manual/SL-SubshaderTags.html
	    // Background : 1000     -        0 - 1499 = Background
        // Geometry   : 2000     -     1500 - 2399 = Geometry
        // AlphaTest  : 2450     -     2400 - 2699 = AlphaTest
        // Transparent: 3000     -     2700 - 3599 = Transparent
        // Overlay    : 4000     -     3600 - 5000 = Overlay
		Tags { "Queue" = "Transparent" "IgnoreProjector" = "True" "RenderType" = "Transparent" }
		Pass
		{
			Blend SrcAlpha OneMinusSrcAlpha

			CGPROGRAM
			//http://docs.unity3d.com/Manual/SL-ShaderPrograms.html
			#pragma vertex vert
			#pragma fragment frag

			//http://docs.unity3d.com/ru/current/Manual/SL-ShaderPerformance.html
			//http://docs.unity3d.com/Manual/SL-ShaderPerformance.html
			uniform half4 _Color;
			uniform sampler2D _MainTex;
			uniform float4 _MainTex_ST;
			uniform float _Center;
			uniform float _Radius;
			uniform float _Feather;
			uniform float _Speed;

			//https://msdn.microsoft.com/en-us/library/windows/desktop/bb509647%28v=vs.85%29.aspx#VS
			struct vertexInput
			{
				float4 vertex : POSITION;
				float4 texcoord : TEXCOORD0;
			};

			struct vertexOutput
			{
				float4 pos : SV_POSITION;
				float4 texcoord : TEXCOORD0;
			};

			vertexOutput vert(vertexInput v)
			{
				vertexOutput o;
				o.pos = UnityObjectToClipPos( v.vertex);
				o.texcoord.xy = (v.texcoord.xy * _MainTex_ST.xy + _MainTex_ST.zw);
				return o;
			}

			float drawCircle(float2 uv, float2 center, float radius,float feather,float speed)
			{
				float circle = pow((uv.y - center.y), 2) + pow ((uv.x - center.x), 2);
				float radiusSq = pow (radius, 2);

				if (circle < radiusSq)
				{
					float fadeVal = sin(_SinTime.x * speed);
					return smoothstep(radiusSq,radiusSq-feather,circle)*fadeVal;
				}
				return 0;
			}


			half4 frag(vertexOutput i) : COLOR
			{
				float4 col = tex2D(_MainTex, i.texcoord) * _Color;
				col.a = drawCircle(i.texcoord, _Center , _Radius,_Feather,_Speed);
				return col;
			}

			ENDCG
		}
	}
}
Ta sẽ được kết quả:

Giờ ta nhân đốm sáng này lên nhiều thay đổi các thông số khác nhau và thêm background để tạo hiệu ứng tốt nhất.
Cảm ơn bạn đã đọc tới đây. Hẹn gặp lại vào bài viết sau ^^ Full scource code: https://www.mediafire.com/file/nol583i382amur1/Gradient Pattern.zip p/s: Bài viết này mình có tham khảo từ https://shaderdev.com
All rights reserved
