Reload giao diện Realtime trong lập trình iOS
Bài đăng này đã không được cập nhật trong 7 năm
1. Giới thiệu
Đối với các mobile Developer nói chung, hay các iOS Developer nói riêng, khi có 1 thay đổi nào về Interface thì chúng ta đều phải thực hiện việc build lại app để kiểm tra lại các update sau khi chúng ta develop. Chúng ta thấy các dev Web hay các dev mobile sử dụng React Native, việc update Interface họ có thể quan sát tức thì chúng ta cảm thấy rất ghen tị phải không nào. Vậy trong lập trình iOS có cách nào khi chúng ta thay đổi một thuộc tính Interface mà chúng ta không cần phải build lại App để test trên silmulator hay không? Trong bài viết này tôi sẽ giới thiệu đến các bạn một công cụ mà chúng ta có thể làm được điều đó. Đó chính là Injection App.
Injection
Cài đặt
Đầu tiên chúng ta cùng nhau cài đặt Injection App:
Với Xcode 9: https://itunes.apple.com/app/injectioniii/id1380446739?mt=12
Với Xcode 10: http://johnholdsworth.com/InjectionX.app.zip
Trong ví dụ của tôi, tôi sử dụng Xcode 10 do vậy tôi sẽ download version cho Xcode 10. Sau khi download về các bạn giải nén và move app vào thư mục Application.
Config Injection
Thêm đoạn code sau trong func didFinishLaunchingWithOptions file AppDelegate
#if DEBUG
        Bundle(path: "/Applications/InjectionX.app/Contents/Resources/iOSInjection.bundle")?.load()
#endif
Trong file Interface:
import UIKit
import SnapKit
import Stevia

class ViewController: UIViewController {
    let email = UITextField()
    let password = UITextField()
    let loginButton = UIButton()

    override func viewDidLoad() {
        super.viewDidLoad()
        setupView()

        #if DEBUG
        handleInjectedNotification()
        #endif
    }

    func handleInjectedNotification() {
        NotificationCenter.default.addObserver(forName: NSNotification.Name(rawValue: "INJECTION_BUNDLE_NOTIFICATION"),
                                               object: nil,
                                               queue: nil) { [weak self] _ in
                                                self?.setupView()
        }
    }

    func setupView() {
        view.backgroundColor = UIColor.white
        snapKitLoginView()
    }

    func snapKitLoginView() {
        view.addSubview(email)
        view.addSubview(password)
        view.addSubview(loginButton)

        email.backgroundColor = UIColor.lightGray
        email.layer.cornerRadius = 5.0
        email.layer.borderWidth = 1.0
        email.layer.borderColor = UIColor.red.cgColor
        email.placeholder = "Email"

        password.backgroundColor = UIColor.lightGray
        password.layer.cornerRadius = 5.0
        password.layer.borderWidth = 1.0
        password.layer.borderColor = UIColor.red.cgColor
        password.placeholder = "Password"


        loginButton.backgroundColor = UIColor.blue
        loginButton.layer.cornerRadius = 5.0
        loginButton.setTitle("Login", for: .normal)

        email.snp.makeConstraints { (make) in
            make.height.equalTo(50)
            make.top.equalTo(200)
            make.left.equalTo(15)
            make.right.equalTo(-15)
        }

        password.snp.makeConstraints { (make) in
            make.height.equalTo(50)
            make.top.equalTo(email.snp.bottom).offset(20)
            make.left.equalTo(15)
            make.right.equalTo(-15)
        }

        loginButton.snp.makeConstraints { (make) in
            make.height.equalTo(50)
            make.top.equalTo(password.snp.bottom).offset(60)
            make.left.equalTo(15)
            make.right.equalTo(-15)
        }
    }
}
Trong đoạn code trên các bạn chú ý func handleInjectedNotification, đây là hàm sử dụng Notification để lắng nghe những thay đổi UI của các bạn.
Chạy Update UI Realtime
Các bạn chạy App Injection, sau khi chạy thành công thì nó sẽ xuất hiện trên thanh status bar của MacOS:

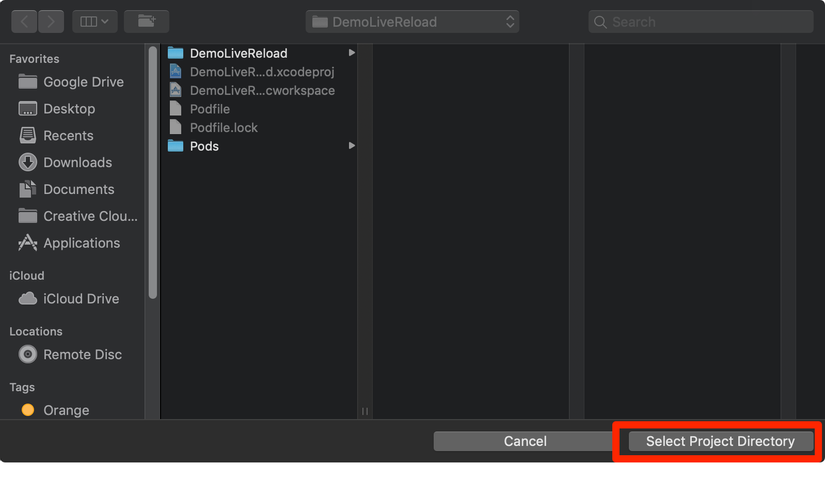
Thực hiện build App, sau khi build App thành công thì sẽ có 1 cửa sổ bật lên để các bạn chọn thư mục của app. Chọn đến đúng thư mục của App rồi bấm chọn Select Product Directory:
Chú ý: Trong trường hợp khi build app mà không có cửa sổ lựa chọn thư mục, nghĩa là trước đó bạn đã lựa chọn rồi, và bạn thực hiện một project khác thì bạn thực hiện bấm vào biểu tượng Injection trên thanh status bar của MacOS, rồi bấm vào Open Project và chọn lại Select Product Directory cho đúng app đang chạy.
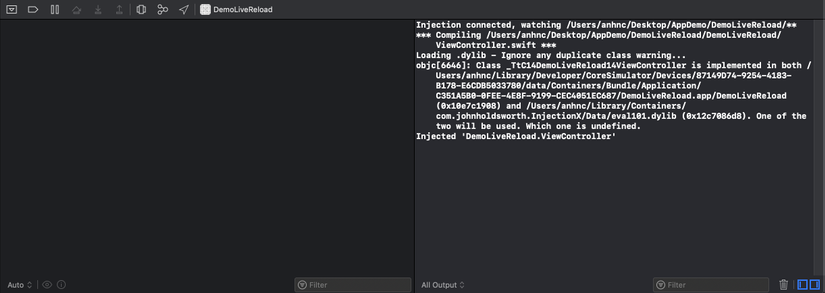
Sau khi build App thành công, nếu Xcode kết nối thành công đến Injection App thì sẽ có log như dưới đây:
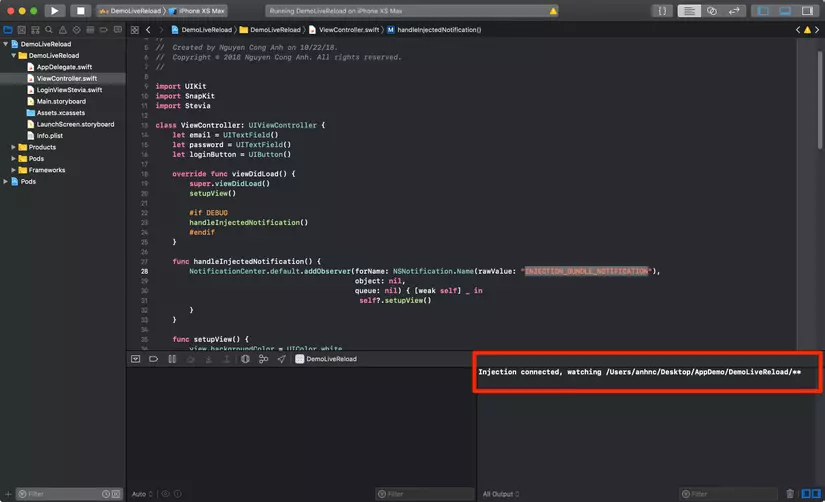
Có nghĩa là Injection App đã kết nối thành công đến Xcode với đường dẫn /Users/anhnc/Desktop/AppDemo/DemoLiveReload/. Như thế tất cả các thay đổi của thư mục này sẽ được lắng nghe bởi Injection App, nó sẽ có nhiệm vụ lắng nghe thay đổi và update UI trên simulator. Lưu ý: Khi thay đổi 1 thuộc tính nào, ví dụ bạn muốn đổi title của 1 Button nào đó mà bạn muốn xem ngay sự thay đổi trên simulator thì bạn phải bấm ⌘S.
Tổng kết
Trên đây tôi đã giới thiệu đến các bạn, một công cụ giúp iOS dev có thể tiết kiệm rất nhiều thời gian cho việc quan sát các thay đổi về UI mà không cần build lại app để test. Hy vọng bài viết hữu ích với các bạn, cám ơn mọi người đã đọc bài viết! 
Dưới đây là link Demo (Do Github đang bị lỗi tạo repository nên tôi upload lên drive):
https://drive.google.com/file/d/1hdPSP2N4L2bVTJy3PPDad4Odlms_I6kp/view?usp=sharing
Công nghệ sử dụng trong App demo: Injection + Snapkit + Stevia Video Demo app:
https://drive.google.com/file/d/1LAkAB2xd96qRoI02KWouzpv7DdmocXnE/view?usp=sharing
All rights reserved
