React Native - Integrating Push Notifications using FCM (Android) - Part 2
Bài đăng này đã không được cập nhật trong 6 năm
Ở bài viết trước mình đã hướng dẩn các bạn setting cho phía iOS và bài viết này mình sẽ làm tiếp nhiệm vụ còn lại là setting cho phía android nhé.
I. Create Application On Console.
Bạn vào trang console của firebase nhé. Đảm bảo google-services.json của bạn được đặt trong các thư mục chính xác.
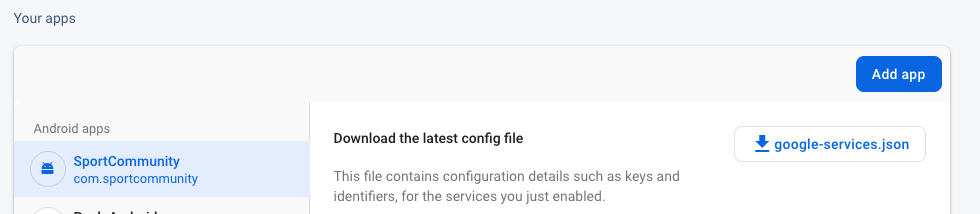
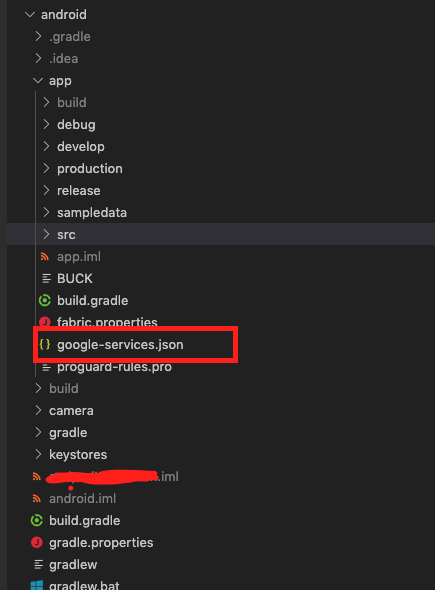
Tải file google-services.json xuống và đặt nó vào cây thư mục như sau .
2. Install Firebase Module
Bạn cài đặt nó Ở Đây nhé .
Cấu hình lại tập tin gradle. Vui lòng sử dụng các phụ thuộc firebase mới nhất có sẵn trong khi làm theo hướng dẫn này. Bạn có thể tìm thấy hướng dẫn FCM chính thức tại đây. Để bạn tham khảo, các tập tin lớp của tôi như sau:
dependencies {
    implementation fileTree(include: ['*.jar'], dir: 'libs')
    implementation 'com.android.support:appcompat-v7:27.1.1'
    implementation 'com.facebook.react:react-native:+'

    //Add these lines
    implementation "com.google.android.gms:play-services-base:16.1.0"
    implementation "com.google.firebase:firebase-core:16.0.9"
    implementation 'com.google.firebase:firebase-messaging:20.0.0'
    implementation 'me.leolin:ShortcutBadger:1.1.21@aar'
}

//Put this on bottom of file
apply plugin: 'com.google.gms.google-services'
Và setting ở đây .
buildscript {
    repositories {
        jcenter()
        google()
        maven { url "https://github.com/layerhq/releases-gradle/raw/master/releases" }
    }
    dependencies {
        classpath 'com.android.tools.build:gradle:3.4.2'
        classpath 'com.google.gms:google-services:4.2.0'

    }
}
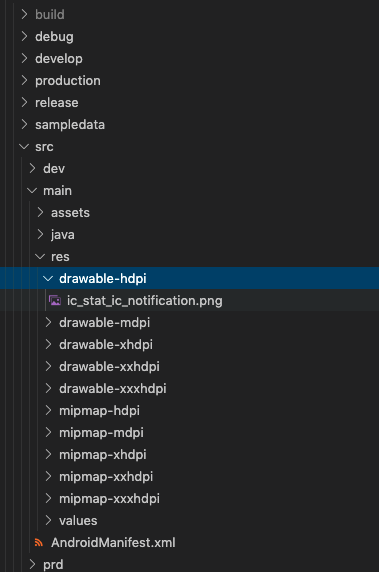
Setting image hiển thị trên Notification cho android
3. Receive Push Notifications
Hãy chạy app với máy ảo. Chú ý là , Trong Android, nếu bạn muốn thử nghiệm trên trình giả lập, bạn cần cài đặt gói Dịch vụ Google Play.
Dưới đây là một đoạn setting Notification Listeners của tôi. bạn có thể tham khảo
componentDidMount() {
    this.checkPermission();
    const channel = new firebase.notifications.Android.Channel(
        'channelId',
        'Andpad',
        firebase.notifications.Android.Importance.Max
    ).setDescription('Andpad');
    firebase.notifications().android.createChannel(channel);
    this.createNotificationListeners();
}

    // Lắng nghe sự kiện khi app đang ở chế độ Background
async createNotificationListeners() {
        this.notificationListener = firebase.notifications().onNotification((notification) => {
        if (Platform.OS === 'android') {
            notification
                .android.setChannelId('channelId')
                .android.setSmallIcon('@drawable/ic_stat_ic_notification')
                .android.setColor(color.vermilion);
            firebase.notifications()
                .displayNotification(notification);
        } else if (Platform.OS === 'ios') {
            const localNotification = new firebase.notifications.Notification()
                .setNotificationId(notification.notificationId)
                .setTitle(notification.title)
                .setSubtitle(notification.subtitle)
                .setBody(notification.body)
                .setData(notification.data)
                .ios.setBadge(Number(notification.data.badge))
            firebase.notifications()
                .displayNotification(localNotification)
                .catch(err => console.error(err));
            }
        });


        this.notificationOpenedListener = firebase.notifications().onNotificationOpened((notificationOpen) => {
            const { data, android } = notificationOpen.notification;
            android.setAutoCancel(true)

            // Điều hướng cho notification sau khi click vào message push
            urlParams = data.url
            var slipRegex = ['\\\/abc/', '/def/', '/gmn/'];
            params = urlParams.replace(config.uriPrefix + "orders/", "").split(new RegExp(slipRegex.join('|'), 'g'))
            this.notificationParams = {params, notificationId: data.notification_id};
            firebase.notifications().removeDeliveredNotification(notificationOpen.notification.notificationId);
            this.setState({
                initialRouteName: this.HOME,
            })
        });


        const notificationOpen = await firebase.notifications().getInitialNotification()
        if (notificationOpen) {
            const { data, android } = notificationOpen.notification;
            android.setAutoCancel(true)
            urlParams = data.url
            var slipRegex = ['\\\/abc/', '/def/', '/gmn/'];
            params = urlParams.replace(config.uriPrefix + "orders/", "").split(new RegExp(slipRegex.join('|'), 'g'))
            this.notificationParams = {params, notificationId: data.notification_id};
            firebase.notifications().removeDeliveredNotification(notificationOpen.notification.notificationId);
        }
    }
Bạn có thể yêu cầu quyền truy cập Notificaiton của thiết bị bắng function này.
    async requestPermission() {
        try {
            await firebase.messaging().requestPermission();
            this.getToken();
        } catch (error) {
            console.log('permission rejected');
        }
    }
Hoặc có thể kiêm tra nó đã có quyền truy cập chưa bằng
    async checkPermission() {
        const enabled = await firebase.messaging().hasPermission();
        if (enabled) {
            this.getToken();
        } else {
            this.requestPermission();
        }
    }
Bài viết nay hi vọng sẽ là một đoạn tài liệu để bạn có thể tham khảo, hoặc gặp khú mắc ở đâu đó trong quá trình cài đặt .
4. References:
https://medium.com/@anum.amin/react-native-integrating-push-notifications-using-fcm-349fff071591
All rights reserved
