Notification Trong React Native Thật Đơn Giản
Bài đăng này đã không được cập nhật trong 7 năm
Gửi thông báo từ server cho client khá phổ biến với anh em phát triển Android & iOS vì số lượng ứng dụng về truyền tải thông tin, nội dung mới, chatting và social media rất nhiều. Lợi ích của việc làm này thì đa số chúng ta đều thấy ngay đó là thu hút sự chú ý của người dùng, chủ đề bài viết mình hướng tới là sử dụng công nghệ này như thế nào? Tất nhiên trên nền tảng native mọi người đã dùng nhiều rồi, mình xin đề cập tới việc sử dụng Firebase Cloud Message (FCM) trong React Native ngắn gọn hơn là RNFirebase (trùng tên với thư viện mà trong bài viết này mình sẽ sử dụng) 
1. Khởi tạo project
Nhìn thôi cũng hiểu đây là bước đầu rồi, vì mong của bài viết là các bạn mới làm quen với react native cũng tiếp cận dễ hơn nên ai đã quen rồi thì chuyển sang bước tiếp theo nha. Mình tạo một project mới theo câu lệnh sau (gõ cho quen tay các bạn nhé ^^ ) :
Terminal:
react-native init RNFProject
Nếu bạn nào gặp báo lỗi: Terminal không hiểu "react-native" nó là lệnh gì thì bạn cần cài đặt react native vào nhé. Xem cách cài đặt trong bài này, nó khá đơn giản để làm quen đọc bài
Cấu trúc của một project React Native :

Vậy là đã khởi tạo xong rồi, anh em đừng vội phải build nó lên chạy xem như nào vì dễ gặp lỗi ở phiên bản mới cập nhật của react, cài đặt thiếu là nó không chạy được đâu. Chúng ta chuyển sang bước sau nhé 
2. Tạo project Firebase
Trước tiên chúng ta tạo một project trên https://console.firebase.google.com Chờ một chút nhé, nếu bạn nào đang thường phát triển Android hoặc iOS thì sẽ chỉ mong muốn chạy được project trên 1 trong 2 nền tảng thôi. Nhưng đây là react native mà nên cứ chơi cả 2 không mất gì cả nhé Nên mình sẽ setting cho cả 2 luôn, cứ "ôm" file google-services.json dành cho Android app và GoogleService-Info.plist của iOS app ném vào folder của project tương ứng.
Ok giờ mình sẽ lần lượt lấy 2 file này về nhé:
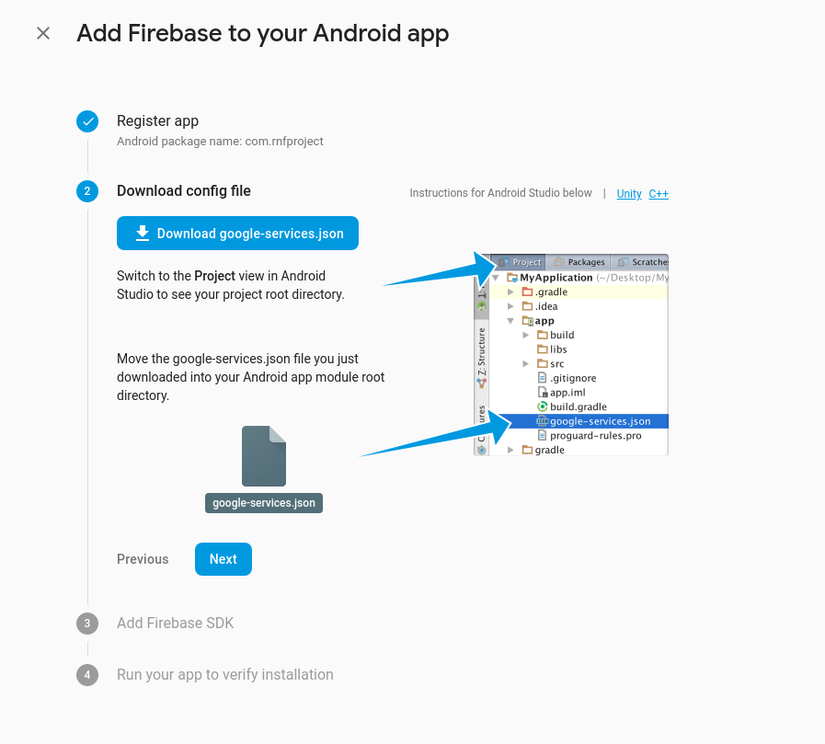
Android:
Sau khi khai báo package name và SHA1 tạm được generate từ debug.keystore, bạn sẽ có file json như sau :
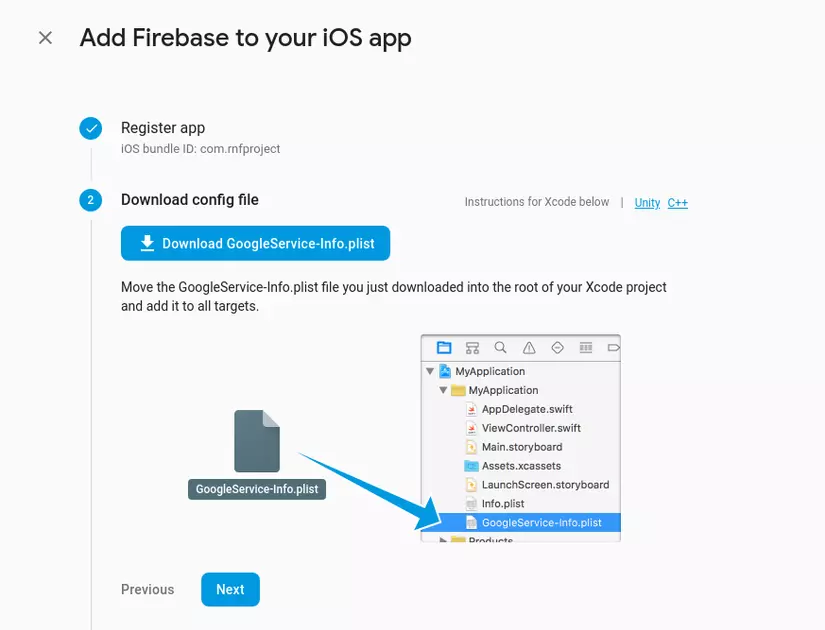
iOS:
Sau khi điền bundle Id, tải file .plist về và để vào folder ios trong project của bạn nhé. (Xem lại ảnh ở trên )
Làm xong các bạn chuyển đến bước số 3
3. Cài đặt Firebase
Android
Chúng ta thiết lập ở các file build.gradle của app và của project android. Các bạn chú ý nhé , có 2 file đó =))
app/build.gradle
Thêm một số dòng sau, mình đang dùng firebase lib bản mới nhất:
    implementation 'com.google.firebase:firebase-core:16.0.4'
    implementation 'com.google.firebase:firebase-messaging:17.3.4'

    //cuối file bạn thêm
    apply plugin: 'com.google.gms.google-services'
Chỉnh sửa lại một chút nếu như react-native của bạn đang ở version mới nhất : "0.57.8" thì làm như sau :
compile "com.facebook.react:react-native:+"
Chuyển thành :
compile ("com.facebook.react:react-native:0.55.4") { force = true }
Vì lúc mình chạy trên bản mới nhất simulator báo lỗi **notmatching của 2 version Javascript 0.55.4 và React Native 0.57.8 ** 
Hơi rắc rối chút nhưng sắp xong bước này rồi. =))
build.gradle
Thêm dòng này :
classpath 'com.google.gms:google-services:4.0.1'
Như vậy là xong với app Android, mình chuyển sang iOS nhé
iOS
1. Tạo APN Authen Key
Click project iOS > Project Settings > Cloud Messaging. Bạn sẽ thấy như hình ảnh :
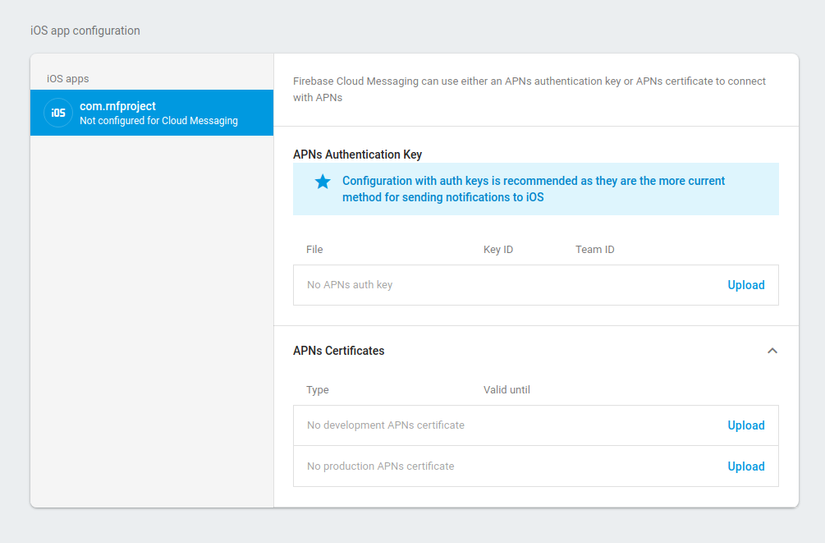
Bạn cần upload file APNS .p12 lên và cần có tài khoản developer của Apple, nếu chưa có thì tạm bỏ qua bước này
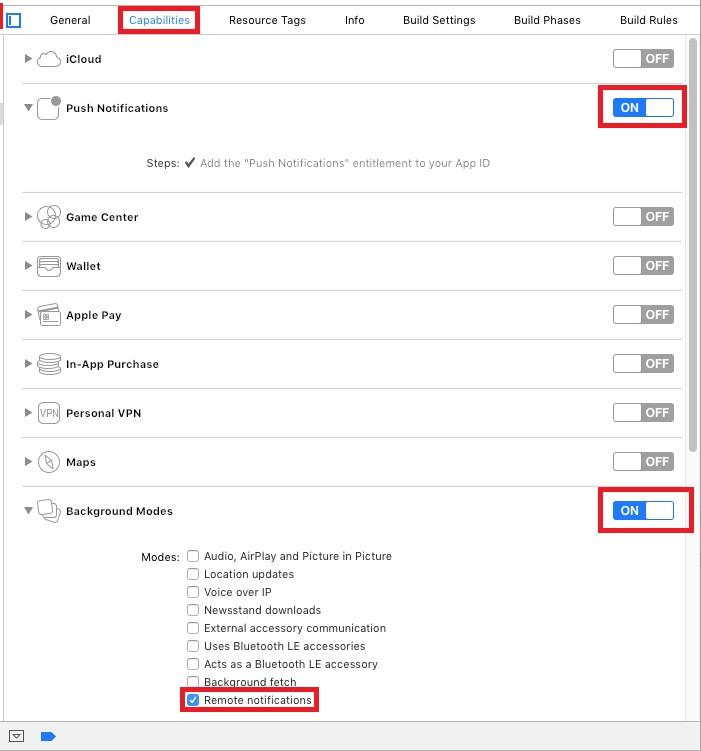
2. Setting notification trên Xcode
Trong Podfile sửa như sau :
# Uncomment the next line to define a global platform for your project
platform :ios, '9.0'

target 'ReactPushNotifications' do
  # Uncomment the next line if you're using Swift or would like to use dynamic frameworks
  # use_frameworks!

  # Pods for ReactPushNotifications - Add these lines
  pod 'Firebase/Core'
  pod 'Firebase/Messaging'

  target 'ReactPushNotificationsTests' do
    inherit! :search_paths
    # Pods for testing
  end

end
Như vậy là chúng ta đã setting môi trường iOS, bạn nào có tài khoản iOS developer thì chắc chắn hoàn thiện bước này khá đơn giản, ngược lại ai đang làm Android thì bước trên cũng rất đơn giản. Nhưng không sao chúng ta đều sang bước sau vì đây mới thực sự là react native nha.
4. Cài đặt RNFirebase
Chạy lệnh cài đặt : npm install --save react-native-firebase
Chạy lệnh link tới native :react-native link react-native-firebase
Android :
Đi tới file MainApplication.java và thêm dòng cài đặt firebase message như sau :
@Override
protected List<ReactPackage> getPackages() {
  return Arrays.<ReactPackage>asList(
 new MainReactPackage(),
 new RNFirebasePackage(),
 new RNFirebaseMessagingPackage(),
 new RNFirebaseNotificationsPackage()
 );
}
Khai báo import :
import io.invertase.firebase.RNFirebasePackage;
import io.invertase.firebase.messaging.RNFirebaseMessagingPackage;
import io.invertase.firebase.notifications.RNFirebaseNotificationsPackage;
trong file settings.gradle nếu bạn thấy chưa có thì thêm vào như sau, đề phòng việc link native ở trên bị thiếu nhé
include ':react-native-firebase'
project(':react-native-firebase').projectDir = new File(rootProject.projectDir, '../node_modules/react-native-firebase/android')
Trong build gradle thêm khai báo transitive :
 compile(project(':react-native-firebase')) {
       transitive = false
   }
Đến đây bạn chạy lệnh :react-native run-android
Việc chạy ứng dụng Android thành công nghĩa là việc kết nối với project Firebase đã hoàn thành
iOS
Thêm thư viện RNFirebase.xcodeproj
Chuột phải Libraries > Add Files To <RNFProject>. Navigate to <RNFProject>/nodemodules/react-native-firebase/ios/. Select RNFirebase.xcodeproj , click Add
Thêm thư viện UserNotifications.framework bắt buộc với iOS 10
Thêm libRNFirebase.a
Thêm value trong build setting :
$(SRCROOT)/../node_modules/react-native-firebase/ios/RNFirebase
Ok giờ bạn clear cache và rebuild project nhé.
Tiếp tục,
Trong file AppDelegate.h:
#import <UIKit/UIKit.h>
#import <UserNotifications/UserNotifications.h>

@interface AppDelegate : UIResponder <UIApplicationDelegate, UNUserNotificationCenterDelegate>
@property (nonatomic, strong) UIWindow *window;

@end
AppDelegate.m:
Sửa lại một chút như sau
#import "AppDelegate.h"
#import <Firebase.h>
#import "RNFirebaseNotifications.h"
#import "RNFirebaseMessaging.h"

#import <React/RCTBundleURLProvider.h>
#import <React/RCTRootView.h>

@implementation AppDelegate

- (BOOL)application:(UIApplication *)application didFinishLaunchingWithOptions:(NSDictionary *)launchOptions
{
  NSURL *jsCodeLocation;

  //Add these 3 lines
  [FIRApp configure];
  [[UNUserNotificationCenter currentNotificationCenter] setDelegate:self];
  [RNFirebaseNotifications configure];

  jsCodeLocation = [[RCTBundleURLProvider sharedSettings] jsBundleURLForBundleRoot:@"index" fallbackResource:nil];

  RCTRootView *rootView = [[RCTRootView alloc] initWithBundleURL:jsCodeLocation
                                                      moduleName:@"agiledefense"
                                               initialProperties:nil
                                                   launchOptions:launchOptions];
  rootView.backgroundColor = [[UIColor alloc] initWithRed:1.0f green:1.0f blue:1.0f alpha:1];

  self.window = [[UIWindow alloc] initWithFrame:[UIScreen mainScreen].bounds];
  UIViewController *rootViewController = [UIViewController new];
  rootViewController.view = rootView;
  self.window.rootViewController = rootViewController;
  [self.window makeKeyAndVisible];
  return YES;
}

- (void)application:(UIApplication *)application didReceiveRemoteNotification:(nonnull NSDictionary *)userInfo
fetchCompletionHandler:(nonnull void (^)(UIBackgroundFetchResult))completionHandler{
  [[RNFirebaseNotifications instance] didReceiveRemoteNotification:userInfo fetchCompletionHandler:completionHandler];
}

- (void)application:(UIApplication *)application didRegisterUserNotificationSettings:(UIUserNotificationSettings *)notificationSettings {
  [[RNFirebaseMessaging instance] didRegisterUserNotificationSettings:notificationSettings];
}

-(void) userNotificationCenter:(UNUserNotificationCenter *)center didReceiveNotificationResponse:(UNNotificationResponse *)response withCompletionHandler:(void (^)(void))completionHandler {

  [[RNFirebaseMessaging instance] didReceiveRemoteNotification:response.notification.request.content.userInfo];
  completionHandler();
}

@end
Như vậy là việc xử lý dưới client cũng đã sắp hoàn thành, bây giờ đến việc nhận Notification nữa là xong rồi.
Trong file App.js sửa lại một chút như sau, để việc hỏi quyền truy cập từ người dùng và đăng kí token gửi - nhận notification và lắng nghe firebase gửi dữ liệu message đến
App.js
import React, {Component} from 'react';
import { AsyncStorage } from 'react-native';
import firebase from 'react-native-firebase';

export default class App extends Component {

async componentDidMount() {
        this.checkPermission();
        this.createNotificationListeners();
    }

    //1
    async checkPermission() {
        const enabled = await firebase.messaging().hasPermission();
        if (enabled) {
            this.getToken();
        } else {
            this.requestPermission();
        }
    }

    //3
    async getToken() {
        let fcmToken = await AsyncStorage.getItem('fcmToken', value);
        if (!fcmToken) {
            fcmToken = await firebase.messaging().getToken();
            if (fcmToken) {
                // user has a device token
                await AsyncStorage.setItem('fcmToken', fcmToken);
            }
        }
    }

    //2
    async requestPermission() {
        try {
            await firebase.messaging().requestPermission();
            // User has authorised
            this.getToken();
        } catch (error) {
            // User has rejected permissions
            console.log('permission rejected');
        }
    }

    render() {
        return (
            <View style={{flex: 1}}>
                <Text>Welcome to React Native!</Text>
            </View>
        );
    }
    ////////////////////// Add these methods //////////////////////

    //Remove listeners allocated in createNotificationListeners()
    componentWillUnmount() {
        this.notificationListener();
        this.notificationOpenedListener();
    }

    async createNotificationListeners() {
        /*
        * Triggered when a particular notification has been received in foreground
        * */
        this.notificationListener = firebase.notifications().onNotification((notification) => {
            const { title, body } = notification;
            this.showAlert(title, body);
        });

        /*
        * If your app is in background, you can listen for when a notification is clicked / tapped / opened as follows:
        * */
        this.notificationOpenedListener = firebase.notifications().onNotificationOpened((notificationOpen) => {
            const { title, body } = notificationOpen.notification;
            this.showAlert(title, body);
        });

        /*
        * If your app is closed, you can check if it was opened by a notification being clicked / tapped / opened as follows:
        * */
        const notificationOpen = await firebase.notifications().getInitialNotification();
        if (notificationOpen) {
            const { title, body } = notificationOpen.notification;
            this.showAlert(title, body);
        }
        /*
        * Triggered for data only payload in foreground
        * */
        this.messageListener = firebase.messaging().onMessage((message) => {
            //process data message
            console.log(JSON.stringify(message));
        });
    }

    showAlert(title, body) {
        Alert.alert(
            title, body,
            [
                { text: 'OK', onPress: () => console.log('OK Pressed') },
            ],
            { cancelable: false },
        );
    }
}
5. Tổng kết
Như vậy mình và các bạn đã thử setup RNFirebase cho việc gửi nhận notification xong rồi. Hy vọng với những thao tác trên mọi người có thêm cái nhìn mới cả về Android và iOS khi xử lý trên React Native, mong rằng sắp tới các bạn áp dụng thật tốt vào dự án của riêng mình nhé !
All rights reserved
