MVVM (Model View ViewModel) + Kotlin + Google Jetpack
Bài đăng này đã không được cập nhật trong 6 năm
Bài đăng này sẽ dựa trên các Android architecture components bởi Google's Android Jetpack được Google công bố chính thức trong I/O năm 2017.
ANDROID JETPACK là một tập hợp các components để phát triển ứng dụng Android tuyệt vời. Nó cung cấp các đoạn code hạ tầng chung vào những gì làm cho ứng dụng.
Các features chính của Architecture sẽ bao gồm:
- MVVM (KOTLIN)
* Navigation Architecture component
Tôi sẽ sử dụng git project này làm ví dụ. Project này bao gồm hai màn hình, màn hình đầu tiên hiển thị tất cả các trending git repositories và màn hình thứ hai sẽ hiển thị chế độ xem chi tiết của từng repository.
LET’S GET STARTED
MVVM viết tắt của Model View ViewModel. Đây là một trong những desgin patten tốt nhất có thể được sử dụng để phát triển ứng dụng Android, nhưng điều làm cho MVVM mạnh hơn là các thành phần mà chứng ta sẽ sử dụng ngày hôm nay từ Android Jetpack.
Kotlin + MVVM + Databinding = Dễ dàng maintainable và code hiệu quả.
Trong MVVM,
-
Model -- chứa tất cả các data classes, database classes, API và repository.
-
View -- là thành phần UI đại diện cho trạng thái hiện tại cảu thông tin mà người dùng có thể nhìn thấy.
-
ViewModel -- chứa data cần thiết trong View và chuyển dịch data được lưu trữ trong Model mà sau đó có thể có trong View. ViewModel và View được kết thông thông qua Databiding và observable Livedata
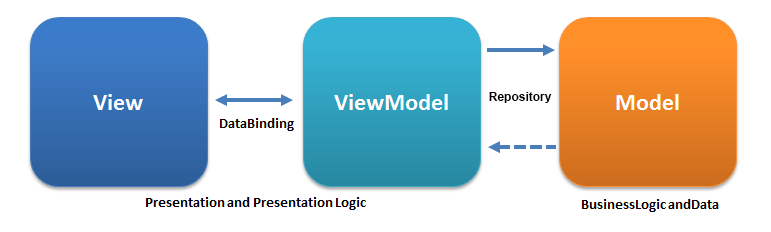
Lợi ích khi sự dụng mô hình này:
- Nó tách business logic với presentation logic.
- View không nhận biết được tất cả các logic xảy ra bên ViewModel, điều này làm cho việc ViewModel có thể sử dụng lại.
- Khi sử dùng repository giữa ViewModel và Model, ViewModel chỉ biết cách tạo data request và repository sẽ quan tâm đến cách data sẽ được tìm gọi, cho dù đó là từ API hoặc local DB.
- Vì chúng ta sử dụng ViewModel và LivaData để nhận biết vòng đời của Activity, nó sẽ dẫn đến ít crashes và memory leaks.
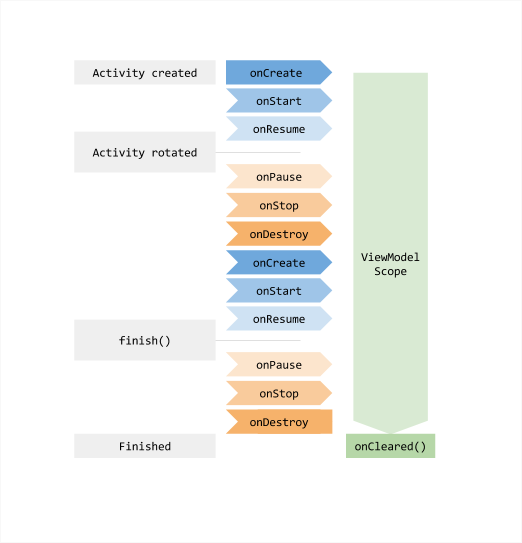
ViewModels
Class được sử dụng để lưu trữ và quản lý data liên quan đến UI theo cách có ý thức trong vòng đời. Nó cho phép data có thể tồn tại khi ta thay đổi cấu hình như xoay màn hình(configuration change). Vì vậy ngay cả khi activity được tạo lại, data vẫn sẽ tồn tại bên trong với Model claass.
LiveData
LiveData là observable data holder class. Không giống như các observables khác, nó nhận thức được vòng đời, tức là nhận nhận thức được vòng đời của các components như là activity, fragment hay services. Điều này có nghĩa là nó chỉ cập nhật các component observers khi chúng ở trạng thái vòng đời hoạt động.
DataBinding
Là library hỗ trợ cho phép chúng ta liên kết với các thành phần UI của mình từ layout với data source trong ứng dụng của chúng ta bằng cách khai báo thay vì lập trình. Chúng ta định nghĩa toàn bộ XML trong thẻ <layout> </ layout>. Chúng ta dùng thẻ <variable></variable> để xác định các custom object mà sau đó có thể được sử dụng bên trong các layout views.
Navigation Component
Nó đơn giản để thực hiện điều hướng các điểm đến trong ứng dụng. Theo mặc định, nó bao gồm các Fragment và Activity hỗ trợ các điểm đến.
LET’S CODE NOW
Creating a project
Hãy để chúng ta sẽ tạo một dự án mới với tên trending-git và gói id com.ankit.treinatinggit
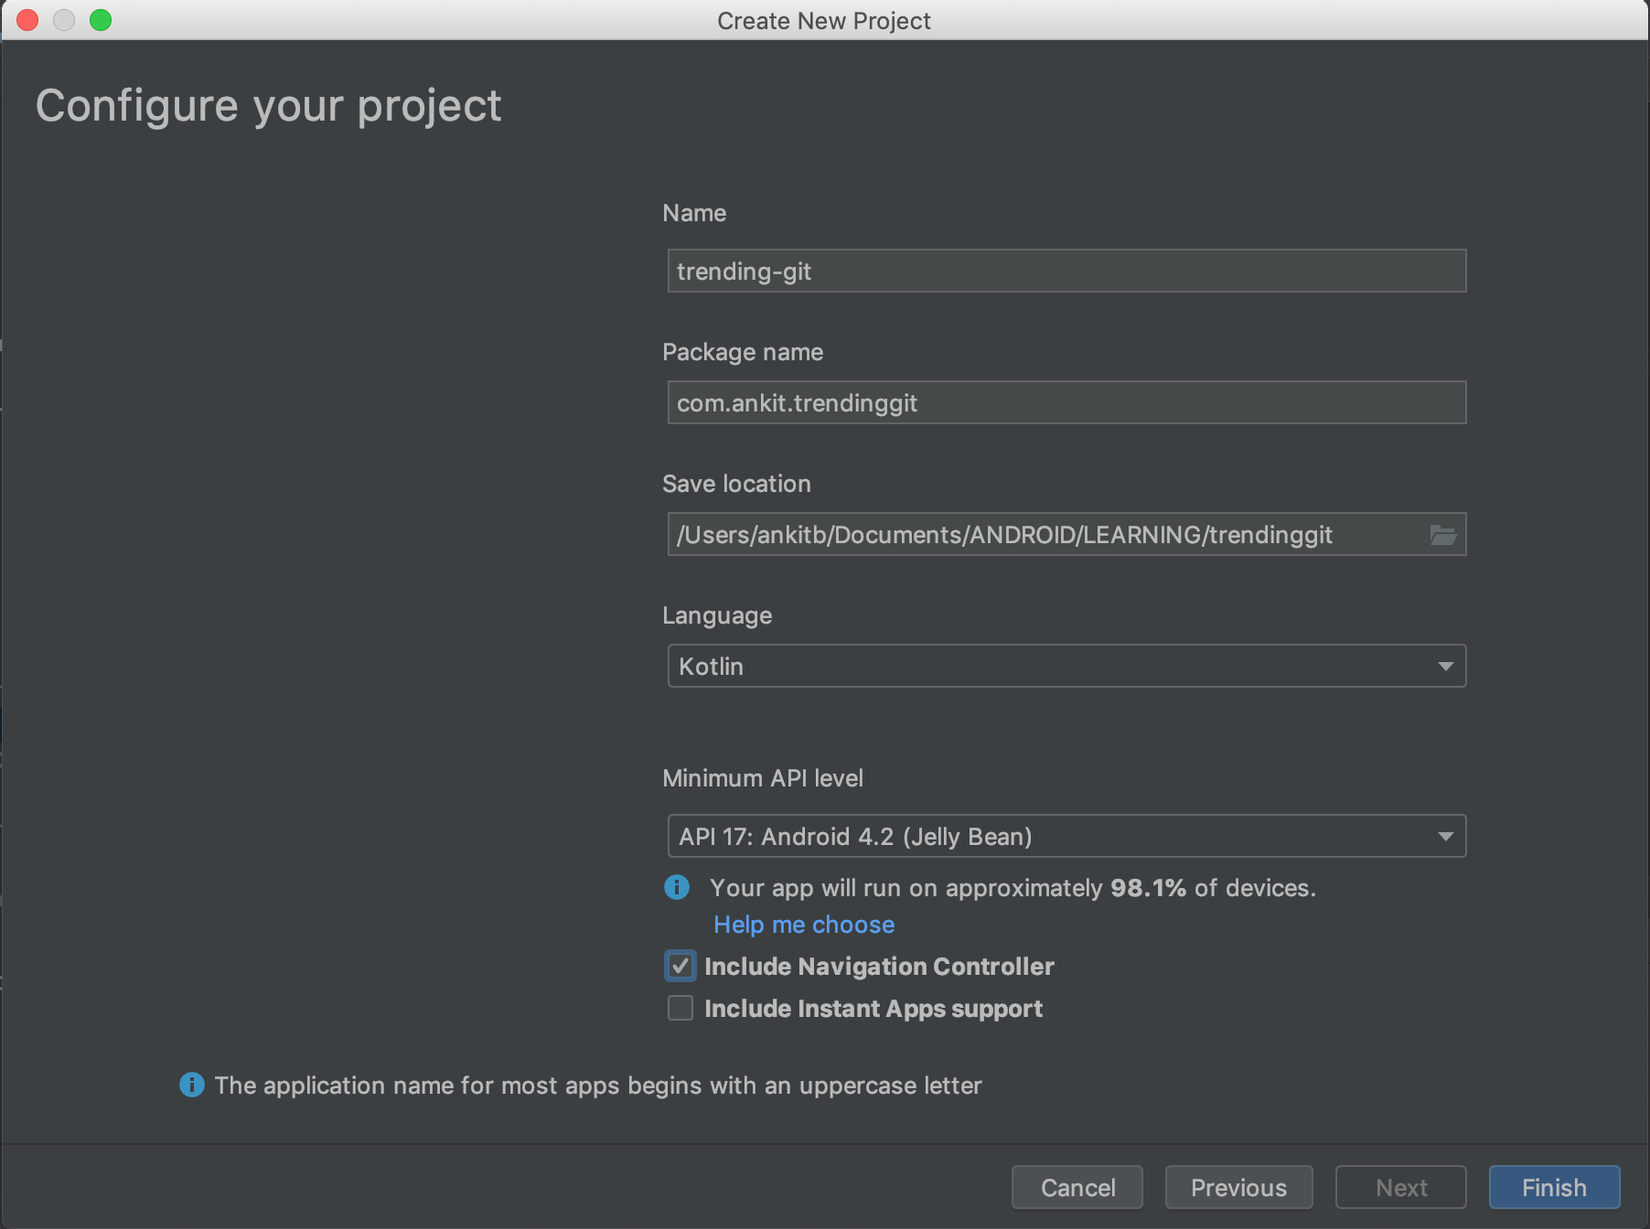
Như bạn có thể thấy chúng ta check "Include Navigation Controller", điều này sẽ bao gồm Jetpack Navigation Component trong dự án của chúng ta.
apply plugin: 'com.android.application'
apply plugin: 'kotlin-android'
apply plugin: 'kotlin-android-extensions'
apply plugin: 'androidx.navigation.safeargs'
apply plugin: 'kotlin-kapt’
android {
....
   dataBinding {
      enabled = true
    }
....
}
dependencies {
implementation"org.jetbrains.kotlin:kotlin-stdlib-jdk7:$kotlinVersion"
implementation "androidx.appcompat:appcompat:$rootProject.appCompatVersion"
implementation "androidx.constraintlayout:constraintlayout:$rootProject.constraintLayoutVersion"
// Navigation component
implementation "android.arch.navigation:navigation-fragment:$rootProject.navVersion"
implementation "android.arch.navigation:navigation-ui:$rootProject.navVersion"
implementation "android.arch.navigation:navigation-runtime-ktx:$rootProject.navVersion"
implementation "android.arch.work:work-runtime-ktx:$rootProject.workVersion"
// Anko
implementation "org.jetbrains.anko:anko:$rootProject.ankoVersion"
implementation "org.jetbrains.anko:anko-commons:$rootProject.ankoVersion"
// Retrofit
implementation "com.squareup.retrofit2:retrofit:$rootProject.retrofitVersion"
implementation "com.squareup.retrofit2:converter-gson:$rootProject.retrofitVersion"
implementation "com.squareup.okhttp3:logging-interceptor:$rootProject.okhttpVersion"
// Picasso
implementation "com.squareup.picasso:picasso:$rootProject.picassoVersion"
// Databinding compiler
kapt "com.android.databinding:compiler:$rootProject.dataBindingCompilerVersion"
}
Cập nhật project gradle file
buildscript {
ext{
kotlinVersion = '1.2.60'
navVersion = '1.0.0-alpha04'
workVersion = '1.0.0-alpha04'
ankoVersion = '0.10.5'
appCompatVersion = '1.0.0'
constraintLayoutVersion = '1.1.3'
retrofitVersion = '2.3.0'
okhttpVersion = '3.9.1'
picassoVersion = '2.71828'
dataBindingCompilerVersion = '3.2.0-alpha10'
gradleVersion = '3.3.0-alpha05'
}
repositories {
google()
jcenter()
}
dependencies {
classpath "com.android.tools.build:gradle:$gradleVersion"
classpath "org.jetbrains.kotlin:kotlin-gradle-plugin:$kotlinVersion"
classpath "android.arch.navigation:navigation-safe-args-gradle-plugin:$navVersion"
// NOTE: Do not place your application dependencies here; they belong
// in the individual module build.gradle files
   }
}
allprojects {
    repositories {
       google()
       jcenter()
    }
}
Hãy tạo file layout activity_main.xml
<?xml version="1.0" encoding="utf-8"?>
<LinearLayout xmlns:android="http://schemas.android.com/apk/res/android"
    xmlns:app="http://schemas.android.com/apk/res-auto"
    xmlns:tools="http://schemas.android.com/tools"
    android:layout_width="match_parent"
    android:layout_height="match_parent"
    android:orientation="vertical"
    tools:context=".view.ui.MainActivity">

    <com.google.android.material.appbar.AppBarLayout
        android:layout_width="match_parent"
        android:layout_height="wrap_content"
        android:theme="@style/AppTheme.AppBarOverlay">

        <androidx.appcompat.widget.Toolbar
            android:id="@+id/toolbar"
            android:layout_width="match_parent"
            android:layout_height="?attr/actionBarSize"
            android:background="?attr/colorPrimary"
            app:popupTheme="@style/AppTheme.PopupOverlay" />

    </com.google.android.material.appbar.AppBarLayout>

    <fragment
        android:id="@+id/main_nav_fragment"
        android:name="androidx.navigation.fragment.NavHostFragment"
        android:layout_width="match_parent"
        android:layout_height="match_parent"
        app:defaultNavHost="true"
        app:navGraph="@navigation/nav_graph" />
</LinearLayout>
Chúng ta hãy tạo ra một thanh toolbar và fragment container. Container này chứa các fragment sẽ được hiển thị trong ứng dụng. Tên của container là androidx.navulation.fragment.NavhostFragment vì NavHost là view trống mà điểm đến được hoán đổi khi người dùng sẽ điều hướng qua App. Thuộc tính navGraph xác địnhNavigation Graph sẽ giữ các đích đến. Thuộc tính defaultNavhost đảm bảo rằng NavhostFragment chặn nút Back hệ thống.
Bây giờ, hãy tạo file class MainActivity.kt
class MainActivity : AppCompatActivity() {

    override fun onCreate(savedInstanceState: Bundle?) {
        super.onCreate(savedInstanceState)
        setContentView(R.layout.activity_main)
        setSupportActionBar(toolbar)
        NavigationUI.setupActionBarWithNavController(this, findNavController(R.id.main_nav_fragment))
    }

    override fun onSupportNavigateUp() = findNavController(R.id.main_nav_fragment).navigateUp()
}
Trong MainActivity sau khi đặt toolbar, NavigationUI.setupActionBarWithNavController sẽ liên kết đến NavController cùng với action bar để NavController có thể cập nhật toolbar khi nguời dùng điều hướng giữa các điểm. Nhưng cập nhật này có thể giống như setup các title và các mục memu.
Cuối cùng, chúng ta đã overridden method onSupportNavigateUp(), điều này sẽ ủy quyền cho cuộc gọi button lên hệ thống với NavController.
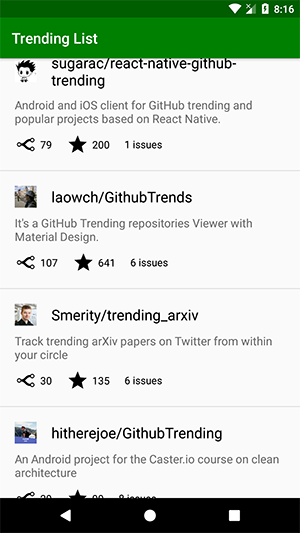
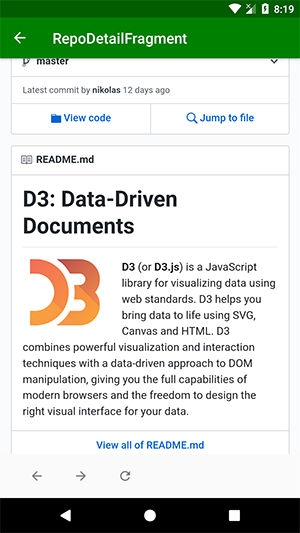
Vì ứng dụng của chúng ta có hai fragment classes, RepoListFragment và RepoDetailFragment mà chúng ta sẽ định nghĩa sau này, navigation graph trông như dưới đây.
res/navigation/nav_graph.xml
<?xml version="1.0" encoding="utf-8"?>
<navigation xmlns:android="http://schemas.android.com/apk/res/android"
    xmlns:app="http://schemas.android.com/apk/res-auto"
    xmlns:tools="http://schemas.android.com/tools"
    android:id="@+id/mobile_navigation"
    app:startDestination="@id/repoListFragment">
    <fragment
        android:id="@+id/repoListFragment"
        android:name="com.ankit.trendinggit.view.ui.repolist.RepoListFragment"
        android:label="Trending List"
        tools:layout="@layout/fragment_repo_list">
        <action
            android:id="@+id/action_repoListFragment_to_repoDetailFragment"
            app:destination="@id/repoDetailFragment" />
    </fragment>
    <fragment
        android:id="@+id/repoDetailFragment"
        android:name="com.ankit.trendinggit.view.ui.repodetail.RepoDetailFragment"
        android:label="RepoDetailFragment">
        <argument
            android:name="url"
            android:defaultValue="https://www.github.com"
            app:argType="string" />
    </fragment>
</navigation>
Navigation graph này là trừu tượng hóa các fragment transactions.
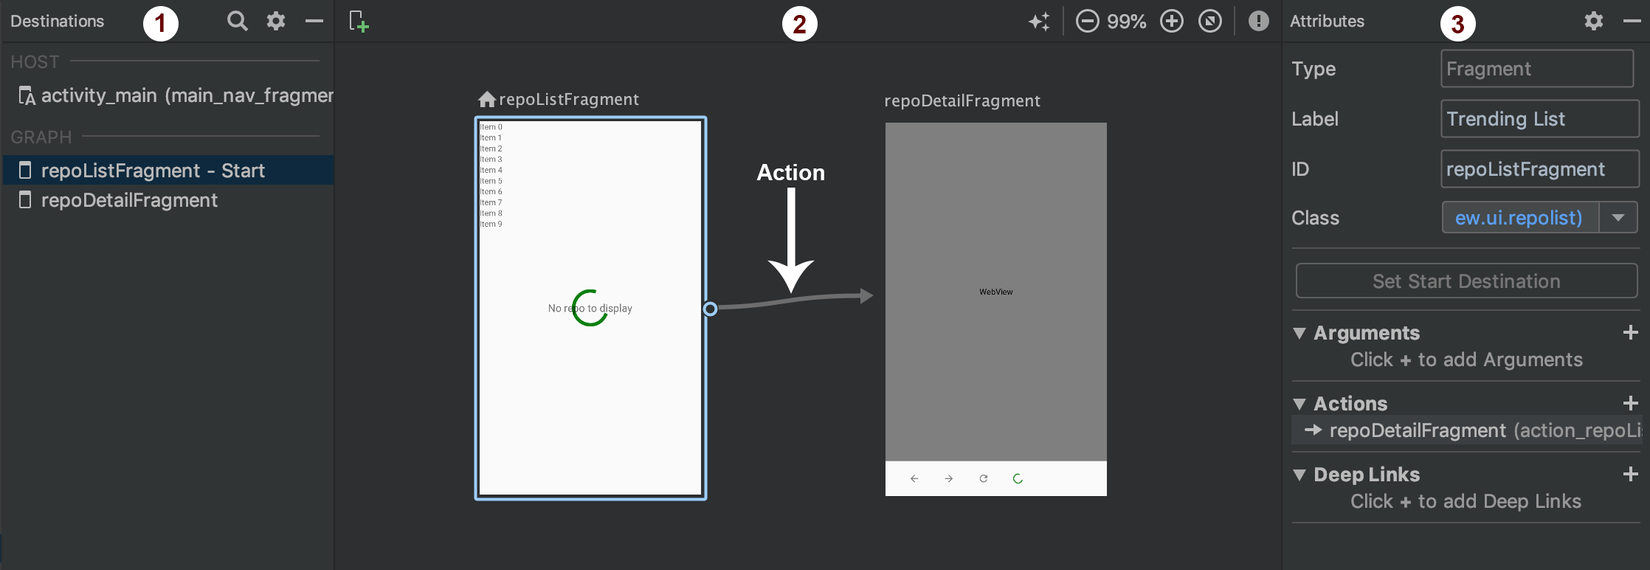
Về cơ bản, đây là UI biểu thị của navigation graph và nó xác định cách điều hướng đang diễn ra giữa các điểm đến.
Navigation graph được chia thành 3 phần:
- Destination list -- Phần bên trái , nó có hai danh sách phụ. Đầu tiên là Host, nơi chúng ta định nghĩa navigation host của mình, trong trường hợp này, nó là "main_nav_fragment" chúng ta đã định nghĩa trong file layout “activity_main.xml”. Thứ hai là Graph(Biểu đồ), trong đó có các danh sách các destinations, đó là repoListFragment, và repoDetailFragment.
- Graph Editor -- Phần giữa, biểu diễn trực quan của navigation graph.
- Attribute Editor -- Phần bên phải, chứa các thuộc tính liên quan đến destinations và actions. Action có thể được xem là dòng có mũi tên giữa đích, nó xác định cách điều hướng sẽ xảy ra. Bạn có thể xác định transition animation, launch options,, v.v. bên trong thẻ action.
Bây giờ chúng ta sẽ tạo các Fragment, Viewmodel và repository classes.
RepoListFragment.kt
private lateinit var viewDataBinding: FragmentRepoListBinding
private lateinit var adapter: RepoListAdapter

override fun onCreateView(inflater: LayoutInflater, container: ViewGroup?, savedInstanceState: Bundle?): View? {
    viewDataBinding = FragmentRepoListBinding.inflate(inflater, container, false).apply {
        viewmodel = ViewModelProviders.of(this@RepoListFragment).get(RepoListViewModel::class.java)
        setLifecycleOwner(viewLifecycleOwner)
    }
    return viewDataBinding.root
}
Khởi tạo data binding của mỗi fragment class cùng với đối tượng viewmodel nằm bên trong layout như 1 biến của đối tượng data binding. Khai báo các reference variables là lateinit, để có thể khởi tạo chúng sau này.
override fun onViewCreated(view: View, savedInstanceState: Bundle?) {
    super.onViewCreated(view, savedInstanceState)
    viewDataBinding.viewmodel?.fetchRepoList()

    setupAdapter()
    setupObservers()
}

private fun setupObservers() {
    viewDataBinding.viewmodel?.repoListLive?.observe(viewLifecycleOwner, Observer {
        adapter.updateRepoList(it)
    })

    viewDataBinding.viewmodel?.toastMessage?.observe(viewLifecycleOwner, Observer {
        activity?.longToast(it)
    })
}

private fun setupAdapter() {
    val viewModel = viewDataBinding.viewmodel
    if (viewModel != null) {
        adapter = RepoListAdapter(viewDataBinding.viewmodel!!)
        val layoutManager = LinearLayoutManager(activity)
        repo_list_rv.layoutManager = layoutManager
        repo_list_rv.addItemDecoration(DividerItemDecoration(activity, layoutManager.orientation))
        repo_list_rv.adapter = adapter
    }
}
Bên trong setupObservers() chúng ta observe 2 live data là repoListLive và toastMessage. repoListLive để cập nhật data repoList mới nhất từ data source và toastMessage chỉ để hiển thị toast message. Cuối cùng, setup adapter bên trong method setupAdapter().
fragment_repo_list.xml
<?xml version="1.0" encoding="utf-8"?>
<layout>

    <data>
        <import type="android.view.View" />
        <variable
            name="viewmodel"
            type="com.ankit.trendinggit.view.ui.repolist.RepoListViewModel" />
    </data>

    <RelativeLayout xmlns:android="http://schemas.android.com/apk/res/android"
        android:layout_width="match_parent"
        android:layout_height="match_parent">

        <androidx.recyclerview.widget.RecyclerView
            android:id="@+id/repo_list_rv"
            android:layout_width="match_parent"
            android:layout_height="match_parent"
            android:visibility="@{safeUnbox(viewmodel.dataLoading) ? View.GONE : View.VISIBLE}" />

        <ProgressBar
            style="?android:attr/progressBarStyleLarge"
            android:layout_width="match_parent"
            android:layout_height="wrap_content"
            android:layout_centerInParent="true"
            android:visibility="@{safeUnbox(viewmodel.dataLoading) ? View.VISIBLE : View.GONE}" />

        <TextView
            android:layout_width="wrap_content"
            android:layout_height="wrap_content"
            android:layout_centerInParent="true"
            android:text="No repo to display"
            android:textSize="@dimen/_18sp"
            android:visibility="@{safeUnbox(viewmodel.empty) ? View.VISIBLE : View.GONE}" />
    </RelativeLayout>
</layout>
Chúng ta dùng thẻ layout bên trong layout để cho phép data binding trong fragment. Chúng ta đã sử dụng livedata dataLoading and empty để ẩn và hiển thị các view trong layout. Bây giờ hãy sẽ xem các livedata này đang được cập nhật như thế nào trong model khi runtime.
BaseViewModel.kt
open class BaseViewModel : ViewModel() {

    val empty = MutableLiveData<Boolean>().apply { value = false }

    val dataLoading = MutableLiveData<Boolean>().apply { value = false }

    val toastMessage = MutableLiveData<String>()
}
Khởi tạo class BaseViewModel.kt này đang extend ViewModel. Chúng có thể định nghĩa live data chung bên trong base class này để có thể được sử dụng trong các class model khác trong toàn bộ ứng dụng.
RepoListViewModel.kt
class RepoListViewModel : BaseViewModel() {
    val repoListLive = MutableLiveData<List<Item>>()

    fun fetchRepoList() {
        dataLoading.value = true
        RepoRepository.getInstance().getRepoList { isSuccess, response ->
            dataLoading.value = false
            if (isSuccess) {
                repoListLive.value = response?.items
                empty.value = false
            } else {
                empty.value = true
            }
        }
    }
}
RepoListViewModel là class viewmodel cho RepoListFragment được extend từ BaseViewModel. repoListLive sẽ giữ các danh sách bài post sẽ được liệt kê trong fragment, bên trong fragment chúng ta sẽ observe livedata này. Nên khi chúng ta gọi fetchRepoList() method, nó sẽ gọi getRepoList từ repository mà chúng ta đã tạo và trong callback sẽ get lại kết quả bên trong live data, sau đó live data sẽ cập nhật observer có trong view(fragment).
RepoRepository.kt
class RepoRepository {

    // GET repo list
    fun getRepoList(onResult: (isSuccess: Boolean, response: GitResponse?) -> Unit) {

        ApiClient.instance.getRepo().enqueue(object : Callback<GitResponse> {
            override fun onResponse(call: Call<GitResponse>?, response: Response<GitResponse>?) {
                if (response != null && response.isSuccessful)
                    onResult(true, response.body()!!)
                else
                    onResult(false, null)
            }

            override fun onFailure(call: Call<GitResponse>?, t: Throwable?) {
                onResult(false, null)
            }

        })
    }

    companion object {
        private var INSTANCE: RepoRepository? = null
        fun getInstance() = INSTANCE
                ?: RepoRepository().also {
                    INSTANCE = it
                }
    }
}
Trong RepoRepository, chusng ta đang thực hiện gọi API thông qua Retrofit, khi nhận được kết quả, nó sẽ gửi lại data thông qua callback function onResult.
Một Repository có thể có các data source khác nhau nhưng ở đây chúng ta chỉ có duy nhất data source thông qua gọi retrofit API.
RepoListAdapter.kt
class RepoListAdapter(private val repoListViewModel: RepoListViewModel) : RecyclerView.Adapter<RepoListViewHolder>() {
    var repoList: List<Item> = emptyList()

    override fun onCreateViewHolder(parent: ViewGroup, viewType: Int): RepoListViewHolder {
        val inflater = LayoutInflater.from(parent.context)
        val dataBinding = ViewRepoListItemBinding.inflate(inflater, parent, false)
        return RepoListViewHolder(dataBinding, repoListViewModel)
    }

    override fun getItemCount() = repoList.size

    override fun onBindViewHolder(holder: RepoListViewHolder, position: Int) {
        holder.setup(repoList[position])
    }

    fun updateRepoList(repoList: List<Item>) {
        this.repoList = repoList
        notifyDataSetChanged()
    }
}
Bên trong onCreateViewHoler chúng ta lại binding data cho layout view_repo_list_item.xml và truyền dataBiding và repoListViewModel object cho constructor của RepoListViewHolder class. Bên trong onBindViewHolder method, chúng ta thiết lập data cho từng list item.
method updateRepoList được sử dụng để cập nhật danh sách bên trong apdater, nó được gọi bên trong observer của repoListLive.
RepoListViewHolder.kt
class RepoListViewHolder constructor(private val dataBinding: ViewDataBinding, private val repoListViewModel: RepoListViewModel)
    : RecyclerView.ViewHolder(dataBinding.root) {

    val avatarImage = itemView.item_avatar
    fun setup(itemData: Item) {
        dataBinding.setVariable(BR.itemData, itemData)
        dataBinding.executePendingBindings()

        Picasso.get().load(itemData.owner.avatar_url).into(avatarImage);

        itemView.onClick {
            val bundle = bundleOf("url" to itemData.html_url)
            itemView.findNavController().navigate(R.id.action_repoListFragment_to_repoDetailFragment, bundle)
        }
    }
}
Trước tiên, bên trong setup method, chúng ta thiết lập itemData variable được định nghĩa bên trong databinding scope của the view_repo_list_item.xml layout, sau đó gọi executePendingBindings qua dataBinding object, cập nhật bất kỳ view nào được hiện thị rằng buộc với các variables đã được thay đổi (nó phải được gọi qua UI thread).
Bên trong item onClick, tạo một bundle với key "url" và set giá trị từ itemData và navigate đến đích tương ứng được định nghĩa bên trong thẻ <action></action> có id “action_repoListFragment_to_repoDetailFragment ” trong navigation graph nav_graph.xml
RepoDetailFragment.kt
override fun onCreateView(inflater: LayoutInflater, container: ViewGroup?, savedInstanceState: Bundle?): View? {
    return inflater.inflate(R.layout.fragment_repo_detail, container, false)
}

override fun onViewCreated(view: View, savedInstanceState: Bundle?) {
    super.onViewCreated(view, savedInstanceState)
    val url = RepoDetailFragmentArgs.fromBundle(arguments).url

    setupWebView()
    setClickListeners()

    repo_web_view.loadUrl(url)
}
Fetching url bên trong onViewCreated method bằng RepoDetailFragmentArgs.fromBundle(), đây là class được tạo tự động cho các arguments cần được truyền đến RepoDetailFragment vì đã được định nghĩa trong thẻ <argument></argument> navigation graph và sau khi nhận được url, sẽ tải lên webview.
Vì vậy, đây là thực thi cơ bản của kiến trúc MVVM bằng cách sử dụng các thành phần Kotlin và Jetpack. MVVM partern rất mạnh mẽ và vẫn đang phát triển.
Tài liệu tham khảo
https://medium.com/@er.ankitbisht/mvvm-model-view-viewmodel-kotlin-google-jetpack-f02ec7754854
All rights reserved
