Drag and Drop trong ứng dụng iOS11
Bài đăng này đã không được cập nhật trong 4 năm
Giới thiệu
Tại WWDC 2017, Apple đã đưa ra thông báo về việc hỗ trợ Drag and Drop trên iOS 11 không chỉ trong phạm vi 1 app mà còn từ app này sang app kia. Dragging giữa các app chỉ support duy nhất trên iPad . Drag and drop chỉ được hỗ trợ ở chế độ split view mode, khi mà source app và destination app được đặt cạnh nhau hay thậm chí destination app bị đóng hoàn toàn. Đấy là khi mà iPad trở thành 1 thiết bị "Pro" hơn, hiệu nặng mạnh mẽ hơn với khả năng thay thế desktop. Chính vì thế, tính năng Drag and drop sẽ trở nên cực kỳ hữu dụng. Ví dụ như app của bạn là 1 app về chỉnh sửa ảnh, sau đó bạn muốn người dùng của bạn có thể lấy bức ảnh đó sang 1 app khác để in ra hay đơn giản hơn là chỉa sẻ với mọi người.
Chuẩn bị
Do chức năng Drag and Drop hỗ trợ ở iOS >= 11.0 nên ta cần phải chuẩn bị:
- IDE XCODE >= 9.0
- Thiết bị hoặc máy ảo IPad chạy iOS11
Mô tả chương trình
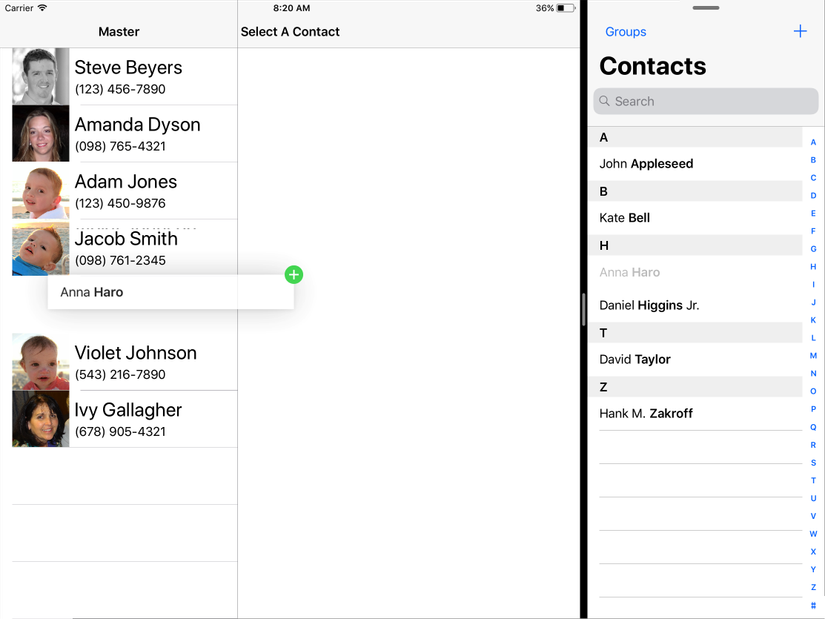
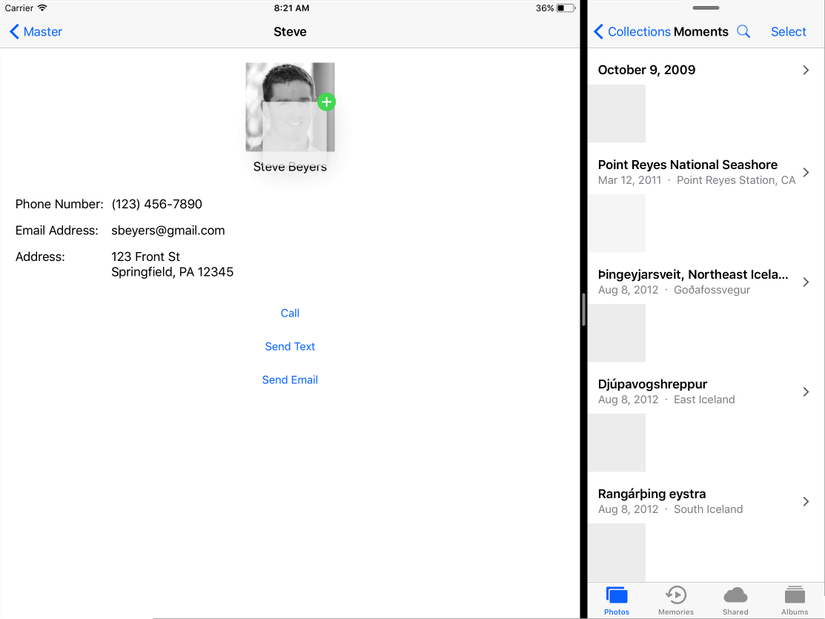
Trong bài này tôi sẽ hướng dẫn mọi người làm cách nào để implement Drag and drop trên destination app. Điều đó có nghĩa là chúng ra sẽ accept dữ liệu từ app khác mà cụ thể ở đây là nhận dữ liệu Contact từ app Contact sang ứng dụng demo, hoặc cập nhật ảnh đại diện của Contact bằng cách kéo thả ảnh từ app Photo sang.
Drag and Drop - Destination App
UITextView, UITableView and UICollectionView được Apple support built-in Drag and Drop. Trong ví dụ này chúng ta sẽ cùng tìm hiểm về việc implement Drag and Drop đối với UITableview và cả UIImageView mặc dù nó thậm chí chưa được Apple support buit in Drag and Drop
Drag and Drop - UITableView
Để enable drop action từ Drag and Drop activity trong 1 UITableView, chúng ta cần thiết lập property dropDelegate của UITableView bằng cách:
tableView.dropDelegate = self
extension MasterViewController: UITableViewDropDelegate {

}
Có 3 methods cần implement. Chúng ta sẽ đi qua từng method để tìm hiểu nhé:
- Method đầu tiên sẽ giúp chúng ta ignore Drag and Drop action nếu data không phù hợp. Ví dụ nếu muốn chỉ muốn drag and drop chỉ có text thôi thì sẽ phải check UIDropSession xem nó có chứa text hay không? Hoặc có thể ignore data dựa trên trạng thái của app hoặc bất kì tham số nào . Trong ví dụ demo, chúng ta chỉ chấp nhận contact từ app contact của device nhưng chỉ chấp nhận 1 item thôi
func tableView(_ tableView: UITableView, canHandle session: UIDropSession) -> Bool {
        return session.hasItemsConforming(toTypeIdentifiers: [kUTTypeVCard as String]) && session.items.count == 1
}
- Method thứ 2 sẽ thông báo cho system cách chúng ta muốn accept data thông qua tham số UIDropOperations , cách drop sẽ xảy ra như thế nào thông qua tham số UIDropIntent
func tableView(_ tableView: UITableView, dropSessionDidUpdate session: UIDropSession, withDestinationIndexPath destinationIndexPath: IndexPath?) -> UITableViewDropProposal {
        return UITableViewDropProposal(dropOperation: .copy, intent: .insertAtDestinationIndexPath)
}
- Method thứ 3 sẽ xử lý nốt action drop và update dữ liệu phụ thuộc vào dữ liệu được nhận. Khi xử lý action drop thì phải xử lý càng nhanh càng tốt, do đó chúng ta cần phải xử lý bất đồng bộ
func tableView(_ tableView: UITableView, performDropWith coordinator: UITableViewDropCoordinator) {
    let destinationIndexPath: IndexPath
    if let indexPath = coordinator.destinationIndexPath {
        destinationIndexPath = indexPath
    } else {
        // Get last index path of table view.
        let section = tableView.numberOfSections - 1
        let row = tableView.numberOfRows(inSection: section)
        destinationIndexPath = IndexPath(row: row, section: section)
    }

    for item: UIDragItem in coordinator.session.items {
        item.itemProvider.loadDataRepresentation(forTypeIdentifier: kUTTypeVCard as String, completionHandler: { (data, error) in
            if let data = data {
                do {
                    let newContacts = try CNContactVCardSerialization.contacts(with: data)
                    var indexPaths = [IndexPath]()

                    for (index, contact) in newContacts.enumerated() {
                        let indexPath = IndexPath(row: destinationIndexPath.row + index, section: destinationIndexPath.section)
                        indexPaths.append(indexPath)

                        let newContact = Contact(contact: contact)
                        self.contacts.insert(newContact, at: indexPath.row)
                    }

                    DispatchQueue.main.async {[weak self]() in
                        self?.tableView.insertRows(at: indexPaths, with: .automatic)
                    }
                } catch {
                    // an error occurred
                }
            }
        })
    }
}
Chúng ta cần xác định index path mà user đã drop content , sau đó insert new Contact vào array of Contact. Sau đó chúng ta sẽ update UITableView bằng cách gọi hàm insertRows của tableView trong main thread
Và kết quả là bật app lên và chạy, bạn đã có thể kéo thả contact bất kì từ app Contact sang ứng dụng của bạn rồi
Drag and Drop - UIImageView
Trong phần này chúng ta sẽ update picture của contact bằng cách kéo thả 1 image từ app khác. Ví dụ từ Photos App chẳng hạn. Điều đầu tiên cần làm đối với những view mà Apple chưa support built in Drag and Drop thì cần tạo ra drop interaction bằng việc sử dụng class UIDropInteraction . View này cũng muốn accept Drag and Drop action cũng cần phải có user interaction enabled
let dropInteraction = UIDropInteraction(delegate: self)
imageView.addInteraction(dropInteraction)
imageView.isUserInteractionEnabled = true
extension DetailViewController: UIDropInteractionDelegate {
}
- Method đầu tiền là để app quyết định xem có hay không việc handle drag and drop activity. Activity này có thể bị cancel dựa trên trạng thái của app, content type mà bạn muốn. Với ứng dụng demo của chúng ta, thì data sẽ là UIImageView vào số lượng sẽ là 1 item mà thôi. Bằng cách sử dụng canLoadObjects(ofClass:) để kiểm tra xem Object có phải là UIImage hay ko
func dropInteraction(_ interaction: UIDropInteraction, canHandle session: UIDropSession) -> Bool {
    return session.canLoadObjects(ofClass: UIImage.self) && session.items.count == 1
}
- Method thứ 2 sẽ cung cấp cho system 1 UIDropProposal để kiểm tra có phải user đang hold item bên trên UIImageView hay không. Và với vị trí này thì sẽ .copy hay .cancel
func dropInteraction(_ interaction: UIDropInteraction, sessionDidUpdate session: UIDropSession) -> UIDropProposal {
    let dropLocation = session.location(in: view)

    let operation: UIDropOperation

    if imageView.frame.contains(dropLocation) {
        operation = .copy
    } else {
        operation = .cancel
    }

    return UIDropProposal(operation: operation)
}
- Method cuối cùng là việc accept dữ liệu, update data model và UI dựa trên data mới. Chúng ta sẽ bắt đầu quá trình này bằng việc gọi 1 hàm bất đồng bộ để load UIImage.
func dropInteraction(_ interaction: UIDropInteraction, performDrop session: UIDropSession) {
    session.loadObjects(ofClass: UIImage.self) { imageItems in
        let images = imageItems as! [UIImage]
        self.imageView.image = images.first
    }
}
Sau khi implement 3 method trên, bạn có thể dễ dàng drag image từ Photo app sau đó drop để update giao diện cho contact của mình rồi:
Nguồn tham khảo:
https://ios.gadgethacks.com/how-to/drag-drop-your-iphone-ios-11-0179059/
https://developer.apple.com/documentation/uikit/views_and_controls/table_views/supporting_drag_and_drop_in_table_views
Source code: https://github.com/oLeThiVanAnh/R12_2017
All rights reserved
