TableView nâng cao trong iOS
Bài đăng này đã không được cập nhật trong 4 năm
1. Giới thiệu:
Một tính năng phổ biến trong hầu hết các ứng dụng trong thực tế là cung cấp nhiều màn hình để người dùng có thể điều hướng và làm việc với chúng. Chúng ta có thể dùng TableView với các cell có thể mở rộng, ẩn, hiện để có thể có các cách khác nhau trong việc hiển thị các màn hình của ứng dụng. Tạo một Table View mở rộng là một cách hay khi dữ liệu cần hiển thị đơn giản hoặc hiển thị thông tin theo yêu cầu cho người dùng. Ở đây chúng ta sẽ tìm hiểu 1 cách để tạo ra một TableView với các cell mở rộng chỉ trong một view controller. Trong tableView này bao gồm 3 section và mỗi section này sẽ có các cell có khả năng mở rộng hoặc chuyển đổi từ hiển thị sang ẩn. Đối với mỗi section sẽ có các cell như sau:
- Thông tin cá nhân:
- Họ tên: Hiển thị tên đầy đủ của người dùng, và khi chúng ta click vào nó thì nó có khả năng mở rộng thêm 2 cell con bên trong để người dùng có thể nhập họ và tên vào
- Ngày sinh: Hiển thị ngày sinh của người dùng, khi chúng ta click vào nó thì nó có khả năng mở rộng một date picker view để chúng ta có thể chọn ngày tháng năm sinh và một button để xác nhận ngày sinh
- Tình trạng hôn nhân: thể hiện thông tin về tình trạng hôn nhân của người dùng là đã kết hôn hay độc thân, khi click vào sẽ có một switch control để có thể chọn tình trạng hôn nhân
- Sở thích:
- Môn thể thao yêu thích: Cell này nhằm mục đích hỏi người dùng nhập vào môn thể thao ưa thích, khi chúng ta click vào nó thì nó có khả năng mở rộng với một số lựa chọn về các môn thể thao để người dùng có thể lựa chọn. Khi một lựa chọn được người dùng lựa chọn thì nó sẽ tự động cập nhật lên môn thể thao ưa thích.
- Màu sắc ưa thích: Cũng tương tự như phần lựa chọn môn thể thao ưa thích thì ở cell màu sắc yêu thích ngừoi dùng được chọn màu sắc mình yêu thích. Khi một màu được chọn nó sẽ được cập nhật vào giá trị màu sắc yêu thích.
- Kinh nghiệm:
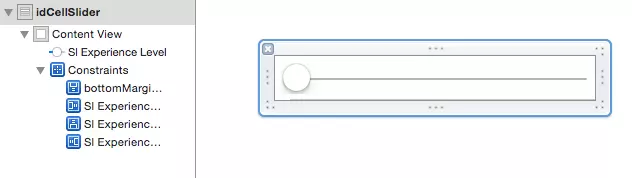
- Trình độ: có một cell trình độ khi được click vào thì nó được mở rộng là một cái slider bar cho phép user chọn trình độ kinh nghiệm giá trị trong khoảng từ 0 đến 10.
2. Thực hiện:
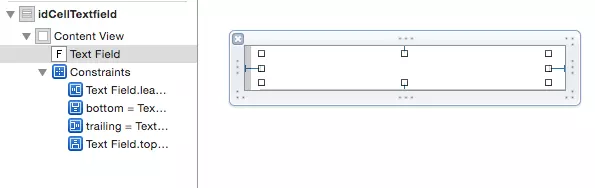
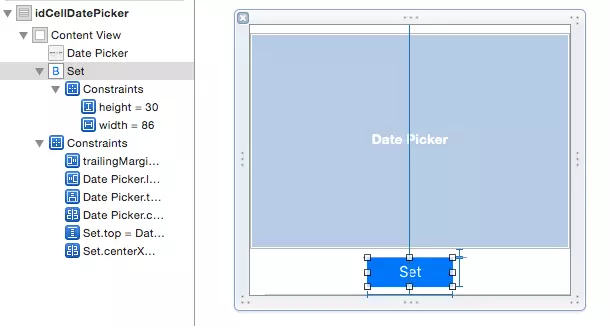
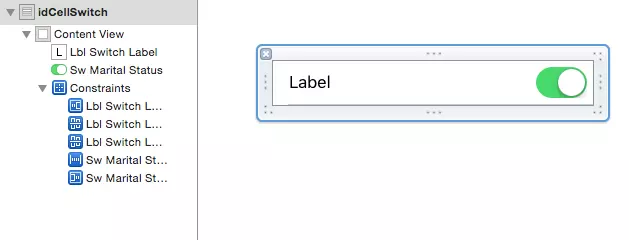
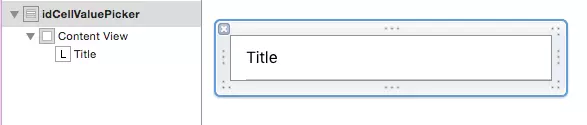
Như giới thiệu bên trên thì chúng ta có khá nhiều các loại cell dùng cho table view này, trong các bài trước tôi đã giới thiệu khá nhiều về autolayout hay kéo các constrain cộng thêm các bài viết khác về custom tableViewCell thì chúng ta hoàn toàn có thể tạo được một số cell cần thiết như hình dưới đây
- Các loại cell:
- Normal:

- Textfield:
- DatePicker:
- Switch:
- Value Picker:
- Slide :
- Normal:
Mỗi loại cell đều có một số thuộc tính riêng thể hiện việc có thể mở rộng hay không, có hiển thị hay không và giá trị text trong mỗi nhãn của cell. Đây sẽ là một bộ các thuộc tính riêng của từng cell. Đối với ứng dụng demo này tôi sẽ tạo một file plist để lưu trữ bộ các thuộc tính của từng cell. Trong file plist này sẽ có một số thuộc tính sau:
- Các thuộc tính của cell:
- expandable: (Bool) khả năng mở rộng
- expanded: (Bool) là cell mở rộng hay cell dưới. Các cell trên cùng thường là
- visible: (Bool) là cell có hiển thị hay không
- value: giữ giá trị của UI controls
- firstTitle: (String) giá trị text hiển thị ở trên label chính của cell
- secondTitle: (String) giá trị text có thể hiển thị ở các label phụ của cell
- identifier: (String) giá trị khi reuse cell
- additionalRows: Tổng số cell sẽ xuất hiện khi cell được mở rộng.
- Các thuộc tính được lưu trong 1 file plist là CellDescriptor.plist việc load dữ liệu để sử dụng khá đơn giản như sau. Trong ViewController.swift chúng ta thêm đoạn code sau:
var cellDescriptors: NSMutableArray!
override func viewWillAppear(animated: Bool) {
        super.viewWillAppear(animated)
        loadCellDescriptors()
    }
func loadCellDescriptors() {
        if let path = NSBundle.mainBundle().pathForResource("CellDescriptor", ofType: "plist") {
            cellDescriptors = NSMutableArray(contentsOfFile: path)
        }
    }
- Thông thường đối với các tableView thường thấy thfi chúng ta có 1 datasource là đã ổn tuy nhiên với mảng dữ liệu chúng ta load ra từ file plist chưa phải datasource mà chúng ta có thể sử dụng luôn. Datasource mà chúng ta cần chính là các cell có thể hiển thị. Vậy nên chúng ta cần xử lý mảng cellDescriptors để lấy ra mảng các cell hiển thị bằng cách thêm đoạn code sau:
var visibleRowsPerSection = [[Int]]()
mảng 2 chiều này sẽ lưu chỉ số của các cell có thể hiển thị của mỗi section. Chúng ta hiện thực một hàm để lấy dữ liệu từ mảng cellDescriptors bằng cách kiểm tra thuộc tính có key là "visible" như sau
func getIndicesOfVisibleRows() {
        visibleRowsPerSection.removeAll()
        for currentSectionCells in cellDescriptors {
            var visibleRows = [Int]()
            for row in 0...((currentSectionCells as! [[String: AnyObject]]).count - 1) {
                if currentSectionCells[row]["visible"] as! Bool == true {
                    visibleRows.append(row)
                }
            }
            visibleRowsPerSection.append(visibleRows)
        }
    }
Thêm hàm này vào hàm load dữ liệu
func loadCellDescriptors() {
        if let path = NSBundle.mainBundle().pathForResource("CellDescriptor", ofType: "plist") {
            cellDescriptors = NSMutableArray(contentsOfFile: path)
            getIndicesOfVisibleRows()
            tblExpandable.reloadData()
        }
    }
Sau đó gọi phương thức reloadData() của tableView. Sau khi các hàm được thực thi ta đã có mảng các cell sẽ hiển thị của các section. Sau đó là việc hiển thị các cell, để hiển thị được các cell ta cần lấy được dữ liệu của các cell trong mảng cellDescriptors dựa vào mảng các cell hiển thị visibleRowsPerSection bằng hàm sau
func getCellDescriptorForIndexPath(indexPath: NSIndexPath) -> [String: AnyObject] {
        let indexOfVisibleRow = visibleRowsPerSection[indexPath.section][indexPath.row]
        let cellDescriptor = cellDescriptors[indexPath.section][indexOfVisibleRow] as! [String: AnyObject]
        return cellDescriptor
    }
- Các phương thức delegate của UITableViewDelegate, UITableViewDataSource được thực thi tương tự các tableView khác khi đã có datasource và indexPath đã được matching với nhau:
func numberOfSectionsInTableView(tableView: UITableView) -> Int {
        if cellDescriptors != nil {
            return cellDescriptors.count
        } else {
            return 0
        }
    }

    func tableView(tableView: UITableView, numberOfRowsInSection section: Int) -> Int {
        return visibleRowsPerSection[section].count
    }

    func tableView(tableView: UITableView, titleForHeaderInSection section: Int) -> String? {
        switch section {
        case 0:
            return "Thông tin cá nhân"
        case 1:
            return "Sở Thích"
        default:
            return "Kinh nghiệm"
        }
    }

    func tableView(tableView: UITableView, heightForRowAtIndexPath indexPath: NSIndexPath) -> CGFloat {
        let currentCellDescriptor = getCellDescriptorForIndexPath(indexPath)
        switch currentCellDescriptor["identifier"] as! String {
        case "idCellNormal":
            return 60.0
        case "idCellDatePicker":
            return 270.0
        default:
            return 44.0
        }
    }

    func tableView(tableView: UITableView, cellForRowAtIndexPath indexPath: NSIndexPath) -> UITableViewCell {
        let currentCellDescriptor = getCellDescriptorForIndexPath(indexPath)
        let cell = tblExpandable.dequeueReusableCellWithIdentifier(currentCellDescriptor["identifier"] as! String, forIndexPath: indexPath) as! CustomCell
        if currentCellDescriptor["identifier"] as! String == "idCellNormal" {
            if let primaryTitle = currentCellDescriptor["firstTitle"] {
                cell.textLabel?.text = primaryTitle as? String
            }
            if let sencondTitle = currentCellDescriptor["secondTitle"] {
                cell.detailTextLabel?.text = sencondTitle as? String
            }
        } else if currentCellDescriptor["identifier"] as! String == "idCellTextfield" {
            cell.textField.placeholder = currentCellDescriptor["firstTitle"] as? String
        } else if currentCellDescriptor["identifier"] as! String == "idCellSwitch" {
            cell.lblSwitchLabel.text = currentCellDescriptor["firstTitle"] as? String
            let value = currentCellDescriptor["value"] as? String
            cell.swMaritalStatus.on = (value == "true") ? true : false
        } else if currentCellDescriptor["identifier"] as! String == "idCellValuePicker" {
            cell.textLabel?.text = currentCellDescriptor["firstTitle"] as? String
        } else if currentCellDescriptor["identifier"] as! String == "idCellSlider" {
            let value = currentCellDescriptor["value"] as! String
            cell.slExperienceLevel.value = (value as NSString).floatValue
        }
        return cell
    }
- Mở rộng và đóng các cell cũng bằng phương thức
func tableView(tableView: UITableView, didSelectRowAtIndexPath indexPath: NSIndexPath) {
        let indexOftappedRow = visibleRowsPerSection[indexPath.section][indexPath.row]
        if cellDescriptors[indexPath.section][indexOftappedRow]["expandable"] as! Bool == true {
            var shouldExpandAndShowSubRows = false
            if cellDescriptors[indexPath.section][indexOftappedRow]["expanded"] as! Bool == true {
                shouldExpandAndShowSubRows = true
            }
            cellDescriptors[indexPath.section][indexOftappedRow].setValue(shouldExpandAndShowSubRows, forPasteboardType: "expanded")
            for i in (indexOftappedRow + 1)...(indexOftappedRow + (cellDescriptors[indexPath.section][indexOftappedRow]["additionalRows"] as! Int)) {
                cellDescriptors[indexPath.section][i].setValue(shouldExpandAndShowSubRows, forPasteboardType: "visible")
            }
        } else {
            if cellDescriptors[indexPath.section][indexOftappedRow]["identifier"] as! String == "idCellValuePicker" {
                var indexOfParentCell: Int!
                for var i = indexOftappedRow - 1; i >= 0; --i {
                    if cellDescriptors[indexPath.section][i]["expandable"] as! Bool == true {
                        indexOfParentCell = i
                        break
                    }
                }
                cellDescriptors[indexPath.section][indexOfParentCell].setValue((tblExpandable.cellForRowAtIndexPath(indexPath) as! CustomCell).textLabel?.text, forKey: "firstTitle")
                cellDescriptors[indexPath.section][indexOfParentCell].setValue(false, forKey: "expanded")
                for i in (indexOfParentCell + 1)...(indexOfParentCell + (cellDescriptors[indexPath.section][indexOfParentCell]["additionalRows"] as! Int)) {
                    cellDescriptors[indexPath.section][i].setValue(false, forKey: "visible")
                }

            }
        }
        getIndicesOfVisibleRows()
        tblExpandable.reloadSections(NSIndexSet(index: indexPath.section), withRowAnimation: UITableViewRowAnimation.Fade)

    }
- Xử lý các action của user khi thay đổi các giác trị của các đối tượng:
- DatePicker
    func dateWasSelected(selectedDateString: String) {
        let dateCellSection = 0
        let dateCellRow = 3
        cellDescriptors[dateCellSection][dateCellRow].setValue(selectedDateString, forKey:"firstTitle")
        tblExpandable.reloadData()
    }
-SwitchStatus
    func maritalStatusSwitchChangedState(isOn: Bool) {
        let maritalSwitchCellSection = 0
        let maritalSwitchCellRow = 6

        let valueToStore = (isOn) ? "true" : "false"
        let valueToDisplay = (isOn) ? "Married" : "Single"

        cellDescriptors[maritalSwitchCellSection][maritalSwitchCellRow].setValue(valueToStore, forKey: "value")
        cellDescriptors[maritalSwitchCellSection][maritalSwitchCellRow - 1].setValue(valueToDisplay, forKey: "firstTitle")
        tblExpandable.reloadData()
    }
- Textfield:
    func textfieldTextWasChanged(newText: String, parentCell: CustomCell) {
        let parentCellIndexPath = tblExpandable.indexPathForCell(parentCell)
        let currentFullName = cellDescriptors[0][0]["fistTitle"] as! String
        let fullNameParts = currentFullName.componentsSeparatedByString("")
        var newFullname = ""
        if parentCellIndexPath?.row == 1 {
            if fullNameParts.count == 2 {
                newFullname = "\(newText) \(fullNameParts[1])"
            } else {
                newFullname = newText
            }
        } else {
            newFullname = "\(fullNameParts[0]) \(newText)"
        }
        cellDescriptors[0][0].setValue(newFullname, forKey: "firstTitle")
        tblExpandable.reloadData()
    }
- slider
    func sliderDidChangeValue(newSliderValue: String) {
        cellDescriptors[2][0].setValue(newSliderValue, forKey: "firstTitle")
        cellDescriptors[2][1].setValue(newSliderValue, forKey: "firstTitle")
        tblExpandable.reloadSections(NSIndexSet(index: 2), withRowAnimation: UITableViewRowAnimation.None)
    }
như vậy ta đã xử lý được các action của người dùng để có thể thay đổi dữ liệu của tableView. Trong quá trình thực hiện demo do dữ liệu khá đơn giản có nhiều chỗ tôi còn thực hiện viết code với nhiều hardcode, các bạn có thể lưu ý ở những điểm đó để cải thiện code một cách tốt nhất trong những trường hợp dữ liệu có thể phức tạp và lớn hơn nữa.All rights reserved
