iOS Animation: Bubble Animation trong iOS
Bài đăng này đã không được cập nhật trong 6 năm
I. Giới thiệu:
- Trong bài viết này, chúng ta sẽ tìm hiểu cách tạo ra một Bubble Animation trong iOS bằng ngôn ngữ Swift.
II. Tính toán quỹ đạo cho bong bóng:
-
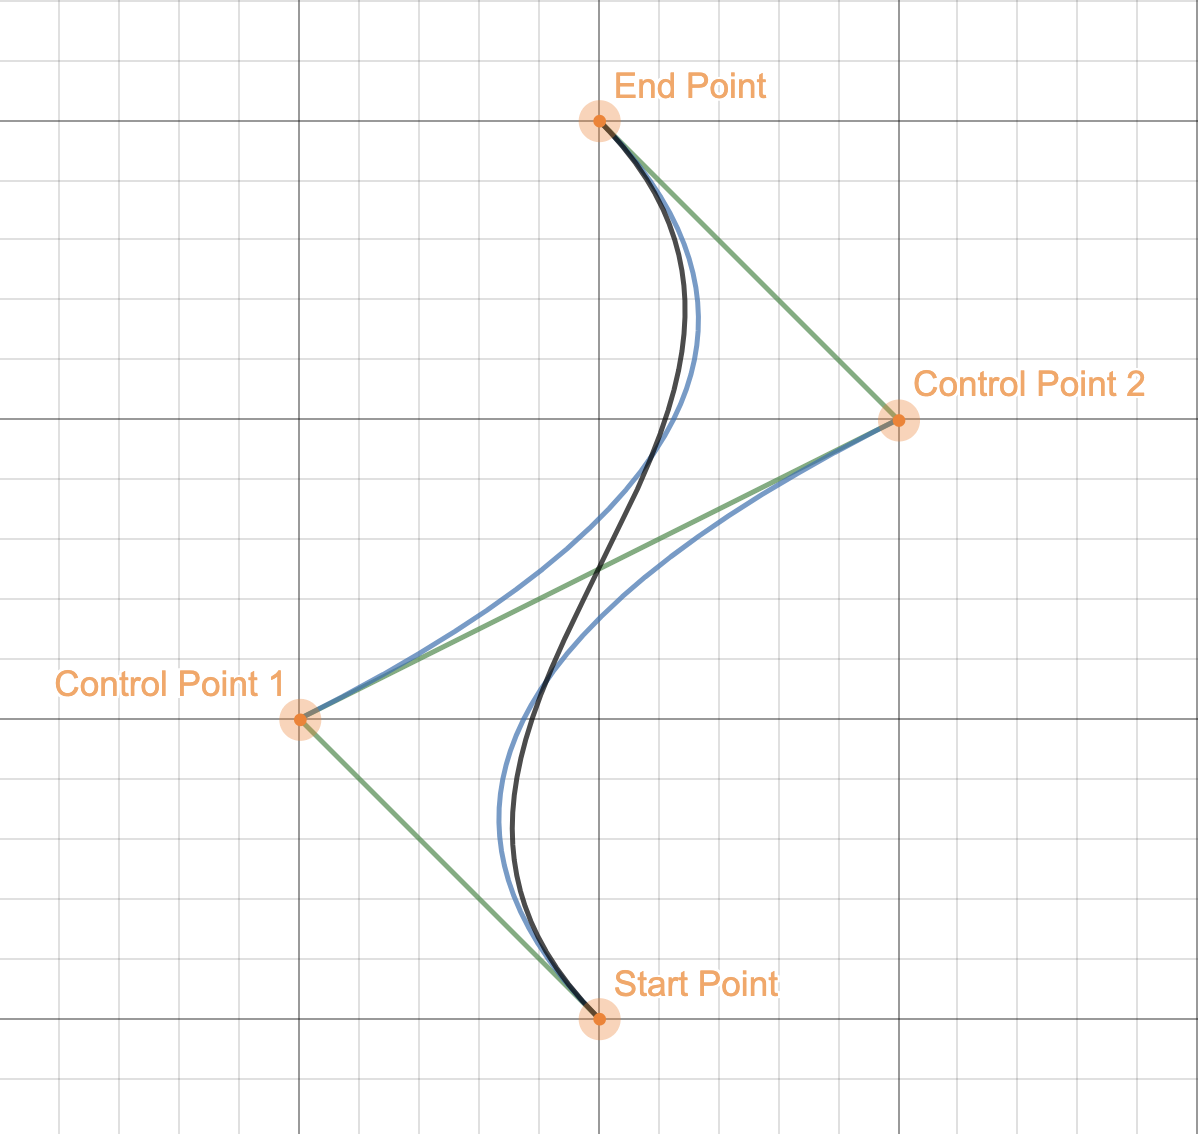
Để tạo ra quỹ đạo chuyển động cho bubble, chúng ta sử dụng UIBezierPath để vẽ đường chạy cho bubble.
![]()
-
Để tạo được một đường cong trong UIBezierPath, ta cần 4 điểm bao gồm:
- Start point
- End point
- Control point 1
- Control point 2
-
Các bạn có thể xem công thức tính toán đường cong tại đây.
let zigzagPath = UIBezierPath()
let startPoint = CGPoint(x: 100, y: 400)
let endPoint = CGPoint(x: 1000, y: 100)
let cp1 = CGPoint(x: 50, y: 300)
let cp2 = CGPoint(x: 150, y: 200)
zigzagPath.move(to: startPoint)
zigzagPath.addCurve(to: endPoint, controlPoint1: cp1, controlPoint2: cp2)
II. Tạo ảnh và animation cho ảnh:
- Tạo ảnh thực hiện animation:
let imageView = UIImageView(image: UIImage(named: "bubble"))
imageView.backgroundColor = .clear
imageView.alpha = 0.8
imageView.frame = CGRect( x: 100, y: 400, width: 50, height: 50)
addSubview(imageView)
- Khởi tạo Animation từ UIBezierPath và add cho layer của UIImageView:
// Create animation by path
let pathAnimation = CAKeyframeAnimation(keyPath: "position")
pathAnimation.duration = duration
pathAnimation.path = zigzagPath.cgPath
pathAnimation.fillMode = kCAFillModeForwards
pathAnimation.isRemovedOnCompletion = false
pathAnimation.timingFunctions = [CAMediaTimingFunction.init(name: kCAMediaTimingFunctionEaseInEaseOut)]

// Add animation for layer of UIImageView
imageView.layer.add(pathAnimation, forKey: "movingAnimation")
III. Kết quả:

All rights reserved
