Tự tạo một Play Button sử dụng SwiftUI
Bài đăng này đã không được cập nhật trong 5 năm
Giới thiệu
Tiếp tục loạt bài viết về sử dụng các hiệu ứng đồ họa của SwiftUI, trong bài viết này chúng ta sẽ xây dựng Play Button giống như trên ứng dụng Netflix
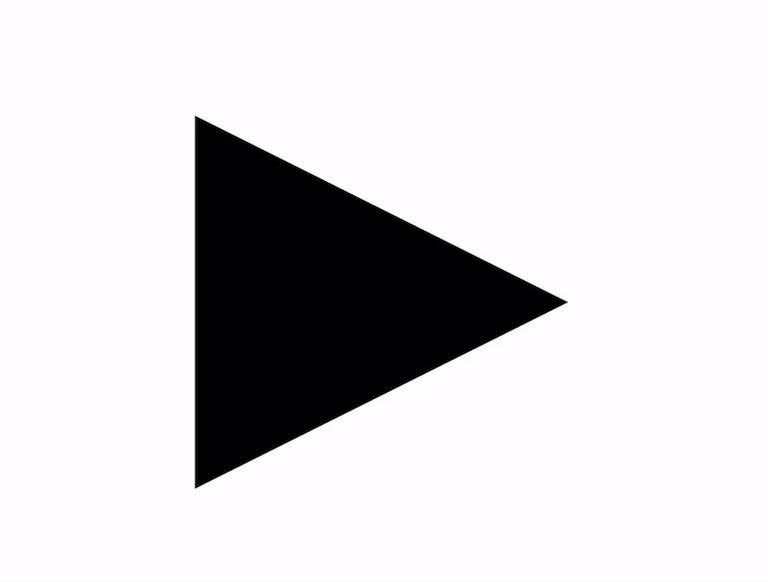
PlayButton.swift
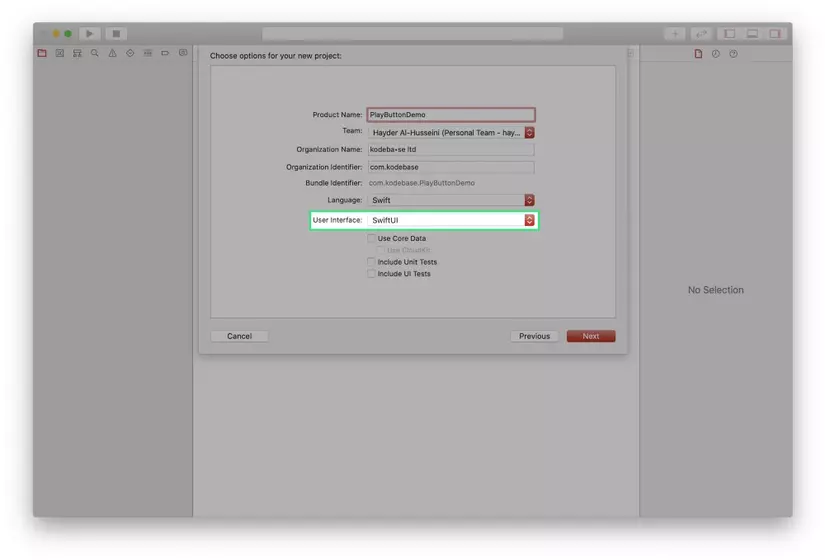
Trước hết ta sẽ tạo một Project dạng iOS Single View Application, và thiết lập tùy chọn SwiftUI cho User Interface
Ta sẽ tạo file PlayButton.swift để khai báo và định nghĩa giao diện liên quan tới Play Button cần xây dựng
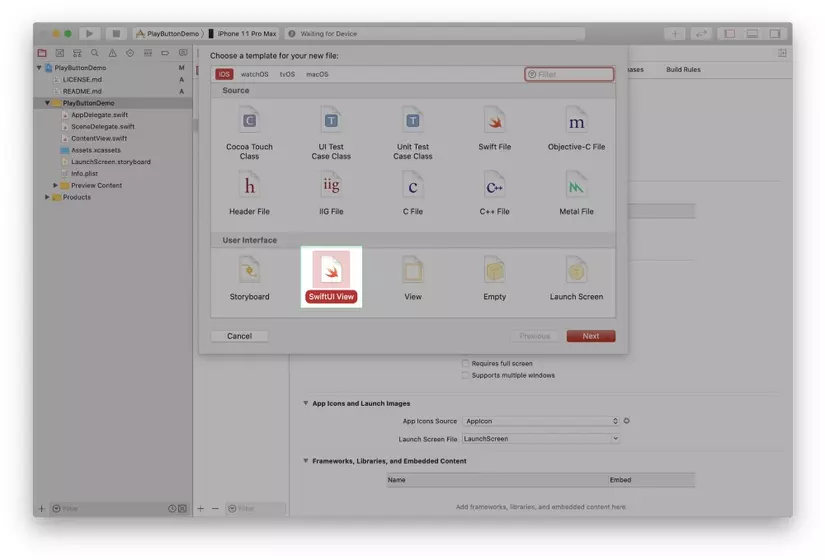
Trong file PlayButton.swift vừa tạo ta sẽ khai báo thuộc tính action, thuộc tính này sẽ lưu trữ closure hàm xử lý khi nút Play được click
var action: () -> Void
Ta tiến hành khai báo một struct PlayPauseShap với nội dung như sau:
private struct PlayPauseShape: Shape {
    func path(in rect: CGRect) -> Path {
        var path = Path()

        path.addRect(rect)
        path.closeSubpath()

        return path
    }
}
Đọan code trên sẽ vẽ một hình chữ nhật, cũng chính là giao diện của Play Button. Ngoài ra ta cần phải bổ sung thuộc tính accessible và tap gesture cho nó.
struct PlayButton: View {
    @State private var isPlaying = false

    var action: () -> Void

    var body: some View {
        PlayPauseShape(isPlaying: isPlaying)
            .accessibility(label: isPlaying ? Text("Pause") : Text("Play"))
            .accessibility(addTraits: .isButton)
            .accessibilityAction { self.performTap() }
            .animation(.easeInOut(duration: 0.3))
            .contentShape(Rectangle())
            .onTapGesture { self.performTap() }
    }

    private func performTap() {
        isPlaying.toggle()
        action()
    }
}
PlayPauseShape
Ở mục này chúng ta sẽ tiến hành phân tích animation của nút Play khi chuyển trạng thái từ Pause sang Play và ngược lại.
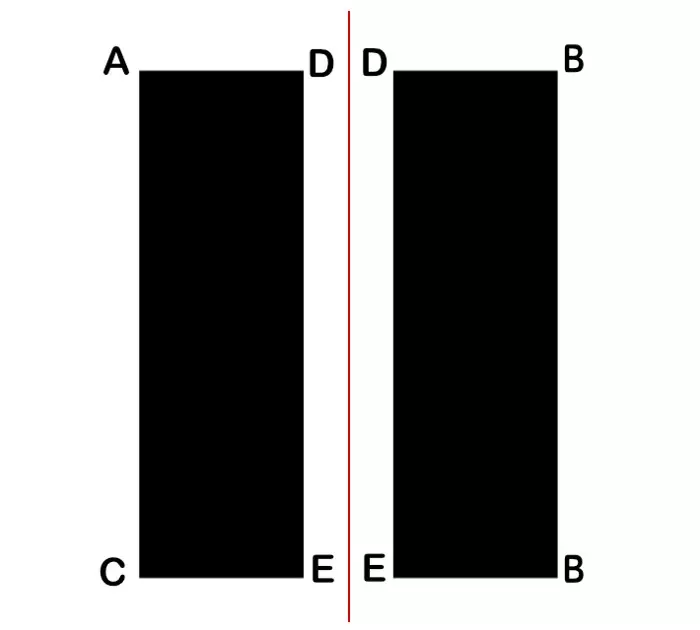
Ta sẽ tiến hành chia đôi hình tam giác của nút Play, và thực hiện phép biến đổi sang hình chữ nhật cho 2 nửa của tam giác đã chia ở trên. Bạn có thể xem hình vẽ ở dưới để dễ hình dung.
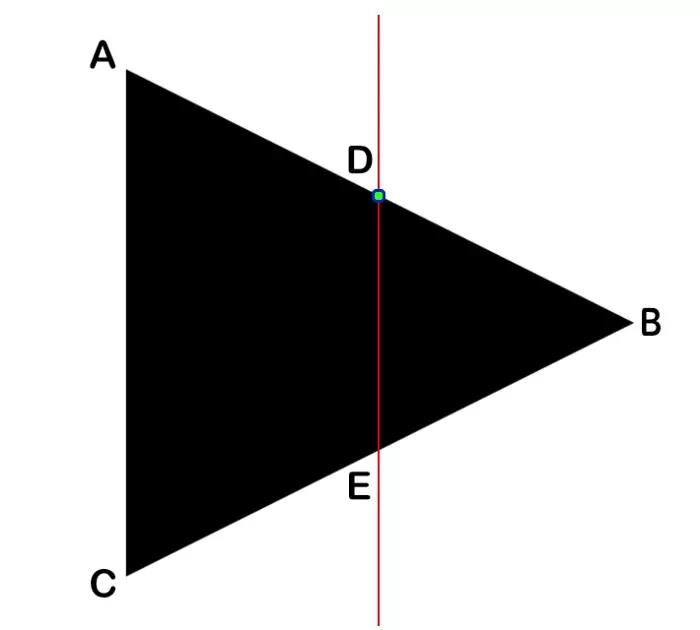
Tọa độ của các điểm trên hình trên được tính theo công thức dưới đây:
- A (0, 0)
- B (width, height * 0.5)
- M = (By - Ay)/(Bx - Ax) => M = (height * 0.5)/width
- D = (width * 0.5, Dy)
- Dy = M(Dx - Ax) + Ay => Dy = (height * 0.5)/width * (width * 0.5)
- Ey = height - Dy
Ta sẽ sử dụng Path để vẽ hình chữ nhật cho 2 nửa của nút Play. Để tạo hiệu ứng đồ họa khi vẽ 2 Path này ta sẽ dùng CABasicAnimation. Hai Path sẽ gồm các nhóm điểm sau:
- Path 1: (A, D, E, C)
- Path 2: (D, B, B, E)
let leftPauseTopLeft = CGPoint(x: ((width * 0.5) - pauseBarWidth) * 0.5, y: 0.0)
let leftPlayTopLeft = CGPoint.zero
let leftDeltaTopLeft = CGPoint(x:pauseTopLeft.x - leftPlayTopLeft.x, y: pauseTopLeft.y - leftPlayTopLeft.y)
let topLeftPoint = CGPoint(x: leftPlayTopLeft.x + (deltaTopLeft.x * t), y: leftPlayTopLeft.y + (deltaTopLeft.y * shift))

path.addLine(to: topLeftPoint)
Ta sẽ tính toán 8 điểm ở trên bằng hàm pathPoints
private func pathPoints(width: CGFloat, height: CGFloat) -> [[CGPoint]] {
    var points: [[CGPoint]] = [[]]
    var left: [CGPoint] = []
    var right: [CGPoint] = []
    let pauseBarWidth = width * barWidthFraction

    // Slope for top play line
    let m = (height * 0.5)/width

    // Y at the center of the play line
    let centerY = (width * 0.5 * m) - (height * 0.5)

    // Left side
    // Top left
    let leftPauseTopLeft = CGPoint(x: ((width * 0.5) - pauseBarWidth) * 0.5, y: 0.0)
    let leftPlayTopLeft = CGPoint.zero
    let leftDeltaTopLeft = leftPauseTopLeft - leftPlayTopLeft
    left.append(leftPlayTopLeft + (leftDeltaTopLeft * shift))

    // Top Right
    let leftPauseTopRight = CGPoint(x:leftPauseTopLeft.x + pauseBarWidth, y: 0.0)
    let leftPlayTopRight = CGPoint(x: width * 0.5, y: -centerY)
    let leftDeltaTopRight = leftPlayTopRight - leftPauseTopRight
    left.append(leftPlayTopRight - (leftDeltaTopRight * shift))

    // Bottom Right
    let leftPauseBottomRight = CGPoint(x: leftPauseTopRight.x, y: height)
    let leftPlayBottomRight = CGPoint(x: width * 0.5, y: height + centerY)
    let leftDeltaBottomRight = leftPlayBottomRight - leftPauseBottomRight
    left.append(leftPlayBottomRight - (leftDeltaBottomRight * shift))

    // Bottom Left
    let leftPauseBottomLeft = CGPoint(x: (width * 0.5 - pauseBarWidth) * 0.5, y: height)
    let leftPlayBottomLeft = CGPoint(x: 0.0, y: height)
    let leftDeltaBottomLeft = leftPlayBottomLeft - leftPauseBottomLeft
    left.append(leftPlayBottomLeft - (leftDeltaBottomLeft * shift))

    points.append(left)

    // Right side
    // Top Left
    let rightPauseTopLeft = CGPoint(x: leftPauseTopLeft.x + width * 0.5, y: leftPauseTopLeft.y)
    let rightPlayTopLeft = CGPoint(x: width * 0.5, y: -centerY)
    let rightDeltaTopLeft = rightPlayTopLeft - rightPauseTopLeft
    right.append( rightPlayTopLeft - (rightDeltaTopLeft * shift))

    // Top Right
    let rightPauseTopRight = CGPoint(x: rightPauseTopLeft.x + pauseBarWidth, y: rightPauseTopLeft.y)
    let rightPlayTopRight = CGPoint(x: width, y: height * 0.5)
    let rightDeltaTopRight = rightPlayTopRight - rightPauseTopRight
    right.append( rightPlayTopRight - (rightDeltaTopRight * shift))

    // Bottom Right
    let rightPauseBottomRight = CGPoint(x: rightPauseTopRight.x, y: height)
    let rightPlayBottomRight = rightPlayTopRight
    let rightDeltaBottomRight = rightPlayBottomRight - rightPauseBottomRight
    right.append( rightPlayBottomRight - (rightDeltaBottomRight * shift))

    // Bottom Left
    let rightPauseBottomLeft = CGPoint(x: rightPauseTopLeft.x, y: height)
    let rightPlayBottomLeft = CGPoint(x: rightPlayTopLeft.x, y: height + centerY)
    let rightDeltaBottomLeft = rightPlayBottomLeft - rightPauseBottomLeft
    right.append(rightPlayBottomLeft - (rightDeltaBottomLeft * shift))

    points.append(right)

    return points
}
Hàm pathPoints(width:height) sẽ trả về một mảng gồm 2 mảng con
- Mảng 1: Danh sách các điểm cần vẽ của nửa trái nút Play
- Mảng 1: Danh sách các điểm cần vẽ của nửa phải nút Play
Để nối các điểm ta sẽ sử dụng hàm path(in:)
func path(in rect: CGRect) -> Path {
    var path = Path()
    let allPoints = self.pathPoints(width: rect.size.width,
                                    height: rect.size.height)

    for points in allPoints {
        guard let startPoint = points.first else {
            continue
        }
        path.move(to: startPoint)

        for i in 1..<points.count {
            let point = points[i]
            path.addLine(to: point)
        }

        path.closeSubpath()
    }
    return path
}
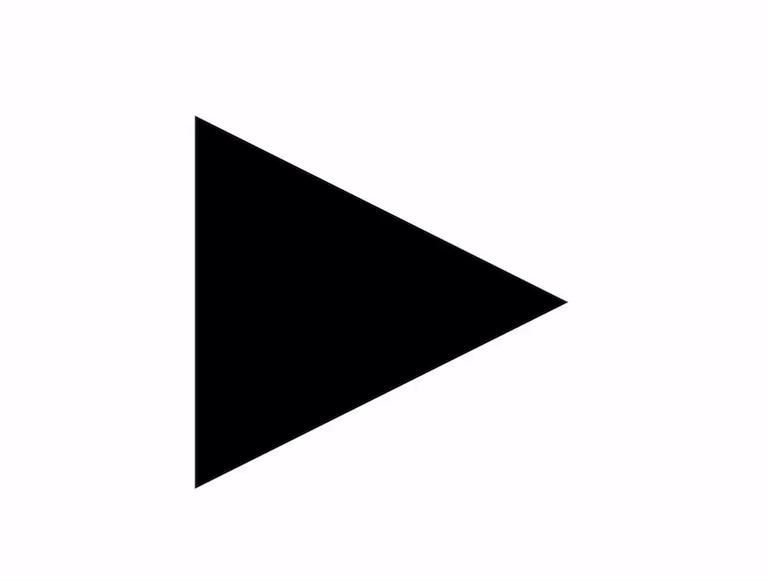
Ghép các đoạn code trên lại với nhau ta sẽ có thành quả như hình dưới đây:
Nguồn tham khảo
https://uxdesign.cc/anatomy-of-the-netflix-play-button-d45cf0eb18c6
All rights reserved