Create web notifications using Laravel and Pusher Channels
Bài đăng này đã không được cập nhật trong 7 năm
1. Giới thiệu
Khi xây dựng các ứng dụng web, không có gì lạ khi tìm thấy một số loại hệ thống thông báo trong ứng dụng sẽ thông báo cho bạn ngay lập tức khi ai đó thực hiện một hành động liên quan đến bạn hoặc tài khoản của bạn. Trên Facebook, bạn sẽ được thông báo khi ai đó thích trạng thái của bạn hoặc khi ai đó nhận xét về hồ sơ của bạn. Mình sẽ mô phỏng tính năng này bằng cách tạo một hệ thống thông báo web bằng cách sử dụng Laravel và Pusher.
2. Những cái ta sẽ xây dựng
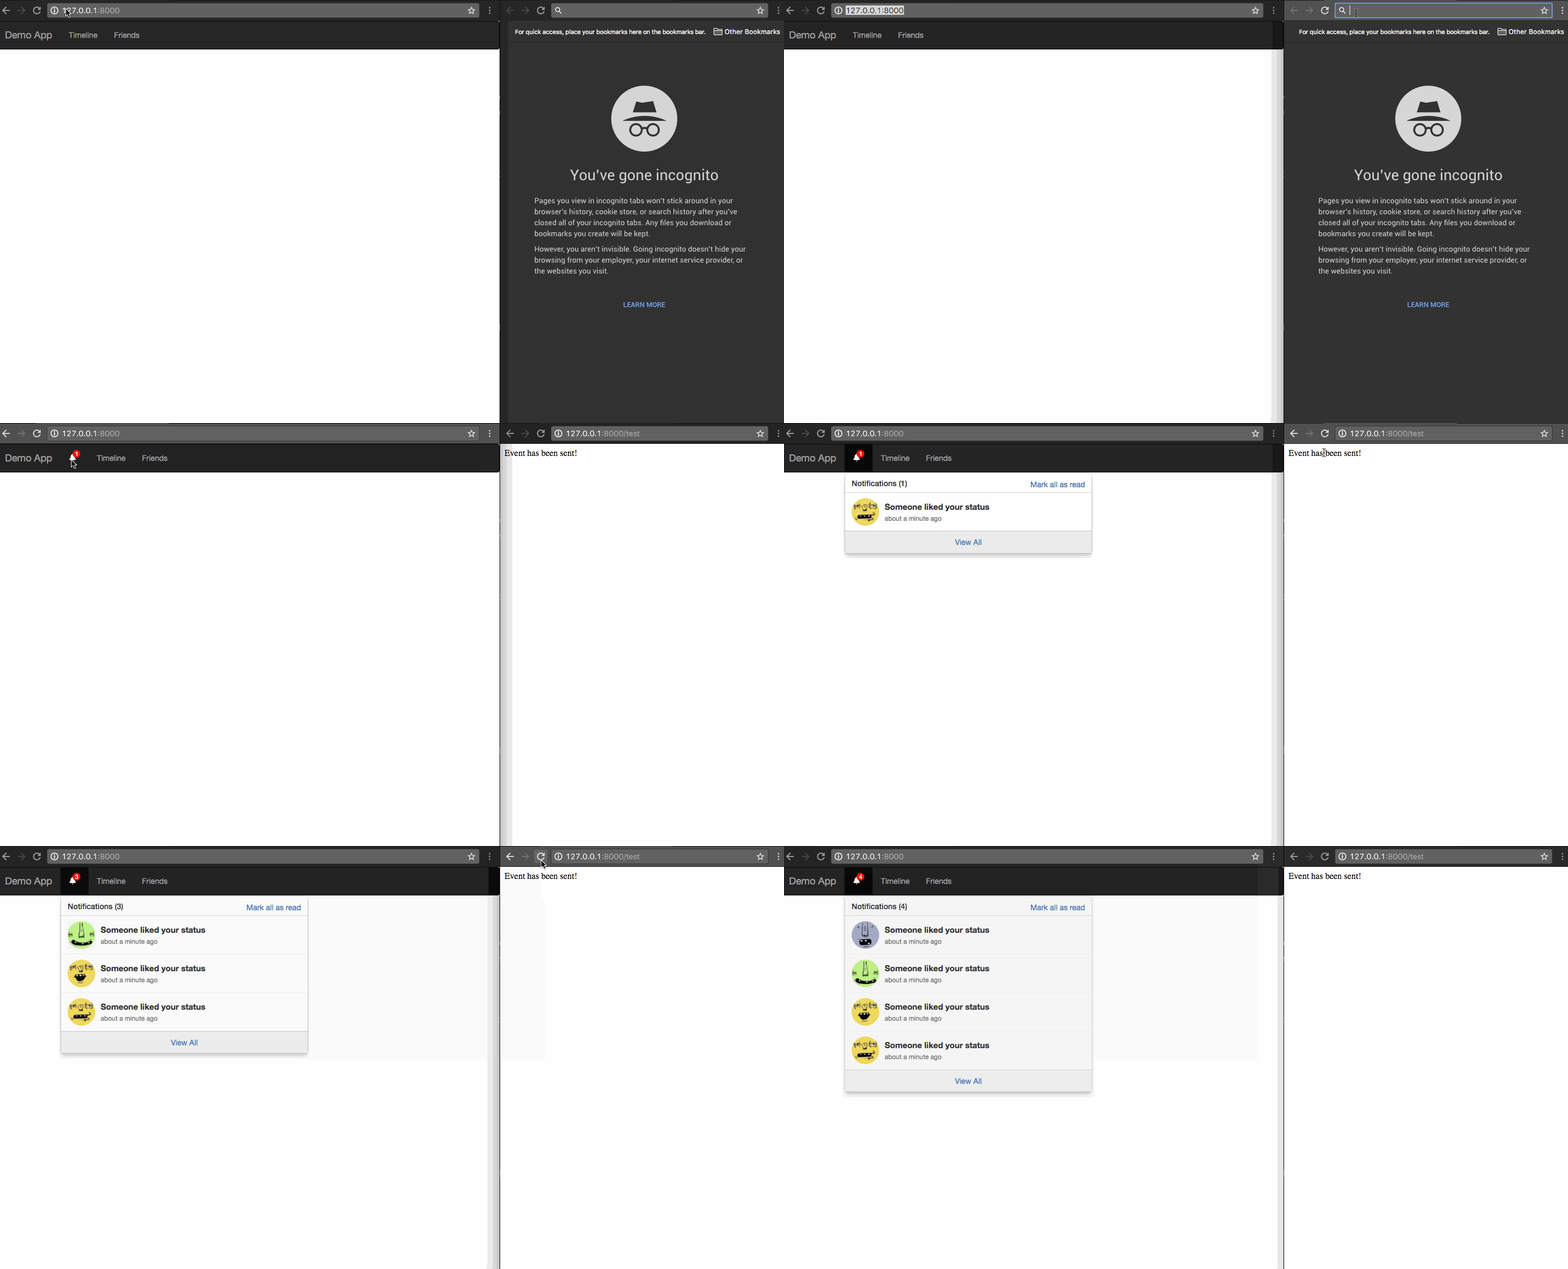
Sau hướng dẫn này, mình sẽ trình bày cách bạn có thể có một ứng dụng web nhỏ hiển thị thông báo bằng cách sử dụng Laravel và Pusher. Nó sẽ tương tự như cách các trang web như Facebook hiển thị thông báo. Ảnh demo bên dưới sau khi hoàn thành:

3. Thiết lập ứng dụng Pusher của bạn
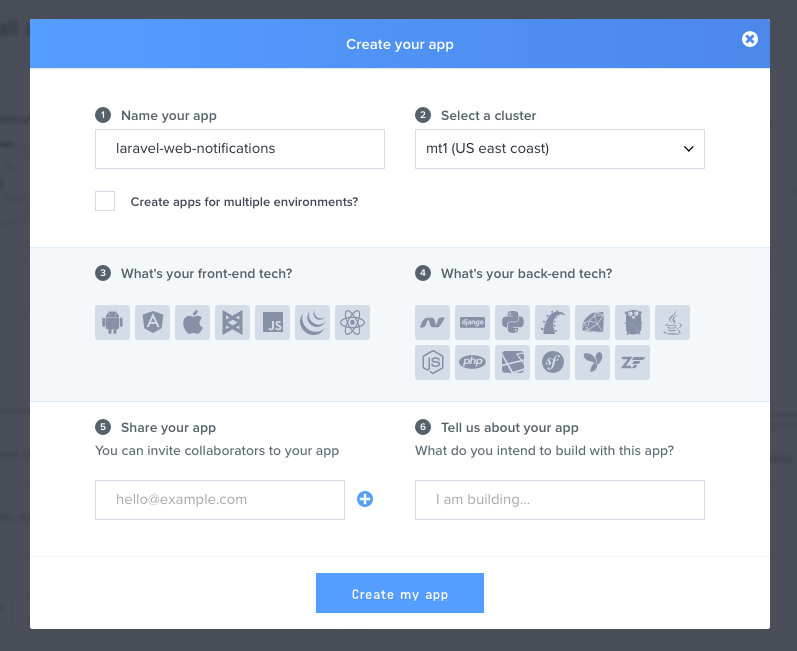
Nếu bạn chưa có tài khoản hãy tạo một tài khoản Pusher, sau đó thiết lập ứng dụng của bạn như ảnh bên dưới.

4. Thiết lập ứng dụng laravel của bạn
Sử dụng câu lệnh dưới đây để tạo ứng dụng của bạn
Đối với composer
composer create-project --prefer-dist laravel-web-notifications
Hoặc bạn đã cài laravel thì sử dụng câu lệnh sau
laravel new laravel-web-notifications
Sau đó, bạn cần cài đặt Pusher PHP SDK, bạn có thể thực hiện việc này bằng composer với câu lệnh bên dưới
composer require pusher/pusher-php-server
Khi cài đặt hoàn tất, bạn sẽ cần định cấu hình Laravel để sử dụng Pusher làm broadcast driver, để thực hiện việc này, hãy mở tệp .env có trong thư mục laravel-web-notifications. Cập nhật các giá trị để tương ứng với cấu hình bên dưới:
BROADCAST_DRIVER=pusher
// các tham số này lấy từ pusher dashboard của bạn
PUSHER_APP_ID=XXXXX
PUSHER_APP_KEY=XXXXXXX
PUSHER_APP_SECRET=XXXXXXX
Trong file config/app.php chỗ code bên dưới ta bỏ phần comment đi .
'providers' => [
        ...
         App\Providers\AuthServiceProvider::class,
        // App\Providers\BroadcastServiceProvider::class,
        App\Providers\RepositoryServiceProvider::class,
        ...
]
5. Tạo ứng dụng laravel và pusher của bạn
Bây giờ bạn đã hoàn thành cấu hình, hãy tạo ứng dụng của bạn. Đầu tiên bạn tạo một lớp Event, cái sẽ broadcast đến Pusher từ ứng dụng Laravel của bạn. Event có thể được kích hoạt từ bất cứ nơi nào trong ứng dụng.
php artisan make:event StatusLiked
Câu lệnh này sẽ tạo ra một lớp StatusLiked trong thư mục app/Event. Mở nội dung của file vừa tạo và cập nhật như sau:
<?php
namespace App\Events;
use Illuminate\Queue\SerializesModels;
use Illuminate\Foundation\Events\Dispatchable;
use Illuminate\Broadcasting\InteractsWithSockets;
use Illuminate\Contracts\Broadcasting\ShouldBroadcast;
class StatusLiked implements ShouldBroadcast
{
    use Dispatchable, InteractsWithSockets, SerializesModels;
    public $username;
    public $message;
    /**
     * Create a new event instance.
     *
     * @return void
     */
    public function __construct($username)
    {
        $this->username = $username;
        $this->message  = "{$username} liked your status";
    }
    /**
     * Get the channels the event should broadcast on.
     *
     * @return Channel|array
     */
    public function broadcastOn()
    {
        return ['status-liked'];
    }
}
Ở đoạn lệnh trên, ta đã implement interface ShouldBroadcast và điều này cho Laravel biết rằng sự kiện này sẽ được broadcast bằng bất kỳ driver nào mà bạn đã thiết lập trong file cấu hình.
6. Tạo một view cho ứng dụng
Mở tệp welcome.blade.php và thay thế nó bằng đoạn code bên dưới.
<!DOCTYPE html>
<html lang="en">
  <head>
    <meta charset="utf-8">
    <meta http-equiv="X-UA-Compatible" content="IE=edge">
    <meta name="viewport" content="width=device-width, initial-scale=1">
    <title>Demo Application</title>
    <link rel="stylesheet" href="//maxcdn.bootstrapcdn.com/bootstrap/3.3.7/css/bootstrap.min.css" integrity="sha384-BVYiiSIFeK1dGmJRAkycuHAHRg32OmUcww7on3RYdg4Va+PmSTsz/K68vbdEjh4u" crossorigin="anonymous">
    <link rel="stylesheet" type="text/css" href="/css/bootstrap-notifications.min.css">
    <!--[if lt IE 9]>
      <script src="https://oss.maxcdn.com/html5shiv/3.7.3/html5shiv.min.js"></script>
      <script src="https://oss.maxcdn.com/respond/1.4.2/respond.min.js"></script>
    <![endif]-->
  </head>
  <body>
    <nav class="navbar navbar-inverse">
      <div class="container-fluid">
        <div class="navbar-header">
          <button type="button" class="navbar-toggle collapsed" data-toggle="collapse" data-target="#bs-example-navbar-collapse-9" aria-expanded="false">
            <span class="sr-only">Toggle navigation</span>
            <span class="icon-bar"></span>
            <span class="icon-bar"></span>
            <span class="icon-bar"></span>
          </button>
          <a class="navbar-brand" href="#">Demo App</a>
        </div>
        <div class="collapse navbar-collapse">
          <ul class="nav navbar-nav">
            <li class="dropdown dropdown-notifications">
              <a href="#notifications-panel" class="dropdown-toggle" data-toggle="dropdown">
                <i data-count="0" class="glyphicon glyphicon-bell notification-icon"></i>
              </a>
              <div class="dropdown-container">
                <div class="dropdown-toolbar">
                  <div class="dropdown-toolbar-actions">
                    <a href="#">Mark all as read</a>
                  </div>
                  <h3 class="dropdown-toolbar-title">Notifications (<span class="notif-count">0</span>)</h3>
                </div>
                <ul class="dropdown-menu">
                </ul>
                <div class="dropdown-footer text-center">
                  <a href="#">View All</a>
                </div>
              </div>
            </li>
            <li><a href="#">Timeline</a></li>
            <li><a href="#">Friends</a></li>
          </ul>
        </div>
      </div>
    </nav>
    <script src="//cdnjs.cloudflare.com/ajax/libs/jquery/2.1.4/jquery.min.js"></script>
    <script src="//js.pusher.com/3.1/pusher.min.js"></script>
    <script src="//maxcdn.bootstrapcdn.com/bootstrap/3.3.7/js/bootstrap.min.js" integrity="sha384-Tc5IQib027qvyjSMfHjOMaLkfuWVxZxUPnCJA7l2mCWNIpG9mGCD8wGNIcPD7Txa" crossorigin="anonymous"></script>
    <script type="text/javascript">
      var notificationsWrapper   = $('.dropdown-notifications');
      var notificationsToggle    = notificationsWrapper.find('a[data-toggle]');
      var notificationsCountElem = notificationsToggle.find('i[data-count]');
      var notificationsCount     = parseInt(notificationsCountElem.data('count'));
      var notifications          = notificationsWrapper.find('ul.dropdown-menu');
      if (notificationsCount <= 0) {
        notificationsWrapper.hide();
      }
      // Enable pusher logging - don't include this in production
      // Pusher.logToConsole = true;
      var pusher = new Pusher('API_KEY_HERE', {
        encrypted: true
      });
      // Subscribe to the channel we specified in our Laravel Event
      var channel = pusher.subscribe('status-liked');
      // Bind a function to a Event (the full Laravel class)
      channel.bind('App\\Events\\StatusLiked', function(data) {
        var existingNotifications = notifications.html();
        var avatar = Math.floor(Math.random() * (71 - 20 + 1)) + 20;
        var newNotificationHtml = `
          <li class="notification active">
              <div class="media">
                <div class="media-left">
                  <div class="media-object">
                    <img src="https://api.adorable.io/avatars/71/`+avatar+`.png" class="img-circle" alt="50x50" style="width: 50px; height: 50px;">
                  </div>
                </div>
                <div class="media-body">
                  <strong class="notification-title">`+data.message+`</strong>
                  <!--p class="notification-desc">Extra description can go here</p-->
                  <div class="notification-meta">
                    <small class="timestamp">about a minute ago</small>
                  </div>
                </div>
              </div>
          </li>
        `;
        notifications.html(newNotificationHtml + existingNotifications);
        notificationsCount += 1;
        notificationsCountElem.attr('data-count', notificationsCount);
        notificationsWrapper.find('.notif-count').text(notificationsCount);
        notificationsWrapper.show();
      });
    </script>
  </body>
</html>
// Initiate the Pusher JS library
// API_KEY_HERE là key bạn tạo ứng dụng pusher
var pusher = new Pusher('API_KEY_HERE', {
    encrypted: true
});
// Subscribe to the channel we specified in our Laravel Event
var channel = pusher.subscribe('status-liked');
// Bind a function to a Event (the full Laravel class)
channel.bind('App\\Events\\StatusLiked', function(data) {
    // this is called when the event notification is received...
});
Theo mặc định, Laravel broadcast sự kiện bằng tên lớp Event. Tuy nhiên, bạn có thể tùy chỉnh tên broadcast bằng cách override lại phương thức sau trong lơp Event của bạn:
public function broadcastAs() {
    return 'event-name';
}
Đoạn code bên trên đơn giản là khởi tạo thư viện Pusher JS và đăng ký kênh. Sau đó, nó sẽ gọi hàm callback khi mà có một broadcast sự kiện tại kênh này
7. Tạo route để test chương trình
Route::get('test', function () {
    event(new App\Events\StatusLiked('Someone'));
    return "Event has been sent!";
});
8. Kết luận
Trong bài viết này, chúng ta đã có thể tận dụng sức mạnh của Pusher để tạo ra một hệ thống thông báo web hiện đại và nó rất dễ dàng.
9 Tài liệu tham khảo
All rights reserved