Basic XML Layouts
Bài đăng này đã không được cập nhật trong 4 năm
Tài liệu này được dịch theo slide giảng dạy Android của Cleveland State University.
BASIC XML LAYOUTS - CONTAINERS
Designing Complex Uis
Đây là danh sách các container được sử dụng thường xuyên trong Android
LinearLayoutRelativeLayoutTableLayoutScrollView- Other(
ListView,GridView,WebView,MapView...)
LinearLayout là công cụ được sử dụng nhiều nhất. Nó cung cấp 1 box tương tự với Box-layout trong Java-Swing. Thông thường thì 1 thiết kế UI phức tạp sẽ là kết quả của tổ hợp các box đơn giản hơn ở bên trong nó theo thứ tự sắp xếp theo chiều ngang hoặc dọc.
Trước khi bắt đầu, chúng ta hãy ghi nhớ 1 vài chú ý :
- Manger layout đơn giản nhất của Android gọi là Frame Layout
- 1 Frame Layout là một hình chữ nhật mà chứa các
conbên trong nó trên góc trái phía trên. - Add thêm các views vào 1 frame layout sẽ stack chúng lên top của nhau.
Linear Layout
LinearLayout là một box model - các widgets hoặc các container con được sắp xếp theo chiều cột hoặc hàng.
Để config LinearLayout, bạn phải có 5 thành phần sau trong nội dung của container :
• orientation
• fill model
• weight
• gravity
• padding
• margin
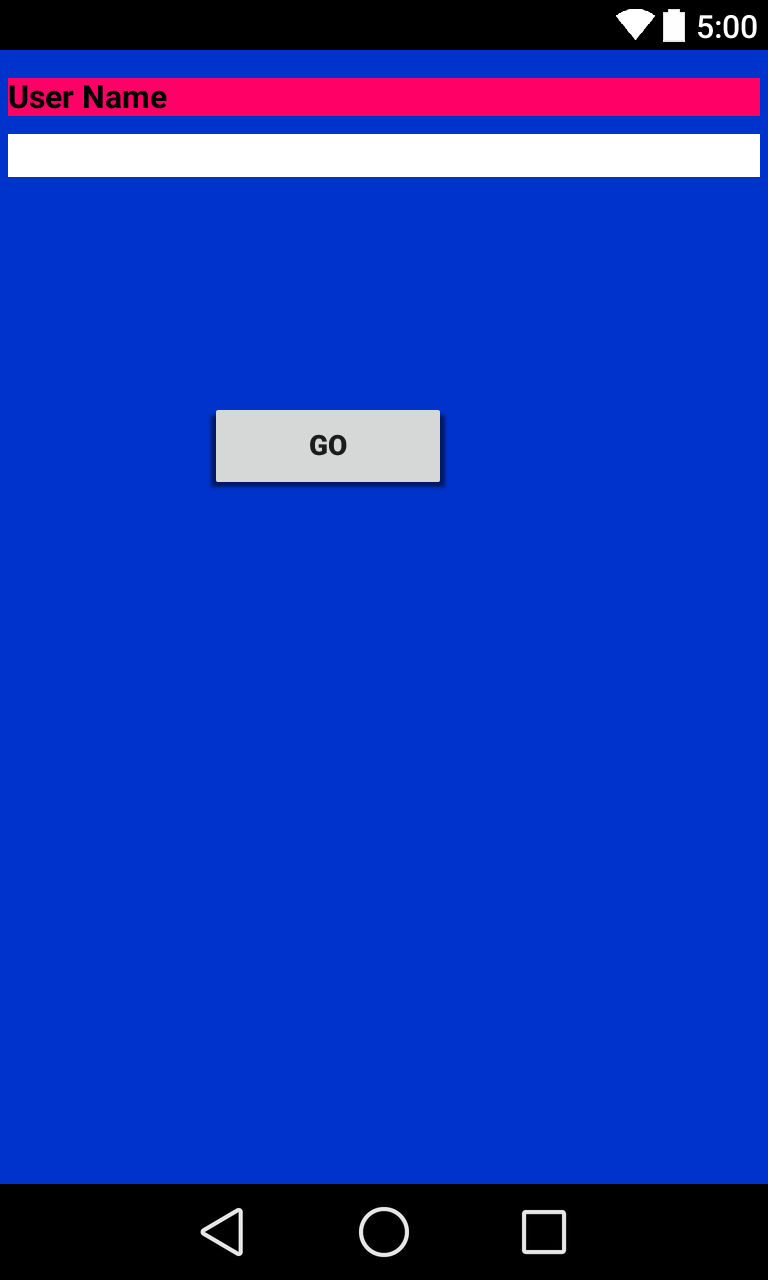
Dưới đây là 1 ví dụ về LinearLayout
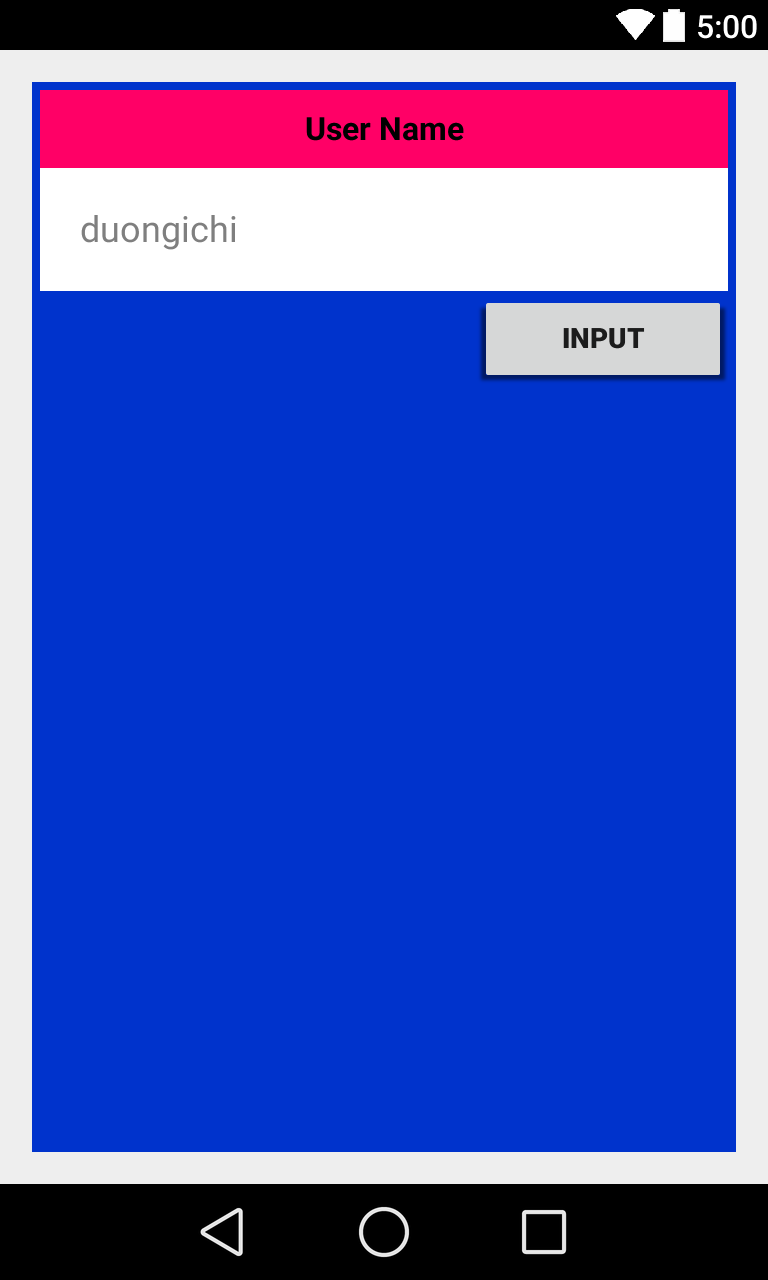
    <?xml version="1.0" encoding="utf-8"?>
    <LinearLayout
        android:id="@+id/myLinearLayout"
        android:layout_width="fill_parent"
        android:layout_height="fill_parent"
        android:background="#ff0033cc"
        android:padding="4dip"
        android:orientation="vertical"
        xmlns:android="http://schemas.android.com/apk/res/android"
        >
        <TextView
            android:id="@+id/labelUserName"
            android:layout_width="fill_parent"
            android:layout_height="wrap_content"
            android:background="#ffff0066"
            android:text="User Name"
            android:textSize="16sp"
            android:textStyle="bold"
            android:textColor="#ff000000"
            android:gravity="center"
            android:padding="10dip"
            >
        </TextView>
        <EditText
            android:id="@+id/ediName"
            android:layout_width="fill_parent"
            android:layout_height="wrap_content"
            android:hint="duongichi"
            android:background="#ffffff"
            android:textSize="18sp"
            android:padding="20dip"
            >
        </EditText>
        <Button
            android:id="@+id/btnGo"
            android:layout_width="125dip"
            android:layout_height="wrap_content"
            android:text="INPUT"
            android:layout_gravity="right"
            android:textStyle="bold"
            >
        </Button>
    </LinearLayout>
Relative Layout
Relative Layout đặt các widgets dựa trên vị trí tương quan của nó với các widgets khác trong container và container cha.
Ngoài ra để sử dụng Relative Notation trong Properties bạn cần phải xác định theo các bước sau :
-
Đầu tiên là đặt identifiers (thuộc tính android:id) vào tất cả ccác elementsmaf bạn định đặt lên.
-
Syntax là :
@+id/.... ví dụ :android:id="@+id/ediUserName" -
Tham chiếu những widgets khác sử dụng cùng giá trị identifier đẫ xác định cho widget này. ví dụ :
android:layout_below="@+id/ediUserName"
Một ví dụ nút CANCEL sử dụng Relative Layout
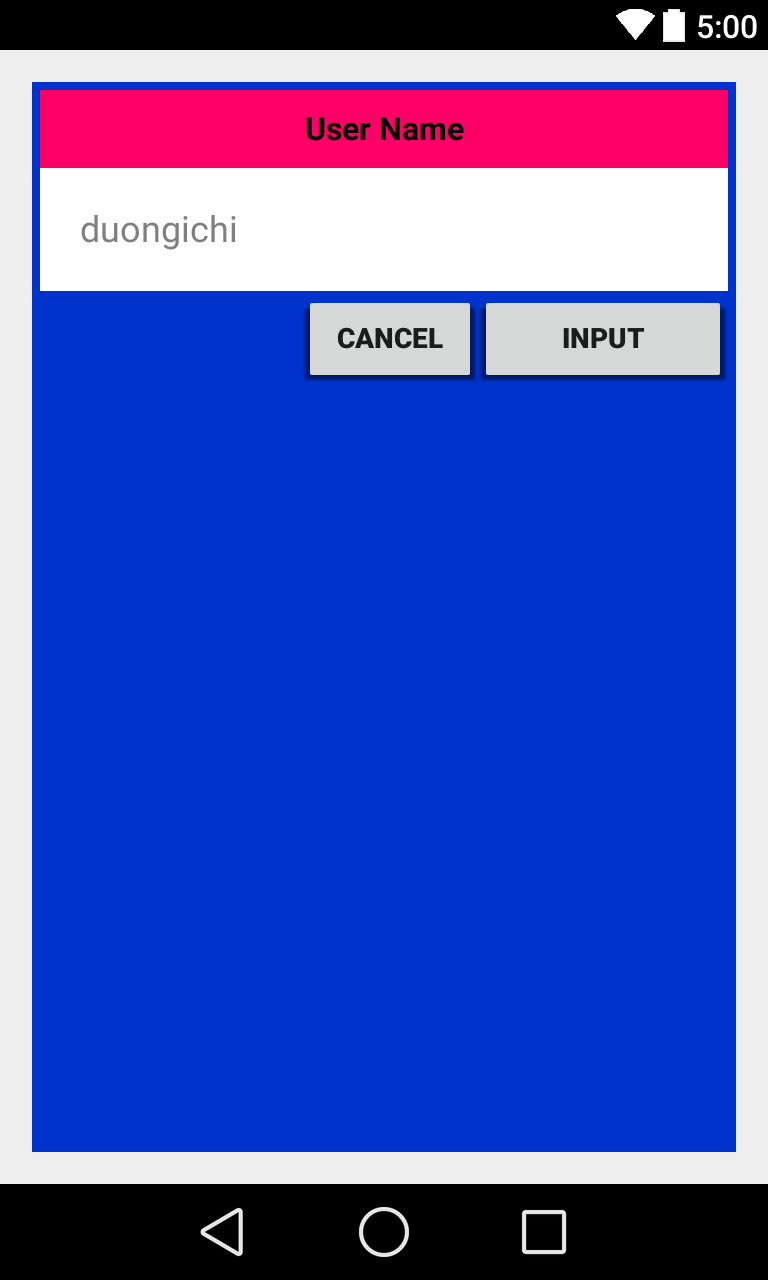
        <RelativeLayout
            android:layout_width="match_parent"
            android:layout_height="wrap_content"
            android:layout_below="@+id/ediUserName"
            >
            <Button
                android:id="@+id/btnGo"
                android:layout_width="125dip"
                android:layout_height="wrap_content"
                android:text="INPUT"
                android:textStyle="bold"
                android:layout_alignParentRight="true"
                >
            </Button>
            <Button
                android:id="@+id/btnCancel"
                android:layout_width="wrap_content"
                android:layout_height="wrap_content"
                android:layout_toLeftOf="@+id/btnGo"
                android:text="Cancel"
                android:textStyle="bold">
            </Button>
        </RelativeLayout>
TABLE LAYOUT
TableLayoutcủa Android cho phép bạn xác định vị trí của widget trong một grid.- Một cột có thể nén lại hoặc được kéo ra để thảo mãn với nội dụng
TableLayoutlàm việc kết hợp vớiTableRowTableLayoutsẽ kiểm soát toàn bộ cac thuộc tính của container, ở đây wiget sẽ tự xác định được vị trí của nó trong 1 hoặc nhiềuTableRowcontainer.
Row được kha báo khi bạn đặt widget như là child của một TableRow trong toàn bộ TableLayout.
Số lượng column sẽ được quyết định bởi Android (bạn cũng có thể control cái này)
Tuy nhiên, một widget đơn thuần có thể chiếm nhiều hơn một cột bằng việc sử dụng thuộc tính android:layout_span, thuộc tính này cho thấy số lượng cột mà wiget span ra.
<TableRow>
	<TextView android:text="URL:" />
	<EditText
	android:id="@+id/entry"
	android:layout_span="3" />
</TableRow>
Đây là một ví dụ bạn có thể dùng để tham khảo :
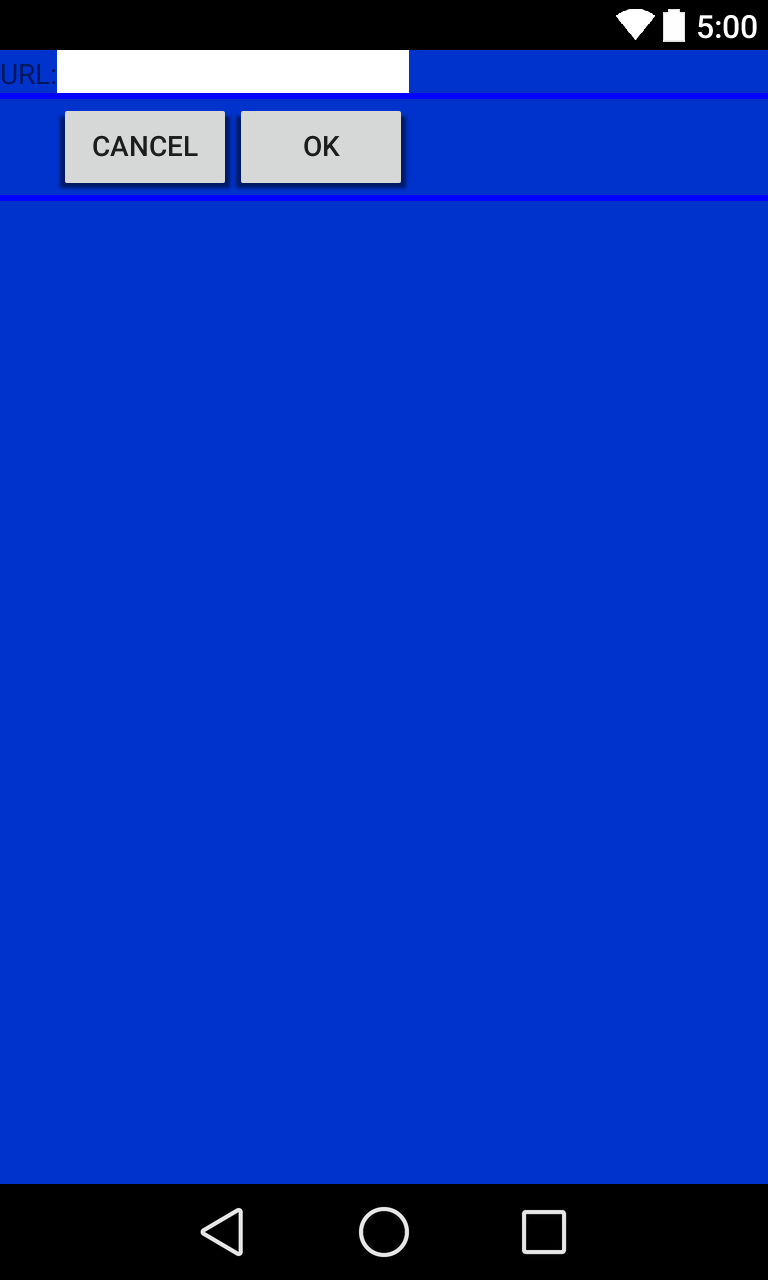
<?xml version="1.0" encoding="utf-8"?>
<TableLayout
    android:id="@+id/myTableLayout"
    android:layout_width="fill_parent"
    android:layout_height="fill_parent"
    android:background="#ff0033cc"
    android:orientation="vertical"
    xmlns:android="http://schemas.android.com/apk/res/android"
    >
    <TableRow>
        <TextView
            android:text="URL:" />
        <EditText
            android:background="#FFFFFF"
            android:id="@+id/ediUrl"
            android:layout_span="3"/>
    </TableRow>
    <View
        android:layout_height="3dip"
        android:background="#0000FF" />
    <TableRow>
        <Button
            android:id="@+id/cancel"
            android:layout_column="2"
            android:text="Cancel" />
        <Button
            android:id="@+id/ok"
            android:text="OK" />
    </TableRow>
    <View
        android:layout_height="3dip"
        android:background="#0000FF" />
</TableLayout>
ScrollView
Khi chúng ta sử dụng nhiều Dữ liệu hơn và ko thể show hết trong một màn hình được. Bạn có thể sẽ cần phải sử dụng đến ScrollView.
Đây là view cung cấp một thanh scroll hoặc sliding để giúp user có thể access vào data. User sẽ nhìn được 1 phần nào đó của layout tại một thời điểm, phần còn lại vấn available thông qua thao tác scroll.
Một ví dụ về ScrollView
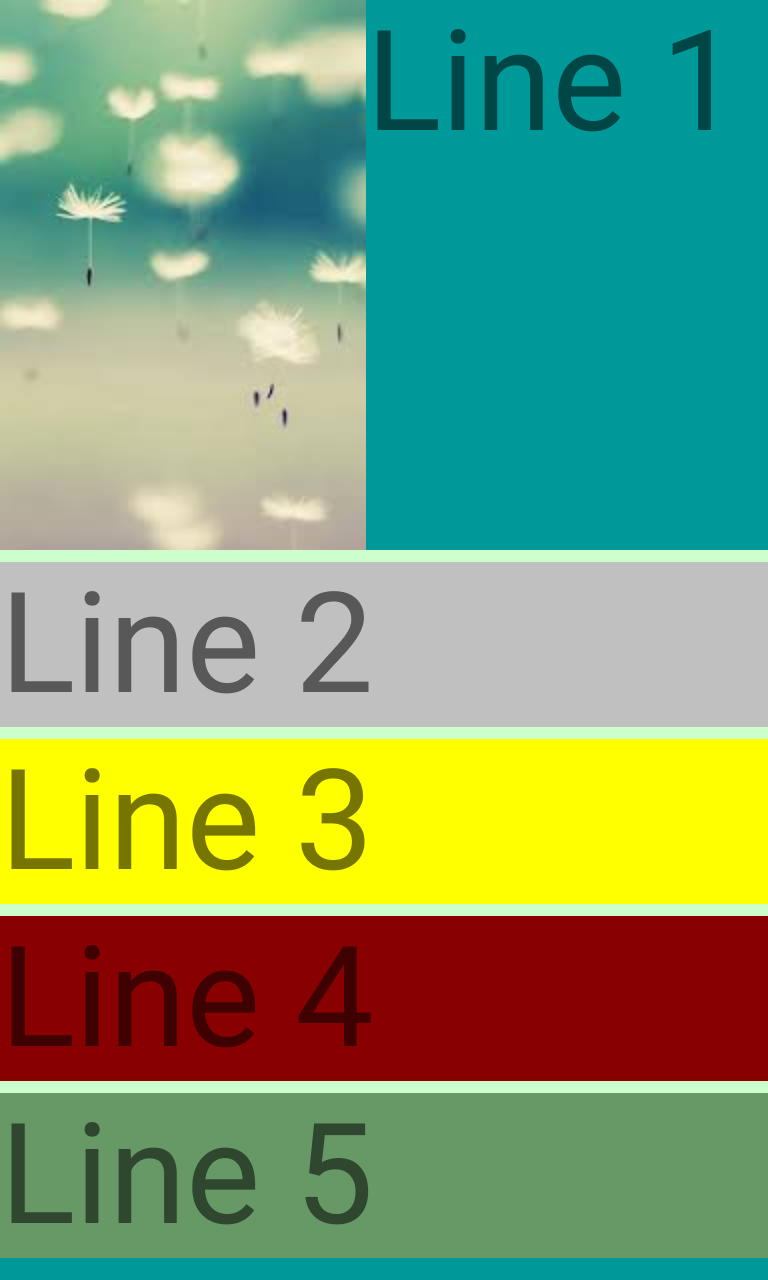
<?xml version="1.0" encoding="utf-8"?>
<ScrollView
    android:id="@+id/myScrollView1"
    android:layout_width="fill_parent"
    android:layout_height="fill_parent"
    android:background="#ff009999"
    xmlns:android="http://schemas.android.com/apk/res/android"
    >
    <LinearLayout
        android:id="@+id/myLinearLayoutVertical"
        android:layout_width="fill_parent"
        android:layout_height="fill_parent"
        android:orientation="vertical"
        >
        <LinearLayout
            android:id="@+id/myLinearLayoutHorizontal1"
            android:layout_width="fill_parent"
            android:layout_height="fill_parent"
            android:orientation="horizontal"
            >
            <ImageView
                android:id="@+id/myPicture"
                android:layout_width="wrap_content"
                android:layout_height="wrap_content"
                android:src="@drawable/images2" />
            <TextView
                android:id="@+id/textView1"
                android:layout_width="fill_parent"
                android:layout_height="wrap_content"
                android:text="Line 1"
                android:textSize="70dip" />
        </LinearLayout>
        <View
            android:layout_width="fill_parent"
            android:layout_height="6dip"
            android:background="#ffccffcc" />
        <TextView
            android:id="@+id/textView2"
            android:layout_width="fill_parent"
            android:layout_height="wrap_content"
            android:background="#C0C0C0"
            android:text="Line 2"
            android:textSize="70dip" />
        <View
            android:layout_width="fill_parent"
            android:layout_height="6dip"
            android:background="#ffccffcc" />
        <TextView
            android:id="@+id/textView3"
            android:layout_width="fill_parent"
            android:layout_height="wrap_content"
            android:background="#FFFF00"
            android:text="Line 3"
            android:textSize="70dip" />
        <View
            android:layout_width="fill_parent"
            android:layout_height="6dip"
            android:background="#ffccffcc" />
        <TextView
            android:id="@+id/textView4"
            android:layout_width="fill_parent"
            android:layout_height="wrap_content"
            android:background="#880000"
            android:text="Line 4"
            android:textSize="70dip" />
        <View
            android:layout_width="fill_parent"
            android:layout_height="6dip"
            android:background="#ffccffcc" />
        <TextView
            android:id="@+id/textView5"
            android:layout_width="fill_parent"
            android:layout_height="wrap_content"
            android:background="#669966"
            android:text="Line 5"
            android:textSize="70dip" />
    </LinearLayout>
</ScrollView>
Absolute Text
Đây là một layout cho phép bạn xác định tạo độ chính xác (x,y) của các Layout con.
Layouts tuyệt đối thì ko linh động được và khó maintain hơn các loại layout khác.
Đây là một ví dụ về Absolute Text.
<?xml version="1.0" encoding="utf-8"?>
<AbsoluteLayout
    android:id="@+id/myLinearLayout"
    android:layout_width="fill_parent"
    android:layout_height="fill_parent"
    android:background="#ff0033cc"
    android:padding="4dip"
    xmlns:android="http://schemas.android.com/apk/res/android"
    >
    <TextView
        android:id="@+id/tvUserName"
        android:layout_width="fill_parent"
        android:layout_height="wrap_content"
        android:background="#ffff0066"
        android:text="User Name"
        android:textSize="16sp"
        android:textStyle="bold"
        android:textColor="#ff000000"
        android:layout_x="0dip"
        android:layout_y="10dip"
        >
    </TextView>
    <EditText
        android:id="@+id/etName"
        android:layout_width="fill_parent"
        android:layout_height="wrap_content"
        android:textSize="18sp"
        android:background="#FFFFFF"
        android:layout_x="0dip"
        android:layout_y="38dip"
        >
    </EditText>
    <Button
        android:layout_width="120dip"
        android:text="Go"
        android:layout_height="wrap_content"
        android:textStyle="bold"
        android:id="@+id/btnGo"
        android:layout_x="100dip"
        android:layout_y="170dip"
        >
    </Button>
</AbsoluteLayout>
All rights reserved
