Spring IoC, Spring Bean Example Tutorial
Bài đăng này đã không được cập nhật trong 4 năm
Spring IoC
Như bài trước, với Dependency Injection thì các đối tượng sẽ không hề phụ thuộc vào nhau. Khi cần đối tượng này sẽ gọi tới đối tượng kia và ngược lại. Vây các đối tượng sẽ được tạo ra và nằm ở đâu để khi cần chúng có thể gọi lẫn nhau. Câu trả lời là các đối tượng được đặt trong một khung chứa, và khung chứa đó chính là một phần của IoC.
Spring Ioc là một cơ chế để đạt được tư tưởng loose-coupling trong Objects dependencies. Đây là tư tưởng mà các thành phần làm việc độc lập với nhau. Dể đạt được tư tưởng này cũng như việc binding các object một cách linh hoạt tại runtime, Objects dependencies được inject bởi các object ghép khác. Spring IoC container là chương trình cho phép inject dependency vào một object và khiến cho sẵn sàng để được sử dụng.
Spring IoC container classes là thành phần của org.springframework.beans và org.springframework.context. Spring IoC container cung cấp cho chúng ta rất nhiều cách để decouple các đối tượng dependencies.
BeanFactory là root interface của Spring IoC container. ApplicationContext là child interface của BeanFactory interface - cung cấp cách chức năng Spring AOP, i18n v.v...
Một trong số các interfaces con hữu ích của ApplicationContext chính là ConfigurableApplicationContext và WebApplicationContext. Spring Framework cung cấp rất nhiều các class implement ApplicationContext mà chúng ta có thể sử dụng để có thể lấy được spring context và Spring Bean.
Một vài implementations rất hữu ích của ApplicationContext implementations mà chúng ta sẽ hay dùng :
- AnnotationConfigApplicationContext: Nếu chúng ta sử dụng Spring trong các ứng dụng java độc lập và sử dụng annotations cho việc cấu hình, thì chúng ta có thể sử dụng nó để khởi tạo container và lấy các đối tượng bean.
- ClassPathXmlApplicationContext: Nếu chúng ta có spring been config xml file trong ứng dụng độc lập, thì có thể sử dụng class này để load file và lấy containter object.
- FileSystemXmlApplicationContext: Tương tự với ClassPathXmlApplicationContext trừ việc file xml configuration có thể dược load từ bất kỳ nơi nào trong hệ thống.
- AnnotationConfigWebApplicationContext và XmlWebApplicationContext cho các ứng dụng web.
Thông thường, nếu bạn làm việc với ứng dụng Spring MVC và ứng dụng được config để sử dụng Spring Framework, Spring IoC container cũng sẽ được khởi tạo khi application start và khi một bean được request, dependencies được tự động inject.
Tuy nhiên đối với các ứng dụng độc lập, bạn cần phải khởi tạo container ở nơi nào đó trong application và sau đó sử dụng nó để lấy spring beans.
Spring Bean
Spring Bean is nothing special, any object in the Spring framework that we initialize through Spring container is called Spring Bean . Any normal Java POJO class can be a Spring Bean if it’s configured to be initialized via container by providing configuration metadata information.
Spring Bean không có gì đặc biệt, bất kỳ object nào trong Spring framework mà chúng ta khởi tạo thông qua Spring container được gọi là Spring Bean. Bất kỳ class Java POJO thông thường nào cũng có thể là Spring Bean nếu nó được cấu hình để khởi tạo thông qua container bằng cách cung cấp thông tin metadata cấu hình.
Spring Bean Scopes
Có 5 scope định nghĩa cho Spring Beans.
- singleton – Chỉ 1 instance của bean được tạo trong mỗi container. Đây là scope default cho spring beans. Khi sử dụng scope này, đảm bảo rằng bearn không share instance nếu ko nó sẽ dấn đến vấn đề bất ổn trong dữ liệu.
- prototype – Một instance mới sẽ được tạo mỗi lần bean được request.
- request – Khá giống prototype scope, tuy nhiên nó được sử dụng cho ứng dụng web. Một instance mới của bean sẽ được tạo cho mỗi HTTP request.
- session – Một bean mới sẽ được tạo cho mỗi HTTP session bởi container.
- global-session – Cái này được sử dụng để tạo các global session beans cho các ứng dụng Portlet. Spring Framework có khả năng mở rộng được và chúng ta có thể tạo scope riêng nếu thích, tuy nhiên, hầu hết mọi thời điểm thì các scope được cung cấp bởi framework là quá đủ rồi.
Spring Bean Configuration
Spring Framework provide three ways to configure beans to be used in the application.
- Annotation Based Configuration – Bằng việc sử dụng
@Servicehoặc@Componentannotations. Chi tiết về Scope có thể được cung cấp bởi@Scopeannotation. - XML Based Configuration – Bằng việc tạo file XML Spring Configuration để config beans. Nếu bạn sử dụng Spring MVC framework, config dựa trên xml có thể được load tự động bằng việc viết một bài code boiler plate trong web.xml.
- Java Based Configuration – Đươc tích hợp từ Spring 3.0, chúng ta có thể configure Spring beans sử dụng chương trình java. Một vài annotations quan trọng được sủ dụng cho config dựa trên java là
@Configuration,@ComponentScanvà@Bean.
Spring IoC and Spring Bean Example Project
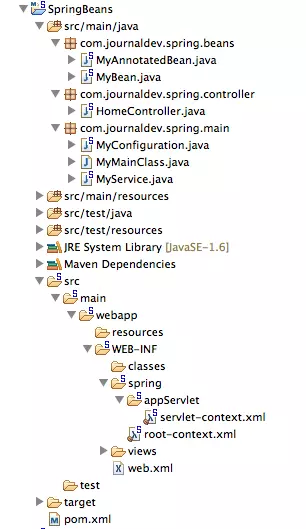
Hãy quan sát một mặt khác của Spring IoC container và Spring Bean configurations với một dự án Spring đơn giản. Ví dụ, tôi tạo một dự án Spring MVC project trong Spring Tool Suite. Cấu trúc dự án sẽ trông như thế này.
 https://images.viblo.asia/e94f506b-1ea4-4c39-b9aa-dfab4bcaf1d3.png)
Tiếp hãy quan sát các thành phần khác biệt của Spring IoC và Spring Bean project.
XML Based Spring Bean Configuration
MyBean là một class Java POJO đơn giản
package com.journaldev.spring.beans;

public class MyBean {

	private String name;

	public String getName() {
		return name;
	}
	public void setName(String name) {
		this.name = name;
	}

}
Spring Configuration XML File
servlet-context.xml code:
<?xml version="1.0" encoding="UTF-8"?>
<beans:beans xmlns="http://www.springframework.org/schema/mvc"
	xmlns:xsi="http://www.w3.org/2001/XMLSchema-instance"
	xmlns:beans="http://www.springframework.org/schema/beans"
	xmlns:context="http://www.springframework.org/schema/context"
	xsi:schemaLocation="http://www.springframework.org/schema/mvc http://www.springframework.org/schema/mvc/spring-mvc.xsd
		http://www.springframework.org/schema/beans http://www.springframework.org/schema/beans/spring-beans.xsd
		http://www.springframework.org/schema/context http://www.springframework.org/schema/context/spring-context.xsd">

	<!-- DispatcherServlet Context: defines this servlet's request-processing infrastructure -->

	<!-- Enables the Spring MVC @Controller programming model -->
	<annotation-driven />

	<!-- Handles HTTP GET requests for /resources/** by efficiently serving up static resources in the ${webappRoot}/resources directory -->
	<resources mapping="/resources/**" location="/resources/" />

	<!-- Resolves views selected for rendering by @Controllers to .jsp resources in the /WEB-INF/views directory -->
	<beans:bean class="org.springframework.web.servlet.view.InternalResourceViewResolver">
		<beans:property name="prefix" value="/WEB-INF/views/" />
		<beans:property name="suffix" value=".jsp" />
	</beans:bean>

	<context:component-scan base-package="com.journaldev.spring" />

	<beans:bean name="myBean" class="com.journaldev.spring.beans.MyBean" scope="singleton" ></beans:bean>

</beans:beans>
Chú ý rằng MyBean được config bằng cách sử dụng bean element với scope là singleton.
Annotation Based Spring Bean Configuration
package com.journaldev.spring.beans;

import org.springframework.context.annotation.Scope;
import org.springframework.stereotype.Service;
import org.springframework.web.context.WebApplicationContext;

@Service
@Scope(WebApplicationContext.SCOPE_REQUEST)
public class MyAnnotatedBean {

	private int empId;

	public int getEmpId() {
		return empId;
	}

	public void setEmpId(int empId) {
		this.empId = empId;
	}

}
MyAnnotatedBean được config sử dụng @Service và scope là Request.
Spring IoC Controller Class
Class HomeController sẽ xử lý các request HTTP cho home page. Chúng ta sẽ inject Spring beans vào class controller này thông qua WebApplicationContext container.
package com.journaldev.spring.controller;

import java.text.DateFormat;
import java.util.Date;
import java.util.Locale;

import org.springframework.beans.factory.annotation.Autowired;
import org.springframework.context.annotation.Scope;
import org.springframework.stereotype.Controller;
import org.springframework.ui.Model;
import org.springframework.web.bind.annotation.RequestMapping;
import org.springframework.web.bind.annotation.RequestMethod;

import com.journaldev.spring.beans.MyAnnotatedBean;
import com.journaldev.spring.beans.MyBean;

@Controller
@Scope("request")
public class HomeController {

	private MyBean myBean;

	private MyAnnotatedBean myAnnotatedBean;

	@Autowired
	public void setMyBean(MyBean myBean) {
		this.myBean = myBean;
	}

	@Autowired
	public void setMyAnnotatedBean(MyAnnotatedBean obj) {
		this.myAnnotatedBean = obj;
	}

	/**
	 * Simply selects the home view to render by returning its name.
	 */
	@RequestMapping(value = "/", method = RequestMethod.GET)
	public String home(Locale locale, Model model) {
		System.out.println("MyBean hashcode="+myBean.hashCode());
		System.out.println("MyAnnotatedBean hashcode="+myAnnotatedBean.hashCode());

		Date date = new Date();
		DateFormat dateFormat = DateFormat.getDateTimeInstance(DateFormat.LONG, DateFormat.LONG, locale);

		String formattedDate = dateFormat.format(date);

		model.addAttribute("serverTime", formattedDate );

		return "home";
	}

}
Deployment Descriptor
Chúng ta cần config ứng dụng cho Spring Framework để configuration metadata sẽ được load và context được khởi tạo.
<?xml version="1.0" encoding="UTF-8"?>
<web-app version="2.5" xmlns="http://java.sun.com/xml/ns/javaee"
	xmlns:xsi="http://www.w3.org/2001/XMLSchema-instance"
	xsi:schemaLocation="http://java.sun.com/xml/ns/javaee http://java.sun.com/xml/ns/javaee/web-app_2_5.xsd">

	<!-- The definition of the Root Spring Container shared by all Servlets and Filters -->
	<context-param>
		<param-name>contextConfigLocation</param-name>
		<param-value>/WEB-INF/spring/root-context.xml</param-value>
	</context-param>

	<!-- Creates the Spring Container shared by all Servlets and Filters -->
	<listener>
		<listener-class>org.springframework.web.context.ContextLoaderListener</listener-class>
	</listener>

	<!-- Processes application requests -->
	<servlet>
		<servlet-name>appServlet</servlet-name>
		<servlet-class>org.springframework.web.servlet.DispatcherServlet</servlet-class>
		<init-param>
			<param-name>contextConfigLocation</param-name>
			<param-value>/WEB-INF/spring/appServlet/servlet-context.xml</param-value>
		</init-param>
		<load-on-startup>1</load-on-startup>
	</servlet>

	<servlet-mapping>
		<servlet-name>appServlet</servlet-name>
		<url-pattern>/</url-pattern>
	</servlet-mapping>

</web-app>
Hầu hết các config ở trên là boiler-plate code được gen bởi tool STS tool một cách tự động.
Run the Spring IoC Bean Example Application
Bây giờ, khi bạn chạy ứng dụng web, home page sẽ được load và console logs sẽ hiển thị các thông tin nếu bạn refresh page nhiều lần.
MyBean hashcode=118267258
MyAnnotatedBean hashcode=1703899856
MyBean hashcode=118267258
MyAnnotatedBean hashcode=1115599742
MyBean hashcode=118267258
MyAnnotatedBean hashcode=516457106
Chú ý rằng MyBean được config là singleton, cho nên container sẽ luôn luôn được trả về cùng một instance và một. Tương tự cho mỗi request, một instance của MyAnnotatedBean được tạo với hashcode khác nhau.
Java Based Spring Bean Configuration
Với các ứng dụng độc lập, chúng ta có thể sử dụng config dựa trên annotation hoặc xml. Cả 2 đều ổn. Yêu cầu duy nhất là khởi tạo context trong chương trình ở nơi mà chúng ta sẽ cần để sử dụng nó.
package com.journaldev.spring.main;

import java.util.Date;

public class MyService {

	public void log(String msg){
		System.out.println(new Date()+"::"+msg);
	}
}
MyService là một class java đơn giản với một vài method.
package com.journaldev.spring.main;

import org.springframework.context.annotation.Bean;
import org.springframework.context.annotation.ComponentScan;
import org.springframework.context.annotation.Configuration;

@Configuration
@ComponentScan(value="com.journaldev.spring.main")
public class MyConfiguration {

	@Bean
	public MyService getService(){
		return new MyService();
	}
}
Config class dựa trên annotation sẽ được sử dụng để khởi tạo Spring container.
package com.journaldev.spring.main;

import org.springframework.context.annotation.AnnotationConfigApplicationContext;

public class MyMainClass {

	public static void main(String[] args) {

		AnnotationConfigApplicationContext ctx = new AnnotationConfigApplicationContext(
				MyConfiguration.class);
		MyService service = ctx.getBean(MyService.class);

		service.log("Hi");

		MyService newService = ctx.getBean(MyService.class);
		System.out.println("service hashcode="+service.hashCode());
		System.out.println("newService hashcode="+newService.hashCode());
		ctx.close();
	}

}
Một chương trình test đơn giản nơi mà chúng ta khởi tạo context AnnotationConfigApplicationContext và sau đó sử dụng getBean() để lấy instance của MyService. Chú ý rằng tôi đang gọi method getBean 2 lần và in hashcode. Do ko có scope định nghĩa trong MyService, nó sẽ là singleton và hashcode sẽ giống nhau cho cả 2 instance.
Khi chúng ta chạy ứng dụng ở trên, console sẽ hiển thị như sau
Sat Dec 28 22:49:18 PST 2013::Hi
service hashcode=678984726
newService hashcode=678984726
Nếu bạn muốn config dựa trên XML, chỉ cần tạo file config Spring XML và khởi tạo context với đoạn code snippet như sau.
ClassPathXmlApplicationContext context = new ClassPathXmlApplicationContext(
                "applicationContext.xml");
        MyService app = context.getBean(MyService.class);
Nguồn
http://www.journaldev.com/2461/spring-ioc-bean-example-tutorial
All rights reserved
