Appium Basic (P2) - Thao tác với Textbox, Check box, Radio button
Bài đăng này đã không được cập nhật trong 6 năm
Sau khi chạy First test thành công ở Phần 1, mình sẽ giới thiệu một số thao tác với các item cơ bản, thường gặp trong quá trình test.
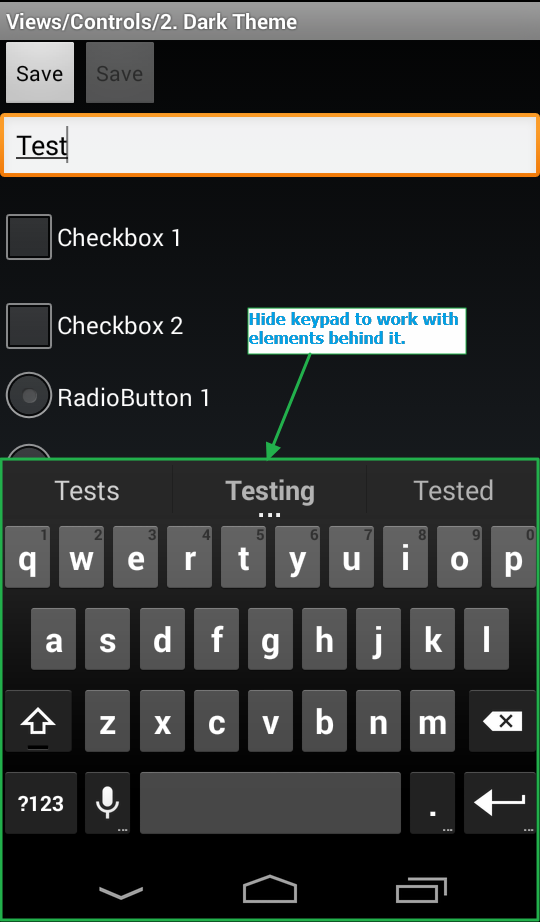
Ở bàn viết này sẽ là Textbox, Check box, Radio button.
App to use
Từ phần này, mình sẽ dùng app API Demos để test. Bạn có thể download tại đây.
Màn hình trên có đầy đủ các item mình thực hiện test trong bài viết này. Bạn có thể điều hướng đến màn hình trên theo trình tự như sau: Home -> Views -> Controls -> 2. Dark Theme
Code setup BeforeTest và các bước để đến được màn hình Dark Theme:
import java.io.File;
import java.io.IOException;
import java.net.MalformedURLException;
import java.net.URL;
import java.text.SimpleDateFormat;
import java.util.Date;
import java.util.List;
import java.util.concurrent.TimeUnit;

import org.apache.commons.io.FileUtils;
import org.openqa.selenium.By;
import org.openqa.selenium.OutputType;
import org.openqa.selenium.TakesScreenshot;
import org.openqa.selenium.WebElement;
import org.openqa.selenium.remote.DesiredCapabilities;
import org.testng.Assert;
import org.testng.annotations.AfterSuite;
import org.testng.annotations.AfterTest;
import org.testng.annotations.BeforeSuite;
import org.testng.annotations.BeforeTest;
import org.testng.annotations.DataProvider;
import org.testng.annotations.Test;

import io.appium.java_client.AppiumDriver;
import io.appium.java_client.FindsByAndroidUIAutomator;
import io.appium.java_client.MobileElement;
import io.appium.java_client.android.AndroidDriver;
import io.appium.java_client.remote.AndroidMobileCapabilityType;
import lesson0312.XLSHelper;

public class LoginCW {

	private AndroidDriver driver;

	@BeforeTest
	public void setUp() throws MalformedURLException {

		//Setup device information
		DesiredCapabilities caps = new DesiredCapabilities();
		caps.setCapability("deviceName", "42001f936b0065bd");
		caps.setCapability("platformName", "Android");

		//Setup app information
		caps.setCapability(AndroidMobileCapabilityType.APP_PACKAGE, "io.appium.android.apis");
		caps.setCapability(AndroidMobileCapabilityType.APP_ACTIVITY,
				"io.appium.android.apis.ApiDemos");

		//Setup appium server address and port number
		driver = new AndroidDriver(new URL("http://0.0.0.0:4723/wd/hub"), caps);
		driver.manage().timeouts().implicitlyWait(15, TimeUnit.SECONDS);
	}

    @Test
 public void typeInText() throws InterruptedException {
  // Scroll till element which contains "Views" text If It Is not visible on screen.
  driver.scrollTo("Views");
  // Click on Views.
  driver.findElement(By.name("Views")).click();
  // Scroll till element which contains "Controls" text If It Is not visible on screen.
  driver.scrollTo("Controls");
  // Click on Controls.
  driver.findElement(By.name("Controls")).click();
  // Scroll till element which contains "2. Dark Theme" text If It Is not visible on screen.
  driver.scrollTo("2. Dark Theme");
  // Click on 2. Dark Theme.
  driver.findElement(By.name("2. Dark Theme")).click();

  //TODO
 }
1. Type In Text Box
Textbox là item phổ biến của các app nói chung cũng như app Android nói riêng. Muốn nhập văn bản vào textbox, ta dùng lệnh sendKeys.
 Nhập text trực tiếp vào text box:
driver.findElement(By.id("io.appium.android.apis:id/edit")).sendKeys("Test");
Nhập text từ file excel:
//Read data from XLS file
@DataProvider
	private Object[][] loginDataProvider() {
		return XLSHelper.retrieveCellsMulti("user.xls", 2, 2);
	}
//Input data on textbox
@Test (dataProvider = "loginDataProvider")
	public void typeTextbox(String content) {
    WebElement tf = driver.findElement(By.id("io.appium.android.apis:id/edit"));
    tf.sendKeys(content);
Xóa nội dung textbox với lệnh clear();
driver.findElement(By.id("io.appium.android.apis:id/edit")).clear();
2. Hide Android Keyboard
Trong app Android, bàn phím sẽ tự động hiện lên khi bạn nhập văn bản vào textbox của một app. Tuy nhiên, trong một số trường hợp, việc hiển thị bàn phím làm ẩn đi một số item. Khi đó, bạn cần ẩn bàn phím đi để có thể thao tác được với các item đang bị ẩn đi.

Dễ dàng ẩn bàn phím bằng lệnh hideKeyboard();
driver.hideKeyboard();
3. Select Checkbox
Checkbox cũng là một item hay gặp trong các ứng dụng. Có thể có một hoặc nhiều checkbox nhưng thao tác Check/Uncheck không khác nhau. Nếu có nhiều checkbox, việc xác định element sẽ phức tạp hơn khi có một checkbox.
 Check vào Checkbox 2 bằng thao tác click:
driver.findElement(By.name("Checkbox 2")).click();
Trường hợp bạn chưa biết Checkbox 2 đang ở trạng thái nào, Checked hay Unchecked. Và bạn muốn sau khi thao tác Checkbox 2 = Checked, thì ta thêm điểu kiện như sau:
WebElement checkbox = driver.findElement(By.name("Checkbox 2")).click();
if(checkbox.getAttribute("checked").equals("false")) checkbox.click();
Select Radio Button
Chọn radio button cũng tương tự như chọn checkbox, chỉ khác là với radio button bạn chỉ có thể chọn một trong các nút.
 Dễ dàng chọn radio button mong muốn bằng thao tác click:
driver.findElement(By.name("RadioButton 2")).click();
---Hết phần 2---
Trên đây là một số hướng dẫn cơ bản để bạn có thể thao tác được với các item quen thuộc như Textbox, Check box, Radio button. Trong bài tiếp theo, mình sẽ giới thiệu thêm về cách thao tác với một số item khác cũng phổ biến không kém là Drop-down list, Set date time, Switch button, Handle alert dia-log. Thanks for reading ^^
Tài liệu tham khảo:
http://www.software-testing-tutorials-automation.com/2015/10/appium-tutorials.html
All rights reserved