Web Push Notification
Bài đăng này đã không được cập nhật trong 5 năm
Đã bao giờ bạn vào một trang nào mà nhận được một popup dạng như này chưa?
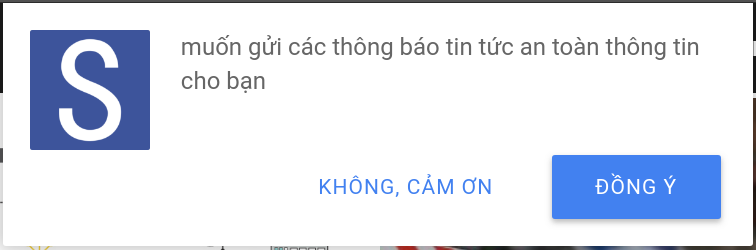
Và bạn có thắc mắc nó là gì và hoạt động ra sao không? Vâng, định nghĩa chính xác nó là gì thì mình không rõ. Nhưng nó sử dụng OneSignal để thực hiện việc này. Nó giúp chúng ta nhận được thông báo khi có bài viết mới (kể cả khi không mở trang đó). Công nghệ được sử dụng ở đây được gọi là web push notification! Hôm nay chúng ta sẽ cùng đi làm một trang đơn giản. Giống như hình mình đã đưa để hiểu được khái niệm cơ bản về nó nhé. Để chế biến, chúng ta cần những nguyên liệu sau:
- Tài khoản tại OneSignal
- Tool giúp chúng ta public localhost ra internet (Ngrok hoặc LocalTunnel. Cá nhân mình chọn LocalTunnel vì nó hỗ trợ tạo subdomain
 ) để test thằng OneSignal
 - Laravel. Mình chọn PHP cho nhanh. Vì dù sao mình cũng là coder PHP
OK, sau khi đã có nguyên liệu. Chúng ta cùng đi sơ chế nhé.
Sơ chế
OneSignal
Sau khi đăng ký tài khoản (nếu chưa có) tại OneSignal. Chúng ta đăng nhập và thực hiện tạo một application và thực hiện cài đặt như sau:
- Trong phần App settings, tại Web Push Platforms ta chọn Google Chrome and Mozilla Firefox
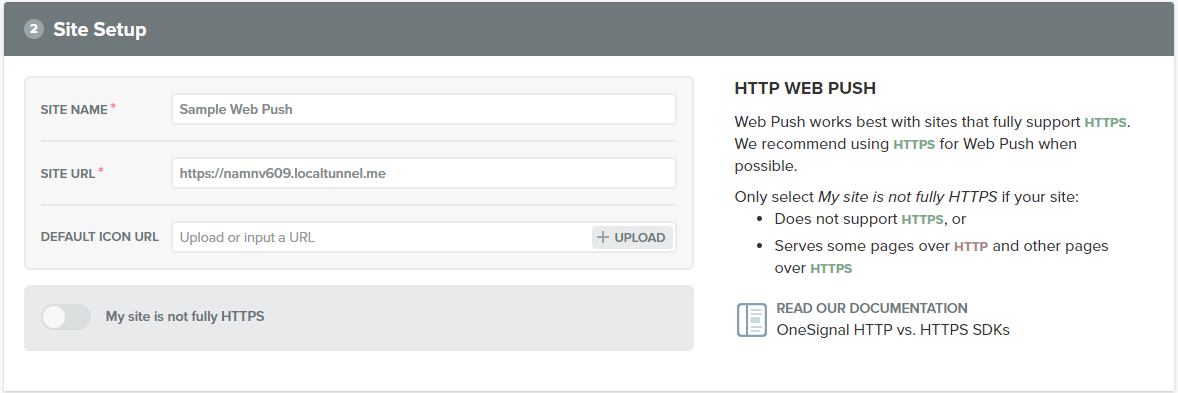
- Trong phần Configure web push, tại mục Choose Integration ta chọn Custom code, tại phần Site Setup ta nhập thông tin dạng như sau (mọi người hãy sửa lại cho phù hợp nhé):
Laravel
Sau khi xử lý xong phần OneSignal. Chúng ta sang phần tạo project Laravel. Do máy mình chỉ có PHP 5.6.30 nên mình dùng Laravel phiên bản v5.4.30 (mọi người có thể cài bản nào tùy ý). Đầu tiên chúng ta tạo Laravel project bằng lệnh:
composer create-project laravel/laravel demo-webpush-notification v5.4.30 --prefer-dist
Sau khi tạo project xong. Chúng ta đi thêm một vài migrations để phục vụ cho demo này. Trong demo này, chúng ta cần 03 bảng là:
posts: Để chứa bài viếtcategories: Danh mục bài viếtusers: Chứa thông tin đăng nhập của admin (chúng ta dùng luôn migrate mặc định của Laravel cho đỡ phải tạo nhiều)
Bắt đầu nào. Bảng categories trước:
php artisan make:migration create_categories_table --create=categories
<?php

use Illuminate\Support\Facades\Schema;
use Illuminate\Database\Schema\Blueprint;
use Illuminate\Database\Migrations\Migration;

class CreateCategoriesTable extends Migration
{
    /**
     * Run the migrations.
     *
     * @return void
     */
    public function up()
    {
        Schema::create('categories', function (Blueprint $table) {
            $table->increments('id');
            $table->string("name");
            $table->timestamps();
        });
    }

    /**
     * Reverse the migrations.
     *
     * @return void
     */
    public function down()
    {
        Schema::dropIfExists('categories');
    }
}
Sau đó đến bảng posts:
php artisan make:migration create_posts_table --create=posts
<?php

use Illuminate\Support\Facades\Schema;
use Illuminate\Database\Schema\Blueprint;
use Illuminate\Database\Migrations\Migration;

class CreatePostsTable extends Migration
{
    /**
     * Run the migrations.
     *
     * @return void
     */
    public function up()
    {
        Schema::create("posts", function (Blueprint $table) {
            $table->increments("id");
            $table->string("title");
            $table->string("description");
            $table->text("content");
            $table->integer("user_id")->unsigned();
            $table->integer("category_id")->unsigned();
            $table->timestamps();
        });
    }

    /**
     * Reverse the migrations.
     *
     * @return void
     */
    public function down()
    {
        Schema::dropIfExists("posts");
    }
}
Sau khi xong phần migration. Chúng ta sẽ tạo models tương ứng với các bảng. Đầu tiên là model Category
php artsan make:model Category
<?php

namespace App;

use Illuminate\Database\Eloquent\Model;

class Category extends Model
{
    protected $fillable = [
        "name",
    ];

    public function posts()
    {
        return $this->hasMany(App\Models\Post::class);
    }
}
Tiếp là model Post
php artsan make:model Category
<?php

namespace App\Models;

use Illuminate\Database\Eloquent\Model;

class Post extends Model
{
    protected $fillable = [
        "title", "description", "content", "user_id", "category_id",
    ];

    public function user()
    {
        return $this->belongsTo(App\Models\User::class);
    }

    public function category()
    {
        return $this->belongsTo(App\Models\Category::class);
    }
}
Cuối cùng là thêm đoạn sau vào model User:
<?php
    namespace App\Models;

    # ...

    public function posts()
    {
        return $this->hasMany(App\Models\Post::class);
    }
Và để cho tiện quản lý, chúng ta sẽ tạo thư mục chứa các file models tại app/Models và chuyển 03 model là User.php, Category.php và Post.php vào đây.
Chế biến
Sau khi sơ chế xong các nguyên liệu. Chúng ta bắt đầu chế biến từng phần một nhé. Let's get cooking 
User homepage
Phần user homepage bạn có thể xem tại pull request này: https://github.com/namnv609/laravel-webpush-notification-demo/pull/4/files
Chi tiết bài viết
Phần chi tiết bài viết các bạn có thể xem tại pull request này: https://github.com/namnv609/laravel-webpush-notification-demo/pull/5/files
Vậy là đã xong bên phần người dùng. Bây giờ chúng ta sang bên admin.
Admin login form
Phần admin login bạn có thể xem tại pull request này: https://github.com/namnv609/laravel-webpush-notification-demo/pull/3/files
Admin quản lý danh mục bài viết
Bạn có thể xem tại pull request này: https://github.com/namnv609/laravel-webpush-notification-demo/pull/7/files
Admin quản lý bài viết
Phần quan trọng nhất đây. Đây là lúc chúng ta cần xử lý nghiệp vụ nhiều hơn bình thường. Ngoài việc thêm bài viết (post) mới vào database thì chúng ta còn gọi lên OneSignal để push notification tới các users đã đăng ký nhận tin mới. Đầu tiên, chúng ta cài một package hỗ trợ chúng ta tương tác với OneSignal API. Package đó do mình tự viết từ trước
composer require namnv609/php-onesignal-sdk
Tiếp theo, chúng ta tạo event và listener để thực hiện gửi notification cho users thông quan OneSignal API:
php artisan make:event NewPostAdded
php artisan make:listener NewPostNotification -e NewPostAdded
Sau khi tạo hai file thành công. Chúng ta bắt tay vào xử lý. Đầu tiên là file app/Events/NewPostAdded.php
<?php

namespace App\Events;

use Illuminate\Broadcasting\Channel;
use Illuminate\Queue\SerializesModels;
use Illuminate\Broadcasting\PrivateChannel;
use Illuminate\Broadcasting\PresenceChannel;
use Illuminate\Foundation\Events\Dispatchable;
use Illuminate\Broadcasting\InteractsWithSockets;
use Illuminate\Contracts\Broadcasting\ShouldBroadcast;

class NewPostAdded
{
    use Dispatchable, InteractsWithSockets, SerializesModels;

    public $post;

    /**
     * Create a new event instance.
     *
     * @return void
     */
    public function __construct($post)
    {
        $this->post = $post;
    }

    /**
     * Get the channels the event should broadcast on.
     *
     * @return Channel|array
     */
    public function broadcastOn()
    {
        return [];
    }
}
Ở đây, chúng ta khai báo biến $post để chứa thông tin về bài viết vừa được thêm mới. Và gán dữ liệu cho nó ở constructor. Tiếp, phần chính là ở đây. Phần lắng nghe sự kiện. Chúng ta thực hiện ở file app/Listeners/NewPostNotification.php
<?php

namespace App\Listeners;

use App\Events\NewPostAdded;
use Illuminate\Queue\InteractsWithQueue;
use Illuminate\Contracts\Queue\ShouldQueue;
use NNV\OneSignal\OneSignal;
use NNV\OneSignal\API\Notification;
use Log;

class NewPostNotification
{
    private $oneSignal;

    /**
     * Create the event listener.
     *
     * @return void
     */
    public function __construct()
    {
        $this->oneSignal = new OneSignal(
            env("ONESIGNAL_AUTH_KEY"), env("ONESIGNAL_APP_ID"), env("ONESIGNAL_APP_REST_KEY")
        );
    }

    /**
     * Handle the event.
     *
     * @param  NewPostAdded  $event
     * @return void
     */
    public function handle(NewPostAdded $event)
    {
        $oneSingalNotification = new Notification($this->oneSignal);
        $post = $event->post;
        $notificationData = [
            "included_segments" => ["All"],
            "contents" => [
                "en" => $post->description,
            ],
            "headings" => [
                "en" => $post->title,
            ],
            "web_buttons" => [
                [
                    "id" => "readmore-button",
                    "text" => "Read more",
                    "url" => "https://namnv609.localtunnel.me/posts/" . $post->id,
                ]
            ],
            "isChromeWeb" => true,
        ];

        $notification = $oneSingalNotification->create($notificationData);

        Log::useDailyFiles(storage_path() . "/logs/onesignal.log");
        Log::info($notification);
    }
}
Trong file trên, chúng ta cần chú ý một số thứ sau:
- ONESIGNAL_AUTH_KEY: Sử dụng để gọi lên API, các bạn có thể lấy nó trong phần User settings của OneSignal
- ONESIGNAL_APP_ID và ONESIGNAL_APP_REST_KEY: Sử dụng để tương tác với OneSignal app. Các bạn có thể lấy nó trong phần Keys & IDs của app settings
web_buttons[0]["url"]: Là URL sẽ được chuyển đến khi người dùng click vào button Read more của notification. Các bạn hãy thay thế cho phù hợp.
Tiếp theo, chúng ta thêm event mà chúng ta đã tạo vào file app/Providers/EventServiceProvider.php
    protected $listen = [
        # ...
        \App\Events\NewPostAdded::class => [
            \App\Listeners\NewPostNotification::class,
        ],
        # ...
    ];
Xong phần event. Giờ chúng ta sẽ gọi nó ở controller mỗi khi thêm một bài viết thành công:
# ...
    public function doCreate(Request $request)
    {
        $this->validate($request, [
            "title" => "required",
            "description" => "required",
            "content" => "required",
        ]);
        $postData = $request->except(["_token"]);
        $post = auth()->user()->posts()->create($postData);

        event(new \App\Events\NewPostAdded($post));

        return redirect("/admin/posts")->with("message", "Create success");
    }
# ...
Bây giờ là phần quan trọng. Thêm popup hỏi người dùng có subscribe khi có tin mới hay không ở phần homepage. Đầu tiên tải OneSignal SDK tại đây. Sau đó giải nén file và copy ba files là manifest.json, OneSignalSDKUpdaterWorker.js và OneSignalSDKWorker.js vào thư mục public của project. Sau đó, mở file layouts/default.blade.php và thêm những dòng sau:
        <link rel="manifest" href="/manifest.json">
        <script src="https://cdn.onesignal.com/sdks/OneSignalSDK.js" async></script>
        <script>
            var OneSignal = window.OneSignal || [];
            OneSignal.push(["init", {
                appId: "{{ env("ONESIGNAL_APP_ID") }}",
                autoRegister: false,
                notifyButton: {
                    enable: true
                },
                promptOptions: {
                    siteName: "Laravel Webpush Notification",
                    actionMessage: "Bạn có muốn nhận thông báo khi chúng tôi có tin mới hay không?",
                    acceptButtonText: "ĐỒNG Ý",
                    cancelButtonText: "KHÔNG, CẢM ƠN",
                }
            }]);
            OneSignal.push(function() {
                OneSignal.showHttpPrompt();
            });
        </script>
OK, giờ chúng ta bắt đầu test nhé. Trước tiên, các bạn cài LocalTunnel để cho phép đưa local lên internet bằng lệnh:
sudo npm install -g localtunnel
Sau khi cài xong. Chúng ta start project bằng lệnh:
php artisan serve
Và bật LocalTunnel. Đưa port 8000 ra với subdomain bạn tự chọn (và đã sử dụng để cài đặt ở OneSignal - ở đây mình dùng subdomain là namnv609):
lt -s namnv609 -p 8000
Sau khi start LocalTunnel. Bạn có thể truy cập bằng đường dẫn sau: https://<Your subdomain>.localtunnel.me. Khi bạn truy cập vào mà hiển thị được như hình sau là đã thành công 

Bạn nhấn đồng ý và bây giờ thử đăng nhập vào admin qua đường dẫn https://<Your subdomain.localtunnel.me/admin/ rồi thêm bài viết mới xem sao nhé.
Lời kết
Đến đây là kết thúc bài viết của mình. Hy vọng nó sẽ giúp mọi người có cái nhìn cơ bản về webpush notification. Nếu có vấn đề gì mắc phải trong quá trình thực hiện thì mọi người hãy để lại comment ở dưới nhé. Hẹn gặp lại mọi người ở bài viết sau. Chào thân ái và quyết thắng  .
.
Source code: https://github.com/namnv609/laravel-webpush-notification-demo
Original post: https://namnv609.cf/posts/web-push-notification.html
All rights reserved
