Sử dụng Pusher trong Laravel tạo thông báo realtime
Bài đăng này đã không được cập nhật trong 7 năm
1. Giới thiệu
Xin chào các bạn, hôm nay mình muốn chia sẻ về một chủ đề được sử dụng khá nhiều trong các project Laravel đó là thông báo realtime. Bất kì một tác vụ nào cần thông báo realtime như có comment mới, có lượt đăng ký mới, có like bài viết mới, ... v.v chúng ta đều có thể sử dụng chức năng này.
Hiện tại Laravel đã hỗ trợ sẵn chúng ta làm việc này thông qua pusher Broadcast.
Vậy chi tiết như thế nào chúng ta cùng tìm hiểu nhé.
2. Tổng quan
Để tạo được ứng dụng sử dụng dịch vụ này, chúng ta cần:
- Tạo view push notification lên pusher.com
- Dựng 1 client lắng nghe notification được trả về từ pusher.com
- Tạo 1 app trên web https://pusher.com/ để có 1 server lắng nghe client push message đến và trả về cho client khác.
3. Setup
** Ở đây mình giả định các bạn đã cài đặt project Laravel thành công. Bạn nào chưa biết cách cài đặt thì vô đây nha: https://laravel.com/docs/5.7/installation
3.1 Install pusher on laravel
Để dùng được pusher, chúng ta sẽ sử dụng package pusher/pusher-php-server, mở command line của bạn và chạy lệnh:
composer require pusher/pusher-php-server
3.2 Create route Laravel
Trong file này mình sẽ tạo 3 route đó là view để submit form push notification, 1 route để handle xử lý push data to pusher channel và 1 view để xem notification đã push. Dưới đây là nội dung file routes/web.php:
Route::get('/', function () {
    return view('showNotification');
});

Route::get('getPusher', function (){
   return view('form_pusher');
});

Route::get('/pusher', function(Illuminate\Http\Request $request) {
    event(new App\Events\HelloPusherEvent($request));
    return redirect('getPusher');
});
Trong 3 route trên:
- Route / dùng để view notification được nhận từ pusher
- Route /getPusher dùng để get view submit form
- Route /pusher dùng để handle sự kiện submit form và push thông tin vào event pusher.
Tiếp đến chúng ta sẽ tạo view để send notification.
3.3 Create view send notification
Chúng ta sẽ tạo 1 file view để gửi data đến pusher thông qua submit form
Nội dung file view form_pusher.blade.php:
<!DOCTYPE html>
<html lang="en">
<head>
    <meta charset="utf-8">
    <meta http-equiv="X-UA-Compatible" content="IE=edge">
    <meta name="viewport" content="width=device-width, initial-scale=1">
    <title>Demo Application</title>

</head>
<body>

<div class="container">
    <div class="col-md-4 col-md-offset-2">
        <fieldset style="padding-top: 30px">
            <legend>Form pusher:</legend>
            <form action="/pusher">
                <label for="">Message push</label>
                <br>
                <textarea name="contents" id="" cols="33" rows="10"></textarea>

                <br>
                <button class="btn btn-primary">Submit</button>
            </form>
        </fieldset>
    </div>
</div>
</body>
</html>
3.4 Create view receive, show notification
File này sẽ là file index để show notification khi có data từ pusher trả về.
Dưới đây là nội dung file showNotification.blade.php
<!DOCTYPE html>
<html lang="en">
<head>
    <meta charset="utf-8">
    <meta http-equiv="X-UA-Compatible" content="IE=edge">
    <meta name="viewport" content="width=device-width, initial-scale=1">
    <title>Demo Application</title>
    <link rel="stylesheet" href="//maxcdn.bootstrapcdn.com/bootstrap/3.3.7/css/bootstrap.min.css" integrity="sha384-BVYiiSIFeK1dGmJRAkycuHAHRg32OmUcww7on3RYdg4Va+PmSTsz/K68vbdEjh4u" crossorigin="anonymous">
    <style>.dropdown-container{position:absolute;top:100%;left:0;z-index:1000;display:none;float:left;min-width:200px;max-width:330px;margin:2px 0 0;list-style:none;font-size:14px;background-color:#fff;border:1px solid #ccc;border:1px solid rgba(0,0,0,0.15);border-radius:4px;-webkit-box-shadow:0 6px 12px rgba(0,0,0,0.175);box-shadow:0 6px 12px rgba(0,0,0,0.175);background-clip:padding-box}.dropdown-container>.dropdown-menu{position:static;z-index:1000;float:none !important;padding:10px 0;margin:0;border:0;background:transparent;border-radius:0;-webkit-box-shadow:none;box-shadow:none;max-height:330px;overflow-y:auto}.dropdown-container>.dropdown-menu+.dropdown-menu{padding-top:0}.dropdown-menu>li>a{overflow:hidden;white-space:nowrap;word-wrap:normal;text-decoration:none;text-overflow:ellipsis;-o-text-overflow:ellipsis;-webkit-transition:none;-o-transition:none;transition:none}.dropdown-toggle{cursor:pointer}.dropdown-header{white-space:nowrap}.open>.dropdown-container>.dropdown-menu,.open>.dropdown-container{display:block}.dropdown-toolbar{padding-top:6px;padding-left:20px;padding-right:20px;padding-bottom:5px;background-color:#fff;border-bottom:1px solid rgba(0,0,0,0.15);border-radius:4px 4px 0 0}.dropdown-toolbar>.form-group{margin:5px -10px}.dropdown-toolbar .dropdown-toolbar-actions{float:right}.dropdown-toolbar .dropdown-toolbar-title{margin:0;font-size:14px}.dropdown-footer{padding:5px 20px;border-top:1px solid #ccc;border-top:1px solid rgba(0,0,0,0.15);border-radius:0 0 4px 4px}.anchor-block small{display:none}@media (min-width:992px){.anchor-block small{display:block;font-weight:normal;color:#777777}.dropdown-menu>li>a.anchor-block{padding-top:6px;padding-bottom:6px}}@media (min-width:992px){.dropdown.hoverable:hover>ul{display:block}}.dropdown-position-topright{top:auto;right:0;bottom:100%;left:auto;margin-bottom:2px}.dropdown-position-topleft{top:auto;right:auto;bottom:100%;left:0;margin-bottom:2px}.dropdown-position-bottomright{right:0;left:auto}.dropmenu-item-label{white-space:nowrap}.dropmenu-item-content{position:absolute;text-align:right;max-width:60px;right:20px;color:#777777;overflow:hidden;white-space:nowrap;word-wrap:normal;-o-text-overflow:ellipsis;text-overflow:ellipsis}small.dropmenu-item-content{line-height:20px}.dropdown-menu>li>a.dropmenu-item{position:relative;padding-right:66px}.dropdown-submenu .dropmenu-item-content{right:40px}.dropdown-menu>li.dropdown-submenu>a.dropmenu-item{padding-right:86px}.dropdown-inverse .dropdown-menu{background-color:rgba(0,0,0,0.8);border:1px solid rgba(0,0,0,0.9)}.dropdown-inverse .dropdown-menu .divider{height:1px;margin:9px 0;overflow:hidden;background-color:#2b2b2b}.dropdown-inverse .dropdown-menu>li>a{color:#cccccc}.dropdown-inverse .dropdown-menu>li>a:hover,.dropdown-inverse .dropdown-menu>li>a:focus{color:#fff;background-color:#262626}.dropdown-inverse .dropdown-menu>.active>a,.dropdown-inverse .dropdown-menu>.active>a:hover,.dropdown-inverse .dropdown-menu>.active>a:focus{color:#fff;background-color:#337ab7}.dropdown-inverse .dropdown-menu>.disabled>a,.dropdown-inverse .dropdown-menu>.disabled>a:hover,.dropdown-inverse .dropdown-menu>.disabled>a:focus{color:#777777}.dropdown-inverse .dropdown-header{color:#777777}.table>thead>tr>th.col-actions{padding-top:0;padding-bottom:0}.table>thead>tr>th.col-actions .dropdown-toggle{color:#777777}.notifications{list-style:none;padding:0}.notification{display:block;padding:9.6px 12px;border-width:0 0 1px 0;border-style:solid;border-color:#eeeeee;background-color:#fff;color:#333333;text-decoration:none}.notification:last-child{border-bottom:0}.notification:hover,.notification.active:hover{background-color:#f9f9f9;border-color:#eeeeee}.notification.active{background-color:#f4f4f4}a.notification:hover{text-decoration:none}.notification-title{font-size:15px;margin-bottom:0}.notification-desc{margin-bottom:0}.notification-meta{color:#777777}.dropdown-notifications>.dropdown-container,.dropdown-notifications>.dropdown-menu{width:450px;max-width:450px}.dropdown-notifications .dropdown-menu{padding:0}.dropdown-notifications .dropdown-toolbar,.dropdown-notifications .dropdown-footer{padding:9.6px 12px}.dropdown-notifications .dropdown-toolbar{background:#fff}.dropdown-notifications .dropdown-footer{background:#eeeeee}.notification-icon{margin-right:6.8775px}.notification-icon:after{position:absolute;content:attr(data-count);margin-left:-6.8775px;margin-top:-6.8775px;padding:0 4px;min-width:13.755px;height:13.755px;line-height:13.755px;background:red;border-radius:10px;color:#fff;text-align:center;vertical-align:middle;font-size:11.004px;font-weight:600;font-family:"Helvetica Neue",Helvetica,Arial,sans-serif}.notification .media-body{padding-top:5.6px}.btn-lg .notification-icon:after{margin-left:-8.253px;margin-top:-8.253px;min-width:16.506px;height:16.506px;line-height:16.506px;font-size:13.755px}.btn-xs .notification-icon:after{content:'';margin-left:-4.1265px;margin-top:-2.06325px;min-width:6.25227273px;height:6.25227273px;line-height:6.25227273px;padding:0}.btn-xs .notification-icon{margin-right:3.43875px}</style>
    <!--[if lt IE 9]>
    <script src="https://oss.maxcdn.com/html5shiv/3.7.3/html5shiv.min.js"></script>
    <script src="https://oss.maxcdn.com/respond/1.4.2/respond.min.js"></script>
    <![endif]-->
</head>
<body>
<nav class="navbar navbar-inverse">
    <div class="container-fluid">
        <div class="navbar-header">
            <button type="button" class="navbar-toggle collapsed" data-toggle="collapse" data-target="#bs-example-navbar-collapse-9" aria-expanded="false">
                <span class="sr-only">Toggle navigation</span>
                <span class="icon-bar"></span>
                <span class="icon-bar"></span>
                <span class="icon-bar"></span>
            </button>
            <a class="navbar-brand" href="#">Demo App</a>
        </div>

        <div class="collapse navbar-collapse">
            <ul class="nav navbar-nav">
                <li class="dropdown dropdown-notifications">
                    <a href="#notifications-panel" class="dropdown-toggle" data-toggle="dropdown">
                        <i data-count="0" class="glyphicon glyphicon-bell notification-icon"></i>
                    </a>

                    <div class="dropdown-container">
                        <div class="dropdown-toolbar">
                            <div class="dropdown-toolbar-actions">
                                <a href="#">Mark all as read</a>
                            </div>
                            <h3 class="dropdown-toolbar-title">Notifications (<span class="notif-count">0</span>)</h3>
                        </div>
                        <ul class="dropdown-menu">
                        </ul>
                        <div class="dropdown-footer text-center">
                            <a href="#">View All</a>
                        </div>
                    </div>
                </li>
                <li><a href="#">Timeline</a></li>
                <li><a href="#">Friends</a></li>
            </ul>
        </div>
    </div>
</nav>

<script src="//cdnjs.cloudflare.com/ajax/libs/jquery/2.1.4/jquery.min.js"></script>
<script src="//js.pusher.com/3.1/pusher.min.js"></script>
<script src="//maxcdn.bootstrapcdn.com/bootstrap/3.3.7/js/bootstrap.min.js" integrity="sha384-Tc5IQib027qvyjSMfHjOMaLkfuWVxZxUPnCJA7l2mCWNIpG9mGCD8wGNIcPD7Txa" crossorigin="anonymous"></script>

<script type="text/javascript">
    var notificationsWrapper   = $('.dropdown-notifications');
    var notificationsToggle    = notificationsWrapper.find('a[data-toggle]');
    var notificationsCountElem = notificationsToggle.find('i[data-count]');
    var notificationsCount     = parseInt(notificationsCountElem.data('count'));
    var notifications          = notificationsWrapper.find('ul.dropdown-menu');

    if (notificationsCount <= 0) {
        notificationsWrapper.hide();
    }

    //Thay giá trị PUSHER_APP_KEY vào chỗ xxx này nhé
    var pusher = new Pusher('xxxxxxxxxxxxxxxxxxxxx', {
        encrypted: true,
        cluster: "ap1"
    });

    // Subscribe to the channel we specified in our Laravel Event
    var channel = pusher.subscribe('development');

    // Bind a function to a Event (the full Laravel class)
    channel.bind('App\\Events\\HelloPusherEvent', function(data) {
        var existingNotifications = notifications.html();
        var avatar = Math.floor(Math.random() * (71 - 20 + 1)) + 20;
        var newNotificationHtml = `
          <li class="notification active">
              <div class="media">
                <div class="media-left">
                  <div class="media-object">
                    <img src="https://api.adorable.io/avatars/71/`+avatar+`.png" class="img-circle" alt="50x50" style="width: 50px; height: 50px;">
                  </div>
                </div>
                <div class="media-body">
                  <strong class="notification-title">`+data.message+`</strong>
                  <!--p class="notification-desc">Extra description can go here</p-->
                  <div class="notification-meta">
                    <small class="timestamp">about a minute ago</small>
                  </div>
                </div>
              </div>
          </li>
        `;
        notifications.html(newNotificationHtml + existingNotifications);

        notificationsCount += 1;
        notificationsCountElem.attr('data-count', notificationsCount);
        notificationsWrapper.find('.notif-count').text(notificationsCount);
        notificationsWrapper.show();
    });
</script>
</body>
</html>
3.3 Create event for pusher
Dưới dây là nội dung file app/Events/HelloPusherEvent.php, file này đơn giản chỉ là lấy data từ form submit để push sang pusher
<?php
namespace App\Events;

use Illuminate\Broadcasting\InteractsWithSockets;
use Illuminate\Contracts\Broadcasting\ShouldBroadcast;
use Illuminate\Foundation\Events\Dispatchable;
use Illuminate\Http\Request;
use Illuminate\Queue\SerializesModels;

class HelloPusherEvent implements ShouldBroadcast
{
    use Dispatchable, InteractsWithSockets, SerializesModels;

    public $message;

    public function __construct(Request $request)
    {
        $this->message  = $request->contents;
    }

    public function broadcastOn()
    {
        return ['development'];
    }
}
4. Tạo app trên pusher.com
Các bạn truy cập vào web https://pusher.com/ đăng ký tài khoản sau đó đăng nhập và tạo app:

Sau khi tạo app các bạn vào xem detail channel mới tạo sẽ nhận được:
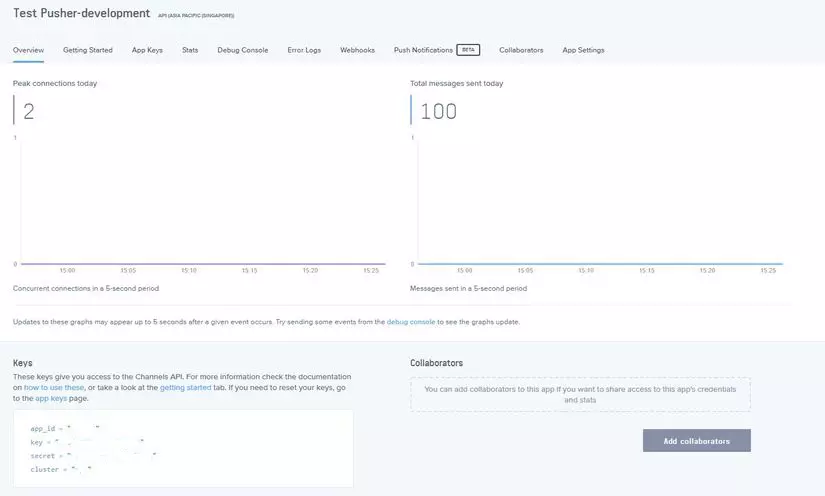
app_id = "xxxxx"
key = "xxxxxxxxxxxxxxxxxxxxx"
secret = "xxxxxxxxxxxxxxxxxxxxxx"
cluster = "ap1"
và cập nhật lại file .env như sau:
BROADCAST_DRIVER=pusher

PUSHER_APP_ID=xxxxx
PUSHER_APP_KEY=xxxxxxxxxxxxxxxxxxxxx
PUSHER_APP_SECRET=xxxxxxxxxxxxxxxxxxxxx
PUSHER_APP_CLUSTER=ap1
5. Demo app
Mời các bạn theo dõi trong ảnh nhé 
6. Kết luận
Như vậy mình đã demo và hướng dẫn cho các bạn cách tạo dựng app để push notification realtime trên ứng dụng laravel.
Các bạn có thể tự áp dụng notification trong project của mình rồi nhé  Bài viết dự trên kinh nghiệm bản thân và tài liệu tham khảo, nếu có chỗ nào thắc mắc hay cần thảo luận các bạn vui lòng để lại comment bên dưới nhé.
Tài liệu tham khảo
Cảm ơn các bạn đã theo dõi bài viết của mình, hẹn gặp lại các bạn trong bài viết tiếp theo .
All rights reserved
