Triển khai Notification Bubbles cho android như facebook
Bài đăng này đã không được cập nhật trong 4 năm
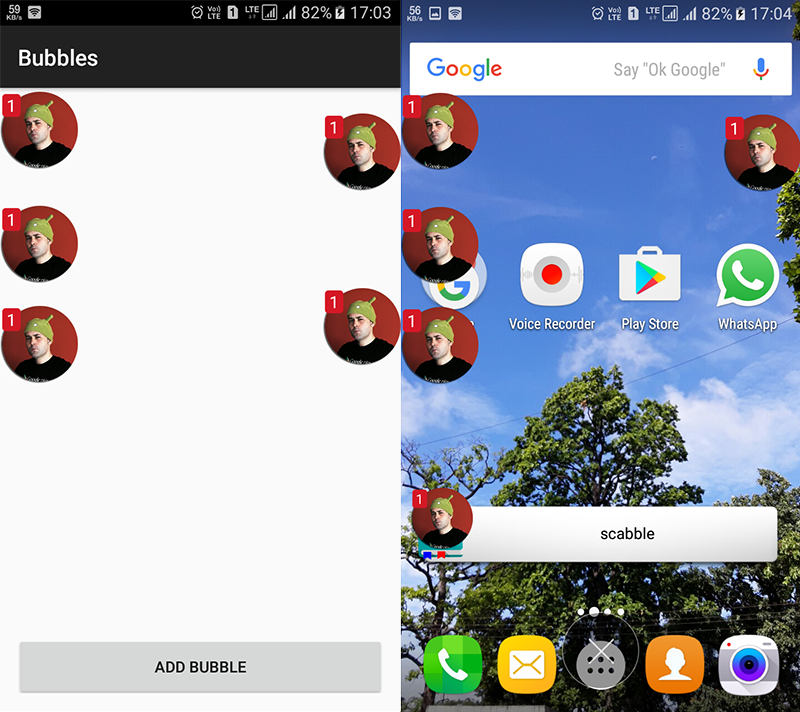
Với post này bạn học :
- Thêm notification bubbles cho chương trình android theo như yêu cầu của bạn.
- Bạn cũng sẽ định nghĩa OnClickes và những sự kiện khác trên notification bubles được tạo ra.
 !
!
Triển khai Notification Bubbles cho Android
Tạo ra một project mới Android Studio với activity trống và thêm thư viện vào project của bạn như dưới đây. Điều này sẽ thêm Bubbles cho thư viện android và do đó làm tăng các chức năng mà đòi hỏi cho project này. Trong Project level gradle bạn thêm dòng sau đây:
allprojects {
    repositories {
        jcenter()
        //The line below is added.
        maven {
            url "https://jitpack.io"
        }
    }
}
Trong app level gradle, bạn thêm dòng sau đây:
dependencies {
    compile fileTree(dir: 'libs', include: ['*.jar'])
    androidTestCompile('com.android.support.test.espresso:espresso-core:2.2.2', {
        exclude group: 'com.android.support', module: 'support-annotations'
    })
    compile 'com.android.support:appcompat-v7:24.2.1'

    //The line below is added.
    compile 'com.txusballesteros:bubbles:1.2.1'
    testCompile 'junit:junit:4.12'
}
Bây giờ thì sync project của bạn để dow những thư viện đòi hỏi Khi bạn đã có thư viện bubbles thì bạn tiếp theo config MainActivity.java và activity_main.xml. Dưới đây là MainActivity.java đơn giản nó bao gồm các phương thức để tạo mới bubble định nghĩa trên sự kiện click. Ngoài những phương thức này nó cũng có thêm nhiệm vụ cho bubbles để trải ra window ở bất kỳ lúc nào . Nên add code dưới đây tới MainActivity.java
package chutka.bitman.com.bubblesforandroidsimplified;

import android.app.Service;
import android.content.Intent;
import android.net.Uri;
import android.os.Build;
import android.provider.Settings;
import android.os.Bundle;
import android.support.v7.app.ActionBarActivity;
import android.view.LayoutInflater;
import android.view.View;
import android.widget.Toast;

import com.txusballesteros.bubbles.BubbleLayout;
import com.txusballesteros.bubbles.BubblesManager;
import com.txusballesteros.bubbles.OnInitializedCallback;

public class MainActivity extends ActionBarActivity {

    private BubblesManager bubblesManager;

    @Override
    protected void onCreate(Bundle savedInstanceState) {
        super.onCreate(savedInstanceState);
        setContentView(R.layout.activity_main);
        initializeBubblesManager();

        //Setting the onClick listener the Add Bubble button
        findViewById(R.id.add).setOnClickListener(new View.OnClickListener() {
            @Override
            public void onClick(View v) {
                addNewBubble();
            }
        });


        //Permission to allow the bubble to overlay the window
        if(Build.VERSION.SDK_INT >= 23) {
            if (!Settings.canDrawOverlays(MainActivity.this)) {
                Intent intent = new Intent(Settings.ACTION_MANAGE_OVERLAY_PERMISSION,
                        Uri.parse("package:" + getPackageName()));
                startActivityForResult(intent, 1234);
            }
        }
        else
        {
            Intent intent = new Intent(MainActivity.this, Service.class);
            startService(intent);
        }
    }


    //This method is executed to add a new bubble.
    private void addNewBubble() {
        BubbleLayout bubbleView = (BubbleLayout)LayoutInflater.from(MainActivity.this).inflate(R.layout.bubble_layout, null);
        bubbleView.setOnBubbleRemoveListener(new BubbleLayout.OnBubbleRemoveListener() {
            @Override
            public void onBubbleRemoved(BubbleLayout bubble) { }
        });

        //The Onclick Listener for the bubble has been set below.
        bubbleView.setOnBubbleClickListener(new BubbleLayout.OnBubbleClickListener() {

            @Override
            public void onBubbleClick(BubbleLayout bubble) {

                //Do what you want onClick of bubble.
                Toast.makeText(getApplicationContext(), "Clicked !",
                        Toast.LENGTH_SHORT).show();
            }
        });
        bubbleView.setShouldStickToWall(true);
        bubblesManager.addBubble(bubbleView, 60, 20);
    }

    private void initializeBubblesManager() {
        bubblesManager = new BubblesManager.Builder(this)
                .setTrashLayout(R.layout.bubble_trash_layout)
                .setInitializationCallback(new OnInitializedCallback() {
                    @Override
                    public void onInitialized() {
                        addNewBubble();
                    }
                })
                .build();
        bubblesManager.initialize();
    }

    @Override
    protected void onDestroy() {
        super.onDestroy();
        bubblesManager.recycle();
    }
}
Đây là activity_main.xml. Có một nút để thêm bubbles.
<?xml version="1.0" encoding="utf-8"?>

<RelativeLayout xmlns:android="http://schemas.android.com/apk/res/android"
    xmlns:tools="http://schemas.android.com/tools" android:layout_width="match_parent"
    android:layout_height="match_parent" android:paddingLeft="@dimen/activity_horizontal_margin"
    android:paddingRight="@dimen/activity_horizontal_margin"
    android:paddingTop="@dimen/activity_vertical_margin"
    android:paddingBottom="@dimen/activity_vertical_margin" tools:context=".MainActivity">

    <Button
        android:id="@+id/add"
        android:layout_width="match_parent"
        android:layout_height="wrap_content"
        android:layout_alignParentBottom="true"
        android:text="Add Bubble"/>

</RelativeLayout>
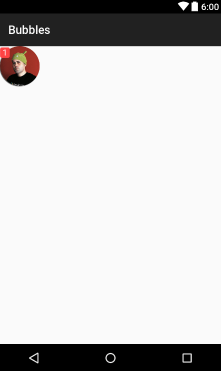
Bây giờ chúng ta tạo ra một số file resources để config bubbles. Bắt đầu tạo ra một layout resources file tên là bubble_layout.xml và thêm code dưới đây. The TextView là sử dụng để trưng bày số lời nhắn mà xuất hiện màu đỏ và bạn config theo như bạn muốn.
<?xml version="1.0" encoding="utf-8"?>

<com.txusballesteros.bubbles.BubbleLayout
    xmlns:android="http://schemas.android.com/apk/res/android"
    android:layout_width="wrap_content"
    android:layout_height="wrap_content"
    android:clipChildren="false"
    android:clipToPadding="false">

    <ImageView
        android:id="@+id/avatar"
        android:layout_width="70dp"
        android:layout_height="70dp"
        android:layout_gravity="center"
        android:background="@drawable/profile_decorator"
        android:src="@drawable/profile"
        android:scaleType="centerCrop"/>

    <TextView
        android:layout_width="wrap_content"
        android:layout_height="wrap_content"
        android:textColor="@android:color/white"
        android:textSize="15sp"
        android:layout_marginTop="2dp"
        android:layout_marginLeft="2dp"
        android:paddingLeft="4dp"
        android:paddingRight="4dp"
        android:background="@drawable/bubble_counter_bkg"
        android:text="1"/>

</com.txusballesteros.bubbles.BubbleLayout>
Code phía trên sẽ tạo ra output như dưới đậy
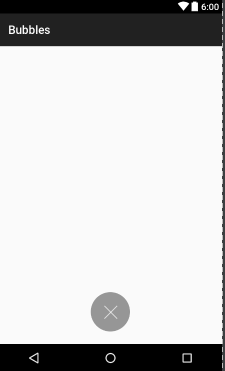
Tiếp theo tạo ra một layout resource khác tên là bubble_trash_layout.xml và thêm code dưới đây. Nó đơn giản chứa ImageView đã được dùng để chỉ ra bubble trash container.
<?xml version="1.0" encoding="utf-8"?>

<ImageView
    xmlns:android="http://schemas.android.com/apk/res/android"
    android:layout_width="wrap_content"
    android:layout_height="wrap_content"
    android:layout_marginBottom="20dp"
    android:src="@drawable/bubble_trash_background"
    android:layout_gravity="bottom|center_horizontal" />
Code trên sẽ tạo ra shown dưới đây:
Tiếp theo tạo ra drawable resource file tên là bubble_counter_bkg.xml và thêm code sau. Nó config hình dạng và background của tag mà có màu đỏ và trưng bày số lời nhắn
<?xml version="1.0" encoding="utf-8"?>
<shape android:shape="rectangle" xmlns:android="http://schemas.android.com/apk/res/android">
    <corners android:radius="3dp" />
    <solid android:color="@android:color/holo_red_light" />
</shape>
Tiếp theo get image đòi hỏi từ link sau và copy chúng vào thư mục drawable . Đảm bảo chắc chắn bạn không thay tên của hình ảnh. Nếu bạn thay tên bạn cũng sẽ cần phải thay một số dòng trong file xml.
Đã xong giờ chỉ cần set permission vào manifest như dưới đây:
<?xml version="1.0" encoding="utf-8"?>
<manifest xmlns:android="http://schemas.android.com/apk/res/android"
    package="chutka.bitman.com.bubblesforandroidsimplified">

    <!--This permission is added-->
    <uses-permission android:name="android.permission.SYSTEM_ALERT_WINDOW"/>

    <application
        android:allowBackup="true"
        android:icon="@mipmap/ic_launcher"
        android:label="@string/app_name"
        android:supportsRtl="true"
        android:theme="@style/AppTheme">
        <activity android:name=".MainActivity">
            <intent-filter>
                <action android:name="android.intent.action.MAIN" />

                <category android:name="android.intent.category.LAUNCHER" />
            </intent-filter>
        </activity>
    </application>

</manifest>
Nguồn dịch : https://www.simplifiedcoding.net/notification-bubbles-for-android/
All rights reserved
