Android làm việc với cơ sở dữ liệu Firebase Realtime (Phần 2)
Bài đăng này đã không được cập nhật trong 8 năm
Dưới đây là nội dung kế tiếp của bài viết. Để xem phần đầu xin tham chiếu link sau : https://viblo.asia/p/android-lam-viec-voi-co-so-du-lieu-firebase-realtime-con-tiep-gGJ5927DKX2
3.4 Xóa dữ liệu
Để xóa dữ liệu, bạn chỉ cần gọi phương thức removeValue () trên cơ sở dữ liệu tham chiếu. Bạn cũng có thể truyền null để setValue () mà làm cùng một hoạt động xóa.
4. An ninh và Nội quy
Các quy tắc Firebase cung cấp một cách xác định vai trò người dùng trong khi thực hiện các thao tác đọc và ghi. Các quy tắc này sẽ hoạt động một lớp bảo mật trên máy chủ trước khi thực hiện bất kỳ hoạt động CRUD nào. Theo mặc định, các quy tắc cho phép người dùng thực hiện thao tác đọc và ghi chỉ sau khi xác thực.
Các quy tắc dưới đây cho phép người dùng xác thực chỉ đọc hoặc ghi dữ liệu.
{
  "rules": {
    ".read": "auth != null",
    ".write": "auth != null"
  }
}
Dưới đây quy tắc cho phép mọi người đọc và ghi dữ liệu mà không cần xác thực.
{
  "rules": {
    ".read": true,
    ".write": true
  }
}
Bạn cũng có thể sử dụng các quy tắc này để xác thực dữ liệu trước khi chèn vào cơ sở dữ liệu. Ví dụ dưới đây các quy tắc xác nhận tên có ít hơn 50 ký tự và email là hợp lệ sử dụng biểu thức chính quy email.
{
    "rules": {
        ".read": true,
        ".write": true,
        "users": {
            "$user": {
                "name": {
                    ".validate": "newData.isString() && newData.val().length < 50"
                },
                "email": {
                    ".validate": "newData.isString() && newData.val().matches(/^[A-Z0-9._%+-]+@[A-Z0-9.-]+\\.[A-Z]{2,4}$/i)"
                }
            }
        }
    }
}
5. Tạo dự án Android
-
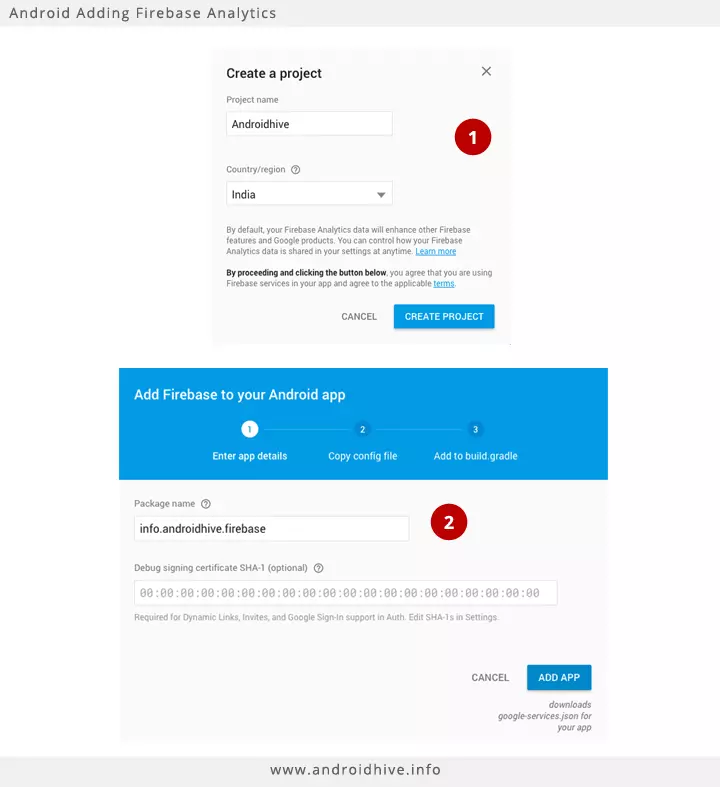
Điều đầu tiên bạn cần làm là vào https://firebase.google.com/ và tạo tài khoản để truy cập vào console của họ. Sau khi bạn truy cập vào giao diện điều khiển bạn có thể bắt đầu bằng cách tạo dự án đầu tiên của bạn
-
Cung cấp tên gói của dự án của bạn (chả hạn của tôi là info.androidhive.firebase), trong đó bạn sẽ tích hợp Firebase. Ở đây, tệp google-services.json sẽ được tải xuống khi bạn nhấn nút Thêm ứng dụng.
-
Tạo một dự án mới trong Android Studio từ Tệp ⇒ Dự án mới. Trong khi điền các chi tiết của dự án, sử dụng cùng một tên gói mà bạn đã cung cấp trong console firebase. Trong trường hợp của tôi tôi đang sử dụng cùng một info.androidhive.firebase.
-
Dán tệp google-services.json vào thư mục ứng dụng của dự án. Bước này rất quan trọng vì dự án của bạn sẽ không xây dựng mà không có tệp tin này.
-
Bây giờ mở build.gradle nằm trong thư mục chính của dự án và thêm Google PlayStation.
build.gradle
dependencies {
        classpath 'com.android.tools.build:gradle:2.2.0'
        classpath 'com.google.gms:google-services:3.0.0'

        // NOTE: Do not place your application dependencies here; they belong
        // in the individual module build.gradle files
    }
- Mở ứng dụng / build.gradle và thêm cơ sở dữ liệu firebase . Ở cuối cùng của tệp, thêm plugin ứng dụng: 'com.google.gms.google-services'
app/build.gradle
dependencies {
    // Adding support library for this demo app
    compile 'com.android.support:design:24.2.1'

    compile 'com.google.firebase:firebase-database:9.6.1'
}

apply plugin: 'com.google.gms.google-services'
- Để lưu trữ hồ sơ người dùng, chúng ta cần một lớp mô hình được gọi là User.java. Tạo một lớp có tên User.java và thêm thuộc tính lớp dưới đây. Nếu Bạn muốn bạn có thể thêm vài tài sản khác như địa chỉ, điện thoại di động vv,
User.java
package info.androidhive.firebase;

import com.google.firebase.database.IgnoreExtraProperties;

/**
 * Created by Ravi Tamada on 07/10/16.
 * www.androidhive.info
 */

@IgnoreExtraProperties
public class User {

    public String name;
    public String email;

    // Default constructor required for calls to
    // DataSnapshot.getValue(User.class)
    public User() {
    }

    public User(String name, String email) {
        this.name = name;
        this.email = email;
    }
}
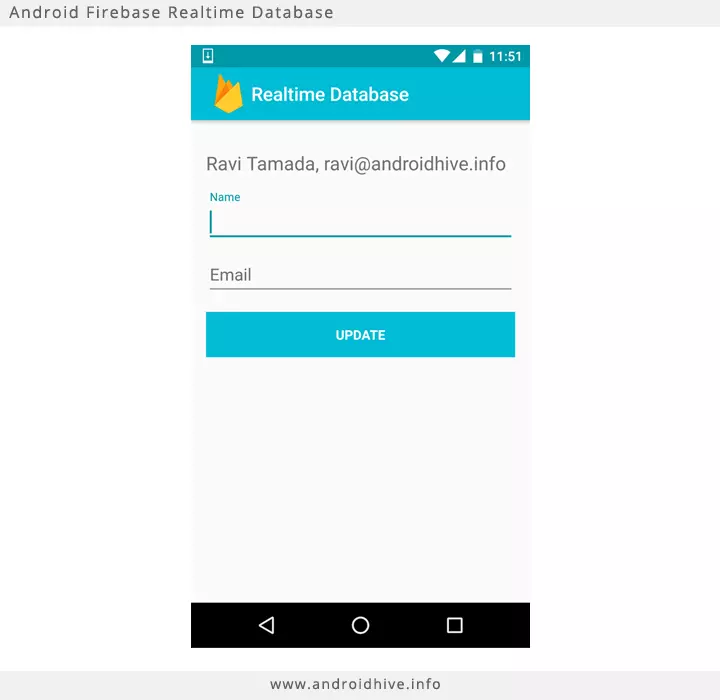
8.Mở tệp bố cục hoạt động chính_main.xml hoạt động và thêm bố cục dưới đây. Bố cục này tạo ra một hình thức đơn giản, nơi bạn có thể nhập dữ liệu tiểu sử để lưu trữ trong cơ sở dữ liệu.
activity_main.xml
<?xml version="1.0" encoding="utf-8"?>
<LinearLayout xmlns:android="http://schemas.android.com/apk/res/android"
    xmlns:tools="http://schemas.android.com/tools"
    android:id="@+id/activity_main"
    android:layout_width="match_parent"
    android:layout_height="match_parent"
    android:orientation="vertical"
    android:paddingBottom="@dimen/activity_vertical_margin"
    android:paddingLeft="@dimen/activity_horizontal_margin"
    android:paddingRight="@dimen/activity_horizontal_margin"
    android:paddingTop="@dimen/activity_vertical_margin"
    tools:context="info.androidhive.firebase.MainActivity">

    <TextView
        android:id="@+id/txt_user"
        android:layout_width="wrap_content"
        android:layout_height="wrap_content"
        android:paddingBottom="@dimen/activity_horizontal_margin"
        android:paddingTop="@dimen/activity_horizontal_margin"
        android:textSize="20dp" />

    <LinearLayout
        android:layout_width="match_parent"
        android:layout_height="wrap_content"
        android:orientation="vertical">

        <android.support.design.widget.TextInputLayout
            android:layout_width="match_parent"
            android:layout_height="wrap_content">

            <EditText
                android:id="@+id/name"
                android:layout_width="match_parent"
                android:layout_height="wrap_content"
                android:hint="@string/name"
                android:inputType="textCapWords"
                android:maxLines="1" />

        </android.support.design.widget.TextInputLayout>

        <android.support.design.widget.TextInputLayout
            android:layout_width="match_parent"
            android:layout_height="wrap_content">

            <EditText
                android:id="@+id/email"
                android:layout_width="match_parent"
                android:layout_height="wrap_content"
                android:hint="@string/email"
                android:inputType="textEmailAddress"
                android:maxLines="1" />

        </android.support.design.widget.TextInputLayout>

        <Button
            android:id="@+id/btn_save"
            style="?android:textAppearanceSmall"
            android:layout_width="match_parent"
            android:layout_height="wrap_content"
            android:layout_marginTop="16dp"
            android:background="@color/colorPrimary"
            android:text="@string/action_save"
            android:textColor="@android:color/white"
            android:textStyle="bold" />

    </LinearLayout>

</LinearLayout>
- Mở MainActivity.java và thực hiện những thay đổi cần thiết dưới đây. Mã này rất đơn giản và dễ hiểu. Mục tiêu của chúng tôi là tạo cấu trúc json dưới đây trong đó 'app_title' lưu tiêu đề ứng dụng. 'Người dùng lưu trữ hồ sơ người dùng như một mảng các nút.
{
  "app_title" : "Realtime Database",
  "users" : {
    "-KTYWvZG4Qn9ZYTc47O6" : {
      "email" : "ravi@androidhive.info",
      "name" : "Ravi Tamada"
    }
  }
}
getReference(“app_title”) create a node named app_title which stores the toolbar title.
getReference(“users”) gets reference to users node.
createUser() method stores a new user in realtime database
updateUser() method updates user information like name and email.
MainActivity.java
package info.androidhive.firebase;

import android.os.Bundle;
import android.support.v7.app.AppCompatActivity;
import android.text.TextUtils;
import android.util.Log;
import android.view.View;
import android.widget.Button;
import android.widget.EditText;
import android.widget.TextView;

import com.google.firebase.database.DataSnapshot;
import com.google.firebase.database.DatabaseError;
import com.google.firebase.database.DatabaseReference;
import com.google.firebase.database.FirebaseDatabase;
import com.google.firebase.database.ValueEventListener;

public class MainActivity extends AppCompatActivity {

    private static final String TAG = MainActivity.class.getSimpleName();
    private TextView txtDetails;
    private EditText inputName, inputEmail;
    private Button btnSave;
    private DatabaseReference mFirebaseDatabase;
    private FirebaseDatabase mFirebaseInstance;

    private String userId;

    @Override
    protected void onCreate(Bundle savedInstanceState) {
        super.onCreate(savedInstanceState);
        setContentView(R.layout.activity_main);

        // Displaying toolbar icon
        getSupportActionBar().setDisplayShowHomeEnabled(true);
        getSupportActionBar().setIcon(R.mipmap.ic_launcher);

        txtDetails = (TextView) findViewById(R.id.txt_user);
        inputName = (EditText) findViewById(R.id.name);
        inputEmail = (EditText) findViewById(R.id.email);
        btnSave = (Button) findViewById(R.id.btn_save);

        mFirebaseInstance = FirebaseDatabase.getInstance();

        // get reference to 'users' node
        mFirebaseDatabase = mFirebaseInstance.getReference("users");

        // store app title to 'app_title' node
        mFirebaseInstance.getReference("app_title").setValue("Realtime Database");

        // app_title change listener
        mFirebaseInstance.getReference("app_title").addValueEventListener(new ValueEventListener() {
            @Override
            public void onDataChange(DataSnapshot dataSnapshot) {
                Log.e(TAG, "App title updated");

                String appTitle = dataSnapshot.getValue(String.class);

                // update toolbar title
                getSupportActionBar().setTitle(appTitle);
            }

            @Override
            public void onCancelled(DatabaseError error) {
                // Failed to read value
                Log.e(TAG, "Failed to read app title value.", error.toException());
            }
        });

        // Save / update the user
        btnSave.setOnClickListener(new View.OnClickListener() {
            @Override
            public void onClick(View view) {
                String name = inputName.getText().toString();
                String email = inputEmail.getText().toString();

                // Check for already existed userId
                if (TextUtils.isEmpty(userId)) {
                    createUser(name, email);
                } else {
                    updateUser(name, email);
                }
            }
        });

        toggleButton();
    }

    // Changing button text
    private void toggleButton() {
        if (TextUtils.isEmpty(userId)) {
            btnSave.setText("Save");
        } else {
            btnSave.setText("Update");
        }
    }

    /**
     * Creating new user node under 'users'
     */
    private void createUser(String name, String email) {
        // TODO
        // In real apps this userId should be fetched
        // by implementing firebase auth
        if (TextUtils.isEmpty(userId)) {
            userId = mFirebaseDatabase.push().getKey();
        }

        User user = new User(name, email);

        mFirebaseDatabase.child(userId).setValue(user);

        addUserChangeListener();
    }

    /**
     * User data change listener
     */
    private void addUserChangeListener() {
        // User data change listener
        mFirebaseDatabase.child(userId).addValueEventListener(new ValueEventListener() {
            @Override
            public void onDataChange(DataSnapshot dataSnapshot) {
                User user = dataSnapshot.getValue(User.class);

                // Check for null
                if (user == null) {
                    Log.e(TAG, "User data is null!");
                    return;
                }

                Log.e(TAG, "User data is changed!" + user.name + ", " + user.email);

                // Display newly updated name and email
                txtDetails.setText(user.name + ", " + user.email);

                // clear edit text
                inputEmail.setText("");
                inputName.setText("");

                toggleButton();
            }

            @Override
            public void onCancelled(DatabaseError error) {
                // Failed to read value
                Log.e(TAG, "Failed to read user", error.toException());
            }
        });
    }

    private void updateUser(String name, String email) {
        // updating the user via child nodes
        if (!TextUtils.isEmpty(name))
            mFirebaseDatabase.child(userId).child("name").setValue(name);

        if (!TextUtils.isEmpty(email))
            mFirebaseDatabase.child(userId).child("email").setValue(email);
    }
}
Chạy và kiểm tra ứng dụng một lần. Bạn sẽ có thể nhìn thấy những thay đổi trong thời gian thực trong bảng điều khiển firebase của bạn. Kiểm tra video Demo cho biết cách chạy và thử nghiệm ứng dụng.
Source : https://www.androidhive.info/2016/10/android-working-with-firebase-realtime-database/
All rights reserved
