
Triển khai Faster RCNN cho các bài toán detection
Bài đăng này đã không được cập nhật trong 6 năm
Đây là bài viết trong series Trà chanh- chém gió về paper
I. Introduction
Xin chào các bạn trong bài viết trước mình đã giới thiệu tới các bạn bài viết Xây dựng mạng nhận diện cảm xúc khuôn mặt cho người mới bắt đầu các bạn có thể đọc thêm theo đường link dưới đây. Như mình đã nói ở bài viết trước thì mình có dùng hàm cv2.CascadeClassifier('haarcascade_frontalface_default.xml') để detect khuôn mặt thì trong bài viết này mình sẽ cùng các bạn xây dựng một mô hình detect khuôn mặt dựa trên bộ FDDB face dataset. Lý do mình chọn mô hình này mà không chọn các mô hình cho Face Detection vì Faster RCNN sẽ dùng được cho các bài toán Object Detection nên các bạn có thể triển khai trên các bài toán khác nhau và bộ dữ liệu này mình đã có sẵn nên mình dùng luôn  . Qua bài viết này mong các bạn có thể hiểu thêm về mô hình Faster RCNN hoạt động như thế nào và cách implement nó, bài viết tiếp theo mình sẽ cùng các bạn thực hiện training mô hình Faster RCNN trên detectron2 cái tên có lẽ không còn xa lạ với mọi người.
https://viblo.asia/p/real-time-emotion-detection-xay-dung-mang-nhan-dien-cam-xuc-khuon-mat-cho-nguoi-moi-bat-dau-vyDZONmQKwj
Các bạn có thể tìm hiểu thêm về các thuật toán Object Detection qua các bài viết trên viblo như sau:
- Thuật toán Faster-RCNN với bài toán phát hiện đường lưỡi bò - Faster-RCNN object detection algorithm for Nine-dash-line detection! - một bài viết rất chi tiết của tác giả Phan Huy Hoàng về việc phân loại các thuật toán Object Detection cũng như giải thích chi tiết về mô hình Faster RCNN, các cách đánh giá độ hiệu quả của mô hình.... và mình nghĩ đó là một bài viết các bạn nên đọc
- Tìm hiểu về YOLO trong bài toán real-time object detection - một bài viết về YOLO của mình
- A discussion of SSD Intuition - tác giả Nguyễn Minh Tâm về SSD
- Sử dụng Tensorflow API cho bài toán Object Detection - tác giả Phạm Thị Hồng Anh
II.Faster R-CNN (Brief explanation)
Trong bài viết của tác giả Phan Huy Hoanganh ấy cũng đã nói rất chi tiết về mô hình thuật toán, các hàm loss và cách đánh giá mô hình nên mình cũng tóm gọn về các khái niệm cũng như ý tưởng chính của paper và mình sẽ tập trung hơn vào các phần kiến trúc của mô hình để qua đó các bạn có thể hiểu chi tiết hơn về các đoạn code của mô hình.
Nguồn
Được viết bởi Shaoqing Ren, Kaiming He, Ross Girshick, and Jian Sun
https://github.com/rbgirshick/py-faster-rcnn
Ý tưởng chính
R-CNN được giới thiệu lần đầu vào 2014 bởi Ross Girshick và các cộng sự ở UC Berkeley, nó là một trong những ứng dụng nền móng đầu tiên của mạng nơ ron tích chập đối với vấn đề định vị, phát hiện và phân đoạn đối tượng. Nó sử dụng search selective để tìm ra các regions of interests sau đó cho qua mạng ConvNet. Nó cố gắng tìm ra các khu vực mà nó có thể là đối tượng bằng cách kết hợp các pixel tương tự. RCNN sử dụng 2000 khu vực đề xuất (proposed areas (rectangular boxes)) từ search selective. Sau đó 2000 proposed area này sẽ được cho qua một mạng pre-trained CNN model. Cuối cùng feature map thu được sẽ được cho qua SVM để classification. Faster RCNN thì đã có một bước cải tiến đột phá bằng việc thay vì sử dụng search selective thì nó dùng một mạng RPN(Region Proposal Network) để trích suất ra các vùng có khả năng chứa đối tượng về cơ bản thì nó cải thiện được tốc độ hơn rất nhiều so với RCNN hay Fast RCNN. 
Anchors
Anchors box đóng một vai trò rất quan trọng trong mô hình FasterRCNN. Đơn giản để hiểu thì anchor box chính là một box. Trong cấu hình mặc định của Faster RCNN thì có tất cả 9 anchor box được đề xuất tại 1 vị trí trong ảnh. Ví dụ hình dưới đây có 9 anchor box tại toạ độ (320,320) trong 1 ảnh có kích thước (600,800).

Để đơn giản hơn các bạn có thể thấy trong hình ảnh này với:
- 3 màu sắc đại diện cho 3 kích thước 128x128, 256x256, 512x512.
- 3 hộp với 3 tỉ lệ kích thước 1:1, 1:2, 2:1
RPN(Region Proposal Network)
Về cơ bản nhìn thì ta có thể thấy rằng mô hình Faster RCNN kế thừa từ Fast RCNN bằng việc thay serch selective bằng lớp RPN. Chúng ta sẽ cùng bóc tách mô hình sau. Giả sử đầu vào là một hình ảnh với kich thước 600x800x3 sau đó được đưa qua mạng VGG16 thu được feature map với kích thước 37x50x256.

Sau khi ta thu được feature map từ VGG16 được đưa qua mạng RPN. RPN là một mạng fully convolution network nên không cần một kích thước đầu vào cố định. RPN sử dụng một Conv với 3x3 filters, 1 padding, 512 output channels. Đầu ra được chia làm 2 nhánh 1 cho binary object classification, 1 cho bounding box regression( với classification ở đây để dự đoán xem box đó có phải là đối tượng hay không). Cả 2 nhánh đều sử dụng conv với 1x1 filter. 
Đầu ra của RPN là các box được đề xuất hay ta thường gọi là proposal box sau đó cho qua một classifier and regressor để kiểm tra xem có sự xuất hiện của đối tượng hay không bằng cách dự đoán các box đó có chứa đổi tượng hay không và định nghĩa các box đó.

Ý tưởng cơ bản của object classification là training một mạng để phân loại các anchor box trước đó thành với label là các ground-truth boxes. Với binary object classification sẽ cho đầu ra là 2k channel output với k ở đây là tổng số lượng anchor box với 2 ở đây là vì chúng ta chỉ quan tâm box đó có chưa đối tượng hay không. Với bounding box regression thì có 4k channel output, với 4 là đặc trưng cho 4 tọa độ offset (x, y, w, h). Trong paper thì tác giả có sử dụng hàm smooth-L1 loss, hàm loss của RPN là loss tổng của classification và regression.
Khi đọc các paper về object detection có thể các bạn không còn xa lạ gì với anchor. Anchor box được hiểu ở đây là các prediction box được định nghĩa trước lúc huấn luyện. Với faster-rcnn thì dùng 9 anchor box ứng với từng điểm pixel trên feature map. Ví dụ feature map đầu ra đang là 37x50x256 thì tổng số anchor box sẽ là 37x50x9=16650. Các anchor box được đưa vào thuật toán NMS để chắc chắn rằng các vùng dự đoán không chồng chéo lên nhau. Kết thúc RPN sẽ được đưa vào lớp ROI POOLING để cố định kích thước đầu vào các feature map trước khi đưa vào mạng gồm nhánh fully connected.
Các bạn có thể đọc thêm để hiểu hơn về ROI theo link dưới đây:
https://blog.deepsense.ai/region-of-interest-pooling-explained/
Điểm cộng
- Với việc Faster RCNN sử dụng mạng RPN giúp cải thiện chất lượng đề xuất các khu vực được cho là có chứa đối tượng từ đó tăng độ chính xác của mô hình.
- Mô hình phát hiện được những vật thể nhỏ
Điểm trừ
- Mô hình nặng không phù hợp chạy trên các thiết bị nhúng
- Sau khi mô hình học tìm được các proposal box từ mạng RPN thì nó sẽ được cho qua thuật toán NMS. Thuật toán NMS sẽ loại đi các box mà nó cho rừng không chứa đối tượng. Trước tiên nó sẽ chọn 1 box có confidence được cho là ground cao nhất, thêm nó vào 1 mảng, sau đó thêm tất cả các box có IOU với box này lớp hơn một ngưỡng sau đó loại đi những box này. Làm vậy cho tới khi mà thu được số lượng box được yêu cầu. Từ đó có thể thấy rằng việc chọn ngưỡng ở đây có thể loại đi những positive box.
III. Faster RCNN (implement code)
Trong bài viết này mình sẽ cùng các bạn triển khai và giải thích chi tiết hơn các phần cơ bản của thuật toán faster rcnn. Chúng ta cùng xem lại kiến trúc tổng quan của faster-rcnn theo hình dưới đây: 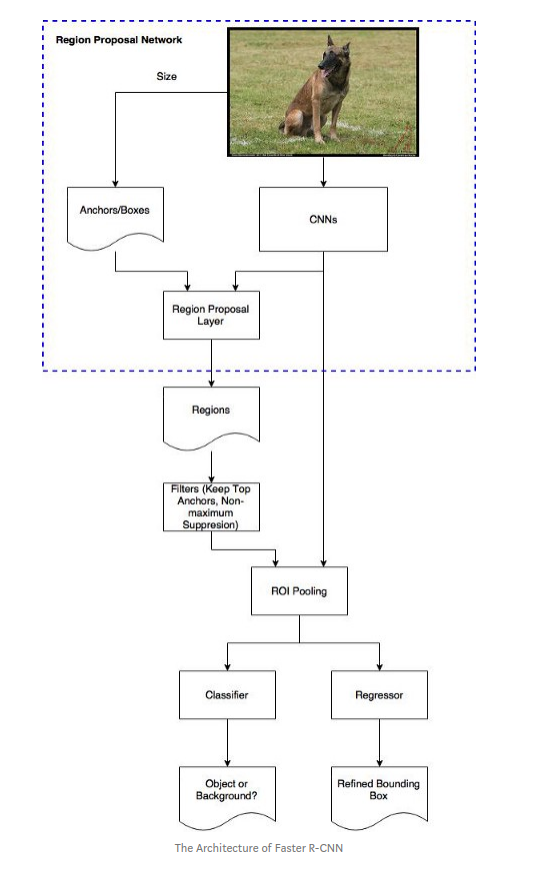
Xây dựng mạng VGG16

def VGG16(input_tensor=None, trainable=False):
  input_shape = (None, None, 3)
  if input_tensor is None:
    img_input = Input(shape=input_shape)
  else:
    if not K.is_keras_tensor(input_tensor):
      img_input = Input(tensor=input_tensor, shape=input_shape)
    else:
      img_input = input_tensor
  bn_axis=3
  #Block1
  x = Conv2D(64, (3,3), activation='relu', padding='same', name='block1_conv1')(img_input)
  x = Conv2D(64, (3,3), activation='relu', padding='same', name='block1_conv2')(x)
  x = MaxPooling2D((2,2), strides=(2,2), name='block1_pool')(x)
  #Block2
  x = Conv2D(128, (3,3), activation='relu', padding='same', name='block2_conv1')(x)
  x = Conv2D(128, (3,3), activation='relu', padding='same', name='block2_conv2')(x)
  x = MaxPooling2D((2,2), strides=(2,2), name='block2_pool')(x)
  # Block 3
  x = Conv2D(256, (3, 3), activation='relu', padding='same', name='block3_conv1')(x)
  x = Conv2D(256, (3, 3), activation='relu', padding='same', name='block3_conv2')(x)
  x = Conv2D(256, (3, 3), activation='relu', padding='same', name='block3_conv3')(x)
  x = MaxPooling2D((2, 2), strides=(2, 2), name='block3_pool')(x)

  # Block 4
  x = Conv2D(512, (3, 3), activation='relu', padding='same', name='block4_conv1')(x)
  x = Conv2D(512, (3, 3), activation='relu', padding='same', name='block4_conv2')(x)
  x = Conv2D(512, (3, 3), activation='relu', padding='same', name='block4_conv3')(x)
  x = MaxPooling2D((2, 2), strides=(2, 2), name='block4_pool')(x)

  # Block 5
  x = Conv2D(512, (3, 3), activation='relu', padding='same', name='block5_conv1')(x)
  x = Conv2D(512, (3, 3), activation='relu', padding='same', name='block5_conv2')(x)
  x = Conv2D(512, (3, 3), activation='relu', padding='same', name='block5_conv3')(x)

  return x
RPN layer
Tiếp theo chúng ta sẽ tạo ra lớp RPN với đầu vào là feature map từ VGG16 mình đã nói ở trên:
def rpn_layer(vgg_net, num_anchors):
  """Create a rpn layer
  Nhận đầu vào feature map từ VGG16
  Args:
      vgg_net: VGG16
      num_anchors: 9

  Returns:
      [x_class, x_regr, vgg_net]
      x_class: classification xem box đó là đối tượng hay không
      x_regr: bboxes regression
      vgg_net: vgg in here
  """
  x_conv = Conv2D(512, (3, 3), padding='same', activation='relu', kernel_initializer='normal', name='rpn_conv1')(vgg_net)

  x_class = Conv2D(num_anchors, (1, 1), activation='sigmoid', kernel_initializer='uniform', name='rpn_out_class')(x_conv)
  x_regr = Conv2D(num_anchors * 4, (1, 1), activation='linear', kernel_initializer='zero', name='rpn_out_regress')(x_conv)

  return [x_class, x_regr, vgg_net]
Calculate rpn for each image (calc_rpn)
Nếu feature map có kích thước là 39x50 thì số lượng anchor box sẽ là 39x50x9. Anchor box là positive nếu IOU > 0.7. Khi mà IOU > 0,3 và < 0.7 thì sẽ không rõ ràng và không bao gồm đối tượng còn IOU < 0.3 thì anchor box là negative. Giới hạn tổng số positive regions and negative regions là 256. Với y_is_box_valid đại diện cho việc anchor box đó có hợp lệ hay không còn y_rpn_overlap địa diện cho việc anchor box đó có chứa đối tượng hay là không.
- ‘positive’ anchor, y_is_box_valid =1, y_rpn_overlap =1.
- ‘neutral’ anchor, y_is_box_valid =0, y_rpn_overlap =0.
- ‘negative’ anchor, y_is_box_valid =1, y_rpn_overlap =0.
Các tham số trong hàm như sau:
- C: config
- img_data: augmented image data
- width: là chiều cao gốc của ảnh
- height: là chiều rộng gốc của ảnh
- resized_width: resized ảnh width kích thước C.im_size
- resized_height: resized ảnh height với kích thước C.im_size
- img_length_calc_function: hàm tính toán kích thước feature map lớp cuối cùng theo kích thước ảnh đầu vào
Kết quả trả về
- y_rpn_cls: list(num_bboxes, y_is_box_valid + y_rpn_overlap)
- y_is_box_valid: 0 or 1
- y_rpn_overlap: 0 or 1
- y_rpn_regr: list(num_bboxes, 4*y_rpn_overlap + y_rpn_regr)
- y_rpn_regr: x1,y1,x2,y2
Trong paper gốc tác giả có đề xuất việc tham số hoá cho box regression như sau:
- x,y are the center point of ground-truth bbox
- xa,ya are the center point of anchor bbox (xa=downscale * (ix + 0.5); ya=downscale * (iy+0.5))
- w,h lần lượt là width and height of ground-truth bbox
- wa,ha lần lượt width and height of anchor bboxe
- tx = (x - xa) / wa
- ty = (y - ya) / ha
- tw = log(w / wa)
- th = log(h / ha)
Phần code dưới đây mình có tham khảo từ git của tác giả
def calc_rpn(C, img_data, width, height, resized_width, resized_height, img_length_calc_function):
	"""(Important part!) Calculate the rpn for all anchors
		If feature map has shape 38x50=1900, there are 1900x9=17100 potential anchors

	Args:
		C: config
		img_data: augmented image data
		width: original image width (e.g. 600)
		height: original image height (e.g. 800)
		resized_width: resized image width according to C.im_size (e.g. 300)
		resized_height: resized image height according to C.im_size (e.g. 400)
		img_length_calc_function: function to calculate final layer's feature map (of base model) size according to input image size

	Returns:
		y_rpn_cls: list(num_bboxes, y_is_box_valid + y_rpn_overlap)
			y_is_box_valid: 0 or 1 (0 means the box is invalid, 1 means the box is valid)
			y_rpn_overlap: 0 or 1 (0 means the box is not an object, 1 means the box is an object)
		y_rpn_regr: list(num_bboxes, 4*y_rpn_overlap + y_rpn_regr)
			y_rpn_regr: x1,y1,x2,y2 bunding boxes coordinates
	"""
	downscale = float(C.rpn_stride)
	anchor_sizes = C.anchor_box_scales   # 128, 256, 512
	anchor_ratios = C.anchor_box_ratios  # 1:1, 1:2*sqrt(2), 2*sqrt(2):1
	num_anchors = len(anchor_sizes) * len(anchor_ratios) # 3x3=9

	# calculate the output map size based on the network architecture
	(output_width, output_height) = img_length_calc_function(resized_width, resized_height)

	n_anchratios = len(anchor_ratios)    # 3

	# initialise empty output objectives
	y_rpn_overlap = np.zeros((output_height, output_width, num_anchors))
	y_is_box_valid = np.zeros((output_height, output_width, num_anchors))
	y_rpn_regr = np.zeros((output_height, output_width, num_anchors * 4))

	num_bboxes = len(img_data['bboxes'])

	num_anchors_for_bbox = np.zeros(num_bboxes).astype(int)
	best_anchor_for_bbox = -1*np.ones((num_bboxes, 4)).astype(int)
	best_iou_for_bbox = np.zeros(num_bboxes).astype(np.float32)
	best_x_for_bbox = np.zeros((num_bboxes, 4)).astype(int)
	best_dx_for_bbox = np.zeros((num_bboxes, 4)).astype(np.float32)

	# get the GT box coordinates, and resize to account for image resizing
	gta = np.zeros((num_bboxes, 4))
	for bbox_num, bbox in enumerate(img_data['bboxes']):
		# get the GT box coordinates, and resize to account for image resizing
		gta[bbox_num, 0] = bbox['x1'] * (resized_width / float(width))
		gta[bbox_num, 1] = bbox['x2'] * (resized_width / float(width))
		gta[bbox_num, 2] = bbox['y1'] * (resized_height / float(height))
		gta[bbox_num, 3] = bbox['y2'] * (resized_height / float(height))

	# rpn ground truth

	for anchor_size_idx in range(len(anchor_sizes)):
		for anchor_ratio_idx in range(n_anchratios):
			anchor_x = anchor_sizes[anchor_size_idx] * anchor_ratios[anchor_ratio_idx][0]
			anchor_y = anchor_sizes[anchor_size_idx] * anchor_ratios[anchor_ratio_idx][1]

			for ix in range(output_width):
				# x-coordinates of the current anchor box
				x1_anc = downscale * (ix + 0.5) - anchor_x / 2
				x2_anc = downscale * (ix + 0.5) + anchor_x / 2

				# ignore boxes that go across image boundaries
				if x1_anc < 0 or x2_anc > resized_width:
					continue

				for jy in range(output_height):

					# y-coordinates of the current anchor box
					y1_anc = downscale * (jy + 0.5) - anchor_y / 2
					y2_anc = downscale * (jy + 0.5) + anchor_y / 2

					# ignore boxes that go across image boundaries
					if y1_anc < 0 or y2_anc > resized_height:
						continue

					# bbox_type indicates whether an anchor should be a target
					# Initialize with 'negative'
					bbox_type = 'neg'

					# this is the best IOU for the (x,y) coord and the current anchor
					# note that this is different from the best IOU for a GT bbox
					best_iou_for_loc = 0.0

					for bbox_num in range(num_bboxes):

						# get IOU of the current GT box and the current anchor box
						curr_iou = iou([gta[bbox_num, 0], gta[bbox_num, 2], gta[bbox_num, 1], gta[bbox_num, 3]], [x1_anc, y1_anc, x2_anc, y2_anc])
						# calculate the regression targets if they will be needed
						if curr_iou > best_iou_for_bbox[bbox_num] or curr_iou > C.rpn_max_overlap:
							cx = (gta[bbox_num, 0] + gta[bbox_num, 1]) / 2.0
							cy = (gta[bbox_num, 2] + gta[bbox_num, 3]) / 2.0
							cxa = (x1_anc + x2_anc)/2.0
							cya = (y1_anc + y2_anc)/2.0
                         # calculate tx, ty,tw,th
							tx = (cx - cxa) / (x2_anc - x1_anc)
							ty = (cy - cya) / (y2_anc - y1_anc)
							tw = np.log((gta[bbox_num, 1] - gta[bbox_num, 0]) / (x2_anc - x1_anc))
							th = np.log((gta[bbox_num, 3] - gta[bbox_num, 2]) / (y2_anc - y1_anc))

						if img_data['bboxes'][bbox_num]['class'] != 'bg':

							# all GT boxes should be mapped to an anchor box, so we keep track of which anchor box was best
							if curr_iou > best_iou_for_bbox[bbox_num]:
								best_anchor_for_bbox[bbox_num] = [jy, ix, anchor_ratio_idx, anchor_size_idx]
								best_iou_for_bbox[bbox_num] = curr_iou
								best_x_for_bbox[bbox_num,:] = [x1_anc, x2_anc, y1_anc, y2_anc]
								best_dx_for_bbox[bbox_num,:] = [tx, ty, tw, th]

							# we set the anchor to positive if the IOU is >0.7 (it does not matter if there was another better box, it just indicates overlap)
							if curr_iou > C.rpn_max_overlap:
								bbox_type = 'pos'
								num_anchors_for_bbox[bbox_num] += 1
								# we update the regression layer target if this IOU is the best for the current (x,y) and anchor position
								if curr_iou > best_iou_for_loc:
									best_iou_for_loc = curr_iou
									best_regr = (tx, ty, tw, th)

							# if the IOU is >0.3 and <0.7, it is ambiguous and no included in the objective
							if C.rpn_min_overlap < curr_iou < C.rpn_max_overlap:
								# gray zone between neg and pos
								if bbox_type != 'pos':
									bbox_type = 'neutral'

					# turn on or off outputs depending on IOUs
					if bbox_type == 'neg':
						y_is_box_valid[jy, ix, anchor_ratio_idx + n_anchratios * anchor_size_idx] = 1
						y_rpn_overlap[jy, ix, anchor_ratio_idx + n_anchratios * anchor_size_idx] = 0
					elif bbox_type == 'neutral':
						y_is_box_valid[jy, ix, anchor_ratio_idx + n_anchratios * anchor_size_idx] = 0
						y_rpn_overlap[jy, ix, anchor_ratio_idx + n_anchratios * anchor_size_idx] = 0
					elif bbox_type == 'pos':
						y_is_box_valid[jy, ix, anchor_ratio_idx + n_anchratios * anchor_size_idx] = 1
						y_rpn_overlap[jy, ix, anchor_ratio_idx + n_anchratios * anchor_size_idx] = 1
						start = 4 * (anchor_ratio_idx + n_anchratios * anchor_size_idx)
						y_rpn_regr[jy, ix, start:start+4] = best_regr

	# we ensure that every bbox has at least one positive RPN region

	for idx in range(num_anchors_for_bbox.shape[0]):
		if num_anchors_for_bbox[idx] == 0:
			# no box with an IOU greater than zero ...
			if best_anchor_for_bbox[idx, 0] == -1:
				continue
			y_is_box_valid[
				best_anchor_for_bbox[idx,0], best_anchor_for_bbox[idx,1], best_anchor_for_bbox[idx,2] + n_anchratios *
				best_anchor_for_bbox[idx,3]] = 1
			y_rpn_overlap[
				best_anchor_for_bbox[idx,0], best_anchor_for_bbox[idx,1], best_anchor_for_bbox[idx,2] + n_anchratios *
				best_anchor_for_bbox[idx,3]] = 1
			start = 4 * (best_anchor_for_bbox[idx,2] + n_anchratios * best_anchor_for_bbox[idx,3])
			y_rpn_regr[
				best_anchor_for_bbox[idx,0], best_anchor_for_bbox[idx,1], start:start+4] = best_dx_for_bbox[idx, :]

	y_rpn_overlap = np.transpose(y_rpn_overlap, (2, 0, 1))
	y_rpn_overlap = np.expand_dims(y_rpn_overlap, axis=0)

	y_is_box_valid = np.transpose(y_is_box_valid, (2, 0, 1))
	y_is_box_valid = np.expand_dims(y_is_box_valid, axis=0)

	y_rpn_regr = np.transpose(y_rpn_regr, (2, 0, 1))
	y_rpn_regr = np.expand_dims(y_rpn_regr, axis=0)

	pos_locs = np.where(np.logical_and(y_rpn_overlap[0, :, :, :] == 1, y_is_box_valid[0, :, :, :] == 1))
	neg_locs = np.where(np.logical_and(y_rpn_overlap[0, :, :, :] == 0, y_is_box_valid[0, :, :, :] == 1))

	num_pos = len(pos_locs[0])

	# one issue is that the RPN has many more negative than positive regions, so we turn off some of the negative
	# regions. We also limit it to 256 regions.
	num_regions = 256

	if len(pos_locs[0]) > num_regions/2:
		val_locs = random.sample(range(len(pos_locs[0])), len(pos_locs[0]) - num_regions/2)
		y_is_box_valid[0, pos_locs[0][val_locs], pos_locs[1][val_locs], pos_locs[2][val_locs]] = 0
		num_pos = num_regions/2

	if len(neg_locs[0]) + num_pos > num_regions:
		val_locs = random.sample(range(len(neg_locs[0])), len(neg_locs[0]) - num_pos)
		y_is_box_valid[0, neg_locs[0][val_locs], neg_locs[1][val_locs], neg_locs[2][val_locs]] = 0

	y_rpn_cls = np.concatenate([y_is_box_valid, y_rpn_overlap], axis=1)
	y_rpn_regr = np.concatenate([np.repeat(y_rpn_overlap, 4, axis=1), y_rpn_regr], axis=1)

	return np.copy(y_rpn_cls), np.copy(y_rpn_regr), num_pos
Sau khi tính được các vùng đề xuất từ RPN như mình có nói ở trên thì Faster RCNN sẽ cho các proposal bbox qua NMS để loại đi các box mà nó cho rằng không chứa đối tượng. Mình có trình bày về thuật toán NMS ở trên
Mình có tham khảo code ở http://www.pyimagesearch.com/2015/02/16/faster-non-maximum-suppression-python/
def non_max_suppression_fast(boxes, probs, overlap_thresh=0.9, max_boxes=300):

    if len(boxes) == 0:
        return []

    # grab the coordinates of the bounding boxes
    x1 = boxes[:, 0]
    y1 = boxes[:, 1]
    x2 = boxes[:, 2]
    y2 = boxes[:, 3]

    np.testing.assert_array_less(x1, x2)
    np.testing.assert_array_less(y1, y2)

    # if the bounding boxes integers, convert them to floats --
    # this is important since we'll be doing a bunch of divisions
    if boxes.dtype.kind == "i":
        boxes = boxes.astype("float")

    # initialize the list of picked indexes
    pick = []

    # calculate the areas
    area = (x2 - x1) * (y2 - y1)

    # sort the bounding boxes
    idxs = np.argsort(probs)

    # keep looping while some indexes still remain in the indexes
    # list
    while len(idxs) > 0:
        # grab the last index in the indexes list and add the
        # index value to the list of picked indexes
        last = len(idxs) - 1
        i = idxs[last]
        pick.append(i)

        # find the intersection

        xx1_int = np.maximum(x1[i], x1[idxs[:last]])
        yy1_int = np.maximum(y1[i], y1[idxs[:last]])
        xx2_int = np.minimum(x2[i], x2[idxs[:last]])
        yy2_int = np.minimum(y2[i], y2[idxs[:last]])

        ww_int = np.maximum(0, xx2_int - xx1_int)
        hh_int = np.maximum(0, yy2_int - yy1_int)

        area_int = ww_int * hh_int

        # find the union
        area_union = area[i] + area[idxs[:last]] - area_int

        # compute the ratio of overlap
        overlap = area_int/(area_union + 1e-6)

        # delete all indexes from the index list that have
        idxs = np.delete(idxs, np.concatenate(([last],
            np.where(overlap > overlap_thresh)[0])))

        if len(pick) >= max_boxes:
            break

    # return only the bounding boxes that were picked using the integer data type
    boxes = boxes[pick].astype("int")
    probs = probs[pick]
    return boxes, probs
Với ROI pooling là một hàm xử lý roi với đầu ra là kích thước cụ thể qua max pooling.
Với kích thước đầu vào là một list của 2 tensor 4D [X_img, X_roi] với kích thước :
X_img:
(1, rows, cols, channels)
X_roi:
(1,num_rois,4) list of rois, with ordering (x,y,w,h)
Và kích thước đầu ra: là một tensor 3D:
(1, num_rois, channels, pool_size, pool_size)
class RoiPoolingConv(Layer):
    '''
    # Arguments
        pool_size: int
            Size of pooling region to use. pool_size = 7 will result in a 7x7 region.
        num_rois: number of regions of interest to be used
    '''
    def __init__(self, pool_size, num_rois, **kwargs):

        self.dim_ordering = K.common.image_dim_ordering()
        self.pool_size = pool_size
        self.num_rois = num_rois

        super(RoiPoolingConv, self).__init__(**kwargs)

    def build(self, input_shape):
        self.nb_channels = input_shape[0][3]

    def compute_output_shape(self, input_shape):
        return None, self.num_rois, self.pool_size, self.pool_size, self.nb_channels

    def call(self, x, mask=None):

        assert(len(x) == 2)

        # x[0] is image with shape (rows, cols, channels)
        img = x[0]

        # x[1] is roi with shape (num_rois,4) with ordering (x,y,w,h)
        rois = x[1]

        input_shape = K.shape(img)

        outputs = []

        for roi_idx in range(self.num_rois):

            x = rois[0, roi_idx, 0]
            y = rois[0, roi_idx, 1]
            w = rois[0, roi_idx, 2]
            h = rois[0, roi_idx, 3]

            x = K.cast(x, 'int32')
            y = K.cast(y, 'int32')
            w = K.cast(w, 'int32')
            h = K.cast(h, 'int32')

            # Resized roi of the image to pooling size (7x7)
            rs = tf.image.resize(img[:, y:y+h, x:x+w, :], (self.pool_size, self.pool_size))
            outputs.append(rs)


        final_output = K.concatenate(outputs, axis=0)

        # Reshape to (1, num_rois, pool_size, pool_size, nb_channels)
        # Might be (1, 4, 7, 7, 3)
        final_output = K.reshape(final_output, (1, self.num_rois, self.pool_size, self.pool_size, self.nb_channels))

        # permute_dimensions is similar to transpose
        final_output = K.permute_dimensions(final_output, (0, 1, 2, 3, 4))

        return final_output


    def get_config(self):
        config = {'pool_size': self.pool_size,
                  'num_rois': self.num_rois}
        base_config = super(RoiPoolingConv, self).get_config()
        return dict(list(base_config.items()) + list(config.items()))
IV. Dataset
Bộ dataset mình sử dụng trong bài viết này là FDDB dataset các bạn có thể dowload theo đường link dưới đây
http://vis-www.cs.umass.edu/fddb/index.html#download
Do bộ dataset này bao gồm với label box là các hình ellipse nên mình sẽ chuyển nó về hình vuông theo code dưới đây
def filterCoordinate(c,m):
	if c < 0:
		return 0
	elif c > m:
		return m
	else:
		return c

#ellipse_filename = '/content/drive/My Drive/Face/FDDB-folds/PATH_IMG_DETAIL/FDDB-fold-10-ellipseList.txt'
rect_filename = '/content/drive/My Drive/Face/FDDB-folds/FDDB_annotattion.txt'

for path in LIST_PATH_ANNOTATION:
  print(path)
  file_path = os.path.join(DATA_DIR_PATH_IMG_ANNOTATION, path)
  if os.path.exists(file_path):
    with open(file_path) as f:
      lines = [line.rstrip('\n') for line in f]
      f = open(rect_filename,'a+')
      i = 0
      while i < len(lines):
        img_file = '/content/drive/My Drive/Face/originalPics/' + lines[i] + '.jpg'
        img = Image.open(img_file)
        w = img.size[0]
        h = img.size[1]
        num_faces = int(lines[i+1])
        for j in range(num_faces):
          ellipse = lines[i+2+j].split()[0:5]
          a = float(ellipse[0])
          b = float(ellipse[1])
          angle = float(ellipse[2])
          centre_x = float(ellipse[3])
          centre_y = float(ellipse[4])
          tan_t = -(b/a)*tan(angle)
          t = atan(tan_t)
          x1 = centre_x + (a*cos(t)*cos(angle) - b*sin(t)*sin(angle))
          x2 = centre_x + (a*cos(t+pi)*cos(angle) - b*sin(t+pi)*sin(angle))
          x_max = filterCoordinate(max(x1,x2),w)
          x_min = filterCoordinate(min(x1,x2),w)
          if tan(angle) != 0:
            tan_t = (b/a)*(1/tan(angle))
          else:
            tan_t = (b/a)*(1/(tan(angle)+0.0001))
          t = atan(tan_t)
          y1 = centre_y + (b*sin(t)*cos(angle) + a*cos(t)*sin(angle))
          y2 = centre_y + (b*sin(t+pi)*cos(angle) + a*cos(t+pi)*sin(angle))
          y_max = filterCoordinate(max(y1,y2),h)
          y_min = filterCoordinate(min(y1,y2),h)
          text = img_file + ',' + str(x_min) + ',' + str(y_min) + ',' + str(x_max) + ',' + str(y_max)	+ '\n'
          f.write(text)
        i = i + num_faces + 2

      f.close()
V. Result
Mô hình bao gồm 2 hàm loss là classfication và regression. Từ hình dưới đây ta có thể thấy mô hình học rất nhanh trong 20 epoches đầu tiên. Sau đó nó sẽ chậm dần với classification còn regression thì vẫn tiếp tục giảm. Lý do có thể được hiểu là độ chính xác cho đối tượng đã khá cao trong khi độ chính xác của các toạ độ box thì vẫn còn chậm và cần điều chỉnh thêm. 
Điều này tương tự với classifer model

Hàm total loss là tổng của 4 loss trên và nó đang có xu hướng giảm dần

Test trên image

Bài viết của mình đến đây là kết thúc cảm ơn các bạn đã theo dõi bài viết của mình.
All rights reserved
