Tổng quan về Zabbix
This post hasn't been updated for 4 years
Ngày nay, giám sát mạng có vị trí rất quan trọng trong một công ty và nó còn đặc biệt quan trọng hơn đối với các công ty làm việc dựa vào các dịch vụ công nghệ thông tin. Một hệ thống giám sát có thể giám sát nhiều vấn đề. Nó có thể tìm và giúp đỡ giải quyết việc tải trang web snail-paced, mất mát email, hoạt động của người truy vấn và truyền tải file, nguyên nhân do quá tải, sự cố server...
Zabbix là một công cụ mã nguồn mở giải quyết cho ta các vấn đề về giám sát. Zabbix là phần mềm sử dụng các tham số của một mạng, tình trạng và tính toàn vẹn của Server cũng như các thiết bị mạng. Zabbix sử dụng một cơ chế thống báo linh hoạt cho phép người dùng cấu hình email hoặc sms để cảnh báo dựa trên sự kiện được ta thiết lập sẵn. Ngoài ra Zabbix cung cấp báo cáo và dữ liệu chính xác dựa trên cơ sở dữ liệu. Điều này khiến cho Zabbix trở nên lý tưởng hơn.
Tất cả các cấu hình của Zabbix thông qua giao diện web. Việc lên kế hoạch và cấu hình một cách đúng đắn sẽ giúp cho việc giám sát trở nên dễ dàng và thuận tiện hơn. Zabbix đóng một vai trò quan trọng trong việc theo dõi hạ tầng mạng.
1. Ưu điểm của Zabbix
-
Giám sát cả Server và thiết bị mạng -
Dễ dàng thao tác và cấu hình -
Hỗ trợ máy chủ Linux, Solaris, FreeBSD … -
Đáng tin cậy trong việc chứng thực người dùng -
Linh hoạt trong việc phân quyền người dùng -
Giao diện web đẹp mắt -
Thông báo sự cố qua email và SMS -
Biểu đổ theo dõi và báo cáo -
Mã nguồn mở và chi phí thấp
2. Yêu cầu phần cứng
Zabbix yêu cầu tối thiểu về RAM là 128, 256MB không gian trống của ổ đĩa cứng. Tuy nhiên số lượng ổ cứng tùy thuộc vào số lượng hosts và các thông số được giám sát.
Phụ thuộc vào số lượng hosts được giám sát mà Zabbix yêu cầu tối thiểu các tài nguyên như sau:
|Name|Platform|CPU/Memory|Database|Monitored hosts| | |Small|Ubuntu Linux|PII 350MHz 256MB|MySQL MyISAM|20| |Medium|Ubuntu Linux 64 bit|AMD Athlon 3200+ 2GB|MySQL InnoDB|500| Large|Ubuntu Linux 64 bit|Intel Dual Core 6400 4GB|RAID10 MySQL InnoDB or PostgreSQL|>1000 Very large|RedHat Enterprise|Intel Xeon 2xCPU 8GB|Fast RAID10 MySQL InnoDB or PostgreSQL|>10000
3. Các thành phần cơ bản của Zabbix
a. Zabbix server
Đây là thành phần trung tâm của phần mềm Zabbix. Zabbix Server có thể kiểm tra các dịch vụ mạng từ xa thông qua các báo cáo của Agent gửi về cho Zabbix Server và từ đó nó sẽ lưu trữ tất cả các cấu hình cũng như là các số liệu thống kê.
b. Zabbix Proxy
Là phần tùy chọn của Zabbix. Nó có nhiệm vụ thu nhận dữ liệu, lưu trong bộ nhớ đệm và chuyển đến Zabbix Server.
Zabbix Proxy là một giải pháp lý tưởng cho việc giám sát tập trung của các địa điểm từ xa, chi nhánh công ty, các mạng lưới không có quản trị viên nội bộ.
Zabbix Proxy cũng được sử dụng để phân phối tải của một Zabbix Server
c. Zabbix Agent
Để giám sát chủ động các thiết bị cục bộ và các ứng dụng (ổ cứng, bộ nhớ, …) trên hệ thống mạng. Zabbix Agent sẽ được cài lên trên Server và từ đó Agent sẽ thu thập thông tin hoạt động từ Server mà nó đang chạy và báo cáo dữ liệu này đến Zabbix Server để xử lý.
d. Web interface
Để dễ dàng truy cập dữ liệu theo dõi và sau đó cấu hình từ giao diện web cung cấp. Giao diện là một phần của Zabbix Server, và thường chạy trên các máy chủ.
4. Cài đặt Zabbix trên Centos
4.1. Cài đặt Apache hoặc Nginx
-
Nếu muốn sử dụng Zabbix trên apache, ta tiến hành cài đặt apache:
yum -y install httpd -
Cài đặt Nginx:
yum -y install nginx
4.2. Cài đặt PHP
-
Cài đặt PHP:
yum -y install php php-mbstring php-pear -
Sửa file config của apache để nhận file php:
vi /etc/httpd/conf/httpd.conf
# line 402: add file name that it can access only with directory's name
DirectoryIndex index.html index.php -
restart httpd:
/etc/rc.d/init.d/httpd restart
4.3 Cài đặt MySQL
- Cài đặt mysql:
yum -y install mysql-server
vi /etc/my.cnf
[mysqld]
datadir=/var/lib/mysql
socket=/var/lib/mysql/mysql.sock
user=mysql
# Disabling symbolic-links is recommended to prevent assorted security risks
symbolic-links=0 # add
character-set-server=utf8\
- Start MySql:
/etc/rc.d/init.d/mysqld start
Initializing MySQL database: WARNING: The host 'www.server.world' could not be looked up with resolveip.
This probably means that your libc libraries are not 100 % compatible with this binary MySQL version. The MySQL daemon, mysqld, should work normally with the exception that host name resolving will not work. This means that you should use IP addresses instead of hostnames when specifying MySQL privileges !
Installing MySQL system tables...
OK
Filling help tables...
OK
...
...
...
You can test the MySQL daemon with mysql-test-run.pl
cd /usr/mysql-test ; perl mysql-test-run.pl
Please report any problems with the /usr/bin/mysqlbug script!
[ OK ]
Starting mysqld: [ OK ]
-
Khởi động MySql cùng hệ điều hành:
chkconfig mysqld on -
Cấu hình MySQL:
mysql_secure_installation
\In order to log into MySQL to secure it, we'll need the current password for the root user. If you've just installed MySQL, and you haven't set the root password yet, the password will be blank, so you should just press enter here.
#Enter
Enter current password for root (enter for none):
OK, successfully used password, moving on..
Setting the root password ensures that nobody can log into the MySQL root user without the proper authorisation.
# set root password
Set root password? [Y/n] y
New password: #input any password
Re-enter new password:
Password updated successfully!
Reloading privilege tables..
... Success!
By default, a MySQL installation has an anonymous user, allowing anyone to log into MySQL without having to have a user account created for them. This is intended only for testing, and to make the installation go a bit smoother. You should remove them before moving into a production environment.
# remove anonymous users Remove anonymous users? [Y/n] y
.. Success!
Normally, root should only be allowed to connect from 'localhost'. This ensures that someone cannot guess at the root password from the network.
# disallow root login remotely
Disallow root login remotely? [Y/n] y
... Success!
By default, MySQL comes with a database named 'test' that anyone can access. This is also intended only for testing, and should be removed before moving into a production environment.
# remove test database
Remove test database and access to it? [Y/n] y
- Dropping test database...
... Success!
- Removing privileges on test database...
... Success!
\Reloading the privilege tables will ensure that all changes made so far will take effect immediately.
# reload privilege tables
Reload privilege tables now? [Y/n] y
... Success!
Cleaning up...
All done! If you've completed all of the above steps, your MySQL installation should now be secure.
Thanks for using MySQL!\
4.4. Cài đặt các gói cần thiết và repo của Zabbix
yum -y install php-mysql php-gd php-xml php-bcmath
yum -y install http://repo.zabbix.com/zabbix/2.4/rhel/6/x86_64/zabbix-release-2.4-1.el6.noarch.rpm
yum install http://dl.fedoraproject.org/pub/epel/6/x86_64/epel-release-6-8.noarch.rpm
yum -y update
4.5. Cài đặt Zabbix server
yum -y install zabbix-server-mysql zabbix-web-mysql zabbix_get
4.6. Cấu hình Zabbix
-
Tạo database cho Zabbix:
mysql -u root -p
mysql> create database zabbix;
mysql> grant all privileges on zabbix.* to zabbix@'localhost' identified by 'password';
mysql> grant all privileges on zabbix.* to zabbix@'%' identified by 'password';
mysql> flush privileges;
mysql> exit
cd /usr/share/doc/zabbix-server-mysql-*/create
mysql -u root -p zabbix < schema.sql
mysql -u root -p zabbix < images.sql
mysql -u root -p zabbix < data.sql -
Cấu hình và start Zabbix server:
vi /etc/zabbix/zabbix_server.conf\
# line 73: add
DBHost=localhost
# line 107: add DB password for Zabbix
DBPassword=password
/etc/rc.d/init.d/zabbix-server start
Starting ZABBIX server: [ OK ]
-
Khởi động Zabbix-server trong startup:
chkconfig zabbix-server on -
Thay đổi tham số của apache:
vi /etc/httpd/conf.d/zabbix.conf\
# line 11: change access permittion for Zabbix frontend Allow from localhost 10.0.0.0/24
-
Restart apache:
/etc/rc.d/init.d/httpd restart -
Nếu sử dụng nginx:
yum -y install nginx php-common php-fpm
chkconfig nginx on
chkconfig php-fpm on
service nginx start
service php-fpm start
vim /etc/php.ini
#change value of this line
max_execution_time = 300
max_input_time = 300
post_max_size = 16M
max_input_time = 300
post_max_size = 16M
- Sửa file config nginx:
vim /etc/nginx/conf.d/zabbix.conf
server {
#server_name zabbix.example.org;
root /var/www/zabbix;
index index.html index.php;
access_log /var/log/nginx/access_zabbix.log main;
error_log /var/log/nginx/error_zabbix.log error;
location ~ \.php {
include fastcgi_params;
try_files ;
#fastcgi_intercept_errors on;
fastcgi_pass unix:/var/run/php-zabbix.socket;
fastcgi_index index.php;
fastcgi_param SCRIPT_FILENAME $document_root$fastcgi_script_name;
include fastcgi_params;
}
}
- thay đổi trong php-fpm pool
mkdir /var/lib/php/zabbix_php-fpm
chmod 770 /var/lib/php/zabbix_php-fpm/
chown root:nginx /var/lib/php/zabbix_php-fpm/
vim /etc/php-fpm.d/zabbix.conf\
[zabbix]
listen = /var/run/php-zabbix.socket
listen.owner = nginx
listen.group = nginx
listen.mode = 0666
user = nginx
group = nginx
pm = dynamic
pm.max_children = 50
pm.start_servers = 5
pm.min_spare_servers = 5
pm.max_spare_servers = 35
slowlog = /var/log/php-fpm/zabbix-slow.log
catch_workers_output = yes
security.limit_extensions = .php .php3 .php4 .php5
php_admin_value[error_log] = /var/log/php-fpm/zabbix-error.log
php_admin_flag[log_errors] = on
php_value[session.save_handler] = files
php_value[session.save_path] = /var/lib/php/zabbix_php-fpm/
- Thay đổi quyền cho nginx:
chown nginx:nginx /etc/zabbix/web/
ln -s /usr/share/zabbix /var/www/
service php-fpm restart
service nginx restart
4.7. Cài đặt Zabbix trên web
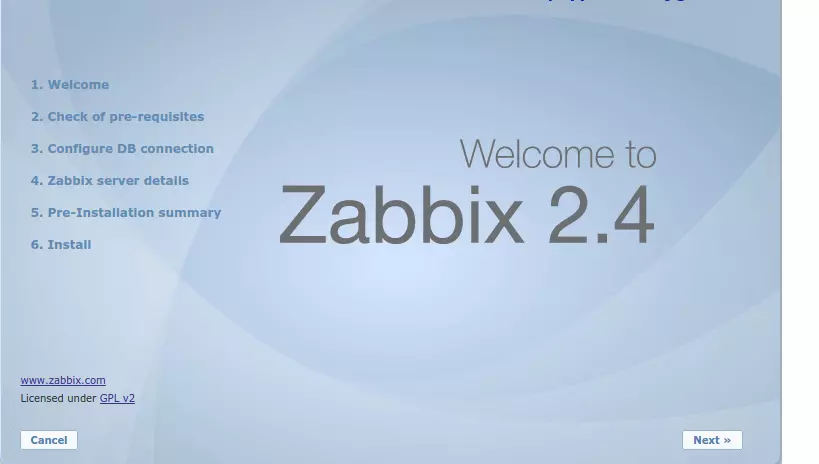
Vào link http://[IP_May_Zabbix]/zabbix với apache
hoặc http://[IP_May_Zabbix] với nginx
-
Click next
-
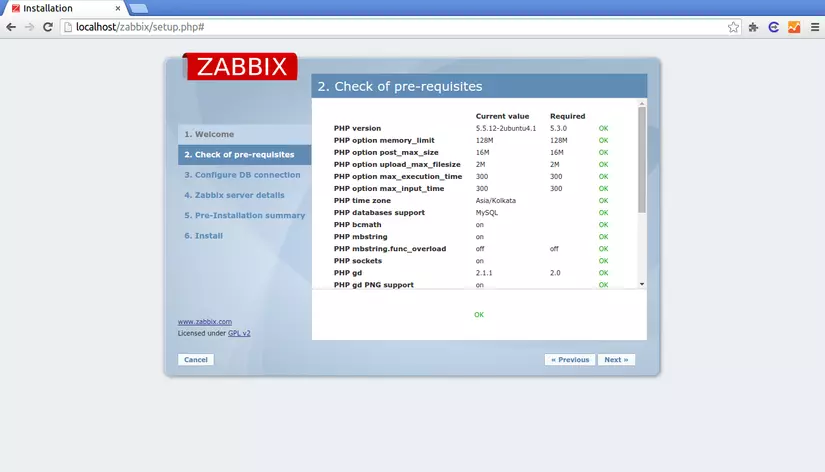
Kiểm tra các yêu cầu có phù hộp với zabbix server. Click Next
-
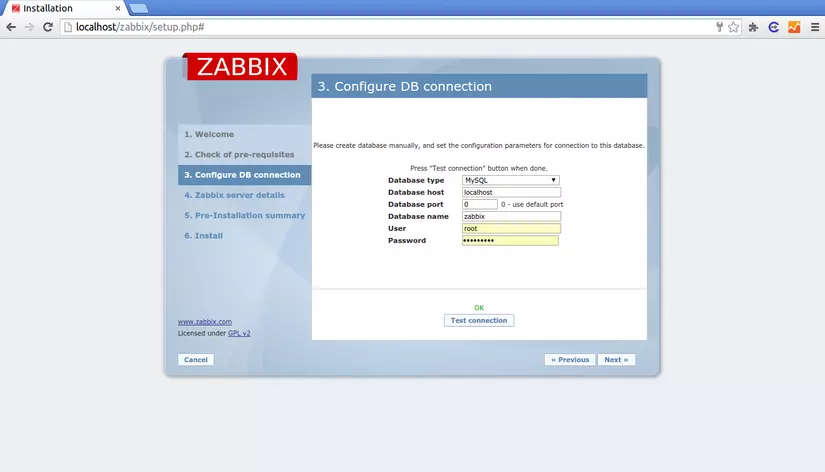
Thiết lập các thông số cho việc quản lý database
-
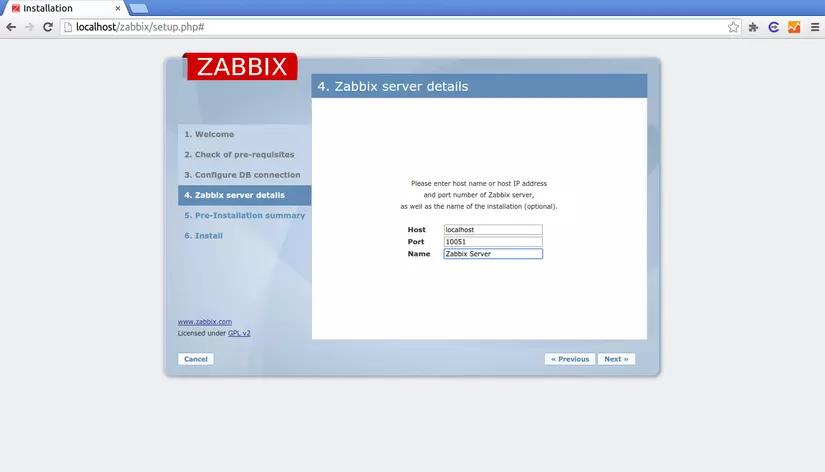
Điền hostname và tên zabbix server
-
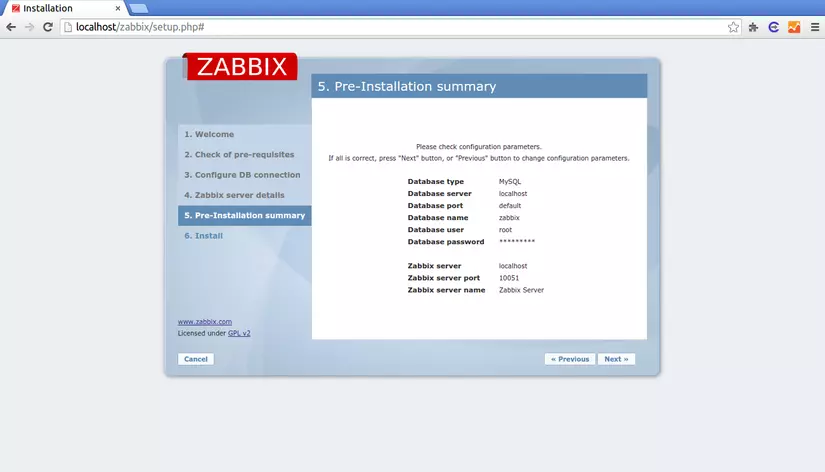
Hiển thị lại các thông tin cấu hình
-
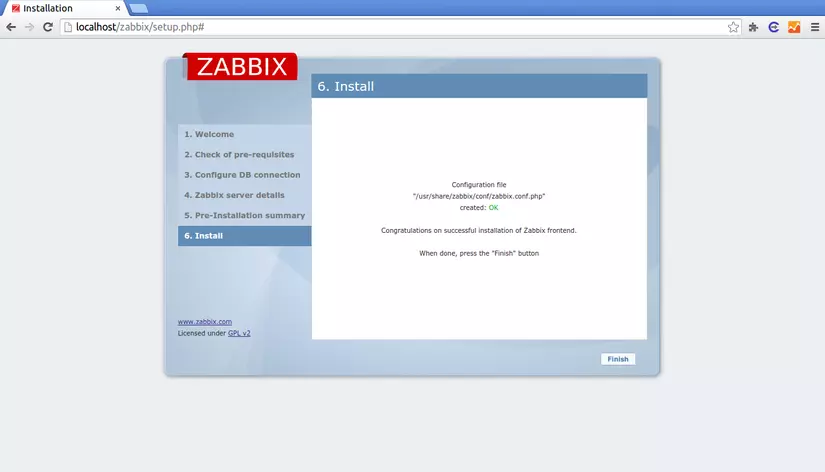
Nhấn finish để kết thúc
-
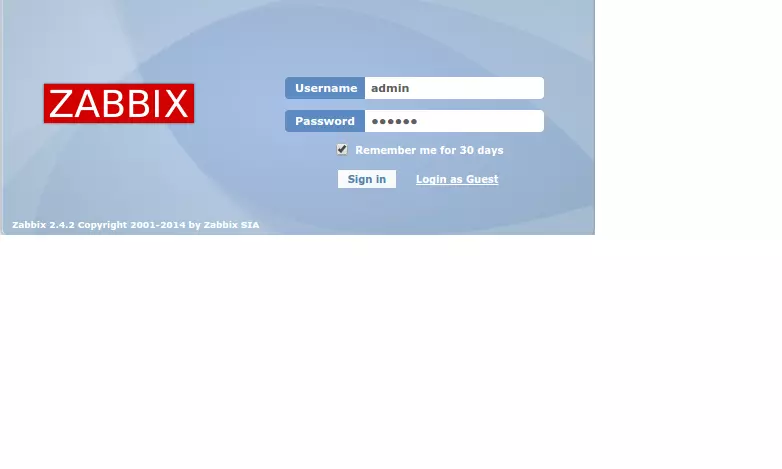
Ta dang nhập vào zabbix server với user/password mặc định là : admin/zabbix
-
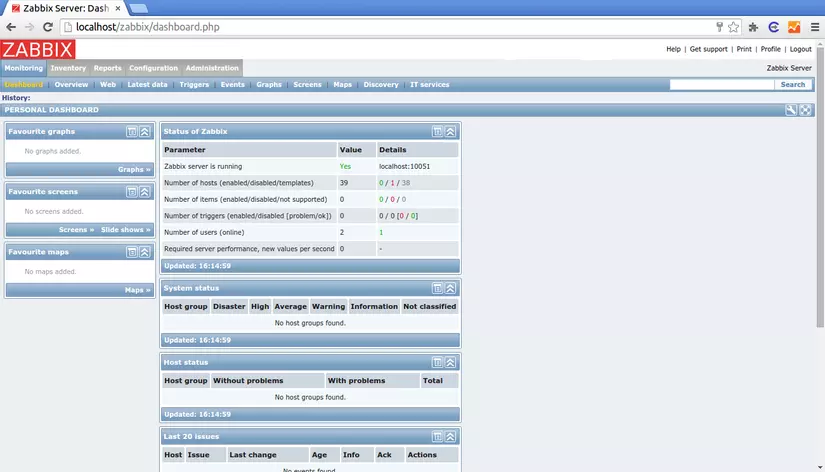
Màn hình Sau khi đăng nhập
Vậy là chúng ta đã cài đặt xong Zabbix server. Ở bài tiếp theo, chúng ta sẽ cùng monitor 1 số thiết bị đơn giản.
All Rights Reserved
